內網 Ubuntu 20.04 搭建 docusaurus 專案(或前端專案)的環境(mobaxterm、tigervnc、nfs、node)
內網 Ubuntu 20.04 搭建 docusaurus 專案(或前端專案)的環境
背景
內網開發機是 win7,只能安裝 node 14 以下,而 spug 的檔案專案採用的是 Facebook 的 docusaurus,需要 node 14 以上才能構建、打包,所以決定藉助另一臺 ubuntu 20.04 的機器來對這個檔案專案進行二次開發。
Tip:這裡 docusaurus 指的是 spug 開源專案的官方檔案專案。前些天發現該官網倉庫已找不到了。
遠端工具
藉助遠端工具,即通過 win7 來遠端控制 ubuntu,在 ubuntu 上進行開發。
思路(mobaxterm + tigerVnc)
使用者端使用 mobaxterm,伺服器端使用 tigerVnc。
Tip: VNC(Virtual Network Console)是虛擬網路控制檯的縮寫。它是一款優秀的遠端控制工具軟體,由著名的 AT&T 的歐洲研究實驗室開發的。
具體做法如下,首先在 ubuntu 中設定 tigerVnc,並啟動服務,然後在 win7 中 通過 mobaxterm 連線 vnc:
增加使用者 vncuser1:
pengjiali@pengjiali:~$ sudo adduser vncuser1
正在新增使用者"vncuser1"...
正在新增新組"vncuser1" (1003)...
正在新增新使用者"vncuser1" (1003) 到組"vncuser1"...
建立主目錄"/home/vncuser1"...
正在從"/etc/skel"複製檔案...
新的 密碼:
重新輸入新的 密碼:
passwd:已成功更新密碼
正在改變 vncuser1 的使用者資訊
請輸入新值,或直接敲確認鍵以使用預設值
        全名 []:
        房間號碼 []:
        工作電話 []:
        家庭電話 []:
        其它 []:

這些資訊是否正確? [Y/n] Y
pengjiali@pengjiali:~$
切換使用者:
pengjiali@pengjiali:~$ su - vncuser1
密碼:
vncuser1@pengjiali:~$
注:以下操作都是在 vncuser1 下進行
通過 apt 命令搜尋 tigervnc 軟體。
Tip:倘若不能搜尋到 tigervnc 相關軟體包,請自行處理。
vncuser1@pengjiali:~$ apt search tigervnc
正在排序... 完成
全文搜尋... 完成
tigervnc-common/focal,focal 1.10.1+dfsg-3 amd64
  Virtual network computing; Common software needed by servers

tigervnc-scraping-server/focal,focal 1.10.1+dfsg-3 amd64
  Virtual network computing server performing X screen scraping

tigervnc-standalone-server/focal,focal 1.10.1+dfsg-3 amd64
  Standalone virtual network computing server

tigervnc-viewer/focal,focal 1.10.1+dfsg-3 amd64
  Virtual network computing client for X

tigervnc-xorg-extension/focal,focal 1.10.1+dfsg-3 amd64
  Virtual network computing X server extension
這裡有五個軟體包,筆者只安裝第三個(tigervnc-standalone-server):
vncuser1@pengjiali:~$ sudo apt install tigervnc-standalone-server
[sudo] vncuser1 的密碼:
正在讀取軟體包列表... 完成
正在分析軟體包的依賴關係樹
正在讀取狀態資訊... 完成
將會同時安裝下列軟體:
  libfile-readbackwards-perl tigervnc-common
建議安裝:
  xfonts-100dpi | xfonts-75dpi
下列【新】軟體包將被安裝:
  libfile-readbackwards-perl tigervnc-common tigervnc-standalone-server
升級了 0 個軟體包,新安裝了 3 個軟體包,要解除安裝 0 個軟體包,有 134 個軟體包未被升級。
需要下載 1,097 kB 的歸檔。
解壓縮後會消耗 3,088 kB 的額外空間。
您希望繼續執行嗎? [Y/n] y
獲取:1 https://mirrors.tuna.tsinghua.edu.cn/ubuntu focal/universe amd64 libfile-readbackwards-perl all 1.05-2 [10.8 kB]
獲取:2 https://mirrors.tuna.tsinghua.edu.cn/ubuntu focal/universe amd64 tigervnc-common amd64 1.10.1+dfsg-3 [69.0 kB]
獲取:3 https://mirrors.tuna.tsinghua.edu.cn/ubuntu focal/universe amd64 tigervnc-standalone-server amd64 1.10.1+dfsg-3 [1,017 kB]
已下載 1,097 kB,耗時 1秒 (943 kB/s)
正在選中未選擇的軟體包 libfile-readbackwards-perl。
(正在讀取資料庫 ... 系統當前共安裝有 333379 個檔案和目錄。)
準備解壓 .../libfile-readbackwards-perl_1.05-2_all.deb  ...
正在解壓 libfile-readbackwards-perl (1.05-2) ...
正在選中未選擇的軟體包 tigervnc-common。
準備解壓 .../tigervnc-common_1.10.1+dfsg-3_amd64.deb  ...
正在解壓 tigervnc-common (1.10.1+dfsg-3) ...
正在選中未選擇的軟體包 tigervnc-standalone-server。
準備解壓 .../tigervnc-standalone-server_1.10.1+dfsg-3_amd64.deb  ...
正在解壓 tigervnc-standalone-server (1.10.1+dfsg-3) ...
正在設定 libfile-readbackwards-perl (1.05-2) ...
正在設定 tigervnc-common (1.10.1+dfsg-3) ...
update-alternatives: 使用 /usr/bin/tigervncconfig 來在自動模式中提供 /usr/bin/vncconfig (vncconfig)
update-alternatives: 使用 /usr/bin/tigervncpasswd 來在自動模式中提供 /usr/bin/vncpasswd (vncpasswd)
正在設定 tigervnc-standalone-server (1.10.1+dfsg-3) ...
update-alternatives: 使用 /usr/bin/tigervncserver 來在自動模式中提供 /usr/bin/vncserver (vncserver)
update-alternatives: 使用 /usr/bin/Xtigervnc 來在自動模式中提供 /usr/bin/Xvnc (Xvnc)
正在處理用於 man-db (2.9.1-1) 的觸發器 ...
通過 vncpasswd 設定一下密碼(後續 win7 通過 vnc 連線時需要使用此密碼):
vncuser1@pengjiali:~$ vncpasswd
Password:
Verify:
Would you like to enter a view-only password (y/n)? n
注:筆者選擇 n
啟動 vnc 服務:
vncuser1@pengjiali:~$ vncserver
/usr/bin/xauth:  file /home/vncuser1/.Xauthority does not exist

New 'pengjiali:1 (vncuser1)' desktop at :1 on machine pengjiali

Starting applications specified in /etc/X11/Xvnc-session
Log file is /home/vncuser1/.vnc/pengjiali:1.log

Use xtigervncviewer -SecurityTypes VncAuth -passwd /home/vncuser1/.vnc/passwd :1 to connect to the VNC server.
檢視 VNC 伺服器 session:
vncuser1@pengjiali:~$ vncserver -list

TigerVNC server sessions:

X DISPLAY #     RFB PORT #      PROCESS ID
:1              5901            28871
現在有一個 vnc session,但只接受來自 localhost 的 VNC 連線。所以先關閉這個無用的 vnc 服務:
vncuser1@pengjiali:~$ vncserver -kill :1
// 關閉所有
// vncuser1@pengjiali:~$ vncserver -kill :*
Killing Xtigervnc process ID 28871... success!
再次檢視,發現服務已關閉:
vncuser1@pengjiali:~$ vncserver -list
TigerVNC server sessions:

X DISPLAY #     RFB PORT #      PROCESS ID
啟動一個可用的 vnc 服務,即關閉 localhost 存取限制:
vncuser1@pengjiali:~$ vncserver -localhost no

New 'pengjiali:1 (vncuser1)' desktop at :1 on machine pengjiali

Starting applications specified in /etc/X11/Xvnc-session
Log file is /home/vncuser1/.vnc/pengjiali:1.log

Use xtigervncviewer -SecurityTypes VncAuth,TLSVnc -passwd /home/vncuser1/.vnc/passwd pengjiali:1 to connect to the VNC server.
Tip: 以某個埠啟動 vncserver -localhost no :5,vnc連線埠則為 5905(5900+5)
vncuser1@pengjiali:~$ vncserver -list

TigerVNC server sessions:

X DISPLAY #     RFB PORT #      PROCESS ID
:1              5901            30645
在 win7 中通過 mobaXterm 連線 ubuntu。

點選」session「,在彈框中切換到 VNC,然後輸入 Ubuntu 的 ip,埠輸入 5901,點選」OK「,順利的話就進入了 ubuntu 的介面系統。
進入桌面退出,如圖所示:

請看,使用者名稱現在就顯示 vncuser1。我們之前的操作就是在這個使用者下進行的。
注:1. 現在有個問題,進入桌面登出後,輸入錯的密碼會提示密碼錯誤,但輸入對的密碼卻也不能再次進入桌面,而且沒任何提示。筆者目前的解決辦法是:設定從不息屏;2. 幫同事安裝,通過 mobaXterm 連結 vnc,進入桌面後黑畫面,無法使用
不在sudoers檔案中,此事將被報告
在 vncuser1 使用者下安裝 tigervnc 報錯:不在sudoers檔案中,此事將被報告
vncuser1@pengjiali:~$ sudo apt install tigervnc-standalone-server
[sudo] vncuser1 的密碼:
vncuser1 不在 sudoers 檔案中。此事將被報告。
解決如下:
切換 root 使用者:
vncuser1@pengjiali:~$ su
密碼:
檢視 /etc/sudoers 檔案許可權,如果唯讀許可權,修改為可寫許可權
root@pengjiali:/home/vncuser1# ls -l /etc/sudoers
-r--r----- 1 root root 755 2月   3  2020 /etc/sudoers
root@pengjiali:/home/vncuser1# chmod u+w /etc/sudoers
root@pengjiali:/home/vncuser1# ls -l /etc/sudoers
-rw-r----- 1 root root 755 2月   3  2020 /etc/sudoers
新增要提升許可權的使用者。在檔案中找到root ALL=(ALL:ALL) ALL,新增使用者資訊:
root@pengjiali:/home/vncuser1# vim /etc/sudoers
root    ALL=(ALL:ALL) ALL
// 新增使用者
vncuser1 ALL=(ALL:ALL) ALL
儲存退出。並恢復 /etc/sudoers 的存取許可權為 440。
root@pengjiali:/home/vncuser1# chmod 440 /etc/sudoers
再次切換到 vncuser 重新安裝即可。
NFS
遠端控制 ubuntu 開發,體驗不好,比較卡,決定使用 NFS。
Tip:網路檔案系統,英文Network File System(NFS),是由SUN公司研製的UNIX表示層協定(presentation layer protocol),能使使用者存取網路上別處的檔案就像在使用自己的計算機一樣。
思路
將專案放在 win7 中,通過 nfs 共用給 utuntu,在 win7 這邊開發,然後在 ubuntu 上存取該專案並編譯。
步驟如下:
win7 安裝 nfs 伺服器。筆者使用 hanewin-nfs-server。
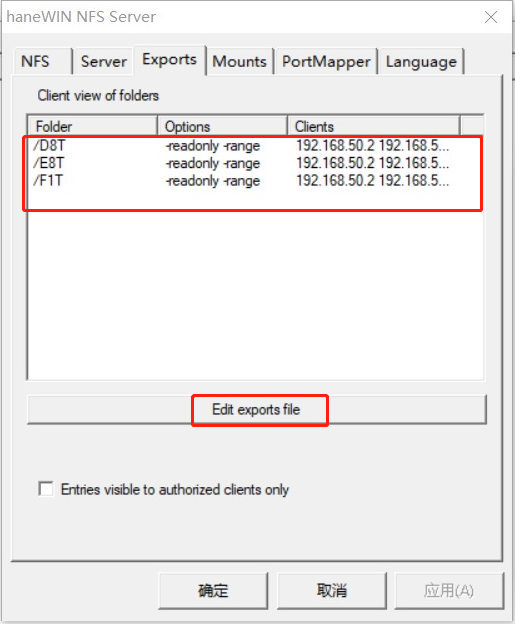
Tip:內網有此軟體,筆者請自行下載安裝,安裝成功後,介面如下:

安裝完成,對輸出進行設定,即點選」Edit exports file「:

輸入如下資訊,編輯完成後,點選【Restart Server】按鈕重啟 nfs 服務。
// 將 spug_docs 共用給 192.168.20.112~192.168.20.253 的機器,暴露出去的名字是 nfs(名字隨便起)
d:\spug\spug_docs -name:nfs -range 192.168.20.112 192.168.20.253 -public
Tip:spug_docs 是 筆者在 win7 中的專案,需要通過 ubuntu 編譯打包。:nfs 冒號後是名字,ubuntu 中會使用到。ip 範圍自己定義,ubuntu 機器的 ip 得在此範圍內。
注:關閉 win7 防火牆。否則 ubuntu 連不上
接著在 ubuntu 中存取 spug_docs:
sudo mount -t nfs 192.168.1.115:nfs /home/vncuser1/tmp/nfsdir -o nolock
192.168.1.115 是 win7 的 ip,:nfs 與 win7 中設定的命名得保持一致,nfsdir 是一個空目錄,用於掛載。
掛載成功後,進入 nfsdir 就應該能看到 psug_docs 專案的檔案。
Tip:解除安裝此掛載點可使用 umount /home/vncuser1/tmp/nfsdir
nfs 的缺陷
現在可以在 win7 中修改 spug_docs 專案,然後在 ubuntu 中編譯,發現如下兩個問題:
中文件案導致編譯失敗
在 ubuntu 中執行 npm run start 報錯。
發現是中文引起的。某資料夾中兩個中文件案(xxx主機管理.xx)在 ubuntu 中沒有,將檔案改為英文,例如 xxxzhujiguanli.xx,參照處也一起改掉,再次執行即可。
未觸發自動編譯
通常,編輯檔案,node 工程會自動編譯,重新整理瀏覽器也能看到變更,很方便。
現在在 win7 中修改專案,ubuntu 中通過 cat 也能發現檔案已變更,但瀏覽器卻看不到效果,如果直接在 ubuntu 中修改檔案,瀏覽器是可以看到變更的。
注:倘若將 spug_docs 直接放到 ubuntu 中執行,不使用 nfs 的方式,就沒有這兩個問題。
其他
ubantu 安裝 node
內網通過 apt install nodejs,發現 node 版本過低,只有 10。
接著通過 node 官網,找到」基於 Debian 和 Ubuntu 的 Linux 發行版「欄目,進入Node.js 二進位制發行版,執行如下兩行命令安裝 node 18:
curl -fsSL https://deb.nodesource.com/setup_18.x | sudo -E bash -

sudo apt-get install -y nodejs
但筆者的 ubuntu 在內網,直接在外網執行如下命名,首先檢視是否有 nodejs 相關包,然後下載:
$ apt-cache search nodejs

$ sudo apt-get download nodejs
Tip:公司外網的機器可能已經設定好源,筆者沒管,直接使用。
將下載的 node 包匯入內網,執行如下命令安裝即可:
$sudo dpkg -i nodejs_18.3.0-deb-1nodesource1_amd64.deb
zip
win7 傳專案給 ubuntu,可以在 win7 中使用 zip 壓縮,然後在 ubuntu 使用 tar 解壓
出處:https://www.cnblogs.com/pengjiali/p/16367920.html
本文版權歸作者和部落格園共有,歡迎轉載,但未經作者同意必須保留此段宣告,且在文章頁面明顯位置給出原文連線。