springboot多環境設定
在平時的開發中,經常會有多個環境,如何管理多個環境中的設定吶?一個是我們原生的開發環境,可以稱為dev,一個是測試環境,我們稱為test,最後還要有生產環境,稱為prod。每個環境的設定都是不一樣的,如何做到快捷方便的使用各自環境的設定絕對是開發中需要著重考慮的。
一、如何設定多環境
在springboot中有預設的組態檔application.properties/application.yml檔案,前面幾篇分享中一直都是以application.properties檔案為例,繼續延用該習慣,且application.properties檔案的優先順序高於application.yml檔案。
在resources目錄下新建application-dev.properties、application-test.properties、application-prod.properties三個組態檔,注意application.properties檔案一定要存在,因為它是預設的組態檔。思考下如果沒有application.properties檔案,有什麼方法可以實現不同環境的組態檔切換,答案是前邊說的「spring.config.name」和「spring.config.location」這兩個屬性,不同環境設定不同的檔名即可。繼續看三個組態檔,
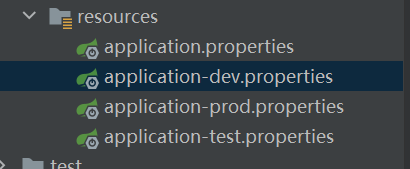
application-dev.properties
server.port=9091application-test.properties
server.port=9092application-prod.properties
server.port=9093另外,在application.properties的設定如下,新加了「spring.profiles.active=test」設定,
server.port=9090
spring.profiles.active=test
看下啟動效果,

可以看到這樣就可以實現多環境的動態切換,只需要修改application.properites檔案中的「spring.profiles.active」的值即可,注意組態檔需滿足application-${profiles}.properties/yml的格式,${profiles}=dev/test/prod/dev3.....
二、生效多環境的多種方式
上面,瞭解瞭如何設定多個環境的設定,下面看下如何動態使用。除了上面提到的「spring.profiles.active」還有很多意想不到的。
2.1、spring.config.name
上面也提到可以使用"spring.config.name"屬性來決定使用哪個組態檔,「spring.config.name」可以設定在JVM引數和環境變數處,且JVM引數的優先順序大於環境變數的。下面嘗試下,直接設定在JVM引數處,演示下效果,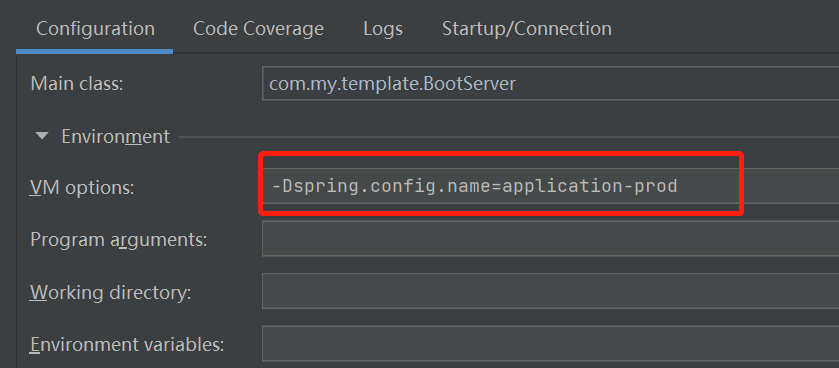
這裡設定「-Dspring.config.name=application-prod」也就是使用application-prod.properties檔案,那麼這裡的埠肯定是「9093」,看下啟動紀錄檔

在不同環境下的多個組態檔,可以使用「spring.config.name」屬性來指定使用哪個環境的檔案。不過大多數情況下不建議使用該方式。
2.2、spring.profiles.active
在上面也提到了該屬性「spring.profiles.active」注意該屬性和「spring.config.name」的設定值是有區別的,「spring.profiles.active」設定的是application-dev.properties中的「dev「,而「spring.config.name」則設定的是」application-dev「。」spring.profiles.active「不僅可以設定在application.properites檔案中,還可以設定在JVM變數和環境變數中,下面看下在組態檔和JVM變數中的優先順序,
在application.properties檔案中設定」spring.profiles.active=test「,

在JVM變數中設定」spring.profiles.active=prod「,

看下啟動紀錄檔,
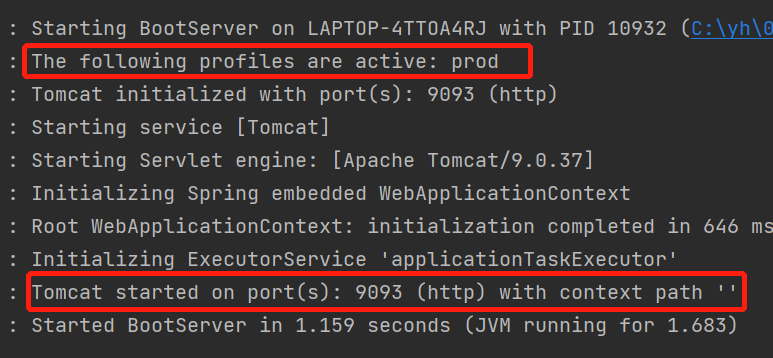
從上圖,可以知道JVM變數的優先順序大於application.properties中的設定,也就是說JVM中的」spring.profiles.active「的值會覆蓋application.properties中的」spring.profiles.active「中的值。
我們上面說到的都是需要在啟動的時候設定引數,那麼有沒有一種方式可以把組態檔打包在jar包裡,在啟動的時候不需要設定引數,直接執行jar即可。下面的這種方式或許可以實現哦。
2.3、pom中<profiles>標籤
可以結合maven中的<profiles>標籤動態切換多環境的組態檔,由於這裡不再使用」spring.config.name「及」spring.profiles.active「等屬性,所以springboot預設讀取的組態檔依然是」application.properties「檔案,既然多環境下都是該檔案,那如何做區分吶,看下圖,
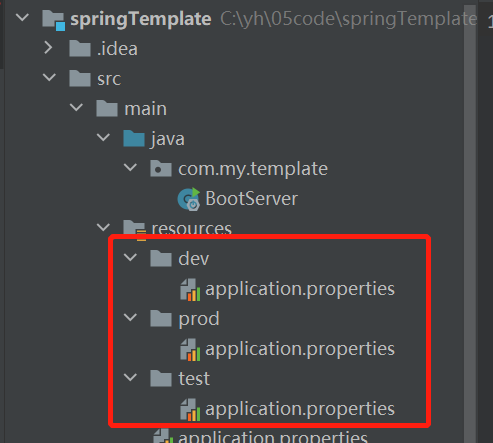
沒錯,通過不同的資料夾來區分不同的環境,每個資料夾下的組態檔的內容分別是dev(9091)、test(9092)、prod(9093),那麼要如何載入不同的檔案,這裡要結合pom.xml檔案,
<?xml version="1.0" encoding="UTF-8"?>
<project xmlns="http://maven.apache.org/POM/4.0.0"
         xmlns:xsi="http://www.w3.org/2001/XMLSchema-instance"
         xsi:schemaLocation="http://maven.apache.org/POM/4.0.0 http://maven.apache.org/xsd/maven-4.0.0.xsd">
    <modelVersion>4.0.0</modelVersion>

    <groupId>org.example</groupId>
    <artifactId>springTemplate</artifactId>
    <version>1.0-SNAPSHOT</version>

    <properties>
        <maven.compiler.source>8</maven.compiler.source>
        <maven.compiler.target>8</maven.compiler.target>
    </properties>
    <dependencies>
        <dependency>
            <groupId>org.springframework.boot</groupId>
            <artifactId>spring-boot-starter-web</artifactId>
            <version>2.3.3.RELEASE</version>
        </dependency>
    </dependencies>
    <profiles>
        <!--dev環境-->
        <profile>
            <id>dev</id>
            <properties>
                <profiles.active>dev</profiles.active>
            </properties>
            <activation>
                <activeByDefault>true</activeByDefault>
            </activation>
        </profile>
        <!--test環境-->
        <profile>
            <id>test</id>
            <properties>
                <profiles.active>test</profiles.active>
            </properties>
        </profile>
        <!--prod環境-->
        <profile>
            <id>prod</id>
            <properties>
                <profiles.active>prod</profiles.active>
            </properties>
        </profile>
    </profiles>
    <build>
        <plugins>
            <plugin>
                <groupId>org.springframework.boot</groupId>
                <artifactId>spring-boot-maven-plugin</artifactId>
                <executions>
                    <execution>
                        <goals>
                            <goal>repackage</goal>
                        </goals>
                    </execution>
                </executions>
            </plugin>
        </plugins>
        <resources>
            <resource>
                <directory>src/main/resources/${profiles.active}</directory>
            </resource>
        </resources>
    </build>
</project>
在pom.xml檔案中加入了上面的設定,idea的」maven「介面,發生了下面的變化,預設是上面設定的」dev「,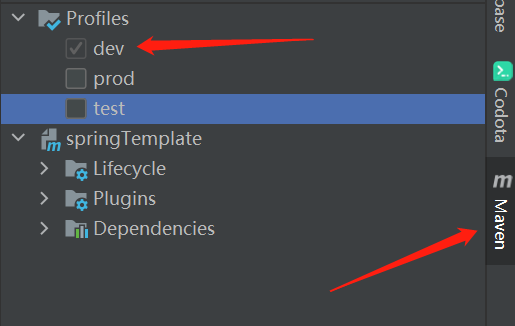
看下選擇了」dev「,服務的啟動紀錄檔,
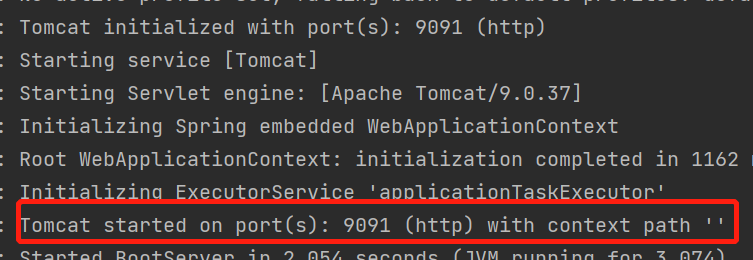
從服務啟動紀錄檔可以看到在埠」9091「啟動,也就是使用的是test的組態檔。注意,修改了下圖中的值後,一定要先執行mvn clean,然後執行mvn compie,最後再啟動專案,
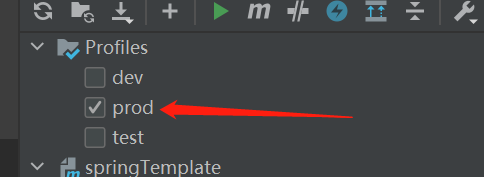
使用這樣的方式,在打包的時候就可以根據不同的環境選擇不同的profile,每個環境的包的組態檔是不一樣的。
三、總結
本文主要分享瞭如何在springboot的專案中使用多環境設定,重點是」spring.profiles.active「屬性,
1、使用」spring.profiles.actvie「屬性可以指定組態檔,要指定的檔案需滿足application-${profiles}.properties/yml的格式,${profiles}可以是dev、test、prod等代表不同環境的值;
2、不同環境設定不同檔案,可使用"spring.profiles.active"和」spring.config.name「屬性,針對」spring.profiles.active「可以設定在application.properties也可以設定在JVM中,JVM引數的優先順序大於application.properties檔案。其實,springboot專案中application.properties檔案中可設定的屬性都可以通過JVM/環境變數的方式設定;
3、多環境打包,可以使用pom中的<profiles>標籤,不同環境打包各自的組態檔;
推薦閱讀
