Spring Ioc原始碼分析系列--@Autowired註解的實現原理
Spring Ioc原始碼分析系列--@Autowired註解的實現原理
前言
前面系列文章分析了一把Spring Ioc的原始碼,是不是雲裡霧裡,感覺並沒有跟實際開發搭上半毛錢關係?看了一遍下來,對我的提升在哪?意義何在?如果沒點收穫,那浪費時間來看這個作甚,玩玩遊戲不香?
這段玩笑話可不是真的玩笑,提升需要自己去把握,意義也需要自己去挖掘。紙上得來終覺淺,絕知此事要躬行。最好是跟著程式碼偵錯一遍才會留下自己的印象,這過程收穫的會比你想象中的要多。看山是山,看水是水。看山不是山,看水不是水。看山還是山,看水還是水。
話不多說,既然這裡是講解@Autowired的原理,那麼這篇文章就會暫時先摒棄本系列文章開始所使用的xml設定方式,投入到註解驅動的懷抱。這兩者對比而言,註解模式已經開始走向了自動裝配,後續的Spring Boot更是徹底走上了自動裝配這條路。
在正式分析之前,先來簡單說一下傳統的裝配和自動裝配的區別。
- 傳統裝配:設定量大,設定複雜,需要手動維護的地方多。
- 自動裝配:只需要簡單設定,不需要維護大量的設定,Spring會根據你現有的要求提前給你設定好需要的東西,省略了很多手動的維護。
那廢話少說,下面搞個例子分析一下吧。
程式碼樣例
例子很簡單,建兩個Service,利用@Autowired給其中一個注入,啟動容器,檢視是否能夠成功注入。
先整個UserService,這個類只有一個sayHi()方法。
/**
 * @author Codegitz
 * @date 2022/6/1
 **/
@Component
public class UserService {

	public void sayHi(String name){
		System.out.println("hi " + name);
	}
}
再新建個ManagerService,前面的UserService會注入到這裡,然後greet()方法會呼叫UserService#sayHi()方法。
/**
 * @author Codegitz
 * @date 2022/6/1
 **/
@Component
public class ManagerService {

	@Autowired
	private UserService userService;

	public void greet(String name){
		userService.sayHi(name);
	}
}
萬事俱備,只欠東風,搞個啟動類AutowiredApplication,看是否能夠夠實現注入。
/**
 * @author Codegitz
 * @date 2022/6/1 10:19
 **/
public class AutowiredApplication {

	public static void main(String[] args) {
		AnnotationConfigApplicationContext applicationContext = new AnnotationConfigApplicationContext("io.codegitz.inject");
		ManagerService managerService = (ManagerService) applicationContext.getBean("managerService");
		managerService.greet("codegitz");
	}
}
啟動之後可以看到注入成功。

執行結束檢視輸出,符合逾期。

上面就是一個簡單的注入例子,日常的業務開發是不是經常這樣寫,終於看到點跟業務相關的邏輯,那接下來就分析一下它的原理。
原始碼分析
這篇文章主要是展示一個過程,所以debug展示的圖片較多
這裡就不遮遮掩掩了,實現@Autowired註解功能的是一個後置處理器AutowiredAnnotationBeanPostProcessor,這個處理器的postProcessMergedBeanDefinition()方法會對標註了@Autowired進行預處理,然後呼叫postProcessProperties()進行注入,這裡分兩步,預處理和真正注入,這個處理器是在什麼時候執行的呢?可以參考文章 Spring Ioc原始碼分析系列--Bean範例化過程(二) 裡面MergedBeanDefinitionPostProcessor的應用那一節。
預處理
我們先看預處理,直接定位到這裡的實現程式碼位置,在AbstractAutowireCapableBeanFactory#applyMergedBeanDefinitionPostProcessors()方法裡。偵錯的時候加上條件,這樣一步到位節省很多時間。

跟進方法,這裡也一樣,加上條件bdp instanceof AutowiredAnnotationBeanPostProcessor,聚焦目標一步到位。

進入postProcessMergedBeanDefinition()方法,顯然這裡的實現是AutowiredAnnotationBeanPostProcessor#postProcessMergedBeanDefinition()裡。預處理方法postProcessMergedBeanDefinition()會比真正的注入方法postProcessProperties()先執行,因此呼叫postProcessProperties()時都是直接拿快取。

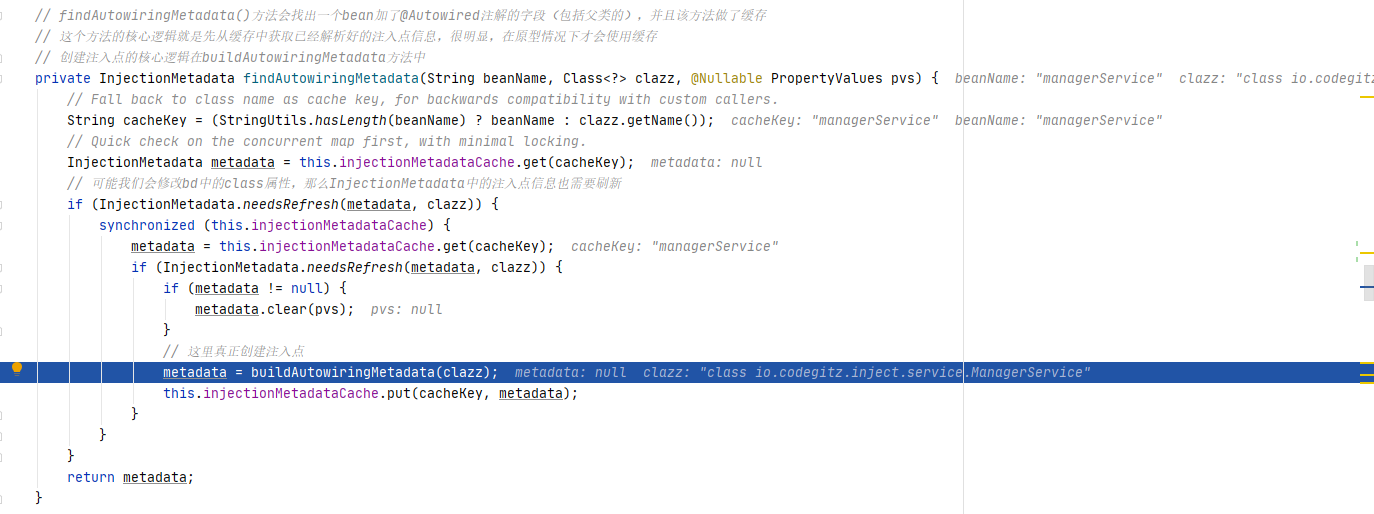
可以看到這裡會先呼叫findAutowiringMetadata()方法,findAutowiringMetadata()方法會找出一個bean加了@Autowired註解的欄位(包括父類別的),並且該方法做了快取,這個方法的核心邏輯就是先從快取中獲取已經解析好的注入點資訊,很明顯,在原型情況下才會使用快取,接下來建立注入點的核心邏輯在buildAutowiringMetadata()方法中。
跟進findAutowiringMetadata()方法,可以看到這裡第一次進來是沒有快取的,這裡會採用一個雙重校驗的方式去解決執行緒安全問題,接下來就是真正建立注入點。

跟進buildAutowiringMetadata()方法,這個方法將@Autowired註解標註的方法以及欄位封裝成InjectionMetadata 在後續階段會呼叫InjectionMetadata#inject()方法進行注入。
先貼一下這個方法的程式碼,可以看到這裡會分別去處理屬性和方法上面的註解,我們這裡只是使用了屬性的注入,因此我們關注的是ReflectionUtils#doWithLocalFields()這一段。
	// 我們應用中使用@Autowired註解標註在欄位上或者setter方法能夠完成屬性注入
	// 就是因為這個方法將@Autowired註解標註的方法以及欄位封裝成InjectionMetadata
	// 在後續階段會呼叫InjectionMetadata的inject方法進行注入
	private InjectionMetadata buildAutowiringMetadata(final Class<?> clazz) {
		if (!AnnotationUtils.isCandidateClass(clazz, this.autowiredAnnotationTypes)) {
			return InjectionMetadata.EMPTY;
		}

		List<InjectionMetadata.InjectedElement> elements = new ArrayList<>();
		Class<?> targetClass = clazz;

		do {
			final List<InjectionMetadata.InjectedElement> currElements = new ArrayList<>();

			// 處理所有的被@AutoWired/@Value註解標註的欄位
			ReflectionUtils.doWithLocalFields(targetClass, field -> {
				MergedAnnotation<?> ann = findAutowiredAnnotation(field);
				if (ann != null) {
					// 靜態欄位會直接跳過
					if (Modifier.isStatic(field.getModifiers())) {
						if (logger.isInfoEnabled()) {
							logger.info("Autowired annotation is not supported on static fields: " + field);
						}
						return;
					}
					// 得到@AutoWired註解中的required屬性
					boolean required = determineRequiredStatus(ann);
					currElements.add(new AutowiredFieldElement(field, required));
				}
			});

			// 處理所有的被@AutoWired註解標註的方法,相對於欄位而言,這裡需要對橋接方法進行特殊處理
			ReflectionUtils.doWithLocalMethods(targetClass, method -> {
				// 只處理一種特殊的橋接場景,其餘的橋接方法都會被忽略
				Method bridgedMethod = BridgeMethodResolver.findBridgedMethod(method);
				if (!BridgeMethodResolver.isVisibilityBridgeMethodPair(method, bridgedMethod)) {
					return;
				}
				MergedAnnotation<?> ann = findAutowiredAnnotation(bridgedMethod);
				// 處理方法時需要注意,當父類別中的方法被子類重寫時,如果子父類別中的方法都加了@Autowired
				// 那麼此時父類別方法不能被處理,即不能被封裝成一個AutowiredMethodElement
				if (ann != null && method.equals(ClassUtils.getMostSpecificMethod(method, clazz))) {
					if (Modifier.isStatic(method.getModifiers())) {
						if (logger.isInfoEnabled()) {
							logger.info("Autowired annotation is not supported on static methods: " + method);
						}
						return;
					}
					if (method.getParameterCount() == 0) {
						if (logger.isInfoEnabled()) {
							logger.info("Autowired annotation should only be used on methods with parameters: " +
									method);
						}
					}
					boolean required = determineRequiredStatus(ann);
					// PropertyDescriptor: 屬性描述符
					// 就是通過解析getter/setter方法,例如void getA()會解析得到一個屬性名稱為a
					// readMethod為getA的PropertyDescriptor,
					// 這裡之所以來這麼一次查詢是因為當XML中對這個屬性進行了設定後,
					// 那麼就不會進行自動注入了,XML中顯示指定的屬性優先順序高於註解
					PropertyDescriptor pd = BeanUtils.findPropertyForMethod(bridgedMethod, clazz);
					// 方法的引數會被自動注入,這裡不限於setter方法
					currElements.add(new AutowiredMethodElement(method, required, pd));
				}
			});

			// 會處理父類別中欄位上及方法上的@AutoWired註解,並且父類別的優先順序比子類高
			elements.addAll(0, currElements);
			targetClass = targetClass.getSuperclass();
		}
		while (targetClass != null && targetClass != Object.class);

		return InjectionMetadata.forElements(elements, clazz);
	}
跟進ReflectionUtils#doWithLocalFields()方法,可以看到這裡會獲取類上所有宣告的註釋,然後逐個放入到FieldCallback進行處理,可以看到這裡已經獲取到了我們類上的userService屬性,跟進fc.doWith(field)方法。
 這裡回到了之前的這一段
lambada表示式,首先會呼叫findAutowiredAnnotation()查詢是否存在該註解,有則返回該註解(包括註解上的屬性),否則返回null。
跟進findAutowiredAnnotation()方法,這裡會找到並且返回該註解。至於怎麼找到該註解的,具體的實現都在annotations.get(type)方法裡,大概的思路就是獲取上面的註解,然後去掃描一遍,尋找符合型別要求的註解並且返回。

獲取到註解後返回,回到那一段lambda表示式裡,會繼續呼叫determineRequiredStatus()確定屬性required的值,顯然這裡會獲取到true,隨後會將當前屬性field和是否必須required封裝成AutowiredFieldElement物件加入到當前元素currElements集合中。這個集合最後會被加入到所有elements集合中,最後封裝成InjectionMetadata物件返回,然後放入到快取injectionMetadataCache裡,後續真正的屬性注入就會從快取中獲取。

到這裡其實已經完成了註解屬性的獲取,
隨後回AutowiredAnnotationBeanPostProcessor#postProcessMergedBeanDefinition()方法裡,隨後會呼叫metadata.checkConfigMembers(beanDefinition)排除掉被外部管理的注入點。

進入該方法可以看到,這裡就是判斷一下是不是被外部管理,沒有就註冊一下,然後加入checkedElements集合裡。

至此,預處理已經完成了。繼續往下走,準備進行真正的注入操作。
執行注入
上面的預處理已經完成,預處理找出了需要執行自動注入的欄位,接下來就是準備自動注入了。
獲取注入點
繼續回到AbstractAutowireCapableBeanFactory#doCreateBean()方法裡,真正注入的邏輯在populateBean()方法裡,進入該方法。略過前面部分邏輯,如果需要分析略過的邏輯,可以看文章 Spring Ioc原始碼分析系列--Bean範例化過程(二) ,這裡不再贅述。
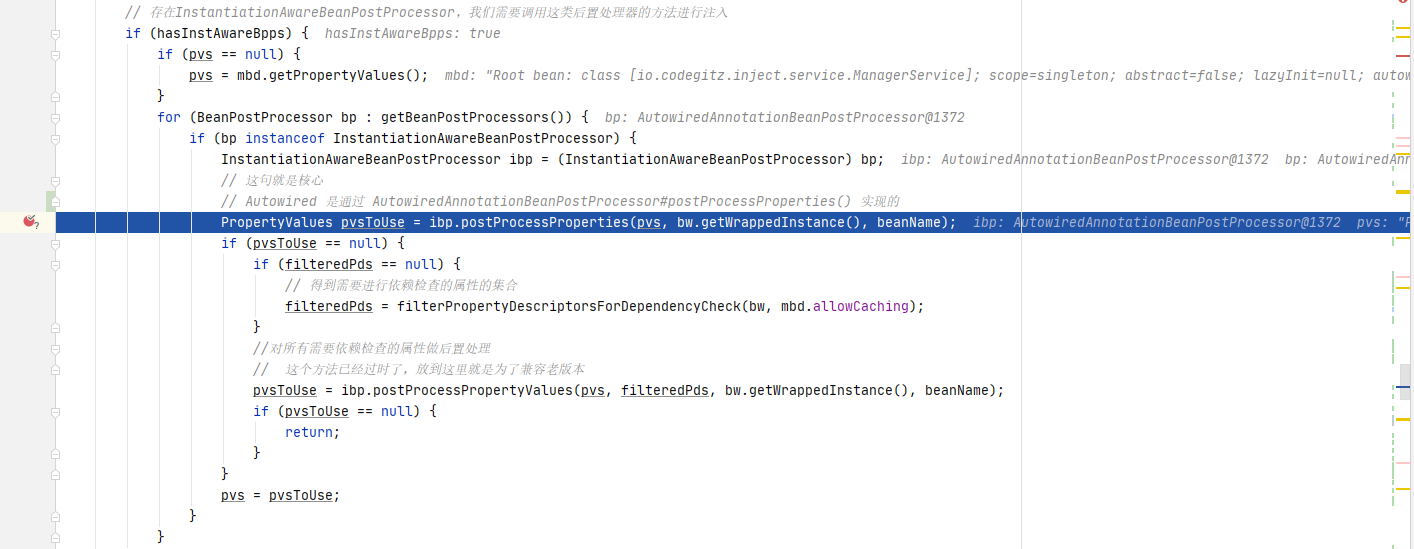
可以看到,這裡會判斷是否存在InstantiationAwareBeanPostProcessor型別的後置處理器,如果有,則執行其postProcessProperties()方法。我們關注的是AutowiredAnnotationBeanPostProcessor後置處理器的實現,直接進入到裡面的邏輯。

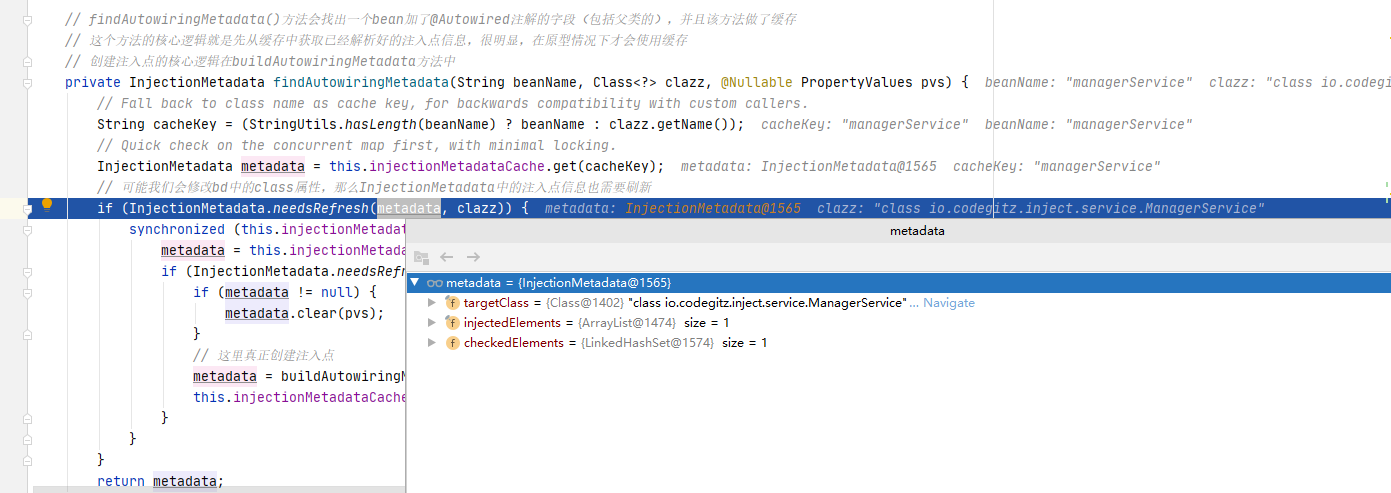
進入AutowiredAnnotationBeanPostProcessor#postProcessProperties()實現,這裡也是呼叫findAutowiringMetadata()方法獲取需要注入的屬性,由於經過了之前的預處理,這裡會直接從快取中獲取。

這裡快取是命中,直接返回。

接下來呼叫metadata.inject(bean, beanName, pvs)執行屬性注入。

進入inject()方法,可以看到這裡就會獲取checkedElements裡面的注入點,然後進行逐個執行注入。

解析注入點依賴
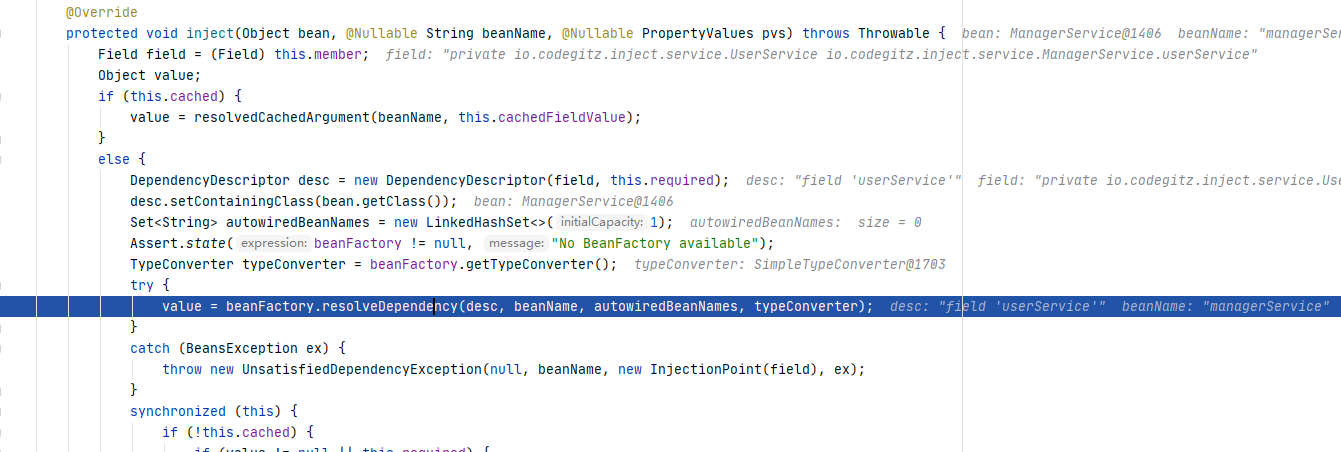
程式碼實現在AutowiredAnnotationBeanPostProcessor$AutowiredFieldElement#inject()裡,這裡最關鍵的就是這一句beanFactory.resolveDependency(desc, beanName, autowiredBeanNames, typeConverter)了,這裡會去解析依賴,獲取我們需要的物件,隨後進行注入。

beanFactory.resolveDependency(desc, beanName, autowiredBeanNames, typeConverter)這個方法十分關鍵,這個方法會處理依賴之間的邏輯,例如處理優先順序,處理Map、陣列、Collection等型別屬性。
下面來重點分析一下這段程式碼,實現是在DefaultListableBeanFactory#resolveDependency()方法裡,先貼一下程式碼。可以看到這裡解析的依賴分幾種型別:
- Optional
型別 - ObjectFactory
、ObjectProvider 型別 - javax.inject.Provider
型別 - @Lazy型別
- 正常Bean型別
	public Object resolveDependency(DependencyDescriptor descriptor, @Nullable String requestingBeanName,
			@Nullable Set<String> autowiredBeanNames, @Nullable TypeConverter typeConverter) throws BeansException {

		// descriptor代表當前需要注入的那個欄位,或者方法的引數,也就是注入點
		// ParameterNameDiscovery用於解析方法引數名稱
		descriptor.initParameterNameDiscovery(getParameterNameDiscoverer());
		// 1. Optional<T>
		if (Optional.class == descriptor.getDependencyType()) {
			return createOptionalDependency(descriptor, requestingBeanName);
		}
		// 2. ObjectFactory<T>、ObjectProvider<T>
		else if (ObjectFactory.class == descriptor.getDependencyType() ||
				ObjectProvider.class == descriptor.getDependencyType()) {
			//ObjectFactory和ObjectProvider類的特殊注入處理
			return new DependencyObjectProvider(descriptor, requestingBeanName);
		}
		// 3. javax.inject.Provider<T>
		else if (javaxInjectProviderClass == descriptor.getDependencyType()) {
			return new Jsr330Factory().createDependencyProvider(descriptor, requestingBeanName);
		}
		else {
			// 4. @Lazy
			Object result = getAutowireCandidateResolver().getLazyResolutionProxyIfNecessary(
					descriptor, requestingBeanName);
			if (result == null) {
				//通用處理邏輯
				// 5. 正常情況
				result = doResolveDependency(descriptor, requestingBeanName, autowiredBeanNames, typeConverter);
			}
			return result;
		}
	}
我們這裡的注入型別是正常的Bean,所以這裡會走到最後的doResolveDependency()方法裡,跟進方法。
可以看到這個方法會先進行預留位置的處理,然後呼叫resolveMultipleBeans()方法處理陣列或者集合型別的依賴。如果不是,則呼叫findAutowireCandidates()尋找合適的依賴,如果找到多個,則需要呼叫determineAutowireCandidate()確定哪個依賴最合適,包括處理優先順序、型別和名稱等,處理完成後返回待注入的依賴。
對於我們這裡而言,重點在於findAutowireCandidates()方法。
	@Nullable
	public Object doResolveDependency(DependencyDescriptor descriptor, @Nullable String beanName,
			@Nullable Set<String> autowiredBeanNames, @Nullable TypeConverter typeConverter) throws BeansException {

		InjectionPoint previousInjectionPoint = ConstructorResolver.setCurrentInjectionPoint(descriptor);
		try {
			Object shortcut = descriptor.resolveShortcut(this);
			if (shortcut != null) {
				return shortcut;
			}

			// 依賴的具體型別
			Class<?> type = descriptor.getDependencyType();
			//用於支援spring中新增的註解@Value
			Object value = getAutowireCandidateResolver().getSuggestedValue(descriptor);
			if (value != null) {
				if (value instanceof String) {
					// 解析@Value中的預留位置
					String strVal = resolveEmbeddedValue((String) value);
					// 獲取到對應的bd
					BeanDefinition bd = (beanName != null && containsBean(beanName) ?
							getMergedBeanDefinition(beanName) : null);
					// 處理EL表示式
					value = evaluateBeanDefinitionString(strVal, bd);
				}
				// 通過解析el表示式可能還需要進行型別轉換
				TypeConverter converter = (typeConverter != null ? typeConverter : getTypeConverter());
				try {
					// 如果需要的話進行型別轉換
					return converter.convertIfNecessary(value, type, descriptor.getTypeDescriptor());
				}
				catch (UnsupportedOperationException ex) {
					// A custom TypeConverter which does not support TypeDescriptor resolution...
					return (descriptor.getField() != null ?
							converter.convertIfNecessary(value, type, descriptor.getField()) :
							converter.convertIfNecessary(value, type, descriptor.getMethodParameter()));
				}
			}

			// 對map,collection,陣列型別的依賴進行處理
			// 最終會根據集合中的元素型別,呼叫findAutowireCandidates方法
			Object multipleBeans = resolveMultipleBeans(descriptor, beanName, autowiredBeanNames, typeConverter);
			if (multipleBeans != null) {
				return multipleBeans;
			}

			/**
			 * 根據屬性型別找到beanFactory中所有型別匹配的bean
			 * 返回值的構成為:key=匹配的beanName,value=beanName對應的範例化的bean(通過getBean(beanName)返回
			 */
			// 根據指定型別可能會找到多個bean
			// 這裡返回的既有可能是物件,也有可能是物件的型別
			// 這是因為到這裡還不能明確的確定當前bean到底依賴的是哪一個bean
			// 所以如果只會返回這個依賴的型別以及對應名稱,最後還需要呼叫getBean(beanName)
			// 去建立這個Bean
			Map<String, Object> matchingBeans = findAutowireCandidates(beanName, type, descriptor);
			// 一個都沒找到,直接丟擲異常
			if (matchingBeans.isEmpty()) {
				if (isRequired(descriptor)) {
					//如果required屬性為true,但是找到的列表屬性卻為空,拋異常
					raiseNoMatchingBeanFound(type, descriptor.getResolvableType(), descriptor);
				}
				return null;
			}

			String autowiredBeanName;
			Object instanceCandidate;

			// 通過型別找到了多個
			if (matchingBeans.size() > 1) {
				// 根據是否是主Bean
				// 是否是最高優先順序的Bean
				// 是否是名稱匹配的Bean
				// 來確定具體的需要注入的Bean的名稱
				// 到這裡可以知道,Spring在查詢依賴的時候遵循先型別再名稱的原則(沒有@Qualifier註解情況下)
				autowiredBeanName = determineAutowireCandidate(matchingBeans, descriptor);
				if (autowiredBeanName == null) {
					// 無法推斷出具體的名稱
					// 如果依賴是必須的,直接丟擲異常
					// 如果依賴不是必須的,但是這個依賴型別不是集合或者陣列,那麼也丟擲異常
					if (isRequired(descriptor) || !indicatesMultipleBeans(type)) {
						return descriptor.resolveNotUnique(descriptor.getResolvableType(), matchingBeans);
					}
					// 依賴不是必須的,但是依賴型別是集合或者陣列,那麼返回一個null
					else {
						// In case of an optional Collection/Map, silently ignore a non-unique case:
						// possibly it was meant to be an empty collection of multiple regular beans
						// (before 4.3 in particular when we didn't even look for collection beans).
						// 在可選的 CollectionMap 的情況下,
						// 默默地忽略非唯一的情況:可能它是多個常規 bean 的空集合(特別是在 4.3 之前,當我們甚至不尋找集合 bean 時)。
						return null;
					}
				}
				instanceCandidate = matchingBeans.get(autowiredBeanName);
			}
			else {
				// We have exactly one match.
				// 直接找到了一個對應的Bean
				Map.Entry<String, Object> entry = matchingBeans.entrySet().iterator().next();
				autowiredBeanName = entry.getKey();
				instanceCandidate = entry.getValue();
			}

			if (autowiredBeanNames != null) {
				autowiredBeanNames.add(autowiredBeanName);
			}
			// 前面已經說過了,這裡可能返回的是Bean的型別,所以需要進一步呼叫getBean
			if (instanceCandidate instanceof Class) {
				instanceCandidate = descriptor.resolveCandidate(autowiredBeanName, type, this);
			}
			// 做一些檢查,如果依賴是必須的,查詢出來的依賴是一個null,那麼報錯
			// 查詢處理的依賴型別不符合,也報錯
			Object result = instanceCandidate;
			if (result instanceof NullBean) {
				if (isRequired(descriptor)) {
					raiseNoMatchingBeanFound(type, descriptor.getResolvableType(), descriptor);
				}
				result = null;
			}
			if (!ClassUtils.isAssignableValue(type, result)) {
				throw new BeanNotOfRequiredTypeException(autowiredBeanName, type, instanceCandidate.getClass());
			}
			return result;
		}
		finally {
			// 更新當前的注入點為前一個
			ConstructorResolver.setCurrentInjectionPoint(previousInjectionPoint);
		}
	}
跟進findAutowireCandidates()方法程式碼,注意這個方法返回的只是候選依賴的bean名稱和class型別,找到名稱後還需要進行獲取bean物件的操作。
	/**
	 * Find bean instances that match the required type.
	 * Called during autowiring for the specified bean.
	 *
	 * 查詢與所需型別匹配的 bean 範例。在指定 bean 的自動裝配期間呼叫。
	 *
	 * @param beanName the name of the bean that is about to be wired
	 * @param requiredType the actual type of bean to look for
	 * (may be an array component type or collection element type)
	 * @param descriptor the descriptor of the dependency to resolve
	 * @return a Map of candidate names and candidate instances that match
	 * the required type (never {@code null})
	 * @throws BeansException in case of errors
	 * @see #autowireByType
	 * @see #autowireConstructor
	 */
	protected Map<String, Object> findAutowireCandidates(
			@Nullable String beanName, Class<?> requiredType, DependencyDescriptor descriptor) {

		// 簡單來說,這裡就是到容器中查詢requiredType型別的所有bean的名稱的集合
		// 這裡會根據descriptor.isEager()來決定是否要匹配factoryBean型別的Bean
		// 如果isEager()為true,那麼會匹配factoryBean,反之,不會
		String[] candidateNames = BeanFactoryUtils.beanNamesForTypeIncludingAncestors(
				this, requiredType, true, descriptor.isEager());
		Map<String, Object> result = new LinkedHashMap<>(candidateNames.length);
		// 第一步會到resolvableDependencies這個集合中查詢是否已經存在瞭解析好的依賴
		// 像我們之所以能夠直接在Bean中注入applicationContext物件
		// 就是因為Spring之前就將這個物件放入了resolvableDependencies集合中
		for (Map.Entry<Class<?>, Object> classObjectEntry : this.resolvableDependencies.entrySet()) {
			Class<?> autowiringType = classObjectEntry.getKey();
			if (autowiringType.isAssignableFrom(requiredType)) {
				Object autowiringValue = classObjectEntry.getValue();
				// 如果resolvableDependencies放入的是一個ObjectFactory型別的依賴
				// 那麼在這裡會生成一個代理物件
				// 例如,我們可以在controller中直接注入request物件
				// 就是因為,容器啟動時就在resolvableDependencies放入了一個鍵值對
				// 其中key為:Request.class,value為:ObjectFactory
				// 在實際注入時放入的是一個代理物件
				autowiringValue = AutowireUtils.resolveAutowiringValue(autowiringValue, requiredType);
				if (requiredType.isInstance(autowiringValue)) {
					// 這裡放入的key不是Bean的名稱
					// value是實際依賴的物件
					result.put(ObjectUtils.identityToString(autowiringValue), autowiringValue);
					break;
				}
			}
		}
		// 接下來開始對之前查詢出來的型別匹配的所有BeanName進行處理
		for (String candidate : candidateNames) {
			// 不是自參照,什麼是自參照?
			// 1.候選的Bean的名稱跟需要進行注入的Bean名稱相同,意味著,自己注入自己
			// 2.或者候選的Bean對應的factoryBean的名稱跟需要注入的Bean名稱相同,
			// 也就是說A依賴了B但是B的建立又需要依賴A
			// 要符合注入的條件
			if (!isSelfReference(beanName, candidate) && isAutowireCandidate(candidate, descriptor)) {
				// 呼叫addCandidateEntry,加入到返回集合中,後文有對這個方法的分析
				addCandidateEntry(result, candidate, descriptor, requiredType);
			}
		}
		// fallback還是失敗
		if (result.isEmpty()) {
			boolean multiple = indicatesMultipleBeans(requiredType);
			// Consider fallback matches if the first pass failed to find anything...
			DependencyDescriptor fallbackDescriptor = descriptor.forFallbackMatch();
			for (String candidate : candidateNames) {
				if (!isSelfReference(beanName, candidate) && isAutowireCandidate(candidate, fallbackDescriptor) &&
						(!multiple || getAutowireCandidateResolver().hasQualifier(descriptor))) {
					addCandidateEntry(result, candidate, descriptor, requiredType);
				}
			}
			// 排除自參照的情況下,沒有找到一個合適的依賴
			if (result.isEmpty() && !multiple) {
				// Consider self references as a final pass...
				// but in the case of a dependency collection, not the very same bean itself.
				// 1.先走fallback邏輯,Spring提供的一個擴充套件吧,感覺沒什麼卵用
				// 預設情況下fallback的依賴描述符就是自身
				for (String candidate : candidateNames) {
					if (isSelfReference(beanName, candidate) &&
							(!(descriptor instanceof MultiElementDescriptor) || !beanName.equals(candidate)) &&
							isAutowireCandidate(candidate, fallbackDescriptor)) {
						addCandidateEntry(result, candidate, descriptor, requiredType);
					}
				}
			}
		}
		return result;
	}
到這裡已經找到了bean名稱,需要開始獲取物件。

跟進descriptor.resolveCandidate(autowiredBeanName, type, this)方法檢視,真是資本家看了都落淚,這裡又開始了一個getBean()操作。這裡又會進行一套操作,詳細可見之前的文章Spring Ioc原始碼分析系列--Bean範例化過程(一),這裡不再贅述。

所以上一步完成後,我們算是得到了一個可用的依賴,後續還會對依賴進行一個校驗,校驗通過就返回,然後就可以執行真正的反射注入了。
解析依賴這裡有非常多的細節需要處理,我這裡就不羅裡吧嗦全部說清楚,感覺也說不清楚,這裡就抓住一個脈絡,注入的是一個簡單物件的依賴,其他的細節不進行過分深究,有興趣可以自行研究一下。

反射注入依賴
回到AutowiredAnnotationBeanPostProcessor$AutowiredFieldElement#inject()方法裡,可以看到注入的就是UserService@1503。至此,注入完成。

再進去就是反射的程式碼,這裡也不再深入了。
    @CallerSensitive
    public void set(Object obj, Object value)
        throws IllegalArgumentException, IllegalAccessException
    {
        if (!override) {
            if (!Reflection.quickCheckMemberAccess(clazz, modifiers)) {
                Class<?> caller = Reflection.getCallerClass();
                checkAccess(caller, clazz, obj, modifiers);
            }
        }
        getFieldAccessor(obj).set(obj, value);
    }
總結
這篇文章本來想簡單寫一下,但是發現這個簡單不起來,都涉及到了很多,儘管已經簡化著來寫,但是寫著寫著也不短了。
回顧一下本文的思路,首先是通過一個例子,構造了一個業務場景經常使用的程式碼片段。雖然一針見血直接對原理直接分析,就不過多兜兜轉轉了。通過後面的原始碼分析得知,AutowiredAnnotationBeanPostProcessor會先去尋找注入點,然後去解析注入點需要的依賴,最後通過反射進行注入。原理就是這麼簡單,只不過實現起來比較複雜。
既然看到了這裡,那麼我留下一個問題,都知道是AutowiredAnnotationBeanPostProcessor完成了這些處理,但是你有沒有留意到AutowiredAnnotationBeanPostProcessor是在哪裡註冊進了容器裡以及是在哪裡進行了初始化呢?前面的文章有答案,可以回想一下。
個人水平有限,如有錯誤,還請指出。
如果有人看到這裡,那在這裡老話重提。與君共勉,路漫漫其修遠兮,吾將上下而求索。