springboot如何使用自定義組態檔
從前邊《springboot竟然有5種預設的載入路徑,你未必都知道》我們知道,springboot會預設載入application.properties/application.yml組態檔,且會從下面5個預設的路徑下載入,其優先順序依次升高,後面的會覆蓋前邊的設定。我們平時使用resources/application.properties其實優先順序是最低。
// Note the order is from least to most specific (last one wins)
private static final String DEFAULT_SEARCH_LOCATIONS = "classpath:/,classpath:/config/,file:./,file:./config/*/,file:./config/";
既然知道了springboot會從預設的路徑載入預設的組態檔application.properties/application.yml,那麼必然可以自定義。
一、如何自定義
這裡分為兩部分,一個是自定義組態檔,一個是自定義組態檔的路徑。祕密就藏在上篇文章提到的一個類中:ConfigFileApplicationListener,再來看下該類的註釋,下面僅貼出部分,
 * <p>
 * The 'spring.config.name' property can be used to specify an alternative name to load
 * and the 'spring.config.location' property can be used to specify alternative search
 * locations or specific files.
 * <p>
這段註釋是什麼意思吶,大體意思是「通過指定spring.config.name屬性來替代預設的組態檔名稱,通過指定spring.config.location屬性來替代預設組態檔的載入路徑」。再來看ConfigFileApplicationListener類中的屬性,
/**
* The "config name" property name.
 */
public static final String CONFIG_NAME_PROPERTY = "spring.config.name";

/**
* The "config location" property name.
*/
public static final String CONFIG_LOCATION_PROPERTY = "spring.config.location";
可以看到在該類中定義了兩個常數來接收「spring.config.name」和「spring.config.location」屬性的值。
二、如何使用
上面已經瞭解到可以通過設定「spring.config.name」和「spring.config.location」屬性值來自定義預設組態檔和預設組態檔的載入路徑。現在就來試試,使用properties檔案來演示,在resources資料夾下建myconfig/custom.properties,
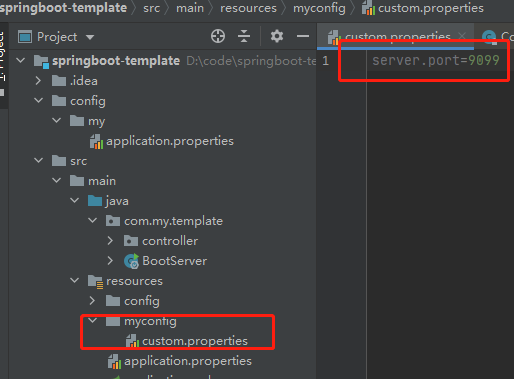
現在,如果啟動服務肯定不會使用埠「9099」,因為前邊說到springboot有自己的預設載入路徑及預設的組態檔名,現在自定義的檔案是resources/myconfig/custome.properties,springboot不會載入到,前邊又說到springboot定義了「spring.config.name」和「spring.config.location」兩個屬性,現在就需要使用這兩個屬性指定自定義的組態檔。
2.1、從原始碼中學習如何使用
要指定如何使用「spring.config.name」和「spring.config.location」兩個設定,還是得去原始碼中尋找,前面說到這兩個屬性在ConfigFileApplicationListener類中,在該類中在下面的地方使用了這兩個屬性,
private Set<String> getSearchNames() {
           //使用CONFIG_NAME_PROPERTY常數也就是spring.config.name
			if (this.environment.containsProperty(CONFIG_NAME_PROPERTY)) {
				String property = this.environment.getProperty(CONFIG_NAME_PROPERTY);
				Set<String> names = asResolvedSet(property, null);
				names.forEach(this::assertValidConfigName);
				return names;
			}
			return asResolvedSet(ConfigFileApplicationListener.this.names, DEFAULT_NAMES);
		}

private Set<String> getSearchLocations() {
			Set<String> locations = getSearchLocations(CONFIG_ADDITIONAL_LOCATION_PROPERTY);
            //使用CONFIG_LOCATION_PROPERTY常數也就是spring.config.location
			if (this.environment.containsProperty(CONFIG_LOCATION_PROPERTY)) {
				locations.addAll(getSearchLocations(CONFIG_LOCATION_PROPERTY));
			}
			else {
				locations.addAll(
						asResolvedSet(ConfigFileApplicationListener.this.searchLocations, DEFAULT_SEARCH_LOCATIONS));
			}
			return locations;
		}
從上面的程式碼中得出這樣一個規律都是呼叫this.environment 中的方法,那麼這個environment到底是什麼,如下

完全看不出來,這時候只有通過debug了,在ConfigFileApplicationListener類中打上斷點,看到environment是一個StandardServletEnvironment範例,
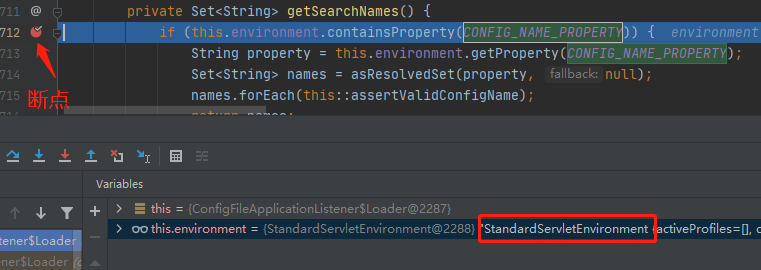
那就好辦了,找到該類即可,該類中有這樣的一個方法:customizePropertySources,直譯過來是「自定義屬性來源」,
@Override
	protected void customizePropertySources(MutablePropertySources propertySources) {
		propertySources.addLast(new StubPropertySource(SERVLET_CONFIG_PROPERTY_SOURCE_NAME));
		propertySources.addLast(new StubPropertySource(SERVLET_CONTEXT_PROPERTY_SOURCE_NAME));
		if (JndiLocatorDelegate.isDefaultJndiEnvironmentAvailable()) {
			propertySources.addLast(new JndiPropertySource(JNDI_PROPERTY_SOURCE_NAME));
		}
		super.customizePropertySources(propertySources);
	}
從該類中可以看到向propertySources中新加了好幾個屬性,我們看下面這句,
super.customizePropertySources(propertySources);呼叫的是父類別的方法,父類別方法如下,
@Override
	protected void customizePropertySources(MutablePropertySources propertySources) {
		propertySources.addLast(
				new PropertiesPropertySource(SYSTEM_PROPERTIES_PROPERTY_SOURCE_NAME, getSystemProperties()));
		propertySources.addLast(
				new SystemEnvironmentPropertySource(SYSTEM_ENVIRONMENT_PROPERTY_SOURCE_NAME, getSystemEnvironment()));
	}
看到又向propertySources中放入了兩個值,分別是下面兩個常數,
/** System environment property source name: {@value}. */
public static final String SYSTEM_ENVIRONMENT_PROPERTY_SOURCE_NAME = "systemEnvironment";

/** JVM system properties property source name: {@value}. */
public static final String SYSTEM_PROPERTIES_PROPERTY_SOURCE_NAME = "systemProperties";
根據註釋我們知道,
SYSTEM_ENVIRONMENT_PROPERTY_SOURCE_NAME 表示的是系統環境引數
SYSTEM_PROPERTIES_PROPERTY_SOURCE_NAME 表示的是JVM系統引數
也就是說springboot會從系統環境變數和JVM引數中讀取設定資訊,結合前邊的分析,「spring.config.name」和「spring.config.location」會從系統環境變數和JVM引數中獲取。
2.2、設定系統環境變數和JVM引數
前邊已經從原始碼中知道了「spring.config.name」和「spring.location」應該如何設定,現在看下設定效果。
2.2.1、設定JVM引數
設定JVM引數看下效果,設定如下,
-Dspring.config.name=custom
-Dspring.config.location=classpath:myconfig/
設定好的效果如下,

看下服務在哪個埠啟動,
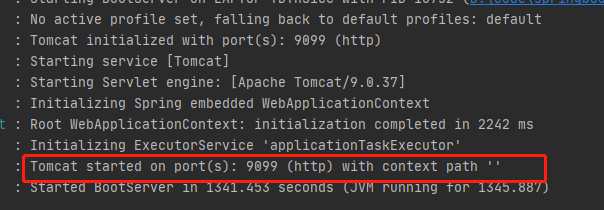
服務在埠「9099」啟動,使用到了我們自定義的組態檔:resources/myconfig/custom.properties。
2.2.2、設定系統環境變數
設定的資訊如下,
spring.config.name=custom
spring.config.location=classpath:myconfig/
設定好的效果,
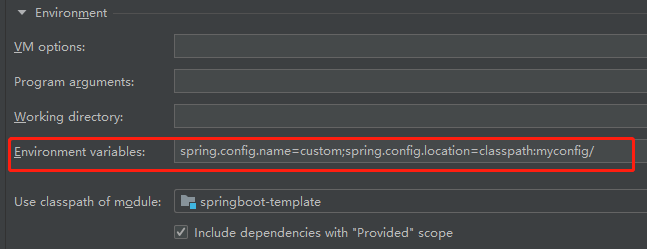
測試結果,我就不再貼了,服務使用的我們自定義的組態檔。
讀到這裡不知道小夥伴們是否有個疑惑,JVM引數和系統環境變數有優先順序嗎,當然是有的,咱們繼續。
2.3、優先順序之爭
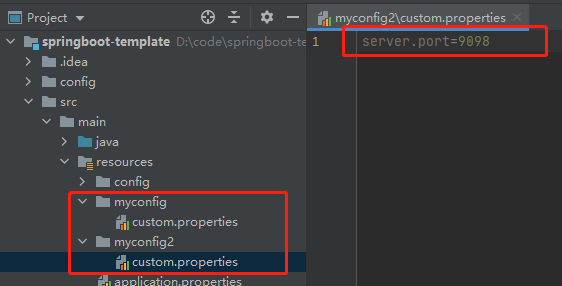
在resources下再建myconfig2/custom.properties檔案,埠為9098,
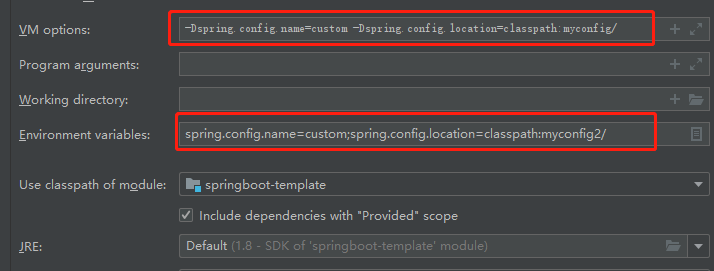
分別設定JVM引數和系統環境變數,
最後服務是在埠「9099」啟動,
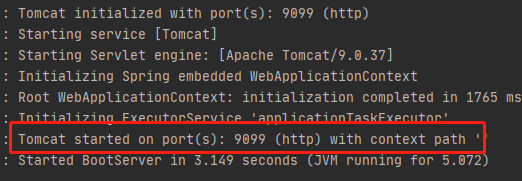
由此我們可以得出結論,JVM引數的優先順序大於系統環境變數。
三、總結
本文主要分享了在springboot中如何使用自定義的組態檔,主要有以下幾點
1、定義自己的組態檔;
2、使用「spring.config.name」、「spring.config.location」定義檔名稱、檔案位置;
3、可以在JVM引數、系統環境變數設定「spring.config.name」、「spring.config.location」;JVM引數的優先順序大於系統環境變數;
不知道有沒有小夥伴還存在一個疑問,我是有疑問的,什麼是JVM引數?什麼是系統環境變數?後續咱們繼續分享。
推薦閱讀
《springboot竟然有5種預設的載入路徑,你未必都知道》
《springboot:讀取application.yml檔案》
