Fastflow——基於golang的輕量級工作流框架
Fastflow 是什麼?用一句話來定義它:一個 基於golang協程、支援水平擴容的分散式高效能工作流框架。
它具有以下特點:
- 易用性:工作流模型基於
DAG來定義,同時還提供開箱即用的 API,你可以隨時通過 API 建立、執行、暫停工作流等,在開發新的原子能力時還提供了開箱即用的分散式鎖功能 - 高效能:得益於 golang 的協程 與 channel 技術,
fastflow可以在單範例上並行執行數百、數千乃至數萬個任務 - 可觀測性:
fastflow基於Prometheus的 metrics 暴露了當前範例上的任務執行資訊,比如並行任務數、任務分發時間等。 - 可伸縮性:支援水平伸縮,以克服海量任務帶來的單點瓶頸,同時通過選舉 Leader 節點來保障各個節點的負載均衡
- 可延伸性:
fastflow準備了部分開箱即用的任務操作,比如 http請求、執行指令碼等,同時你也可以自行定義新的節點動作,同時你可以根據上下文來決定是否跳過節點(skip) - 輕量:它僅僅是一個基礎框架,而不是一個完整的產品,這意味著你可以將其很低成本融入到遺留專案而無需部署、依賴另一個專案,這既是它的優點也是缺點——當你真的需要一個開箱即用的產品時(比如 airflow),你仍然需要少量的程式碼開發才能使用
為什麼要開發 Fastflow
組內有很多專案都涉及複雜的任務流場景,比如離線任務,叢集上下架,容器遷移等,這些場景都有幾個共同的特點:
- 流程耗時且步驟複雜,比如建立一個 k8s 叢集,需要幾十步操作,其中包含指令碼執行、介面呼叫等,且相互存在依賴關係。
- 任務量巨大,比如容器平臺每天都會有幾十萬的離線任務需要排程執行、再比如我們管理數百個K8S叢集,幾乎每天會有叢集需要上下節點、遷移容器等。
我們嘗試過各種解法:
- 寫死實現:雖然工作量較小,但是隻能滿足某個場景下的特定工作流,沒有可複用性。
- airflow:我們最開始的離線任務引擎就是基於這個來實現的,不得不承認它的功能很全,也很方便,但是存在幾個問題
- 由 python 編寫的,我們希望團隊維護的專案能夠統一語言,更有助於提升工作效率,雖然對一個有經驗的程式設計師來說多語言並不是問題,但是頻繁地在多個語言間來回切換其實是不利於高效工作的
- airflow 的任務執行是以
程序來執行的,雖然有更好的隔離性,但是顯然因此而犧牲了效能和並行度。
- 公司內的工作流平臺:你可能想象不到一個世界前十的網際網路公司,他們內部一個經歷了數年線上考證的運維用工作流平臺,會脆弱到承受不了上百工作流的並行,第一次壓測就直接讓他們的服務癱瘓,進而影響到其他業務的運維任務。據團隊反饋稱是因為我們的工作流組成太複雜,一個流包含數十個任務節點才導致了這次意外的服務過載,隨後半年這個團隊重寫了一個新的v2版本。
當然 Github 上也還有其他的任務流引擎,我們也都評估過,無法滿足需求。比如 kubeflow 是基於 Pod 執行任務的,比起 程序 更為重量,還有一些專案,要麼就是沒有經過海量資料的考驗,要麼就是沒有考慮可伸縮性,面對大量任務的執行無法水平擴容。
Concept
工作流模型
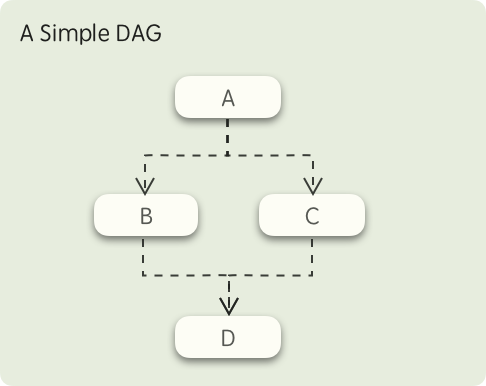
fastflow 的工作流模型基於 DAG(Directed acyclic graph),下圖是一個簡單的 DAG 示意圖:

在這個圖中,首先 A 節點所定義的任務會被執行,當 A 執行完畢後,B、C兩個節點所定義的任務將同時被觸發,而只有 B、C 兩個節點都執行成功後,最後的 D 節點才會被觸發,這就是 fastflow 的工作流模型。
工作流的要素
fastflow 執行任務的過程會涉及到幾個概念:Dag, Task, Action, DagInstance
Dag
描述了一個完整流程,它的每個節點被稱為 Task,它定義了各個 Task 的執行順序和依賴關係,你可以通過程式設計 or yaml 來定義它
一個程式設計式定義的DAG
dag := &entity.Dag{
BaseInfo: entity.BaseInfo{
ID: "test-dag",
},
Name: "test",
Tasks: []entity.Task{
{ID: "task1", ActionName: "PrintAction"},
{ID: "task2", ActionName: "PrintAction", DependOn: []string{"task1"}},
{ID: "task3", ActionName: "PrintAction", DependOn: []string{"task2"}},
},
}
對應的yaml如下:
id: "test-dag"
name: "test"
tasks:
- id: "task1"
actionName: "PrintAction"
- id: ["task2"]
actionName: "PrintAction"
dependOn: ["task1"]
- id: "task3"
actionName: "PrintAction"
dependOn: ["task2"]
同時 Dag 可以定義這個工作流所需要的引數,以便於在各個 Task 去消費它:
id: "test-dag"
name: "test"
vars:
fileName:
desc: "the file name"
defaultValue: "file.txt"
filePath:
desc: "the file path"
defaultValue: "/tmp/"
tasks:
- id: "task1"
actionName: "PrintAction"
params:
writeName: "{{fileName}}"
writePath: "{{filePath}}"
Task
它定義了這個節點的具體工作,比如是要發起一個 http 請求,或是執行一段指令碼等,這些不同動作都通過選擇不同的 Action 來實現,同時它也可以定義在何種條件下需要跳過 or 阻塞該節點。
下面這段yaml演示了 Task 如何根據某些條件來跳過執行該節點。
id: "test-dag"
name: "test"
vars:
fileName:
desc: "the file name"
defaultValue: "file.txt"
tasks:
- id: "task1"
actionName: "PrintAction"
preCheck:
- act: skip #you can set "skip" or "block"
conditions:
- source: vars # source could be "vars" or "share-data"
key: "fileName"
op: "in"
values: ["warn.txt", "error.txt"]
Task 的狀態有以下幾個:
- init: Task已經初始化完畢,等待執行
- running: 正在執行中
- ending: 當執行 Action 的
Run所定義的內容後,會進入到該狀態 - retrying: 任務重試中
- failed: 執行失敗
- success: 執行成功
- blocked: 任務已阻塞,需要人工啟動
- skipped: 任務已跳過
Action
Action 是工作流的核心,定義了該節點將執行什麼操作,fastflow攜帶了一些開箱即用的Action,但是一般你都需要根據具體的業務場景自行編寫,它有幾個關鍵屬性:
- Name:
RequiredAction的名稱,不可重複,它是與 Task 關聯的核心 - Run:
Required需要執行的動作,fastflow 將確保該動作僅會被執行 一次(ExactlyOnce) - RunBefore:
Optional在執行 Run 之前執行,如果有一些前置動作,可以在這裡執行,RunBefore 有可能會被執行多次。 - RunAfter:
Optional在執行 Run 之後執行,一些長時間執行的任務內容建議放在這裡,只要 Task 尚未結束,節點發生故障重啟時仍然會繼續執行這部分內容, - RetryBefore:
Optional在重試失敗的任務節點,可以提前執行一些清理的動作
自行開發的 Action 在使用前都必須先註冊到 fastflow,如下所示:
type PrintParams struct {
Key string
Value string
}

type PrintAction struct {
}

// Name define the unique action identity, it will be used by Task
func (a *PrintAction) Name() string {
return "PrintAction"
}

func (a *PrintAction) Run(ctx run.ExecuteContext, params interface{}) error {
cinput := params.(*ActionParam)

fmt.Println("action start: ", time.Now())
fmt.Println(fmt.Sprintf("params: key[%s] value[%s]", cinput.Key, cinput.Value))
return nil
}

func (a *PrintAction) ParameterNew() interface{} {
return &PrintParams{}
}

func main() {
...

// Register action
fastflow.RegisterAction([]run.Action{
&PrintAction{},
})

...
}
DagInstance
當你開始執行一個 Dag 後,則會為本次執行生成一個執行記錄,它被稱為 DagInstance,當它生成以後,會由 Leader 範例將其分發到一個健康的 Worker,再由其解析、執行。
範例型別與Module
首先 fastflow 是一個分散式的框架,意味著你可以部署多個範例來分擔負載,而範例被分為兩類角色:
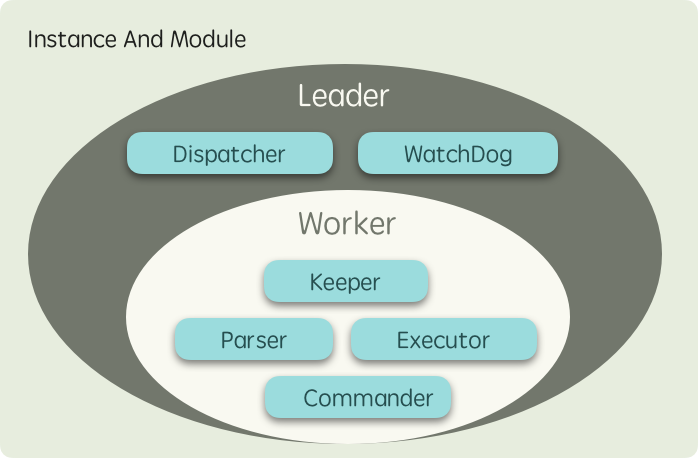
- Leader:此類範例在執行過程中只會存在一個,從 Worker 中進行選舉而得出,它負責給 Worker 範例分發任務,也會監聽長時間得不到執行的任務將其排程到其他節點等
- Worker:此類範例會存在複數個,它們負責解析 DAG 工作流並以
協程執行其中的任務
而不同節點能夠承擔不同的功能,其背後是不同的 模組 在各司其職,不同節點所執行的模組如下圖所示:

NOTE
- Leader 範例本質上是一個承擔了
仲裁者角色的 Worker,因此它也會分擔工作負載。- 為了實現更均衡的負載,以及獲得更好的可延伸性,fastflow 沒有選擇加鎖競爭的方式來實現工作分發
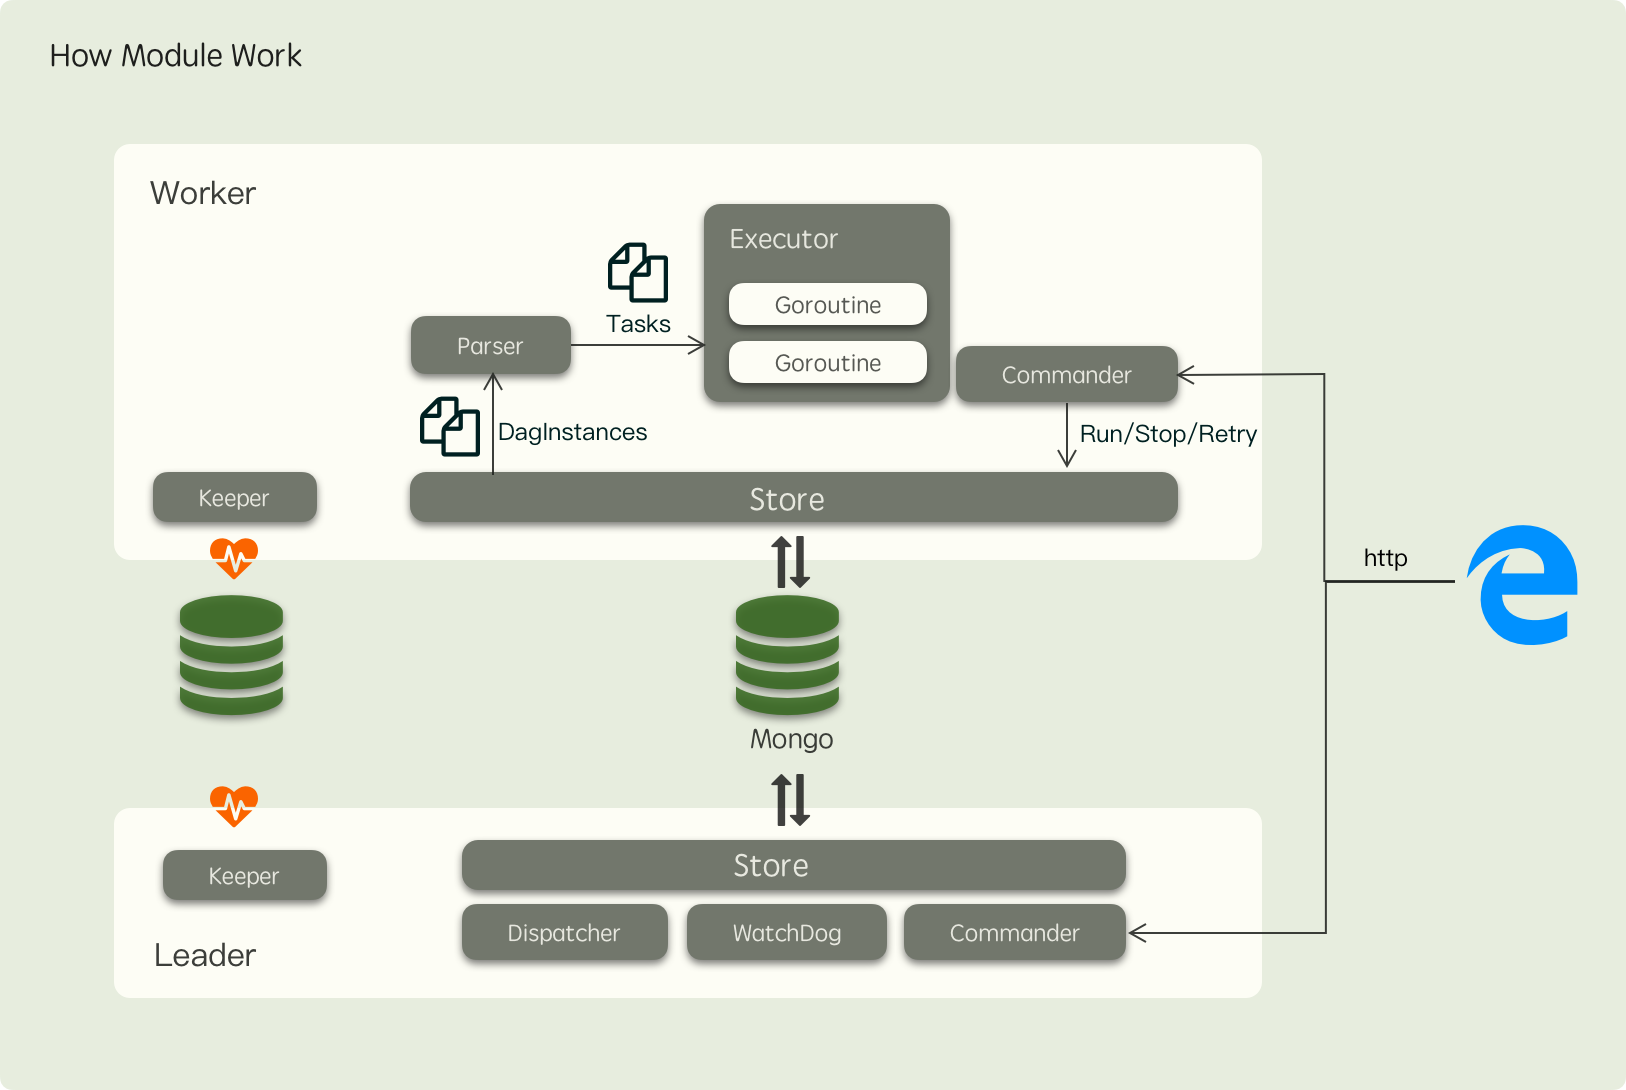
從上面的圖看,Leader 範例會比 Worker 範例多執行一些模組用於執行中仲裁者相關的任務,模組之間的共同作業關係如下圖所示:

其中各個模組的職責如下:
- Keeper:
每個節點都會執行負責註冊節點到儲存中,保持心跳,同時也會週期性嘗試競選 Leader,防止上任 Leader 故障後阻塞系統,這個模組同時也提供了分散式鎖功能,我們也可以實現不同儲存的 Keeper 來滿足特定的需求,比如EtcdorZookeepper,目前支援的 Keeper 實現只有Mongo - Store:
每個節點都會執行負責解耦 Worker 對底層儲存的依賴,通過這個元件,我們可以實現利用Mongo,Mysql等來作為 fastflow 的後端儲存,目前僅實現了Mongo - Parser:
Worker 節點執行負責監聽分發到自己節點的任務,然後將其 DAG 結構重組為一顆 Task 樹,並渲染好各個任務節點的輸入,接下來通知Executor模組開始執行 Task - Commander:
每個節點都會執行負責封裝一些常見的指令,如停止、重試、繼續等,下發到節點去執行 - Executor:
Worker 節點執行按照 Parser 解析好的 Task 樹以 goroutine 執行單個的 Task - Dispatcher:
Leader節點才會執行負責監聽等待執行的 DAG,並根據 Worker 的健康狀況均勻地分發任務 - WatchDog:
Leader節點才會執行負責監聽執行超時的 Task 將其更新為失敗,同時也會重新排程那些一直得不到執行的 DagInstance 到其他 Worker
Tips
以上模組的分佈機制僅僅只是 fastflow 的預設實現,你也可以自行決定範例執行的模組,比如在 Leader 上不再執行 Worker 的範例,讓其專注於任務排程。
GetStart
更多例子請參考專案下面的
examples目錄
準備一個Mongo範例
如果已經你已經有了可測試的範例,可以直接替換為你的範例,如果沒有的話,可以使用Docker容器在本地跑一個,指令如下:
docker run -d --name fastflow-mongo --network host mongo
執行 fastflow
執行以下範例
package main

import (
"fmt"
"log"
"time"

"github.com/shiningrush/fastflow"
mongoKeeper "github.com/shiningrush/fastflow/keeper/mongo"
"github.com/shiningrush/fastflow/pkg/entity/run"
"github.com/shiningrush/fastflow/pkg/mod"
mongoStore "github.com/shiningrush/fastflow/store/mongo"
)

type PrintAction struct {
}

// Name define the unique action identity, it will be used by Task
func (a *PrintAction) Name() string {
return "PrintAction"
}
func (a *PrintAction) Run(ctx run.ExecuteContext, params interface{}) error {
fmt.Println("action start: ", time.Now())
return nil
}

func main() {
// Register action
fastflow.RegisterAction([]run.Action{
&PrintAction{},
})

// init keeper, it used to e
keeper := mongoKeeper.NewKeeper(&mongoKeeper.KeeperOption{
Key: "worker-1",
// if your mongo does not set user/pwd, youshould remove it
ConnStr: "mongodb://root:[email protected]:27017/fastflow?authSource=admin",
Database: "mongo-demo",
Prefix: "test",
})
if err := keeper.Init(); err != nil {
log.Fatal(fmt.Errorf("init keeper failed: %w", err))
}

// init store
st := mongoStore.NewStore(&mongoStore.StoreOption{
// if your mongo does not set user/pwd, youshould remove it
ConnStr: "mongodb://root:[email protected]:27017/fastflow?authSource=admin",
Database: "mongo-demo",
Prefix: "test",
})
if err := st.Init(); err != nil {
log.Fatal(fmt.Errorf("init store failed: %w", err))
}

go createDagAndInstance()

// start fastflow
if err := fastflow.Start(&fastflow.InitialOption{
Keeper: keeper,
Store: st,
// use yaml to define dag
ReadDagFromDir: "./",
}); err != nil {
panic(fmt.Sprintf("init fastflow failed: %s", err))
}
}

func createDagAndInstance() {
// wait fast start completed
time.Sleep(time.Second)

// run some dag instance
for i := 0; i < 10; i++ {
_, err := mod.GetCommander().RunDag("test-dag", nil)
if err != nil {
log.Fatal(err)
}
time.Sleep(time.Second * 10)
}
}
程式執行目錄下的test-dag.yaml
id: "test-dag"
name: "test"
tasks:
- id: "task1"
actionName: "PrintAction"
- id: "task2"
actionName: "PrintAction"
dependOn: ["task1"]
- id: "task3"
actionName: "PrintAction"
dependOn: ["task2"]
Basic
Task與Task之間的通訊
由於任務都是基於 goroutine 來執行,因此任務之間的 context 是共用的,意味著你完全可以使用以下的程式碼:
func (a *UpAction) Run(ctx run.ExecuteContext, params interface{}) error {
ctx.WithValue("key", "value")
return nil
}

func (a *DownAction) Run(ctx run.ExecuteContext, params interface{}) error {
val := ctx.Context().Value("key")
return nil
}
但是注意這樣做有個弊端:當節點重啟時,如果任務尚未執行完畢,那麼這部分內容會丟失。
如果不想因為故障or升級而丟失你的更改,可以使用 ShareData 來傳遞進行通訊,ShareData 是整個 在整個 DagInstance 的生命週期都會共用的一塊資料空間,每次對它的寫入都會通過 Store 元件持久化,以確保資料不會丟失,用法如下:
func (a *UpAction) Run(ctx run.ExecuteContext, params interface{}) error {
ctx.ShareData().Set("key", "value")
return nil
}

func (a *DownAction) Run(ctx run.ExecuteContext, params interface{}) error {
val := ctx.ShareData().Get("key")
return nil
}
任務紀錄檔
fastflow 還提供了 Task 粒度的紀錄檔記錄,這些紀錄檔都會通過 Store 元件持久化,用法如下:
func (a *Action) Run(ctx run.ExecuteContext, params interface{}) error {
ctx.Trace("some message")
return nil
}
使用Dag變數
上面的文章中提到,我們可以在 Dag 中定義一些變數,在建立工作流時可以對這些變數進行賦值,比如以下的Dag,定義了一個名為 `fileName 的變數
id: "test-dag"
name: "test"
vars:
fileName:
desc: "the file name"
defaultValue: "file.txt"
隨後我們可以使用 Commander 元件來啟動一個具體的工作流:
mod.GetCommander().RunDag("test-id", map[string]string{
"fileName": "demo.txt",
})
這樣本次啟動的工作流的變數則被賦值為 demo.txt,接下來我們有兩種方式去消費它
- 帶引數的Action
id: "test-dag"
name: "test"
vars:
fileName:
desc: "the file name"
defaultValue: "file.txt"
tasks:
- id: "task1"
action: "PrintAction"
params:
# using {{var}} to consume dag's variable
fileName: "{{fileName}}"
PrintAction.go:
type PrintParams struct {
FileName string `json:"fileName"`
}

type PrintAction struct {
}

// Name define the unique action identity, it will be used by Task
func (a *PrintAction) Name() string {
return "PrintAction"
}

func (a *PrintAction) Run(ctx run.ExecuteContext, params interface{}) error {
cinput := params.(*ActionParam)

fmt.Println(fmt.Sprintf("params: file[%s]", cinput.FileName, cinput.Value))
return nil
}

func (a *PrintAction) ParameterNew() interface{} {
return &PrintParams{}
}
- 程式設計式讀取
fastflow 也提供了相關函數來獲取 Dag 變數
func (a *Action) Run(ctx run.ExecuteContext, params interface{}) error {
// get variable by name
ctx.GetVar("fileName")

// iterate variables
ctx.IterateVars(func(key, val string) (stop bool) {
...
})
return nil
}
分散式鎖
如前所述,你可以在直接使用 Keeper 模組提供的分散式鎖,如下所示:
...
mod.GetKeeper().NewMutex("mutex key").Lock(ctx.Context(),
mod.LockTTL(time.Second),
mod.Reentrant("worker-key1"))
...
其中:
LockTTL表示你持有該鎖的TTL,到期之後會自動釋放,預設30sReentrant用於需要實現可重入的分散式鎖的場景,作為持有場景的標識,預設為空,表示該鎖不可重入