滿滿乾貨!手把手教你實現基於eTS的分散式計算器
最近收到很多小夥伴反饋,想基於擴充套件的TS語言(eTS)進行HarmonyOS應用開發,但是不知道程式碼該從何處寫起,從0到1的過程讓新手們抓狂。
本期我們將帶來「分散式計算器」的開發,幫助大家瞭解宣告式開發正規化的UI描述、元件化機制、UI狀態管理、渲染控制語法等核心機制和功能。下面我們直接進入正題。
一、整體介紹
分散式計算器可以進行簡單的數值計算,並支援遠端拉起另一個計算器FA,實現兩個FA進行協同計算。
如圖1所示,分散式計算器介面主要由「鍵盤」、「顯示」及「標題列」三個模組組成。其中,「鍵盤」與「顯示」模組負責響應使用者點選並控制運算表示式及運算結果的顯示,實現了基礎的計算功能。「選單欄」模組為計算器頂部的選單欄,是分散式計算功能的入口。
那麼,如何實現分散式計算器各模組的功能?下面我們將從元件化、宣告式描述和狀態管理三個維度來解析分散式計算器的實現。
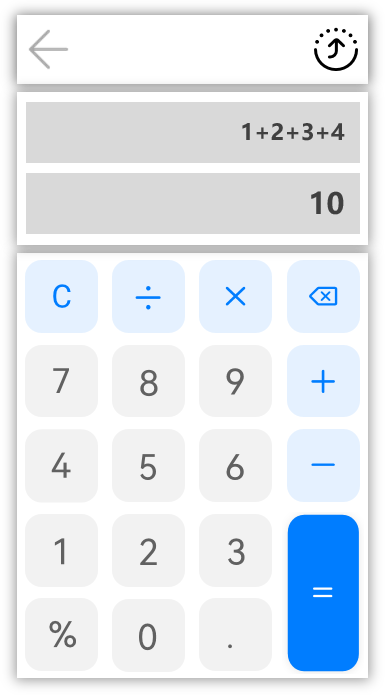 圖1 計算器介面
1. 元件化
ArkUI開發框架定義了一些具有特殊含義的元件管理裝飾器,如圖2所示:
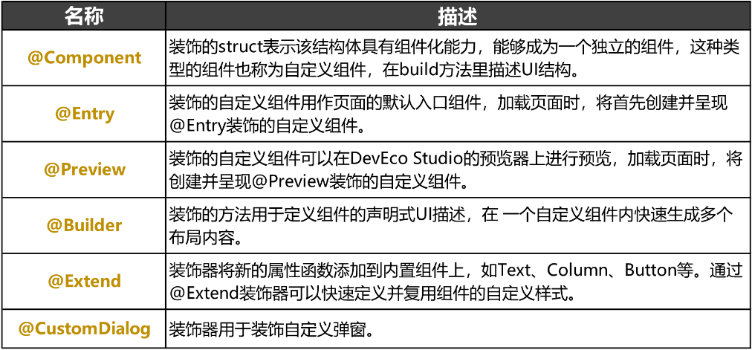 圖2 元件管理裝飾器
根據宣告式UI的元件化思想,我們可以將通過元件管理裝飾器將計算器介面上的各個模組元件化為一個個獨立的UI單元。
2. 宣告式描述
通過ArkUI開發框架提供的一系列基礎元件,如Column、Text、Divider、Button等,以宣告方式進行組合和擴充套件來對各個模組進行描述,包括引數構造設定、屬性設定、事件設定以及子元件設定等,並通過基礎的資料繫結和事件處理機制實現各個模組的邏輯互動。
3. 狀態管理
ArkUI開發框架定義了一些具有特殊含義的狀態管理裝飾器,如圖3所示:
 圖3 狀態管理裝飾器
通過狀態管理裝飾器裝飾元件擁有的狀態屬性,當裝飾的變數更改時,元件會重新渲染更新UI介面。
以上就是實現分散式計算器的核心原理,下面我們將為大家帶來分散式計算器的基礎計算功能與分散式功能的具體實現。
二、基礎計算功能的實現
上文中提到,分散式計算器的基礎計算功能由鍵盤模組及顯示模組實現。
1. 鍵盤模組
鍵盤模組響應了使用者的點選,並實現了計算器的基本功能。下面我們將介紹鍵盤佈局以及鍵盤功能的實現。
(1) 鍵盤佈局
計算器介面上的鍵盤,其實是一張張圖片按照 4*5格式排列,如圖4所示:
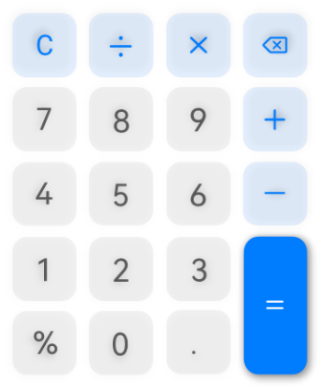 圖4 鍵盤模組
首先,我們需要將所有圖片儲存至專案的media資料夾下,並初始化為ImageList,程式碼如下:
export function obtainImgVertical(): Array<Array<ImageList>> {
  let list =
    [
      [
        { img: $r('app.media.ic_cal_seven'), value: '7' },
        { img: $r('app.media.ic_cal_eight'), value: '8' },
        { img: $r('app.media.ic_cal_nine'), value: '9' }
      ],
      [
        { img: $r('app.media.ic_cal_four'), value: '4' },
        { img: $r('app.media.ic_cal_five'), value: '5' },
        { img: $r('app.media.ic_cal_six'), value: '6' }
      ],
    ]
  return list
}
export function obtainImgV(): Array<ImageList> {
  let list =
    [
      { img: $r('app.media.ic_cal_delete'), value: '' },
      { img: $r('app.media.ic_cal_minus'), value: '-' },
      { img: $r('app.media.ic_cal_plus'), value: '+'  },
      { img: $r('app.media.ic_cal_equal'), value: '=' }
    ]
  return list
}
然後,我們需要對鍵盤模組進行元件化操作。這裡我們通過@Component裝飾器讓鍵盤模組成為一個獨立的元件。
最後,使用ArkUI開發框架提供的內建元件及屬性方法進行宣告性描述。這裡我們使用了Grid元件進行佈局,並通過ForEach元件來迭代圖片陣列實現迴圈渲染,同時還為每張圖片新增了ClickButton事件方法。程式碼如下:
@Component
export struct ButtonComponent {
  private isLand: boolean
  private onInputValue: (result) => void
  build() {
    Row() {
      Grid() {
        ForEach(obtainImgV(), (item, index) => {
          GridItem() {
            Image(item.Img)
              .margin({ top: 5 })
              .onClick(() => {
                this.onInputValue(item.value)
              })
          }
          .rowStart(index)
          .rowEnd(index === 3 ? index + 1 : index)
          .columnStart(3)
          .columnEnd(3)
        })
        ForEach(obtainImgVertical(), (item) => {
          ForEach(item, (item) => {
            GridItem() {
              Image(item.Img)
                .margin({ top: 5 })
                .onClick(() => {
                  this.onInputValue(item.value)
                })
            }
          })
        })
      }
    }
  }
}
(2) 功能實現
按鍵功能包含了「歸零」、「清除」、「計算」三個功能。
① 當用戶點選「C」按鈕後,運算表示式與運算結果「歸零」,程式碼如下:
onInputValue = (value) => {
  if (value === 'C') { // 當用戶點選C按鈕,表示式和運算結果歸0
    this.expression = ''
    this.result = ''
    return
  }
  // 輸入數位,表示式直接拼接,計算運算結果
  this.expression += value
  this.result = JSON.stringify(MATH.evaluate(this.expression))
}
② 當用戶點選「X」按鈕後,刪除運算表示式的最後一個字元。程式碼如下:
onInputValue = (value) => {
  if (value === '') { // 當用戶點選刪除按鈕,表示式刪除上一次的輸入,重新運算表示式
    this.expression = this.expression.substr(0, this.expression.length - 1)
    this.result = JSON.stringify(MATH.evaluate(this.expression))
    return
  }
  if (this.isOperator(value)) { // 當用戶輸入的是運運算元
    // 判斷表示式最後一個字元是運運算元則覆蓋上一個運運算元,否則表示式直接拼接
    if (this.isOperator(this.expression.substr(this.expression.length - 1, this.expression.length))) {
      this.expression = this.expression.substr(0, this.expression.length - 1)
      this.expression += value
    } else {
      this.expression += value
    }
    return
  }
  // 輸入數位,表示式直接拼接,計算運算結果
  this.expression += value
  this.result = JSON.stringify(MATH.evaluate(this.expression))
}
③ 當用戶點選「=」按鈕後,將呼叫JavaScript的math.js庫對錶示式進行計算。程式碼如下:
import { create, all } from 'mathjs'
onInputValue = (value) => {
  if (value === '=') { // 當用戶點選=按鈕
    this.result = ''
    // 判斷表示式最後一個字元是運運算元,運算結果需要去掉最後一個運運算元運算,否則直接運算
    if (this.isOperator(this.expression.substr(this.expression.length - 1, this.expression.length))) {
      this.expression = JSON.stringify(MATH.evaluate(this.expression.substr(0, this.expression.length - 1)))
    } else {
      this.expression = JSON.stringify(MATH.evaluate(this.expression))
    }
    return
  }
  // 輸入數位,表示式直接拼接,計算運算結果
  this.expression += value
  this.result = JSON.stringify(MATH.evaluate(this.expression))
}
注:計算功能的實現依賴於JavaScript的math.js庫,使用前需通過npm install mathjs--save命令下載並安裝math.js庫。
2. 顯示模組
顯示模組實現了「鍵入的運算表示式」與「運算結果」的顯示,本質上是Text文字,如圖5所示:
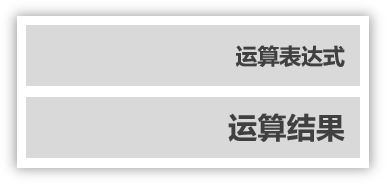 圖5 顯示模組
首先我們通過@Component裝飾器使該模組具有元件化能力,然後在build方法裡描述UI結構,最後使用@Link狀態裝飾器管理元件內部的狀態資料,當這些狀態資料被修改時,將會呼叫所在元件的build方法進行UI重新整理。程式碼如下:
@Component
export struct InPutComponent {
  private isLand: boolean
  @Link result: string
  @Link expression: string
  build() {
    Stack({ alignContent: this.isLand ? Alignment.BottomStart : Alignment.TopEnd }) {
      Column() {
        //運算表示式文字方塊
        Scroll() {
          Text(this.expression)
            .maxLines(1)
            .opacity(0.9)
            .fontWeight(400)
            .textAlign(TextAlign.Start)
            .fontSize(this.isLand ? 50 : 35)
        }
        .width('90%')
        .scrollable(ScrollDirection.Horizontal)
        .align(this.isLand ? Alignment.Start : Alignment.End)
        //運算結果文字方塊
        Scroll() {
          Text(this.result)
            .maxLines(1)
            .opacity(0.38)
            .textAlign(TextAlign.Start)
            .fontSize(this.isLand ? 45 : 30)
            .margin(this.isLand ? { bottom: 64 } : {})
        }
      }
    }
  }
}
至此,一個初具計算功能的計算器就實現了。下面我們將實現計算器的分散式功能。
三、分散式功能的實現
計算器的分散式功能以選單欄模組為入口,並基於分散式裝置管理與分散式資料管理技術實現。
1. 選單欄模組
「選單欄」模組為計算器頂部選單欄,是計算器分散式功能的入口。
 圖6 選單欄模組
如圖6所示,當用戶點選圖示 時,執行terminate()方法,退出計算器應用。當用戶點選 按鈕時,執行showDialog()方法,介面上彈出的分散式裝置列表彈窗,選擇裝置後將獲取分散式資料管理的許可權,最後實現遠端裝置的拉起。程式碼如下:
@Component
export struct TitleBar {
  build() {
    Row() {
      Image($r("app.media.ic_back"))
        .height('60%')
        .margin({ left: 32 })
        .width(this.isLand ? '5%' : '8%')
        .objectFit(ImageFit.Contain)
        //執行terminate()方法,退出計算器應用
        .onClick(() => {
          app.terminate()
        })
      Blank().layoutWeight(1)
      Image($r("app.media.ic_hop"))
        .height('60%')
        .margin({ right: 32 })
        .width(this.isLand ? '5%' : '8%')
        .objectFit(ImageFit.Contain)
        //執行showDialog()方法,介面上彈出的分散式裝置列表彈窗
        .onClick(() => {
          this.showDiainfo()
        })
    }
    .width('100%')
    .height(this.isLand ? '10%' : '8%')
    .constraintSize({ minHeight: 50 })
    .alignItems(VerticalAlign.Center)
  }
}
2. 分散式裝置管理
在分散式計算器應用中,分散式裝置管理包含了分散式裝置搜尋、分散式裝置列表彈窗、遠端裝置拉起三部分。首先在分散式組網內搜尋裝置,然後把裝置展示到分散式裝置列表彈窗中,最後根據使用者的選擇拉起遠端裝置。
(1) 分散式裝置搜尋
通過SUBSCRIBE_ID搜尋分散式組網內的遠端裝置,程式碼如下:
startDeviceDiscovery() {
  SUBSCRIBE_ID = Math.floor(65536 * Math.random())
  let info = {
    subscribeId: SUBSCRIBE_ID,
    mode: 0xAA,
    medium: 2,
    freq: 2,
    isSameAccount: false,
    isWakeRemote: true,
    capability: 0
  }
  Logger.info(TAG, `startDeviceDiscovery ${SUBSCRIBE_ID}`)
  this.deviceManager.startDeviceDiscovery(info)
}
(2) 分散式裝置列表彈窗
分散式裝置列表彈窗實現了遠端裝置的選擇,如圖7所示,使用者可以根據裝置名稱選擇相應的裝置進行協同計算。
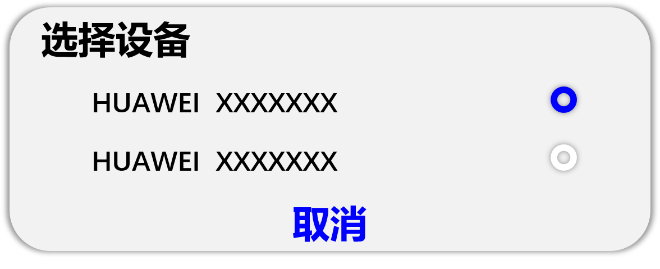 圖7 分散式裝置列表彈窗
這裡我們使用@CustomDialog裝飾器來裝飾分散式裝置列表彈窗,程式碼如下:
@CustomDialog
export struct DeviceDialog {
  build() {
    Column() {
      List() {
        ForEach(this.deviceList, (item, index) => {
          ListItem() {
            Row() {
              Text(item.deviceName)
                .fontSize(21)
                .width('90%')
                .fontColor(Color.Black)
              Image(index === this.selectedIndex ? $r('app.media.checked') : $r('app.media.uncheck'))
                .width('8%')
                .objectFit(ImageFit.Contain)
            }
            .height(55)
            .margin({ top: 17 })
            .onClick(() => {
                if (index === this.selectedIndex) {
                return
              }
              this.selectedIndex = index
              this.onSelectedIndexChange(this.selectedIndex)
            })
          }
        }, item => item.deviceName)
      }
    }
  }
}
(3) 遠端裝置拉起
通過startAbility(deviceId)方法拉起遠端裝置的FA,程式碼如下:
startAbility(deviceId) {
  featureAbility.startAbility({
    want: {
      bundleName: 'ohos.samples.DistributeCalc',
      abilityName: 'ohos.samples.DistributeCalc.MainAbility',
      deviceId: deviceId,
      parameters: {
        isFA: 'FA'
      }
    }
  }).then((data) => {
    this.startAbilityCallBack(DATA_CHANGE)
  })
}
3. 分散式資料管理
分散式資料管理用於實現協同計算時資料在多端裝置之間的相互同步。我們需要建立一個分散式資料庫來儲存協同計算時資料,並通過分散式資料通訊進行同步。
(1) 管理分散式資料庫
建立一個KVManager物件範例,用於管理分散式資料庫物件。程式碼如下:
async createKvStore(callback) {
  //建立一個KVManager物件範例
  this.kvManager = await distributedData.createKVManager(config)
  let options = {
    createIfMissing: true,
    encrypt: false,
    backup: false,
    autoSync: true,
    kvStoreType: 1,
    securityLevel: 1,
  }
  // 通過指定Options和storeId,建立並獲取KVStore資料庫,並通過Promise方式返回,此方法為非同步方法。
  this.kvStore = await this.kvManager.getKVStore(STORE_ID, options)
  callback()
}
(2) 訂閱分散式資料變化
通過訂閱分散式資料庫所有(本地及遠端)資料變化實現資料協同,程式碼如下:
kvStoreModel.setOnMessageReceivedListener(DATA_CHANGE, (value) => {
  if (this.isDistributed) {
    if (value.search(EXIT) != -1) {
      Logger.info(TAG, `EXIT ${EXIT}`)
      featureAbility.terminateSelf((error) => {
        Logger.error(TAG, `terminateSelf finished, error= ${error}`)
      });
    } else {
      this.expression = value
      if (this.isOperator(this.expression.substr(this.expression.length - 1, this.expression.length))) {
        this.result = JSON.stringify(MATH.evaluate(this.expression.substr(0, this.expression.length - 1)))
      } else {
        this.result = JSON.stringify(MATH.evaluate(this.expression))
      }
    }
  }
})
至此,具有分散式能力的計算器就實現了。期待廣大開發者能基於TS擴充套件的宣告式開發正規化開發出更多有趣的應用。
點選連結,可獲取分散式計算器完整程式碼:https://gitee.com/openharmony/app_samples/tree/master/Preset/DistributeCalc
