大檔案怎麼快速上傳?來看看我的實現方法吧!
本文只介紹資源分塊上傳的方式,並且會通過 前端( + vite) 和 伺服器端( + koa2) 互動的方式,實現大檔案分塊上傳的簡單功能。
梳理思路
問題 1:誰負責資源分塊?誰負責資源整合?
當然這個問題也很簡單,肯定是前端負責分塊,伺服器端負責整合。
問題 2:前端怎麼對資源進行分塊?
首先是選擇上傳的檔案資源,接著就可以得到對應的檔案物件 File,而 File.prototype.slice 方法可以實現資源的分塊,當然也有人說是 Blob.prototype.slice 方法,因為 Blob.prototype.slice === File.prototype.slice。
問題 3:伺服器端怎麼知道什麼時候要整合資源?如何保證資源整合的有序性?
由於前端會將資源分塊,然後單獨傳送請求,也就是說,原來 1 個檔案對應 1 個上傳請求,現在可能會變成 1 個檔案對應 n 個上傳請求,所以前端可以基於 Promise.all 將這多個介面整合,上傳完成在傳送一個合併的請求,通知伺服器端進行合併。
合併時可通過 nodejs 中的讀寫流(readStream/writeStream),將所有切片的流通過管道(pipe)輸入最終檔案的流中。
在傳送請求資源時,前端會定好每個檔案對應的序號,並將當前分塊、序號以及檔案 hash 等資訊一起傳送給伺服器端,伺服器端在進行合併時,通過序號進行依次合併即可。
問題 4:如果某個分塊的上傳請求失敗了,怎麼辦?
一旦伺服器端某個上傳請求失敗,會返回當前分塊失敗的資訊,其中會包含檔名稱、檔案 hash、分塊大小以及分塊序號等,前端拿到這些資訊後可以進行重傳,同時考慮此時是否需要將 Promise.all 替換為 Promise.allSettled 更方便。
前端部分
建立專案
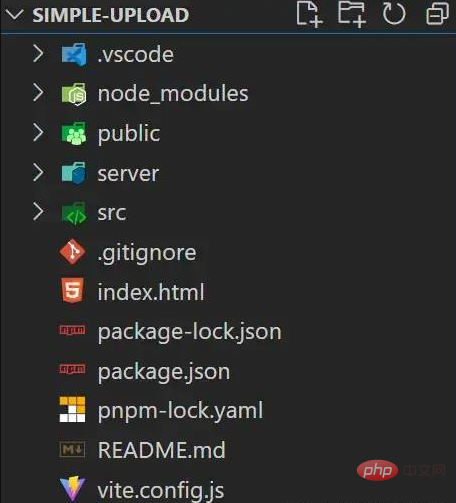
通過 pnpm create vite 建立專案,對應檔案目錄如下.
請求模組
src/request.js
該檔案就是針對 axios 進行簡單的封裝,如下:
import axios from "axios";
const baseURL = 'http://localhost:3001';
export const uploadFile = (url, formData, onUploadProgress = () => { }) => {
  return axios({
    method: 'post',
    url,
    baseURL,
    headers: {
      'Content-Type': 'multipart/form-data'
    },
    data: formData,
    onUploadProgress
  });
}
export const mergeChunks = (url, data) => {
  return axios({
    method: 'post',
    url,
    baseURL,
    headers: {
      'Content-Type': 'application/json'
    },
    data
  });
}
檔案資源分塊
根據 DefualtChunkSize = 5 * 1024 * 1024 ,即 5 MB ,來對檔案進行資源分塊進行計算,通過 spark-md5[1] 根據檔案內容計算出檔案的 hash 值,方便做其他優化,比如:當 hash 值不變時,伺服器端沒有必要重複讀寫檔案等。
// 獲取檔案分塊
const getFileChunk = (file, chunkSize = DefualtChunkSize) => {
  return new Promise((resovle) => {
    let blobSlice = File.prototype.slice || File.prototype.mozSlice || File.prototype.webkitSlice,
      chunks = Math.ceil(file.size / chunkSize),
      currentChunk = 0,
      spark = new SparkMD5.ArrayBuffer(),
      fileReader = new FileReader();
    fileReader.onload = function (e) {
      console.log('read chunk nr', currentChunk + 1, 'of');
      const chunk = e.target.result;
      spark.append(chunk);
      currentChunk++;
      if (currentChunk < chunks) {
        loadNext();
      } else {
        let fileHash = spark.end();
        console.info('finished computed hash', fileHash);
        resovle({ fileHash });
      }
    };
    fileReader.onerror = function () {
      console.warn('oops, something went wrong.');
    };
    function loadNext() {
      let start = currentChunk * chunkSize,
        end = ((start + chunkSize) >= file.size) ? file.size : start + chunkSize;
      let chunk = blobSlice.call(file, start, end);
      fileChunkList.value.push({ chunk, size: chunk.size, name: currFile.value.name });
      fileReader.readAsArrayBuffer(chunk);
    }
    loadNext();
  });
}
傳送上傳請求和合並請求
通過 Promise.all 方法整合所以分塊的上傳請求,在所有分塊資源上傳完畢後,在 then 中傳送合併請求。
// 上傳請求
const uploadChunks = (fileHash) => {
  const requests = fileChunkList.value.map((item, index) => {
    const formData = new FormData();
    formData.append(`${currFile.value.name}-${fileHash}-${index}`, item.chunk);
    formData.append("filename", currFile.value.name);
    formData.append("hash", `${fileHash}-${index}`);
    formData.append("fileHash", fileHash);
    return uploadFile('/upload', formData, onUploadProgress(item));
  });
  Promise.all(requests).then(() => {
    mergeChunks('/mergeChunks', { size: DefualtChunkSize, filename: currFile.value.name });
  });
}
進度條資料
分塊進度資料利用 axios 中的 onUploadProgress 設定項獲取資料,通過使用computed 根據分塊進度資料的變化自動自動計算當前檔案的總進度。
// 總進度條
const totalPercentage = computed(() => {
  if (!fileChunkList.value.length) return 0;
  const loaded = fileChunkList.value
    .map(item => item.size * item.percentage)
    .reduce((curr, next) => curr + next);
  return parseInt((loaded / currFile.value.size).toFixed(2));
})
// 分塊進度條
const onUploadProgress = (item) => (e) => {
  item.percentage = parseInt(String((e.loaded / e.total) * 100));
}
伺服器端部分
搭建服務
使用 koa2 搭建簡單的服務,埠為 3001
使用 koa-body 處理接收前端傳遞
'Content-Type': 'multipart/form-data'型別的資料使用 koa-router 註冊伺服器端路由
使用 koa2-cors 處理跨域問題
目錄/檔案劃分
server/server.js
該檔案是伺服器端具體的程式碼實現,用於處理接收和整合分塊資源。
server/resources
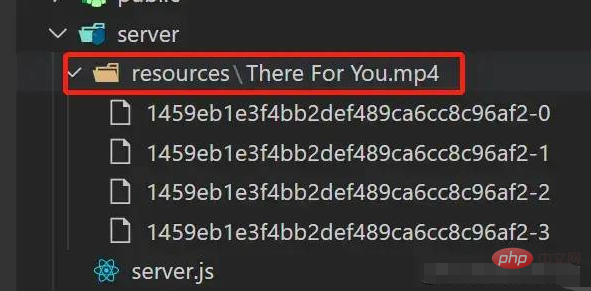
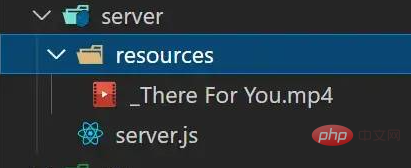
該目錄是用於存放單檔案的多個分塊,以及最後分塊整合後的資源:
分塊資源未合併時,會在該目錄下以當前檔名建立一個目錄,用於存放這個該檔案相關的所有分塊
分塊資源需合併時,會讀取這個檔案對應的目錄下的所有分塊資源,然後將它們整合成原檔案
分塊資源合併完成,會刪除這個對應的檔案目錄,只保留合併後的原檔案,生成的檔名比真實檔名多一個
_字首,如原檔名 "測試檔案.txt" 對應合併後的檔名 "_測試檔案.txt"
接收分塊
使用 koa-body 中的 formidable 設定中的 onFileBegin 函數處理前端傳來的 FormData 中的檔案資源,在前端處理對應分塊名時的格式為:filename-fileHash-index,所以這裡直接將分塊名拆分即可獲得對應的資訊。
// 上傳請求
router.post(
  '/upload',
  // 處理檔案 form-data 資料
  koaBody({
    multipart: true,
    formidable: {
      uploadDir: outputPath,
      onFileBegin: (name, file) => {
        const [filename, fileHash, index] = name.split('-');
        const dir = path.join(outputPath, filename);
        // 儲存當前 chunk 資訊,發生錯誤時進行返回
        currChunk = {
          filename,
          fileHash,
          index
        };
        // 檢查資料夾是否存在如果不存在則新建資料夾
        if (!fs.existsSync(dir)) {
          fs.mkdirSync(dir);
        }
        // 覆蓋檔案存放的完整路徑
        file.path = `${dir}/${fileHash}-${index}`;
      },
      onError: (error) => {
        app.status = 400;
        app.body = { code: 400, msg: "上傳失敗", data: currChunk };
        return;
      },
    },
  }),
  // 處理響應
  async (ctx) => {
    ctx.set("Content-Type", "application/json");
    ctx.body = JSON.stringify({
      code: 2000,
      message: 'upload successfully!'
    });
  });
整合分塊
通過檔名找到對應檔案分塊目錄,使用 fs.readdirSync(chunkDir) 方法獲取對應目錄下所以分塊的命名,在通過 fs.createWriteStream/fs.createReadStream 建立可寫/可讀流,結合管道 pipe 將流整合在同一檔案中,合併完成後通過 fs.rmdirSync(chunkDir) 刪除對應分塊目錄。
// 合併請求
router.post('/mergeChunks', async (ctx) => {
  const { filename, size } = ctx.request.body;
  // 合併 chunks
  await mergeFileChunk(path.join(outputPath, '_' + filename), filename, size);
  // 處理響應
  ctx.set("Content-Type", "application/json");
  ctx.body = JSON.stringify({
    data: {
      code: 2000,
      filename,
      size
    },
    message: 'merge chunks successful!'
  });
});
// 通過管道處理流
const pipeStream = (path, writeStream) => {
  return new Promise(resolve => {
    const readStream = fs.createReadStream(path);
    readStream.pipe(writeStream);
    readStream.on("end", () => {
      fs.unlinkSync(path);
      resolve();
    });
  });
}
// 合併切片
const mergeFileChunk = async (filePath, filename, size) => {
  const chunkDir = path.join(outputPath, filename);
  const chunkPaths = fs.readdirSync(chunkDir);
  if (!chunkPaths.length) return;
  // 根據切片下標進行排序,否則直接讀取目錄的獲得的順序可能會錯亂
  chunkPaths.sort((a, b) => a.split("-")[1] - b.split("-")[1]);
  console.log("chunkPaths = ", chunkPaths);
  await Promise.all(
    chunkPaths.map((chunkPath, index) =>
      pipeStream(
        path.resolve(chunkDir, chunkPath),
        // 指定位置建立可寫流
        fs.createWriteStream(filePath, {
          start: index * size,
          end: (index + 1) * size
        })
      )
    )
  );
  // 合併後刪除儲存切片的目錄
  fs.rmdirSync(chunkDir);
};
前端 & 伺服器端 互動
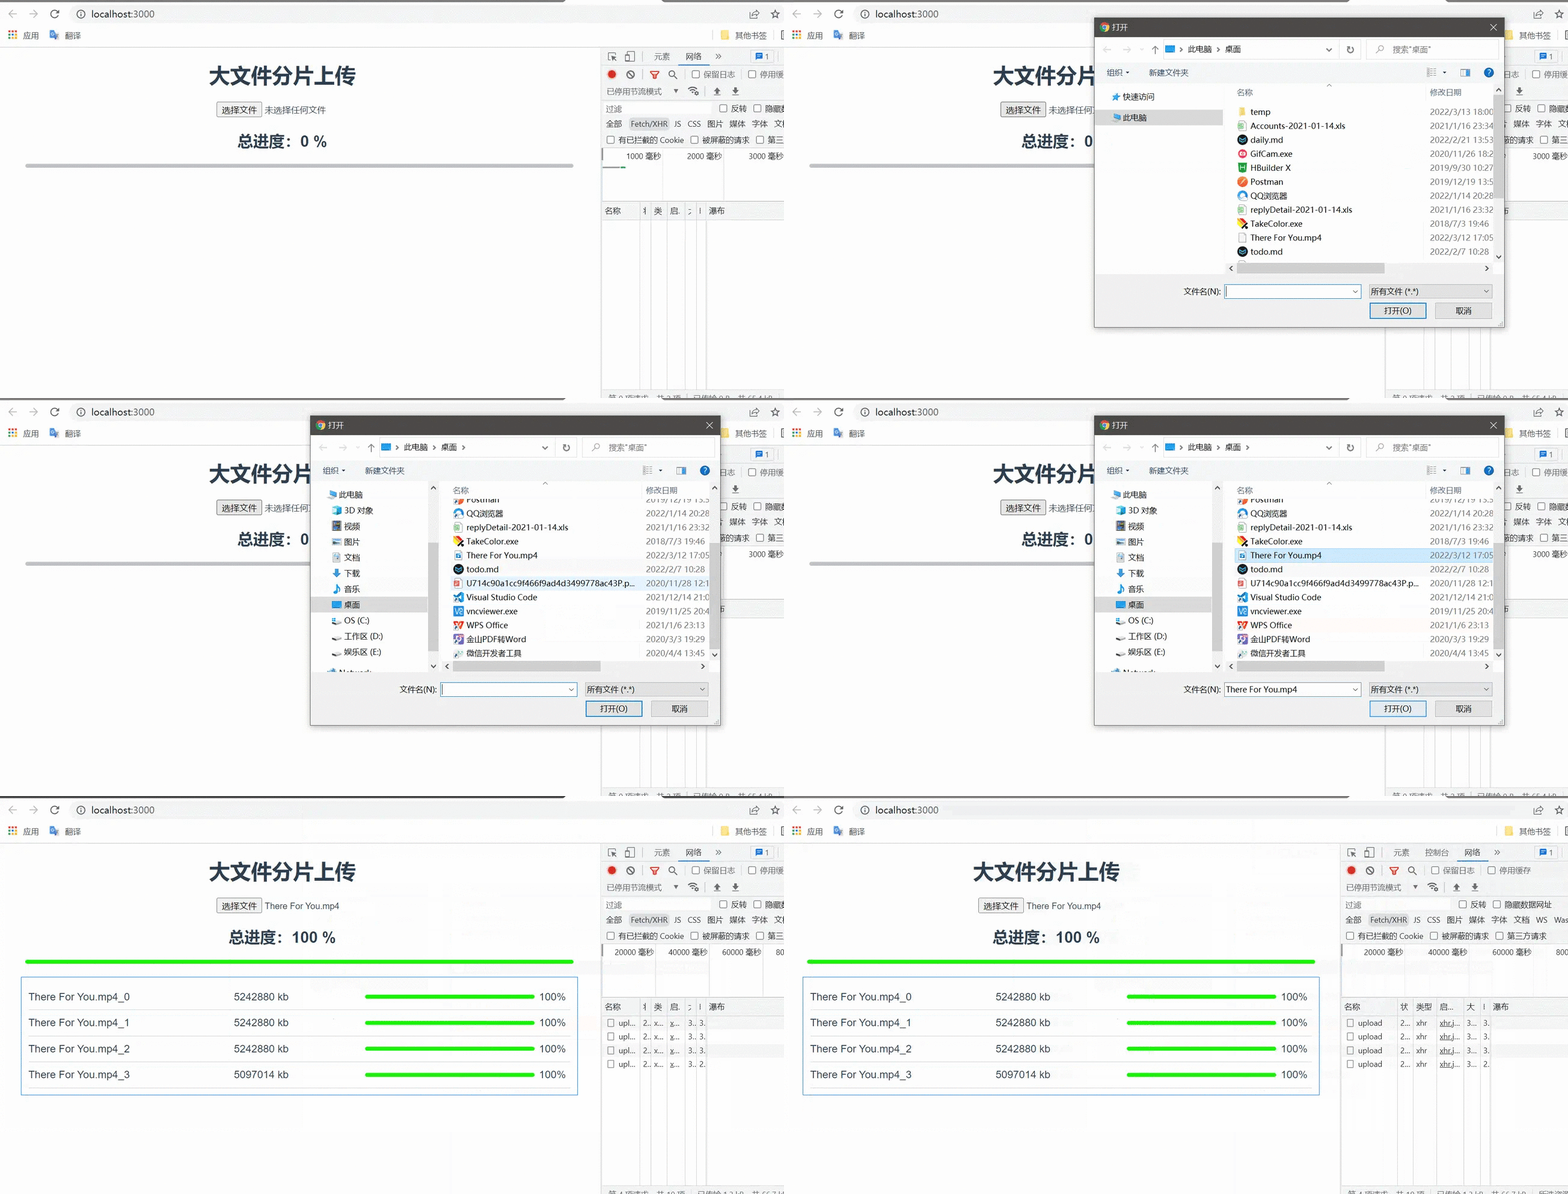
前端分塊上傳
測試檔案資訊:
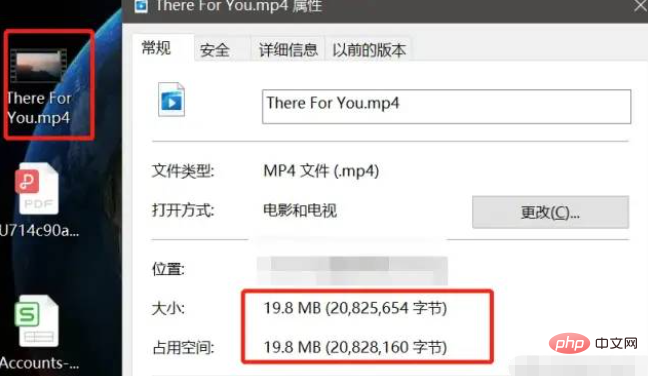
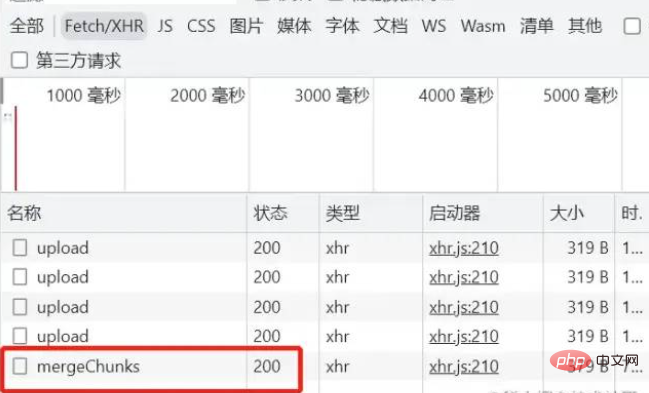
選擇檔案型別為 19.8MB,而且上面設定預設分塊大小為 5MB ,於是應該要分成 4 個分塊,即 4 個請求。
伺服器端分塊接收
前端傳送合併請求
伺服器端合併分塊
擴充套件 —— 斷點續傳 & 秒傳
有了上面的核心邏輯之後,要實現斷點續傳和秒傳的功能,只需要在取擴充套件即可,這裡不再給出具體實現,只列出一些思路。
斷點續傳
斷點續傳其實就是讓請求可中斷,然後在接著上次中斷的位置繼續傳送,此時要儲存每個請求的範例物件,以便後期取消對應請求,並將取消的請求儲存或者記錄原始分塊列表取消位置資訊等,以便後期重新發起請求。
取消請求的幾種方式:
如果使用原生 XHR 可使用
(new XMLHttpRequest()).abort()取消請求如果使用 axios 可使用
new CancelToken(function (cancel) {})取消請求如果使用 fetch 可使用
(new AbortController()).abort()取消請求
秒傳
不要被這個名字給誤導了,其實所謂的秒傳就是不用傳,在正式發起上傳請求時,先發起一個檢查請求,這個請求會攜帶對應的檔案 hash 給伺服器端,伺服器端負責查詢是否存在一模一樣的檔案 hash,如果存在此時直接複用這個檔案資源即可,不需要前端在發起額外的上傳請求。
最後
前端分片上傳的內容單純從理論上來看其實還是容易理解的,但是實際自己去實現的時候還是會踩一些坑,比如伺服器端接收解析 formData 格式的資料時,沒法獲取檔案的二進位制資料等。
更多程式設計相關知識,請存取:!!