怎麼上手Vue全新狀態管理Pinia,看看這篇文章吧!

Vuex 作為一個老牌 Vue 狀態管理庫,大家都很熟悉了
Pinia 是 Vue.js 團隊成員專門為 Vue 開發的一個全新的狀態管理庫,並且已經被納入官方 github
為什麼有 Vuex 了還要再開發一個 Pinia ?
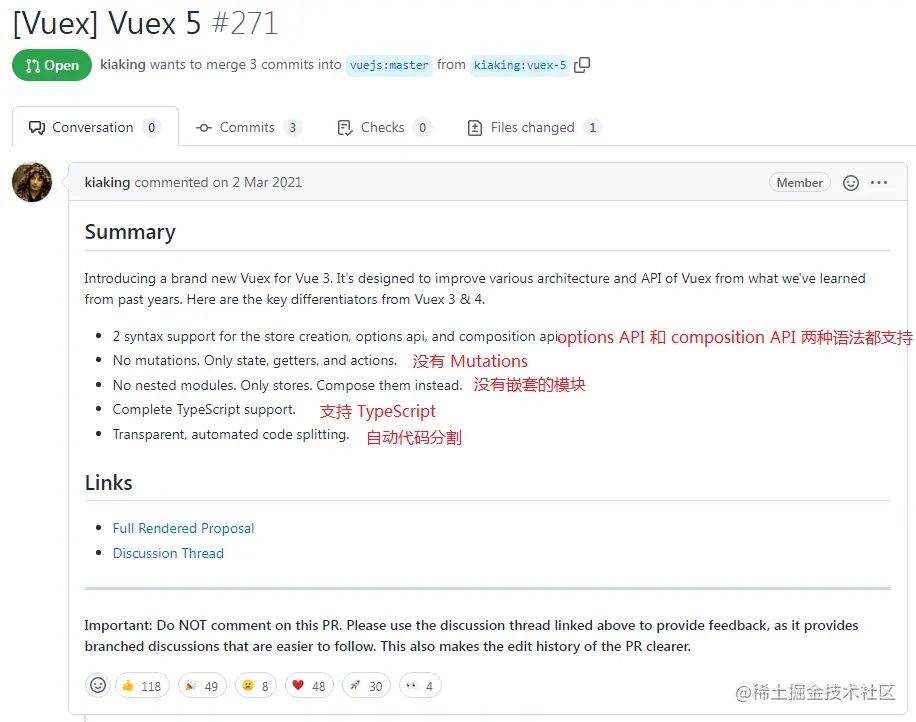
先來一張圖,看下當時對於 Vuex5 的提案,就是下一代 Vuex5 應該是什麼樣子的。【相關推薦:】

Pinia 就是完整的符合了他當時 Vuex5 提案所提到的功能點,所以可以說 Pinia 就是 Vuex5 也不為過,因為它的作者就是官方的開發人員,並且已經被官方接管了,只是目前 Vuex 和 Pinia 還是兩個獨立的倉庫,以後可能會合並,也可能獨立發展,只是官方肯定推薦的是 Pinia
因為在 Vue3 中使用 Vuex 的話需要使用 Vuex4,還只能作為一個過渡的選擇,存在很大缺陷,所以在 Componsition API 誕生之後,也就設計了全新的狀態管理 Pinia
Pinia 和 Vuex
Vuex: State、Gettes、Mutations(同步)、Actions(非同步)
Pinia: State、Gettes、Actions(同步非同步都支援)
Vuex 當前最新版是 4.x
- Vuex4 用於 Vue3
- Vuex3 用於 Vue2
Pinia 當前最新版是 2.x
- 即支援 Vue2 也支援 Vue3
就目前而言 Pinia 比 Vuex 好太多了,解決了 Vuex 的很多問題,所以筆者也非常建議直接使用 Pinia,尤其是 TypeScript 的專案
Pinia 核心特性
- Pinia 沒有
Mutations Actions支援同步和非同步- 沒有模組的巢狀結構
- Pinia 通過設計提供扁平結構,就是說每個 store 都是互相獨立的,誰也不屬於誰,也就是扁平化了,更好的程式碼分割且沒有名稱空間。當然你也可以通過在一個模組中匯入另一個模組來隱式巢狀 store,甚至可以擁有 store 的迴圈依賴關係
- 更好的
TypeScript支援- 不需要再建立自定義的複雜包裝器來支援 TypeScript 所有內容都型別化,並且 API 的設計方式也儘可能的使用 TS 型別推斷
- 不需要注入、匯入函數、呼叫它們,享受自動補全,讓我們開發更加方便
- 無需手動新增 store,它的模組預設情況下建立就自動註冊的
- Vue2 和 Vue3 都支援
- 除了初始化安裝和SSR設定之外,兩者使用上的API都是相同的
- 支援
Vue DevTools- 跟蹤 actions, mutations 的時間線
- 在使用了模組的元件中就可以觀察到模組本身
- 支援 time-travel 更容易偵錯
- 在 Vue2 中 Pinia 會使用 Vuex 的所有介面,所以它倆不能一起使用
- 但是針對 Vue3 的偵錯工具支援還不夠完美,比如還沒有 time-travel 功能
- 模組熱更新
- 無需重新載入頁面就可以修改模組
- 熱更新的時候會保持任何現有狀態
- 支援使用外掛擴充套件 Pinia 功能
- 支援伺服器端渲染
Pinia 使用
以 Vue3 + TypeScript 為例
安裝
npm install pinia
main.ts 初始化設定
import { createPinia } from 'pinia'createApp(App).use(createPinia()).mount('#app')在 store 目錄下建立一個 user.ts 為例,我們先定義並匯出一個名為 user 的模組
import { defineStore } from 'pinia'
export const userStore = defineStore('user', {
    state: () => {
        return {
            count: 1,
            arr: []
        }
    },
    getters: { ... },
    actions: { ... }
})
defineStore 接收兩個引數
第一個引數就是模組的名稱,必須是唯一的,多個模組不能重名,Pinia 會把所有的模組都掛載到根容器上
第二個引數是一個物件,裡面的選項和 Vuex 差不多
- 其中
state用來儲存全域性狀態,它必須是箭頭函數,為了在伺服器端渲染的時候避免交叉請求導致的資料狀態汙染所以只能是函數,而必須用箭頭函數則為了更好的 TS 型別推導 getters就是用來封裝計算屬性,它有快取的功能actions就是用來封裝業務邏輯,修改 state
存取 state
比如我們要在頁面中存取 state 裡的屬性 count
由於 defineStore 會返回一個函數,所以要先呼叫拿到資料物件,然後就可以在模板中直接使用了
<template>
    <div>{{ user_store.count }}</div>
</template>
<script setup>
import { userStore } from '../store'
const user_store = userStore()
// 解構
// const { count } = userStore()
</script>比如像註釋中的解構出來使用,是完全沒有問題的,只是注意了,這樣拿到的資料不是響應式的,如果要解構還保持響應式就要用到一個方法 storeToRefs(),範例如下
<template>
    <div>{{ count }}</div>
</template>
<script setup>
import { storeToRefs } from 'pinia'
import { userStore } from '../store'
const { count } = storeToRefs(userStore)
</script>
原因就是 Pinia 其實是把 state 資料都做了 reactive 處理,和 Vue3 的 reactive 同理,解構出來的也不是響應式,所以需要再做 ref 響應式代理
getters
這個和 Vuex 的 getters 一樣,也有快取功能。如下在頁面中多次使用,第一次會呼叫 getters,資料沒有改變的情況下之後會讀取快取
<template>
    <div>{{ myCount }}</div>
    <div>{{ myCount }}</div>
    <div>{{ myCount }}</div>
</template>
注意兩種方法的區別,寫在註釋裡了
getters: {
    // 方法一,接收一個可選引數 state
    myCount(state){
        console.log('呼叫了') // 頁面中使用了三次,這裡只會執行一次,然後快取起來了
        return state.count + 1
    },
    // 方法二,不傳引數,使用 this
    // 但是必須指定函數返回值的型別,否則型別推導不出來
    myCount(): number{
        return this.count + 1
    }
}
更新和 actions
更新 state 裡的資料有四種方法,我們先看三種簡單的更新,說明都寫在註釋裡了
<template>
    <div>{{ user_store.count }}</div>
    <button @click="handleClick">按鈕</button>
</template>
<script setup>
import { userStore } from '../store'
const user_store = userStore()
const handleClick = () => {
    // 方法一
    user_store.count++

    // 方法二,需要修改多個資料,建議用 $patch 批次更新,傳入一個物件
    user_store.$patch({
        count: user_store.count1++,
        // arr: user_store.arr.push(1) // 錯誤
        arr: [ ...user_store.arr, 1 ] // 可以,但是還得把整個陣列都拿出來解構,就沒必要
    })

    // 使用 $patch 效能更優,因為多個資料更新只會更新一次檢視

    // 方法三,還是$patch,傳入函數,第一個引數就是 state
    user_store.$patch( state => {
        state.count++
        state.arr.push(1)
    })
}
</script>
第四種方法就是當邏輯比較多或者請求的時候,我們就可以封裝到範例中 store/user.ts 裡的 actions 裡
可以傳引數,也可以通過 this.xx 可以直接獲取到 state 裡的資料,需要注意的是不能用箭頭函數定義 actions,不然就會繫結外部的 this 了
actions: {
    changeState(num: number){ // 不能用箭頭函數
        this.count += num
    }
}
呼叫
const handleClick = () => {
    user_store.changeState(1)
}
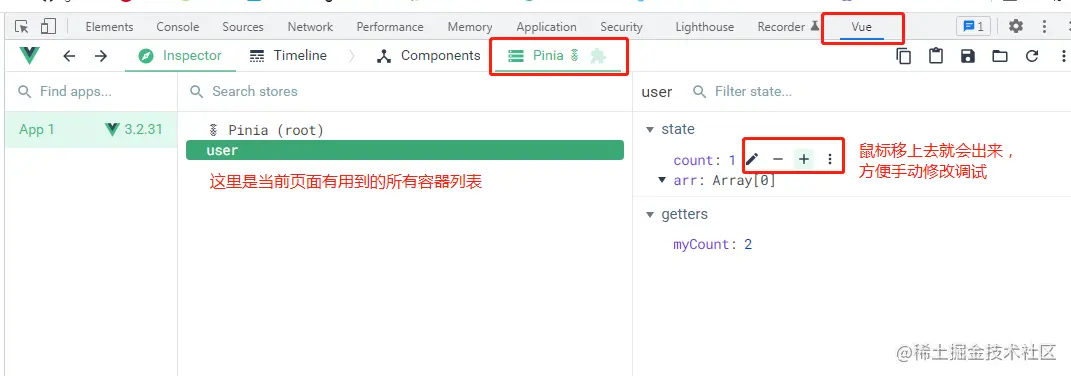
支援 VueDevtools
開啟開發者工具的 Vue Devtools 就會發現 Pinia,而且可以手動修改資料偵錯,非常方便

模擬呼叫介面
範例:
我們先定義範例介面 api/user.ts
// 介面資料型別
export interface userListType{
    id: number
    name: string
    age: number
}
// 模擬請求介面返回的資料
const userList = [
    { id: 1, name: '張三', age: 18 },
    { id: 2, name: '李四', age: 19 },
]
// 封裝模擬非同步效果的定時器
async function wait(delay: number){
    return new Promise((resolve) => setTimeout(resolve, delay))
}
// 介面
export const getUserList = async () => {
    await wait(100) // 延遲100毫秒返回
    return userList
}
然後在 store/user.ts 裡的 actions 封裝呼叫介面
import { defineStore } from 'pinia'
import { getUserList, userListType } from '../api/user'
export const userStore = defineStore('user', {
    state: () => {
        return {
            // 使用者列表
            list: [] as userListType // 型別轉換成 userListType
        }
    },
    actions: {
        async loadUserList(){
            const list = await getUserList()
            this.list = list
        }
    }
})
頁面中呼叫 actions 發起請求
<template>
    <ul>
        <li v-for="item in user_store.list"> ... </li>
    </ul>
</template>
<script setup>
import { userStore } from '../store'
const user_store = userStore()
user_store.loadUserList() // 載入所有資料
</script>
跨模組修改資料
在一個模組的 actions 裡需要修改另一個模組的 state 資料
範例:比如在 chat 模組裡修改 user 模組裡某個使用者的名稱
// chat.ts
import { defineStore } from 'pinia'
import { userStore } from './user'
export const chatStore = defineStore('chat', {
    actions: {
        someMethod(userItem){
            userItem.name = '新的名字'
            const user_store = userStore()
            user_store.updateUserName(userItem)
        }
    }
})
user 模組裡
// user.ts
import { defineStore } from 'pinia'
export const userStore = defineStore('user', {
    state: () => {
        return {
            list: []
        }
    },
    actions: {
        updateUserName(userItem){
            const user = this.list.find(item => item.id === userItem.id)
            if(user){
                user.name = userItem.name
            }
        }
    }
})
(學習視訊分享:、)
以上就是怎麼上手Vue全新狀態管理Pinia,看看這篇文章吧!的詳細內容,更多請關注TW511.COM其它相關文章!