什麼是流?深入瞭解Node.js中的可讀流

1. 基本概念
1.1. 流的歷史演變
流不是 特有的概念。 它們是幾十年前在 Unix 作業系統中引入的,程式可以通過管道運運算元(|)對流進行相互互動。
在基於Unix系統的MacOS以及Linux中都可以使用管道運運算元(|),他可以將運運算元左側程序的輸出轉換成右側的輸入。
在Node中,我們使用傳統的readFile去讀取檔案的話,會將檔案從頭到尾都讀到記憶體中,當所有內容都被讀取完畢之後才會對載入到記憶體中的檔案內容進行統一處理。
這樣做會有兩個缺點:
記憶體方面:佔用大量記憶體
時間方面:需要等待資料的整個有效負載都載入完才會開始處理資料
為了解決上述問題,Node.js效仿並實現了流的概念,在Node.js流中,一共有四種型別的流,他們都是Node.js中EventEmitter的範例:
可讀流(Readable Stream)
可寫流(Writable Stream)
可讀可寫全雙工流(Duplex Stream)
轉換流(Transform Stream)
為了深入學習這部分的內容,循序漸進的理解Node.js中流的概念,並且由於原始碼部分較為複雜,本人決定先從可讀流開始學習這部分內容。
1.2. 什麼是流(Stream)
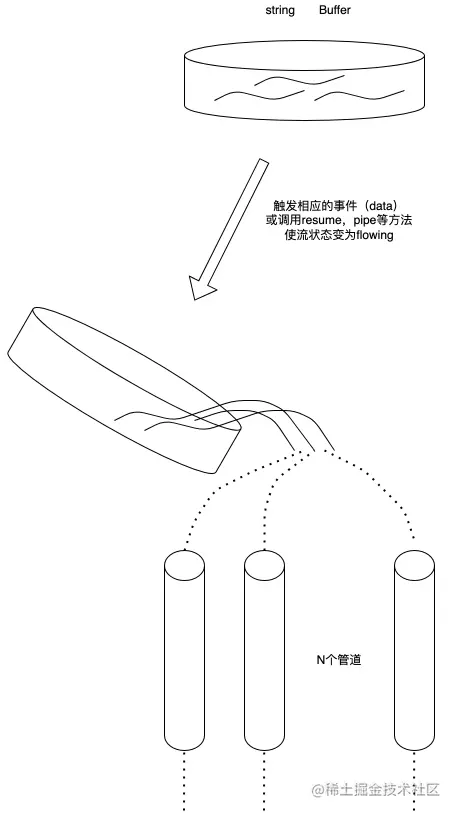
流是一種抽象的資料結構,是資料的集合,其中儲存的資料型別只能為以下型別(僅針對objectMode === false的情況):
- string
- Buffer
我們可以把流看作這些資料的集合,就像液體一樣,我們先把這些液體儲存在一個容器裡(流的內部緩衝區BufferList),等到相應的事件觸發的時候,我們再把裡面的液體倒進管道里,並通知其他人在管道的另一側拿自己的容器來接裡面的液體進行處理。
1.3. 什麼是可讀流(Readable Stream)
可讀流是流的一種型別,他有兩種模式三種狀態
兩種讀取模式:
流動模式:資料會從底層系統讀取,並通過EventEmitter儘快的將資料傳遞給所註冊的事件處理程式中
暫停模式:在這種模式下將不會讀取資料,必須顯示的呼叫Stream.read()方法來從流中讀取資料
三種狀態:
readableFlowing === null:不會產生資料,呼叫Stream.pipe()、Stream.resume會使其狀態變為true,開始產生資料並主動觸發事件
readableFlowing === false:此時會暫停資料的流動,但不會暫停資料的生成,因此會產生資料積壓
readableFlowing === true:正常產生和消耗資料
2. 基本原理
2.1. 內部狀態定義(ReadableState)
ReadableState
_readableState: ReadableState {
  objectMode: false, // 操作除了string、Buffer、null之外的其他型別的資料需要把這個模式開啟
  highWaterMark: 16384, // 水位限制,1024 \* 16,預設16kb,超過這個限制則會停止呼叫\_read()讀資料到buffer中
  buffer: BufferList { head: null, tail: null, length: 0 }, // Buffer連結串列,用於儲存資料
  length: 0, // 整個可讀流資料的大小,如果是objectMode則與buffer.length相等
  pipes: [], // 儲存監聽了該可讀流的所有管道佇列
  flowing: null, // 可獨流的狀態 null、false、true
  ended: false, // 所有資料消費完畢
  endEmitted: false, // 結束事件收否已傳送
  reading: false, // 是否正在讀取資料
  constructed: true, // 流在構造好之前或者失敗之前,不能被銷燬
  sync: true, // 是否同步觸發'readable'/'data'事件,或是等到下一個tick
  needReadable: false, // 是否需要傳送readable事件
  emittedReadable: false, // readable事件傳送完畢
  readableListening: false, // 是否有readable監聽事件
  resumeScheduled: false, // 是否呼叫過resume方法
  errorEmitted: false, // 錯誤事件已傳送
  emitClose: true, // 流銷燬時,是否傳送close事件
  autoDestroy: true, // 自動銷燬,在'end'事件觸發後被呼叫
  destroyed: false, // 流是否已經被銷燬
  errored: null, // 標識流是否報錯
  closed: false, // 流是否已經關閉
  closeEmitted: false, // close事件是否已傳送
  defaultEncoding: 'utf8', // 預設字元編碼格式
  awaitDrainWriters: null, // 指向監聽了'drain'事件的writer參照,型別為null、Writable、Set<Writable>
  multiAwaitDrain: false, // 是否有多個writer等待drain事件
  readingMore: false, // 是否可以讀取更多資料
  dataEmitted: false, // 資料已傳送
  decoder: null, // 解碼器
  encoding: null, // 編碼器
  [Symbol(kPaused)]: null
},
2.2. 內部資料儲存實現(BufferList)
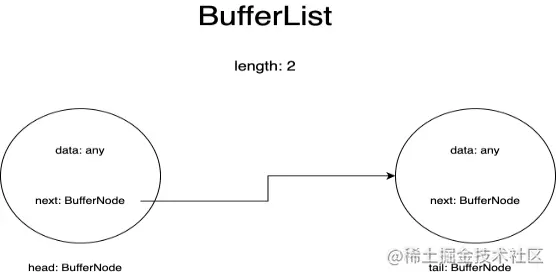
BufferList是用於流儲存內部資料的容器,它被設計為了連結串列的形式,一共有三個屬性head、tail和length。
BufferList中的每一個節點我把它表示為了BufferNode,裡面的Data的型別取決於objectMode。
這種資料結構獲取頭部的資料的速度快於Array.prototype.shift()。
2.2.1. 資料儲存型別
如果objectMode === true:
那麼data則可以為任意型別,push的是什麼資料則儲存的就是什麼資料
objectMode=true
const Stream = require('stream');
const readableStream = new Stream.Readable({
  objectMode: true,
  read() {},
});

readableStream.push({ name: 'lisa'});
console.log(readableStream._readableState.buffer.tail);
readableStream.push(true);
console.log(readableStream._readableState.buffer.tail);
readableStream.push('lisa');
console.log(readableStream._readableState.buffer.tail);
readableStream.push(666);
console.log(readableStream._readableState.buffer.tail);
readableStream.push(() => {});
console.log(readableStream._readableState.buffer.tail);
readableStream.push(Symbol(1));
console.log(readableStream._readableState.buffer.tail);
readableStream.push(BigInt(123));
console.log(readableStream._readableState.buffer.tail);
執行結果:

如果objectMode === false:
那麼data只能為string或者Buffer或者Uint8Array
objectMode=false
const Stream = require('stream');

const readableStream = new Stream.Readable({

  objectMode: false,

  read() {},

});

readableStream.push({ name: 'lisa'});
執行結果:

2.2.2. 資料儲存結構
我們在控制檯通過node命令列建立一個可讀流,來觀察buffer中資料的變化:
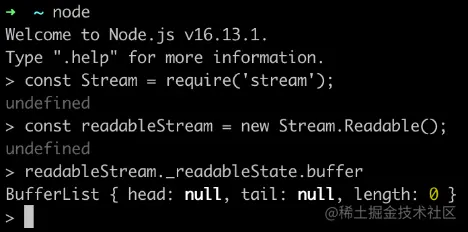
當然在push資料之前我們需要實現他的_read方法,或者在建構函式的引數中實現read方法:
const Stream = require('stream');

const readableStream = new Stream.Readable();

RS._read = function(size) {}
或者
const Stream = require('stream');

const readableStream = new Stream.Readable({

  read(size) {}

});
經過readableStream.push('abc')操作之後,當前的buffer為:

可以看到目前的資料儲存了,頭尾儲存的資料都是字串'abc'的ascii碼,型別為Buffer型別,length表示當前儲存的資料的條數而非資料內容的大小。
2.2.3. 相關API
列印一下BufferList的所有方法可以得到:

除了join是將BufferList序列化為字串之外,其他都是對資料的存取操作。
這裡就不一一講解所有的方法了,重點講一下其中的consume 、_getString和_getBuffer。
2.2.3.1. consume
原始碼地址:BufferList.consume
https://github.com/nodejs/node/blob/d5e94fa7121c9d424588f0e1a388f8c72c784622/lib/internal/streams/buffer_list.js#L80
comsume
// Consumes a specified amount of bytes or characters from the buffered data.
consume(n, hasStrings) {
  const data = this.head.data;
  if (n < data.length) {
    // `slice` is the same for buffers and strings.
    const slice = data.slice(0, n);
    this.head.data = data.slice(n);
    return slice;
  }
  if (n === data.length) {
    // First chunk is a perfect match.
    return this.shift();
  }
  // Result spans more than one buffer.
  return hasStrings ? this.\_getString(n) : this.\_getBuffer(n);
}
程式碼一共有三個判斷條件:
如果所消耗的資料的位元組長度小於連結串列頭節點儲存資料的長度,則將頭節點的資料取前n位元組,並把當前頭節點的資料設定為切片之後的資料
如果所消耗的資料恰好等於連結串列頭節點所儲存的資料的長度,則直接返回當前頭節點的資料
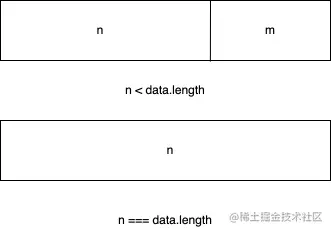
如果所消耗的資料的長度大於連結串列頭節點的長度,那麼會根據傳入的第二個引數進行最後一次判斷,判斷當前的BufferList底層儲存的是string還是Buffer
2.2.3.2. _getBuffer
原始碼地址:BufferList._getBuffer
https://github.com/nodejs/node/blob/d5e94fa7121c9d424588f0e1a388f8c72c784622/lib/internal/streams/buffer_list.js#L137
comsume
// Consumes a specified amount of bytes from the buffered data.
_getBuffer(n) {
  const ret = Buffer.allocUnsafe(n);
  const retLen = n;
  let p = this.head;
  let c = 0;
  do {
    const buf = p.data;
    if (n > buf.length) {
      TypedArrayPrototypeSet(ret, buf, retLen - n);
      n -= buf.length;
    } else {
      if (n === buf.length) {
        TypedArrayPrototypeSet(ret, buf, retLen - n);
        ++c;
        if (p.next)
          this.head = p.next;
        else
          this.head = this.tail = null;
      } else {
       TypedArrayPrototypeSet(ret,
                              new Uint8Array(buf.buffer, buf.byteOffset, n),
                              retLen - n);
        this.head = p;
        p.data = buf.slice(n);
      }
      break;
    }
    ++c;
  } while ((p = p.next) !== null);
  this.length -= c;
  return ret;
}
總的來說就是迴圈對連結串列中的節點進行操作,新建一個Buffer陣列用於儲存返回的資料。
首先從連結串列的頭節點開始取資料,不斷的複製到新建的Buffer中,直到某一個節點的資料大於等於要取的長度減去已經取得的長度。
或者說讀到連結串列的最後一個節點後,都還沒有達到要取的長度,那麼就返回這個新建的Buffer。
2.2.3.3. _getString
原始碼地址:BufferList._getString
https://github.com/nodejs/node/blob/d5e94fa7121c9d424588f0e1a388f8c72c784622/lib/internal/streams/buffer_list.js#L106
comsume
// Consumes a specified amount of characters from the buffered data.
_getString(n) {
  let ret = '';
  let p = this.head;
  let c = 0;
  do {
    const str = p.data;
    if (n > str.length) {
    ret += str;
    n -= str.length;
  } else {
    if (n === str.length) {
      ret += str;
      ++c;
      if (p.next)
        this.head = p.next;
      else
        this.head = this.tail = null;
    } else {
      ret += StringPrototypeSlice(str, 0, n);
      this.head = p;
      p.data = StringPrototypeSlice(str, n);
    }
    break;
    }
    ++c;
  } while ((p = p.next) !== null);
  this.length -= c;
  return ret;
}
對於操作字串來說和操作Buffer是一樣的,也是迴圈從連結串列的頭部開始讀資料,只是進行資料的拷貝儲存方面有些差異,還有就是_getString操作返回的資料型別是string型別。
2.3. 為什麼可讀流是EventEmitter的範例?
對於這個問題而言,首先要了解什麼是釋出訂閱模式,釋出訂閱模式在大多數API中都有重要的應用,無論是Promise還是Redux,基於釋出訂閱模式實現的高階API隨處可見。
它的優點在於能將事件的相關回撥函數儲存到佇列中,然後在將來的某個時刻通知到對方去處理資料,從而做到關注點分離,生產者只管生產資料和通知消費者,而消費者則只管處理對應的事件及其對應的資料,而Node.js流模式剛好符合這一特點。
那麼Node.js流是怎樣實現基於EventEmitter建立範例的呢?
這部分原始碼在這兒:stream/legacy
https://github.com/nodejs/node/blob/d5e94fa7121c9d424588f0e1a388f8c72c784622/lib/internal/streams/legacy.js#L10
legacy
function Stream(opts) {
  EE.call(this, opts);
}
ObjectSetPrototypeOf(Stream.prototype, EE.prototype);
ObjectSetPrototypeOf(Stream, EE);
然後在可讀流的原始碼中有這麼幾行程式碼:
這部分原始碼在這兒:readable
https://github.com/nodejs/node/blob/d5e94fa7121c9d424588f0e1a388f8c72c784622/lib/internal/streams/readable.js#L77
legacy
ObjectSetPrototypeOf(Readable.prototype, Stream.prototype);
ObjectSetPrototypeOf(Readable, Stream);
首先將Stream的原型物件繼承自EventEmitter,這樣Stream的所有範例都可以存取到EventEmitter上的方法。
同時通過ObjectSetPrototypeOf(Stream, EE)將EventEmitter上的靜態方法也繼承過來,並在Stream的建構函式中,借用建構函式EE來實現所有EventEmitter中的屬性的繼承,然後在可讀流裡,用同樣的的方法實現對Stream類的原型繼承和靜態屬性繼承,從而得到:
Readable.prototype.__proto__ === Stream.prototype;
Stream.prototype.__proto__ === EE.prototype
因此:
Readable.prototype.__proto__.__proto__ === EE.prototype
所以捋著可讀流的原型鏈可以找到EventEmitter的原型,實現對EventEmitter的繼承
2.4. 相關API的實現
這裡會按照原始碼檔案中API的出現順序來展示,且僅解讀其中的核心API實現。
注:此處僅解讀Node.js可讀流原始碼中所宣告的函數,不包含外部引入的函數定義,同時為了減少篇幅,不會將所有程式碼都拷貝下來。
Readable.prototype
Stream {
  destroy: [Function: destroy],
  _undestroy: [Function: undestroy],
  _destroy: [Function (anonymous)],
  push: [Function (anonymous)],
  unshift: [Function (anonymous)],
  isPaused: [Function (anonymous)],
  setEncoding: [Function (anonymous)],
  read: [Function (anonymous)],
  _read: [Function (anonymous)],
  pipe: [Function (anonymous)],
  unpipe: [Function (anonymous)],
  on: [Function (anonymous)],
  addListener: [Function (anonymous)],
  removeListener: [Function (anonymous)],
  off: [Function (anonymous)],
  removeAllListeners: [Function (anonymous)],
  resume: [Function (anonymous)],
  pause: [Function (anonymous)],
  wrap: [Function (anonymous)],
  iterator: [Function (anonymous)],
  [Symbol(nodejs.rejection)]: [Function (anonymous)],
  [Symbol(Symbol.asyncIterator)]: [Function (anonymous)]
}
2.4.1. push
readable.push
Readable.prototype.push = function(chunk, encoding) {
  return readableAddChunk(this, chunk, encoding, false);
};
push方法的主要作用就是將資料塊通過觸發'data'事件傳遞給下游管道,或者將資料儲存到自身的緩衝區中。
以下程式碼為相關虛擬碼,僅展示主流程:
readable.push
function readableAddChunk(stream, chunk, encoding, addToFront) {
  const state = stream.\_readableState;
  if (chunk === null) { // push null 流結束訊號,之後不能再寫入資料
    state.reading = false;
    onEofChunk(stream, state);
  } else if (!state.objectMode) { // 如果不是物件模式
    if (typeof chunk === 'string') {
      chunk = Buffer.from(chunk);
    } else if (chunk instanceof Buffer) { //如果是Buffer
    // 處理一下編碼
    } else if (Stream.\_isUint8Array(chunk)) {
      chunk = Stream.\_uint8ArrayToBuffer(chunk);
    } else if (chunk != null) {
      err = new ERR\_INVALID\_ARG\_TYPE('chunk', ['string', 'Buffer', 'Uint8Array'], chunk);
    }
  }

  if (state.objectMode || (chunk && chunk.length > 0)) { // 是物件模式或者chunk是Buffer
    // 這裡省略幾種資料的插入方式的判斷
    addChunk(stream, state, chunk, true);
  }
}

function addChunk(stream, state, chunk, addToFront) {
  if (state.flowing && state.length === 0 && !state.sync &&
    stream.listenerCount('data') > 0) { // 如果處於流動模式,有監聽data的訂閱者
      stream.emit('data', chunk);
  } else { // 否則儲存資料到緩衝區中
    state.length += state.objectMode ? 1 : chunk.length;
    if (addToFront) {
      state.buffer.unshift(chunk);
    } else {
      state.buffer.push(chunk);
    }
  }
  maybeReadMore(stream, state); // 嘗試多讀一點資料
}
push操作主要分為對objectMode的判斷,不同的型別對傳入的資料會做不同的操作:
- objectMode === false: 將資料(chunk)轉換成Buffer
- objectMode === true: 將資料原封不動的傳遞給下游
其中addChunk的第一個判斷主要是處理Readable處於流動模式、有data監聽器、並且緩衝區資料為空時的情況。
這時主要將資料passthrough透傳給訂閱了data事件的其他程式,否則就將資料儲存到緩衝區裡面。
2.4.2. read
除去對邊界條件的判斷、流狀態的判斷,這個方法主要有兩個操作
呼叫使用者實現的_read方法,對執行結果進行處理
從緩衝區buffer中讀取資料,並觸發'data'事件
readable.read
// 如果read的長度大於hwm,則會重新計算hwm
if (n > state.highWaterMark) {
  state.highWaterMark = computeNewHighWaterMark(n);
}
// 呼叫使用者實現的\_read方法
try {
  const result = this.\_read(state.highWaterMark);
  if (result != null) {
    const then = result.then;
    if (typeof then === 'function') {
      then.call(
        result,
        nop,
        function(err) {
          errorOrDestroy(this, err);
        });
    }
  }
} catch (err) {
  errorOrDestroy(this, err);
}
如果說使用者實現的_read方法返回的是一個promise,則呼叫這個promise的then方法,將成功和失敗的回撥傳入,便於處理異常情況。
read方法從緩衝區裡讀區資料的核心程式碼如下:
readable.read
function fromList(n, state) {
  // nothing buffered.
  if (state.length === 0)
    return null;
  let ret;
  if (state.objectMode)
    ret = state.buffer.shift();
  else if (!n || n >= state.length) { // 處理n為空或者大於緩衝區的長度的情況
    // Read it all, truncate the list.
    if (state.decoder) // 有解碼器,則將結果序列化為字串
      ret = state.buffer.join('');
    else if (state.buffer.length === 1) // 只有一個資料,返回頭節點資料
      ret = state.buffer.first();
    else // 將所有資料儲存到一個Buffer中
      ret = state.buffer.concat(state.length);
    state.buffer.clear(); // 清空緩衝區
  } else {
    // 處理讀取長度小於緩衝區的情況
    ret = state.buffer.consume(n, state.decoder);
  }
  return ret;
}
2.4.3. _read
使用者初始化Readable stream時必須實現的方法,可以在這個方法裡呼叫push方法,從而持續的觸發read方法,當我們push null時可以停止流的寫入操作。
範例程式碼:
readable._read
const Stream = require('stream');
const readableStream = new Stream.Readable({
  read(hwm) {
    this.push(String.fromCharCode(this.currentCharCode++));
    if (this.currentCharCode > 122) {
      this.push(null);
    }
  },
});
readableStream.currentCharCode = 97;
readableStream.pipe(process.stdout);
// abcdefghijklmnopqrstuvwxyz%
2.4.4. pipe(重要)
將一個或多個writable流繫結到當前的Readable流上,並且將Readable流切換到流動模式。
這個方法裡面有很多的事件監聽控制程式碼,這裡不會一一介紹:
readable.pipe
Readable.prototype.pipe = function(dest, pipeOpts) {
  const src = this;
  const state = this.\_readableState;
  state.pipes.push(dest); // 收集Writable流

  src.on('data', ondata);
  function ondata(chunk) {
    const ret = dest.write(chunk);
    if (ret === false) {
      pause();
    }
  }
  // Tell the dest that it's being piped to.
  dest.emit('pipe', src);
  // 啟動流,如果流處於暫停模式
  if (dest.writableNeedDrain === true) {
    if (state.flowing) {
      pause();
    }
  } else if (!state.flowing) {
    src.resume();
  }
  return dest;
}
pipe操作和Linux的管道操作符'|'非常相似,將左側輸出變為右側輸入,這個方法會將可寫流收集起來進行維護,並且當可讀流觸發'data'事件。
有資料流出時,就會觸發可寫流的寫入事件,從而做到資料傳遞,實現像管道一樣的操作。並且會自動將處於暫停模式的可讀流變為流動模式。
2.4.5. resume
使流從'暫停'模式切換到'流動'模式,如果設定了'readable'事件監聽,那麼這個方法其實是沒有效果的
readable.resume
Readable.prototype.resume = function() {
  const state = this._readableState;
  if (!state.flowing) {
    state.flowing = !state.readableListening; // 是否處於流動模式取決於是否設定了'readable'監聽控制程式碼
    resume(this, state);
  }
};

function resume(stream, state) {
  if (!state.resumeScheduled) { // 開關,使resume_方法僅在同一個Tick中呼叫一次
    state.resumeScheduled = true;
    process.nextTick(resume_, stream, state);
  }
}

function resume_(stream, state) {
  if (!state.reading) {
    stream.read(0);
  }
  state.resumeScheduled = false;
  stream.emit('resume');
  flow(stream);
}

function flow(stream) { // 當流處於流模式該方法會不斷的從buffer中讀取資料,直到緩衝區為空
  const state = stream._readableState;
  while (state.flowing && stream.read() !== null);
  // 因為這裡會呼叫read方法,設定了'readable'事件監聽器的stream,也有可能會呼叫read方法,
  //從而導致資料不連貫(不影響data,僅影響在'readable'事件回撥中呼叫read方法讀取資料)
}
2.4.6. pause
將流從流動模式轉變為暫停模式,停止觸發'data'事件,將所有的資料儲存到緩衝區
readable.pause
Readable.prototype.pause = function() {
  if (this._readableState.flowing !== false) {
    debug('pause');
    this._readableState.flowing = false;
    this.emit('pause');
  }
  return this;
};
2.5. 使用方法與工作機制
使用方法在BufferList部分已經講過了,建立一個Readable範例,並實現其_read()方法,或者在建構函式的第一個物件引數中實現read方法。
2.5.1. 工作機制
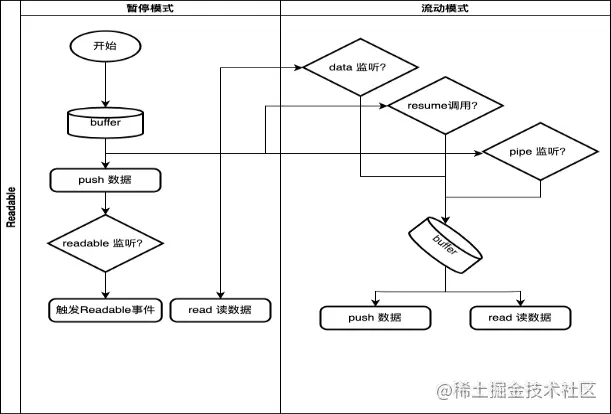
這裡只畫了大致的流程,以及Readable流的模式轉換觸發條件。
其中:
- needReadable(true): 暫停模式並且buffer資料<=hwm、繫結了readable事件監聽函數、read資料時緩衝區沒有資料或者返回資料為空
- push: 如果處於流動模式,緩衝區裡沒有資料會觸發'data'事件;否則將資料儲存到緩衝區根據needReadable狀態觸發'readable'事件
- read: 讀length=0長度的資料時,buffer中的資料已經到達hwm或者溢位需要觸發'readable'事件;從buffer中讀取資料並觸發'data'事件
- resume: 有'readable'監聽,該方法不起作用;否則將流由暫停模式轉變為流動模式,並清空緩衝區裡的資料
- readable觸發條件:繫結了'readable'事件並且緩衝區裡有資料、push資料時緩衝區有資料,並且needReadable === true、讀length=0長度的資料時,buffer中的資料已經到達hwm或者溢位
3. 總結
- Node.js為了解決記憶體問題和時間問題,實現了自己的流,從而可以將資料一小塊一小塊的讀到記憶體裡給消費者消費
- 流並不是Node.js特有的概念,它們是幾十年前在 Unix 作業系統中引入的
- 流一共有四種型別:可讀流、可寫流、可讀可寫流、轉換流,他們都繼承了EventEmiiter的實體方法和靜態方法,都是EE的範例
- 流的底層容器是基於BufferList的,這是一種自定義的連結串列實現,頭尾各是一個「指標」指向下一個節點參照
- 可讀流有兩種模式三種狀態,在流動模式下會通過EventEmitter將資料傳送給消費者
- 基於流我們可以實現對資料的鏈式處理,並且可以裝配不同的流處理常式,來實現對流的各種操作,轉換成我們想要的資料
更多node相關知識,請存取:!
以上就是什麼是流?深入瞭解Node.js中的可讀流的詳細內容,更多請關注TW511.COM其它相關文章!