聊聊怎麼解析Apache Avro資料(範例講解)

隨著網際網路高速的發展,雲端計算、巨量資料、人工智慧AI、物聯網等前沿技術已然成為當今時代主流的高新技術,諸如電商網站、臉部辨識、無人駕駛、智慧家居、智慧城市等等,不僅方面方便了人們的衣食住行,背後更是時時刻刻有大量的資料在經過各種各樣的系統平臺的採集、清晰、分析,而保證資料的低時延、高吞吐、安全性就顯得尤為重要,Apache Avro本身通過Schema的方式序列化後進行二進位制傳輸,一方面保證了資料的高速傳輸,另一方面保證了資料安全性,avro當前在各個行業的應用越來越廣泛,如何對avro資料進行處理解析應用就格外重要,本文將演示如果序列化生成avro資料,並使用FlinkSQL進行解析。
本文是avro解析的demo,當前FlinkSQL僅適用於簡單的avro資料解析,複雜巢狀avro資料暫時不支援。
場景介紹
本文主要介紹以下三個重點內容:
如何序列化生成Avro資料
如何反序列化解析Avro資料
如何使用FlinkSQL解析Avro資料
前提條件
瞭解avro是什麼,可參考apache avro官網快速入門指南
瞭解avro應用場景
操作步驟
1、新建avro maven工程專案,設定pom依賴
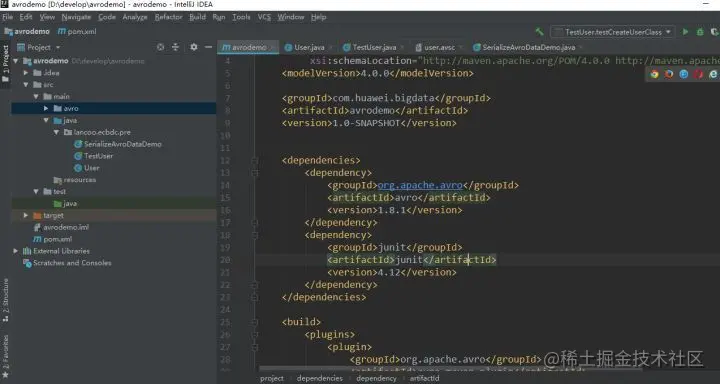
pom檔案內容如下:
<?xml version="1.0" encoding="UTF-8"?>
<project xmlns="http://maven.apache.org/POM/4.0.0"
         xmlns:xsi="http://www.w3.org/2001/XMLSchema-instance"
         xsi:schemaLocation="http://maven.apache.org/POM/4.0.0 http://maven.apache.org/xsd/maven-4.0.0.xsd">
    <modelVersion>4.0.0</modelVersion>

    <groupId>com.huawei.bigdata</groupId>
    <artifactId>avrodemo</artifactId>
    <version>1.0-SNAPSHOT</version>
    <dependencies>
        <dependency>
            <groupId>org.apache.avro</groupId>
            <artifactId>avro</artifactId>
            <version>1.8.1</version>
        </dependency>
        <dependency>
            <groupId>junit</groupId>
            <artifactId>junit</artifactId>
            <version>4.12</version>
        </dependency>
    </dependencies>

    <build>
        <plugins>
            <plugin>
                <groupId>org.apache.avro</groupId>
                <artifactId>avro-maven-plugin</artifactId>
                <version>1.8.1</version>
                <executions>
                    <execution>
                        <phase>generate-sources</phase>
                        <goals>
                            <goal>schema</goal>
                        </goals>
                        <configuration>
                            <sourceDirectory>${project.basedir}/src/main/avro/</sourceDirectory>
                            <outputDirectory>${project.basedir}/src/main/java/</outputDirectory>
                        </configuration>
                    </execution>
                </executions>
            </plugin>
            <plugin>
                <groupId>org.apache.maven.plugins</groupId>
                <artifactId>maven-compiler-plugin</artifactId>
                <configuration>
                    <source>1.6</source>
                    <target>1.6</target>
                </configuration>
            </plugin>
        </plugins>
    </build>

</project>注意:以上pom檔案設定了自動生成類的路徑,即{project.basedir}/src/main/java/,這樣設定之後,在執行mvn命令的時候,這個外掛就會自動將此目錄下的avsc schema生成類檔案,並放到後者這個目錄下。如果沒有生成avro目錄,手動建立一下即可。
2、定義schema
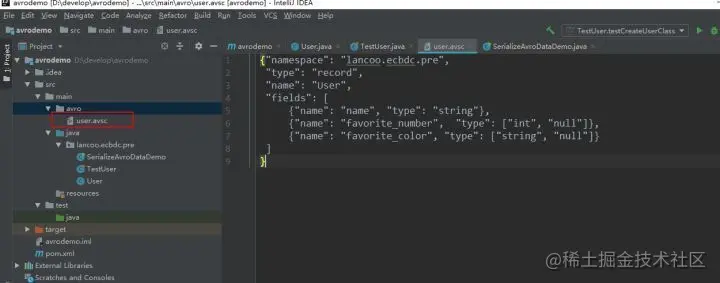
使用JSON為Avro定義schema。schema由基本型別(null,boolean, int, long, float, double, bytes 和string)和複雜型別(record, enum, array, map, union, 和fixed)組成。例如,以下定義一個user的schema,在main目錄下建立一個avro目錄,然後在avro目錄下新建檔案 user.avsc :
{"namespace": "lancoo.ecbdc.pre",
 "type": "record",
 "name": "User",
 "fields": [
     {"name": "name", "type": "string"},
     {"name": "favorite_number",  "type": ["int", "null"]},
     {"name": "favorite_color", "type": ["string", "null"]}
 ]
}
3、編譯schema
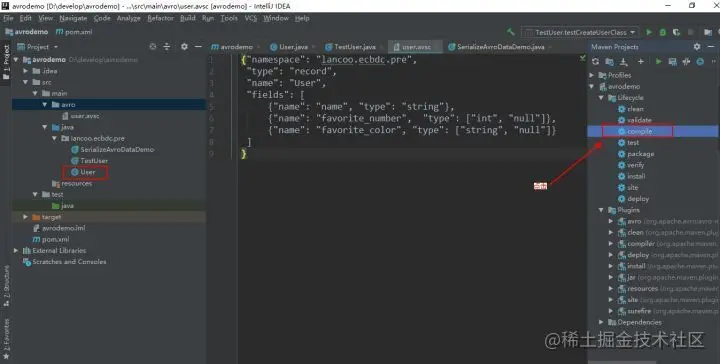
點選maven projects專案的compile進行編譯,會自動在建立namespace路徑和User類程式碼
4、序列化
建立TestUser類,用於序列化生成資料
User user1 = new User();
user1.setName("Alyssa");
user1.setFavoriteNumber(256);
// Leave favorite col or null

// Alternate constructor
User user2 = new User("Ben", 7, "red");

// Construct via builder
User user3 = User.newBuilder()
        .setName("Charlie")
        .setFavoriteColor("blue")
        .setFavoriteNumber(null)
        .build();

// Serialize user1, user2 and user3 to disk
DatumWriter<User> userDatumWriter = new SpecificDatumWriter<User>(User.class);
DataFileWriter<User> dataFileWriter = new DataFileWriter<User>(userDatumWriter);
dataFileWriter.create(user1.getSchema(), new File("user_generic.avro"));
dataFileWriter.append(user1);
dataFileWriter.append(user2);
dataFileWriter.append(user3);
dataFileWriter.close();
執行序列化程式後,會在專案的同級目錄下生成avro資料
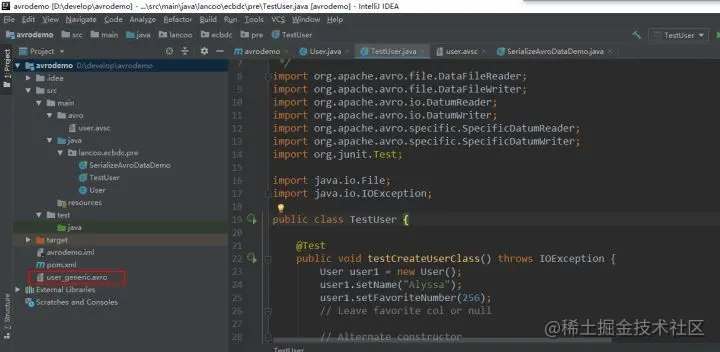
user_generic.avro內容如下:
Objavro.schema�{"type":"record","name":"User","namespace":"lancoo.ecbdc.pre","fields":[{"name":"name","type":"string"},{"name":"favorite_number","type":["int","null"]},{"name":"favorite_color","type":["string","null"]}]}至此avro資料已經生成。
5、反序列化
通過反序列化程式碼解析avro資料
// Deserialize Users from disk
DatumReader<User> userDatumReader = new SpecificDatumReader<User>(User.class);
DataFileReader<User> dataFileReader = new DataFileReader<User>(new File("user_generic.avro"), userDatumReader);
User user = null;
while (dataFileReader.hasNext()) {
    // Reuse user object by passing it to next(). This saves us from
    // allocating and garbage collecting many objects for files with
    // many items.
    user = dataFileReader.next(user);
    System.out.println(user);
}
執行反序列化程式碼解析user_generic.avro
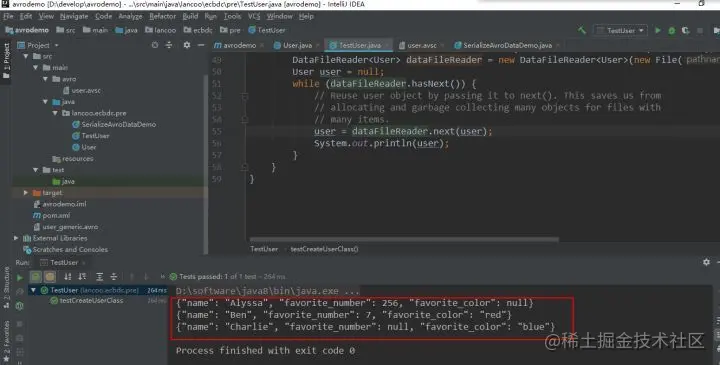
avro資料解析成功。
6、將user_generic.avro上傳至hdfs路徑
hdfs dfs -mkdir -p /tmp/lztest/

hdfs dfs -put user_generic.avro /tmp/lztest/

7、設定flinkserver
- 準備avro jar包
將flink-sql-avro-*.jar、flink-sql-avro-confluent-registry-*.jar放入flinkserver lib,將下面的命令在所有flinkserver節點執行
cp /opt/huawei/Bigdata/FusionInsight_Flink_8.1.2/install/FusionInsight-Flink-1.12.2/flink/opt/flink-sql-avro*.jar /opt/huawei/Bigdata/FusionInsight_Flink_8.1.3/install/FusionInsight-Flink-1.12.2/flink/lib

chmod 500 flink-sql-avro*.jar

chown omm:wheel flink-sql-avro*.jar
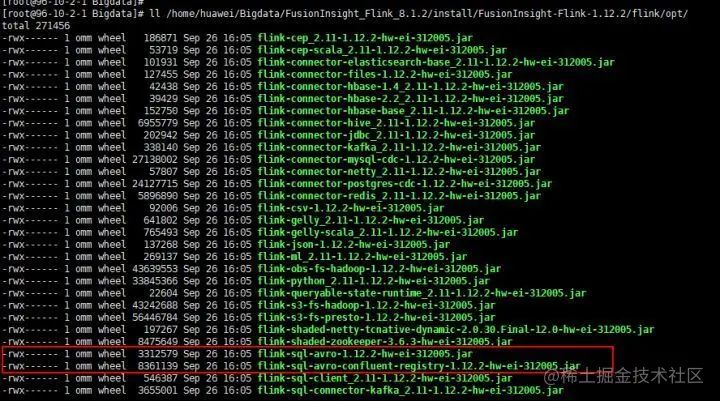
同時重新啟動FlinkServer範例,重新啟動完成後檢視avro包是否被上傳
hdfs dfs -ls /FusionInsight_FlinkServer/8.1.2-312005/lib

8、編寫FlinkSQL
CREATE TABLE testHdfs(
  name String,
  favorite_number int,
  favorite_color String
) WITH(
  'connector' = 'filesystem',
  'path' = 'hdfs:///tmp/lztest/user_generic.avro',
  'format' = 'avro'
);CREATE TABLE KafkaTable (
  name String,
  favorite_number int,
  favorite_color String
) WITH (
  'connector' = 'kafka',
  'topic' = 'testavro',
  'properties.bootstrap.servers' = '96.10.2.1:21005',
  'properties.group.id' = 'testGroup',
  'scan.startup.mode' = 'latest-offset',
  'format' = 'avro'
);
insert into
  KafkaTable
select
  *
from
  testHdfs;
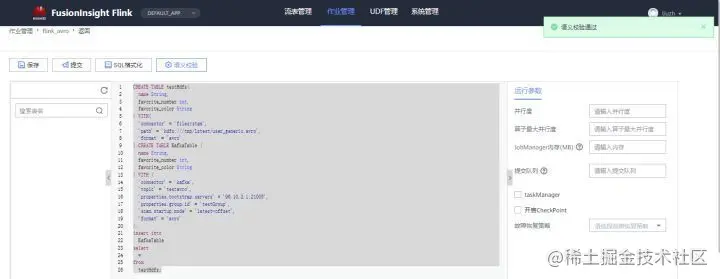
儲存提交任務
9、檢視對應topic中是否有資料

FlinkSQL解析avro資料成功。
【推薦:】
以上就是聊聊怎麼解析Apache Avro資料(範例講解)的詳細內容,更多請關注TW511.COM其它相關文章!