深入聊聊Vue3.2中的setup語法糖

vue3.2 到底更新了什麼?
根據原文內容的更新的內容主要有以下 5 塊:
1、SSR:伺服器端渲染優化。@vue/server-renderer包加了一個ES模組建立,【相關推薦:】
與Node.js解耦,使在非Node環境用@vue/serve-render做伺服器端渲染成為可能,
比如(Workers、Service Workers)
2、New SFC Features:新的單檔案元件特性
3、Web Components:自定義 web 元件。這個我們平時很少用到,但是應該知道
4、Effect Scope API: effect 作用域,
用來直接控制響應式副作用的釋放時間(computed 和 watchers)。
這是底層庫的更新,開發不用關心,但是應該知道
5、Performance Improvements:效能提升。這是內部的提升,跟開發無關
setup 的簡單介紹
起初 Vue3.0 暴露變數必須 return 出來,template中才能使用;
這樣會導致在頁面上變數會出現很多次。
很不友好,vue3.2只需在script標籤中新增setup。
可以幫助我們解決這個問題。
1、元件只需引入不用註冊,屬性和方法也不用返回,
也不用寫setup函數,也不用寫export default ,
甚至是自定義指令也可以在我們的template中自動獲得。
變數、方法不需要 return 出來
<template>
  <div class="home">
    顯示的值{{flag }}
    <button @click="changeHander">改變值</button>
  </div>
</template>
<!-- 只需要在script上新增setup -->
<script lang="ts" setup>
    import { ref } from 'vue';

    <!-- flag變數不需要在 return出去了 -->
    let flag=ref("開端-第一次迴圈")

    <!-- 函數也可以直接參照,不用在return中返回 -->
    let changeHander=():void=>{
        flag.value='開端-第二次迴圈'
    }

</script>
元件不需要在註冊
<!-- 這個是元件 -->
<template>
    <div>
        <h2> 你好-我是肖鶴雲</h2>
    </div>
</template>


使用的頁面
<template>
  <div class="home">
    <test-com></test-com>
  </div>
</template>
<script lang="ts" setup>
// 元件命名採用的是大駝峰,引入後不需要在註冊,是不是爽歪歪呀!
//在使用的使用直接是小寫和橫槓的方式連線 test-com
import TestCom from "../components/TestCom.vue"
</script>
分析引入 setup 後元件的變化
在 script setup 中,
引入的元件可以直接使用無需再通過components進行註冊,[是不是真的很香啊!]
並且無法指定當前元件的名字,它會自動以檔名為主,也就是不用再寫name屬性了。
當我們的頁面上需要使用很多元件時,它的功能一下就體現出來了。
新增 defineProps
剛剛我一直在強調,不需要使用setup函數,機智的小夥伴會說:
那麼子元件怎麼接受父元件傳遞過來的值呢?
props,emit怎麼獲取呢?
別擔心,新的api出現了,我們的主角 defineProps複製程式碼
defineProps 的使用
父元件傳遞引數
<template>
  <div class="home">
    <test-com :info="msg" time="42分鐘"></test-com>
  </div>
</template>
<script lang="ts" setup>
// 元件命名採用的是大駝峰,引入後不需要在註冊,是不是爽歪歪呀!
import TestCom from "../components/TestCom.vue"
let msg='公交車-第一次迴圈'
</script>
子元件接受引數
<template>
    <div>
        <h2> 你好-我是肖鶴雲</h2>
        <p>資訊:{{ info}}</p>
        <p>{{ time }}</p>
    </div>
</template>
<script lang="ts" setup>
import {defineProps} from 'vue'
defineProps({
    info:{
        type:String,
        default:'----'
    },
    time:{
        type:String,
        default:'0分鐘'
    },
})
</script>
子元件怎麼向父元件丟擲事件?defineEmits的到來!
子元件使用
別擔心,我們使用defineEmits。它可以像父元件丟擲事件。
<template>
    <div>
        <h2> 你好-我是肖鶴雲</h2>
        <button @click="hander1Click">新增</button>
        <button @click="hander2Click">刪除</button>
    </div>
</template>

<script lang="ts" setup>
 import {defineEmits} from 'vue'
//  使用defineEmits建立名稱,接受一個陣列
let $myemit=defineEmits(['myAdd','myDel'])
let hander1Click=():void=>{
    $myemit('myAdd','新增的資料')
}

let hander2Click=():void=>{
    $myemit('myDel','刪除的資料')
}
</script>
父元件
<template>
  <div class="home">
    <test-com @myAdd="myAddHander" @myDel='myDelHander'></test-com>
  </div>
</template>
<script lang="ts" setup>
// 元件命名採用的是大駝峰,引入後不需要在註冊,是不是爽歪歪呀!
//在使用的使用直接是小寫和橫槓的方式連線 test-com
import TestCom from "../components/TestCom.vue"
let myAddHander=(mess):void=>{
  console.log('新增==>',mess);
}

let myDelHander=(mess):void=>{
  console.log('刪除==>', mess);
}
</script>
如何獲取子元件中的屬性值
子元件
<template>
    <div>
        <h2> 你好-我是肖鶴雲</h2>
        <p>性別:{{ sex}}</p>
        <p>其他資訊:{{ info}}</p>
    </div>
</template>

<script lang="ts" setup>
import { reactive, ref,defineExpose } from "vue";
let sex=ref('男')
let info=reactive({
    like:'喜歡李詩晴',
    age:27
})
// 將元件中的屬性暴露出去,這樣父元件可以獲取
defineExpose({
    sex,
    info
})
</script>複製程式碼
父元件
<template>
  <div class="home">
    <test-com @myAdd="myAddHander" @myDel='myDelHander' ref="testcomRef"></test-com>
    <button @click="getSonHander">獲取子元件中的資料</button>
  </div>
</template>
<script lang="ts" setup>
import TestCom from "../components/TestCom.vue"
import {ref} from 'vue'
const testcomRef = ref()
const getSonHander=()=>{
  console.log('獲取子元件中的性別', testcomRef.value.sex );
  console.log('獲取子元件中的其他資訊', testcomRef.value.info );
}
</script>複製程式碼
新增指令 v-memo
v-memod會記住一個模板的子樹,元素和元件上都可以使用。
該指令接收一個固定長度的陣列作為依賴值進行[記憶比對]。
如果陣列中的每個值都和上次渲染的時候相同,則整個子樹的更新會被跳過。
即使是虛擬 DOM 的 VNode 建立也將被跳過,因為子樹的記憶副本可以被重用。
因此渲染的速度會非常的快。
需要注意得是:正確地宣告記憶陣列是很重要。
開發者有責任指定正確的依賴陣列,以避免必要的更新被跳過。
<li v-for="item in listArr"  :key="item.id"  v-memo="['valueA','valueB']">
    {{ item.name   }}
</li>
v-memod的指令使用較少,它的作用是:快取模板中的一部分資料。
只建立一次,以後就不會再更新了。也就是說用記憶體換取時間。複製程式碼
style v-bind 該同學已經從實驗室畢業了
經過尤大大和團隊的努力,<style> v-bind 已經從實驗室畢業了。
我們可以使用這個屬性了。爽歪歪!
我們可以在style中去使用變數。是不是感覺很牛逼呀!
現在我們用起來,第一次使用<style> v-bind複製程式碼
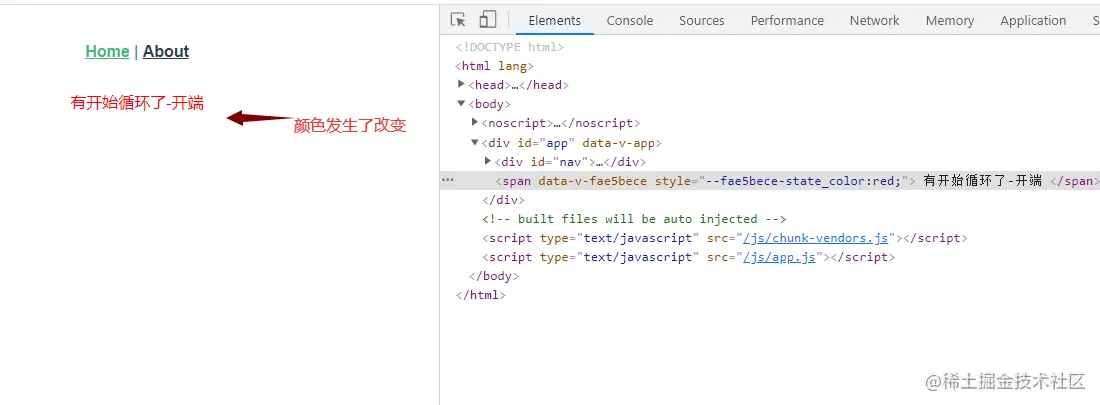
style v-bind將span變成紅色
<template>
  <span> 有開始迴圈了-開端 </span>
</template>
<script setup>
  import { reactive } from 'vue'
  const state = reactive({
    color: 'red'
  })
</script>
<style scoped>
  span {
    /* 使用v-bind繫結state中的變數 */
    color: v-bind('state.color');
  }
</style>複製程式碼
尾聲
如果你覺得我寫的不錯的話,點一下推薦。
我已經幾個月沒有人給我推薦了。
聽說打賞的小哥哥都追到女朋友了,
咦!你不信,不信你給我打賞看一下!
保準你追到到喜歡的Ta
更多程式設計相關知識,請存取:!!
以上就是深入聊聊Vue3.2中的setup語法糖的詳細內容,更多請關注TW511.COM其它相關文章!