聊聊node中怎麼使用Nest.js 連線 MongoDB 資料庫

在學習 Nest 與資料庫進行連線時,難免會遇到選擇資料庫的問題,這裡作者選擇的是 MongoDB 記錄一下簡單使用。 大家可以根據不同需求選擇合適的資料庫。
貼出跟進看的檔案以方便大家進一步學習 Nest 中文檔案 ,MongoDB菜鳥教學
資料庫簡介
MongoDB 是一個基於分散式檔案儲存的資料庫。由 C++ 語言編寫。旨在為 WEB 應用提供可延伸的高效能資料儲存解決方案。
MongoDB 是一個介於關聯式資料庫和非關聯式資料庫之間的產品,是非關聯式資料庫當中功能最豐富,最像關聯式資料庫的。
資料庫選擇
- 目前市面上有很多成熟的資料庫可供大家選擇。
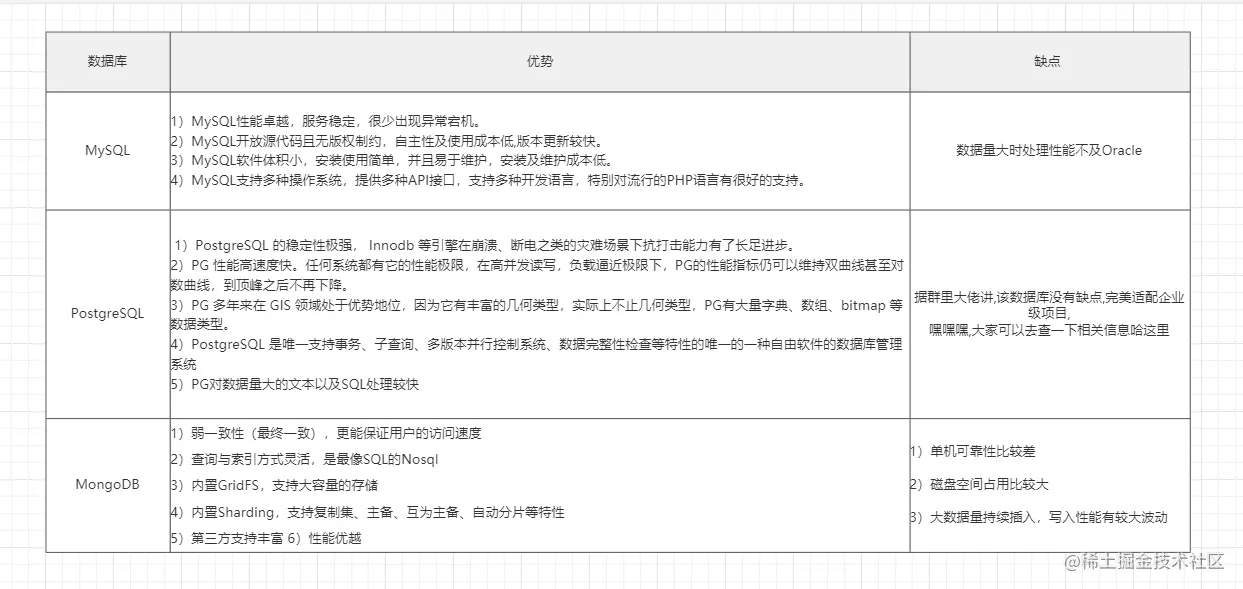
- 據翻看各種資料作者這裡得出的結論為大專案用
PostgreSql小專案用MongoDB所以作者準備一起學習下,這次因為想做一個小專案練練手所以先用MongoDB看看怎麼樣。 - 大家有不同看法歡迎在評論區討論。
設定基本服務
確保電腦已經安裝了
MongoDB沒記得弄完做一下環境設定,可以開機自啟, 也可以選擇自己啟動哈hhh看個人
Mongoose
簡單介紹一下 ,
Mongoose是一個操作MongoDB的Nodejs驅動庫MongoDB是資料庫,Nodejs是js的一個執行環境,Nodejs不直接操作Mongodb,這個時候就需要相應的驅動程式來提供介面。在 Nest 專案中安裝一下依賴項,兩種安裝方式,自行選擇
 $ npm install --save @nestjs/mongoose mongoose  // NPM 安裝
 $ yarn add @nestjs/mongoose mongoose  // YARN 安裝複製程式碼
安裝完成後我們在 AppModule 檔案中引入一下
 /* app.module.ts */
import { Module } from '@nestjs/common';
import { AppController } from './app.controller';
import { AppService } from './app.service';
// 我自己準備的 USER 模組
import { UserModule } from './user/user.module';
// 引入 Mongoose
import { MongooseModule } from '@nestjs/mongoose';
@Module({
  // 用 forRoot 方法連線資料庫
  imports: [UserModule, MongooseModule.forRoot('mongodb://localhost/test')],
  controllers: [AppController],
  providers: [AppService],
})
export class AppModule {}
基礎功能模組
這裡用一個 User 模組來做 demo
這裡我理解的基礎功能模組包括
module(模組)Controller(控制器)Service(提供者)Schema(資料模型) 我們主要是用Nest對MongoDB做增刪改查 這幾個模組目前暫時夠用。對這幾個模組做一些簡單介紹:
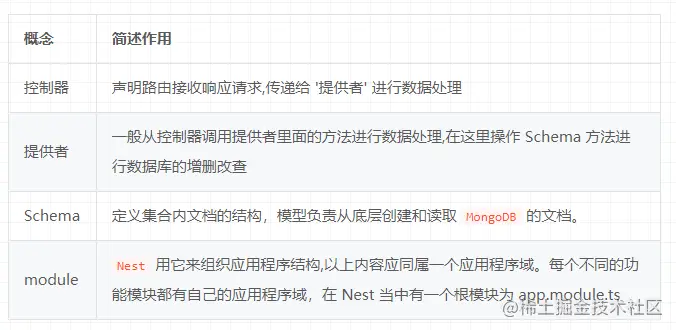
由於我們上面已經對 app.module.ts 該根模組已經引入過了
mongoose所以下面我們之間看一下功能模組是怎樣的
Schema
在
Mongoose中,一切都源於 Scheme,每個Schema都會對映到MongoDB的一個集合,並定義集合內檔案的結構。Schema被用來定義模型,而模型負責從底層建立和讀取MongoDB的檔案。Schema可以用NestJS內建的裝飾器來建立,或者也可以自己動手使用Mongoose的常規方式。使用裝飾器來建立Schema會極大大減少參照並且提高程式碼的可讀性。這裡作者用的是官方推薦方式用裝飾器來建立,畢竟用的是 Nest 不得用點特色的hhh。/* user.schema.ts */ import { Prop, Schema, SchemaFactory } from '@nestjs/mongoose'; // @Prop 裝飾器接受一個可選的引數,通過這個,你可以指示這個屬性是否是必須的,是否需要預設值,或者是標記它作為一個常數,下面是例子 // SchemaFactory 是 mongoose 內建的一個方法做用是讀取模式檔案 並建立 Schema 物件 import { Document } from 'mongoose'; export type UserDocument = User & Document; @Schema() export class User extends Document { @Prop() name: string; // 設定值為必填 @Prop({ required: true }) age: number; @Prop() height: number; } export const UserSchema = SchemaFactory.createForClass(User);等下和其他功能一起在 Module 中引入。
Service
控制器的目的是接收應用的特定請求。路由機制控制哪個控制器接收哪些請求。通常,每個控制器有多個路由,不同的路由可以執行不同的操作。
    /* user.service.ts */
    import { Model } from 'mongoose';
    import { InjectModel } from '@nestjs/mongoose';
    import { User, UserDocument } from 'src/schema/user.schema';
    import { CreateUserDto } from './user.dto';
    @Injectable()
    export class UserService {
      // 註冊Schema後,可以使用 @InjectModel() 裝飾器將 User 模型注入到 UserService 中:
        constructor(@InjectModel('User') private userTest: Model<UserDocument>) {}
          // 新增
          async create(createUserDto: CreateUserDto): Promise<User> {
            const createUser = new this.userTest(createUserDto);
            const temp = await createUser.save();
            return temp;
          }
          // 查詢
          async findAll(): Promise<User[]> {
            // 這裡是非同步的
            const temp = await this.userTest.find().exec();
            return temp;
          }
          // 查詢
          async findOne(name: string): Promise<User[]> {
            // 這裡是非同步的
            const temp = await this.userTest.find({ name });
            return temp;
          }
          // 刪除
          async delete(sid: number) {
            // 這裡是非同步的  remove 方法刪除成功並返回相應的個數
            const temp = await this.userTest.remove({ _id: sid });
            return temp;
          }
          // 修改
          async updateUser(sid: string, data: any) {
            // 這裡是非同步的  remove 方法刪除成功並返回相應的個數
            const temp = await this.userTest.updateOne({ _id: sid }, { $set: data });
            return temp;
          }
    }
等下和其他功能一起在 Module 中引入。
Controller
控制器的目的是接收應用的特定請求。路由機制控制哪個控制器接收哪些請求。通常,每個控制器有多個路由,不同的路由可以執行不同的操作。
    /* user.controller.ts */
    // 引入 Nest.js 內建的各個功能
    import { Body, Controller, Delete, Get, Param, Post, Put, Query } from '@nestjs/common';
    // 引入使用者服務
    import { UserService } from './user.service';
    // 引入建立使用者 DTO 用於限制從介面處傳來的引數
    import { CreateUserDto } from './user.dto';
    // 設定區域性路由
    @Controller('user')
    export class UserController {
      constructor(private readonly userService: UserService) {}
      // 建立user路由 user/createUser
      @Post('createUser')
      async createUser(@Body() body: CreateUserDto) {
        return this.userService.create(body);
      }
      //查詢所有 user 路由
      @Get('findAll')
      async findAll() {
        return this.userService.findAll();
      }
      // 查詢某一個使用者路由
      @Get('findOne')
      async findOne(@Query() query: any) {
        return this.userService.findOne(query.name);
      }
      // 刪除一個使用者的路由
      @Delete(':sid')
      deleteUser(@Param() param: any) {
        return this.userService.delete(param.sid);
      }
      // 更改使用者資訊的路由
      @Put(':sid')
      updateUser(@Body() body: any, @Param() param: any) {
        return this.userService.updateUser(param.sid, body);
      }
    }
Moudle
模組是具有
@Module()裝飾器的類。@Module()裝飾器提供了後設資料,Nest 用它來組織應用程式結構。我們把以上內容引入到我們的 User 模組中
/* user.module.ts */ import { Module } from '@nestjs/common'; import { UserController } from './user.controller'; import { UserService } from './user.service'; import { MongooseModule } from '@nestjs/mongoose'; import { UserSchema } from 'src/schema/user.schema'; @Module({ // MongooseModule提供了forFeature()方法來設定模組,包括定義哪些模型應該註冊在當前範圍中。 // 如果你還想在另外的模組中使用這個模型,將MongooseModule新增到CatsModule的exports部分並在其他模組中匯入CatsModule。 // 這裡的 name:'User' 為資料庫表名稱與 service 中注入的表名稱對應兩者不一樣會報錯 imports: [MongooseModule.forFeature([{ name: 'User', schema: UserSchema }])], controllers: [UserController], providers: [UserService], }) export class UserModule {}- 以上我們的基礎佈局完成,可以進行介面檢驗了
介面檢驗
- 處理這些設定我們還在 main.ts 檔案中設定了全域性路由
app.setGlobalPrefix('api');意思就是所有請求前面會有一個/api/ - 這裡我們用的
PostMan和MongoDB Compass官方推薦的視覺化工具檢視效果
POST 增
這裡我使用
POST請求,路由為/api/user/createUser因為要限制請求引數的資料型別所以這裡方式為application/json因為這裡我們之前定義的 User 資料模型為 name,age,height, 所以請求裡面只需要這幾個引數即可,別的就算寫進去也新增不到集合中
Postman
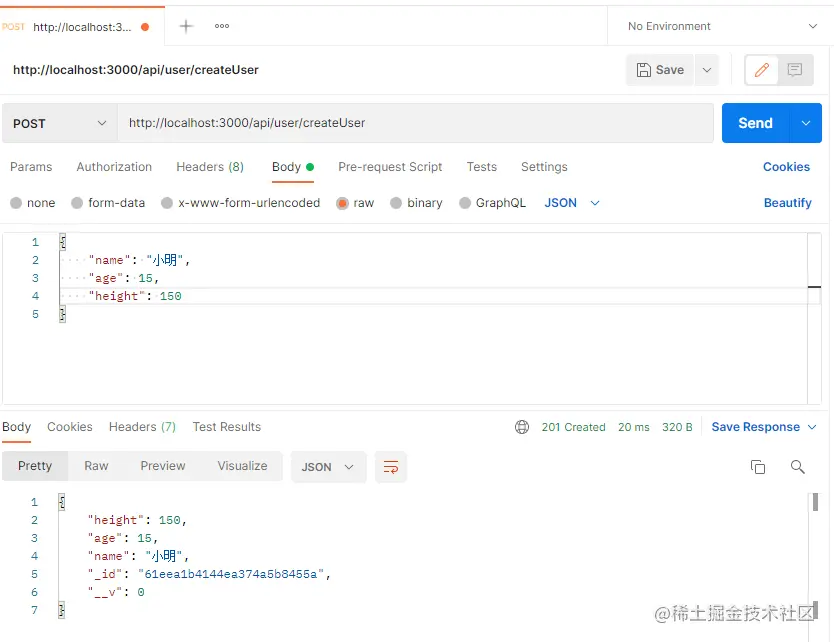
開啟 MongoDB Compass 檢視資料
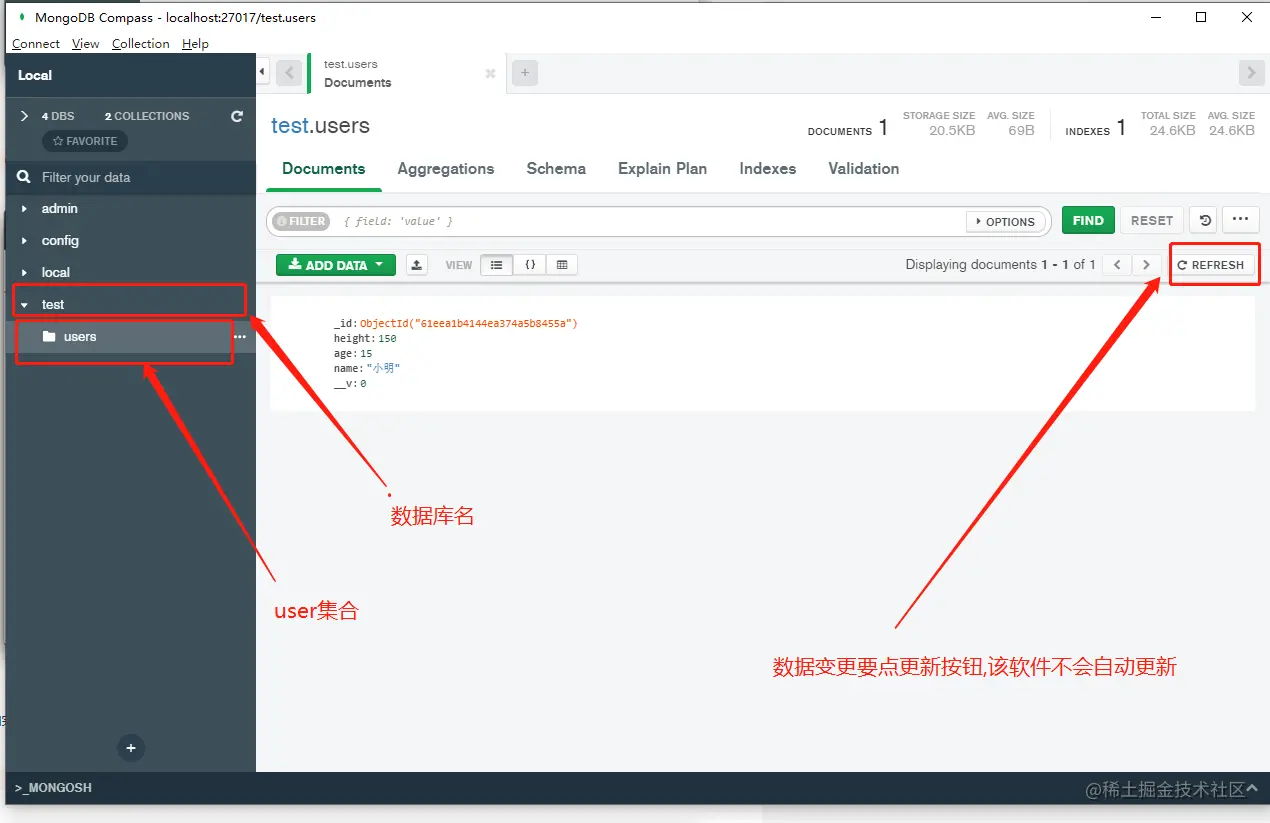
可以看到我們已經新增到資料庫中一條資料,接下來我們在新增兩條,方便等會的查詢/刪除/更改操作
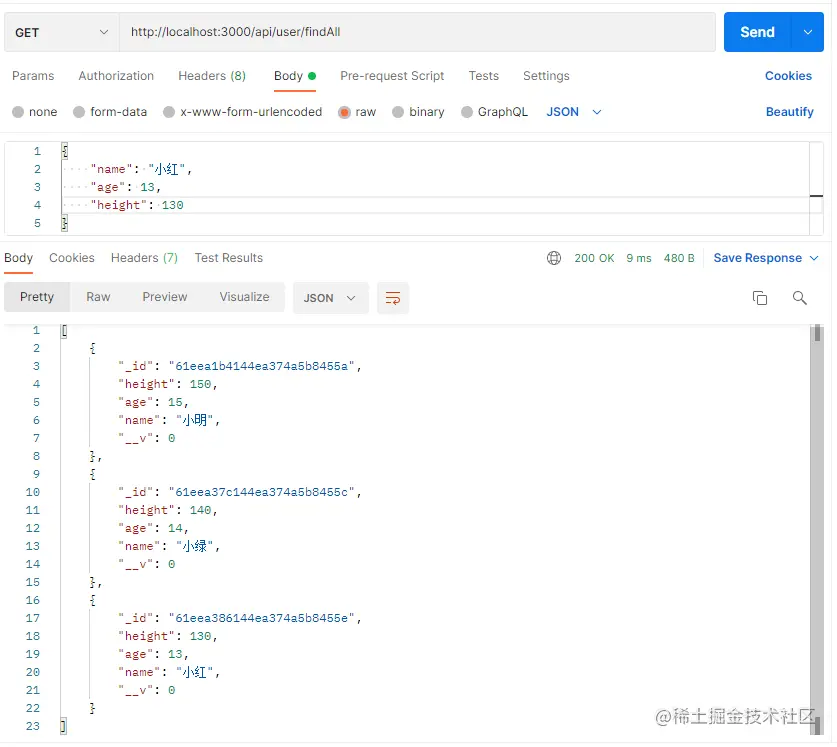
GET 查所有
這裡我使用
GET請求,,路由為/api/user/findAll因為這裡是查 User 集合內所有資料,所以不用新增請求引數Postman
開啟 MongoDB Compass 檢視資料
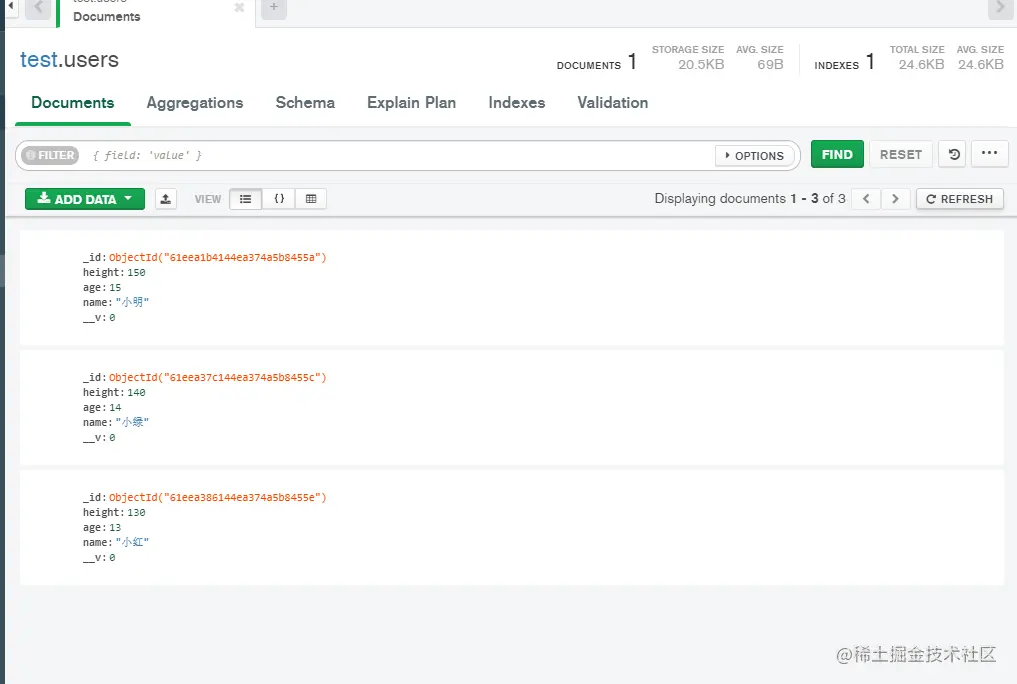
可以看到我們已經查詢到資料庫中剛才在
User集合中新增的三條資料切記要點REFRESH建不然軟體不會自己重新整理
GET 查單個使用者
這裡我使用
GET請求,路由為/api/user/findOne因為這裡是查 User 集合內對應搜尋條件的資料集合,這裡我們用的是name 去查詢的。也可以用唯一值 id 去查詢。Postman
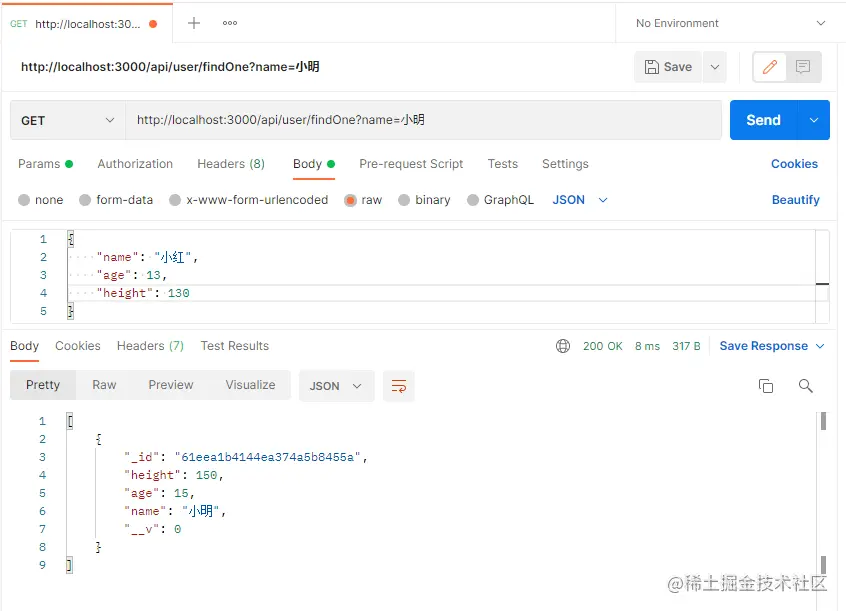
可以看到返回結果是一個集合,瞭解更多查詢方式可以看下官網
PUT 改
這裡我使用
PUT請求,路由為/api/user/:sid因為要限制請求引數的資料型別所以這裡方式為application/json因為這裡我們之前定義的 User 資料模型為 age,height, 所以請求裡面只需要這幾個引數即可,別的就算寫進去也新增不到集合中,我們這裡傳入資料庫中小明的_id
61eea1b4144ea374a5b8455a傳入Param中 ,然後把要修改的內容放入Body中Postman
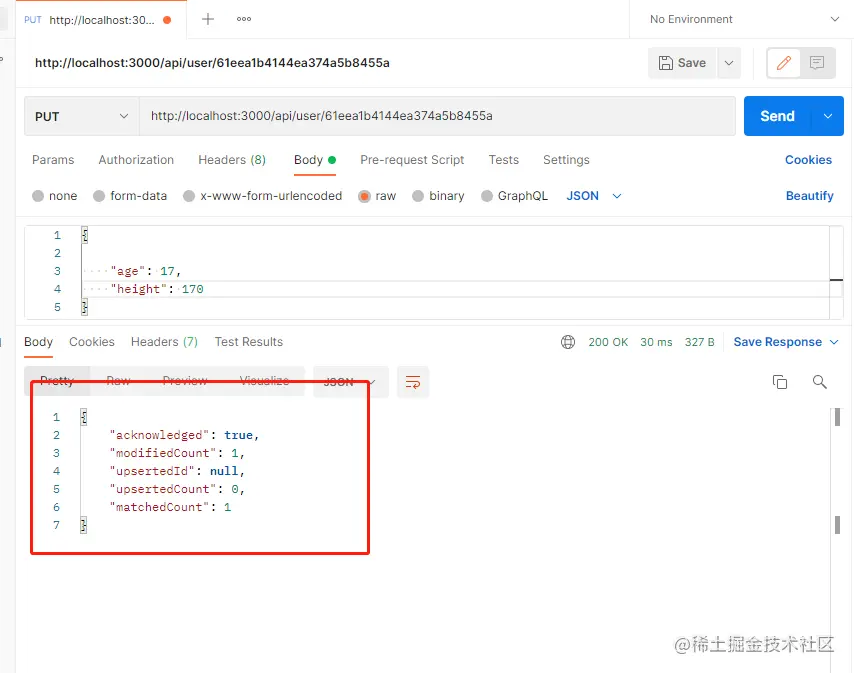
開啟 MongoDB Compass 檢視資料
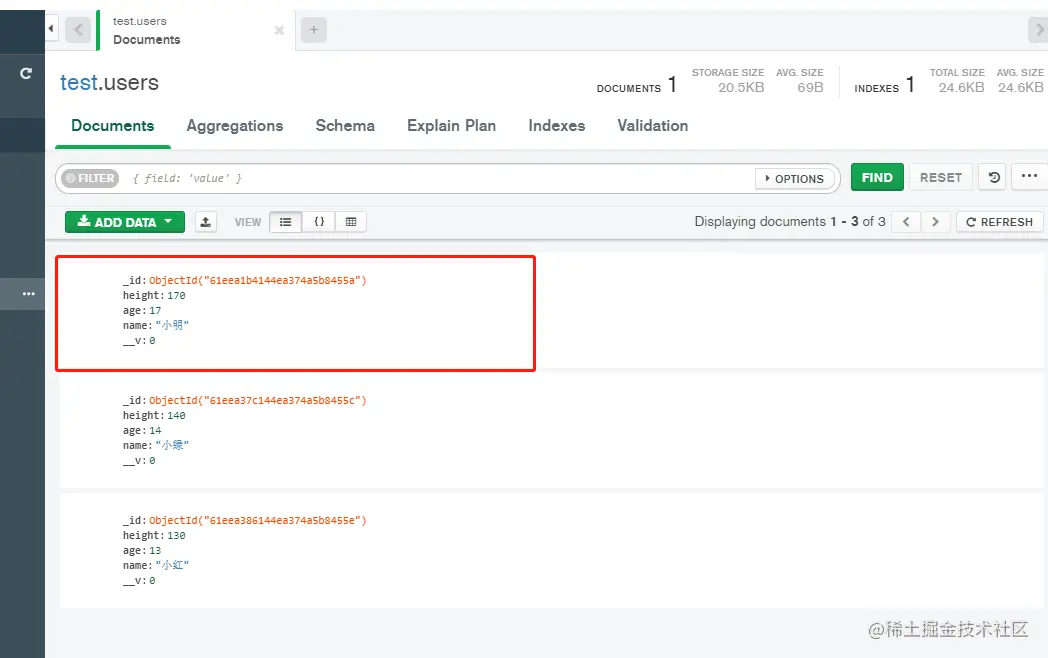
可以看到我們已經把小明的年齡與身高做了修改
DELETE 刪
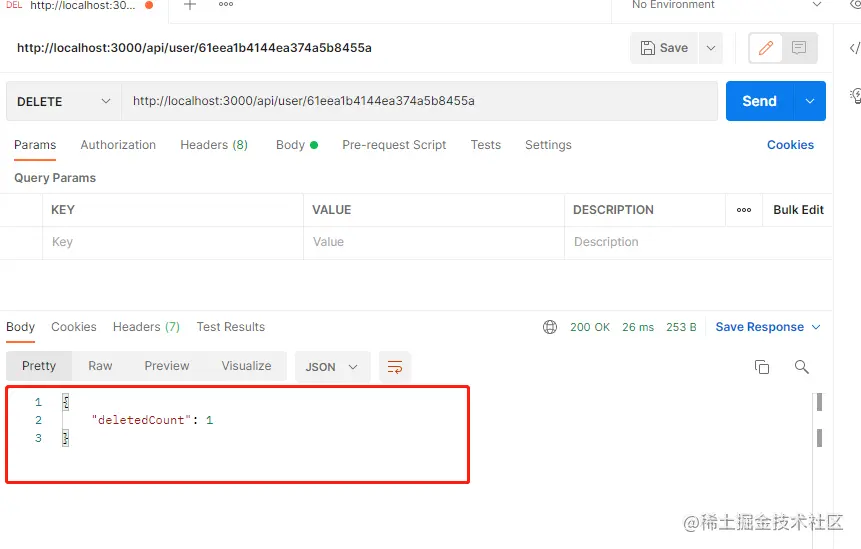
這裡我使用
DELETE請求,路由為/api/user/:sid因為要限制請求引數的資料型別所以這裡方式為application/json我們這裡傳入資料庫中小明的_id
61eea1b4144ea374a5b8455a傳入Param中 ,並行起請求Postman
開啟 MongoDB Compass 檢視資料
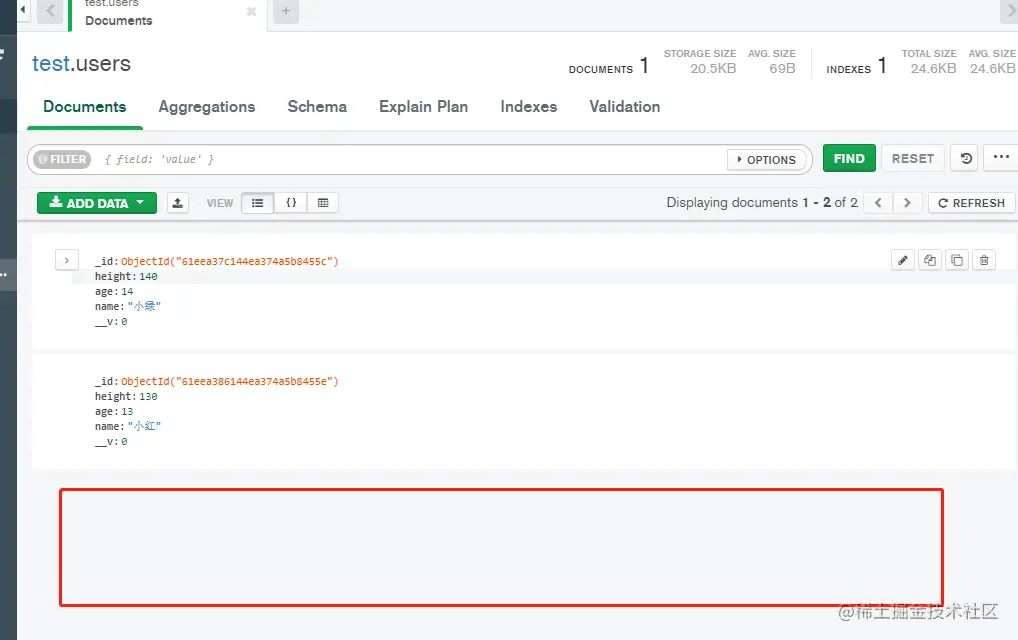
可以看到小明的資訊已經不存在了
總結
- 至此我們已經完成在
Nest.js中使用 Mongoose 對MongoDB資料的基礎操作。並完成了在 Nest 中使用裝飾器來建立 資料模型Schema。 - 看檔案好像還可以使用 Nest 中內建的TypeORM 來建立模型感興趣的小夥伴可以去看一下。回頭我學習其他資料庫連線時在去翻閱看看怎麼操作下。
- Nest 要學的還有很多,管道,中介軟體,攔截器,路由守衛等,這些我是準備在寫小 demo 中去使用來加深個人理解,不然只是單純的看檔案,難以理解,這裡就先不贅述了~ 目前我知道的就是用管道做請求型別判斷是很香的hhh感興趣的小夥伴可以去了解下類驗證器
更多node相關知識,請存取:!
以上就是聊聊node中怎麼使用Nest.js 連線 MongoDB 資料庫的詳細內容,更多請關注TW511.COM其它相關文章!