FastDFS快速實現和SpringBoot的整合開發

FastDFS使用者端操作
1.Fastdfs-java-client
首先我們來看下如何實現FastDFS中提供的JavaAPI來直接實現對應的檔案上傳和下載操作。
1.1 檔案上傳
先來看下檔案上傳的流程
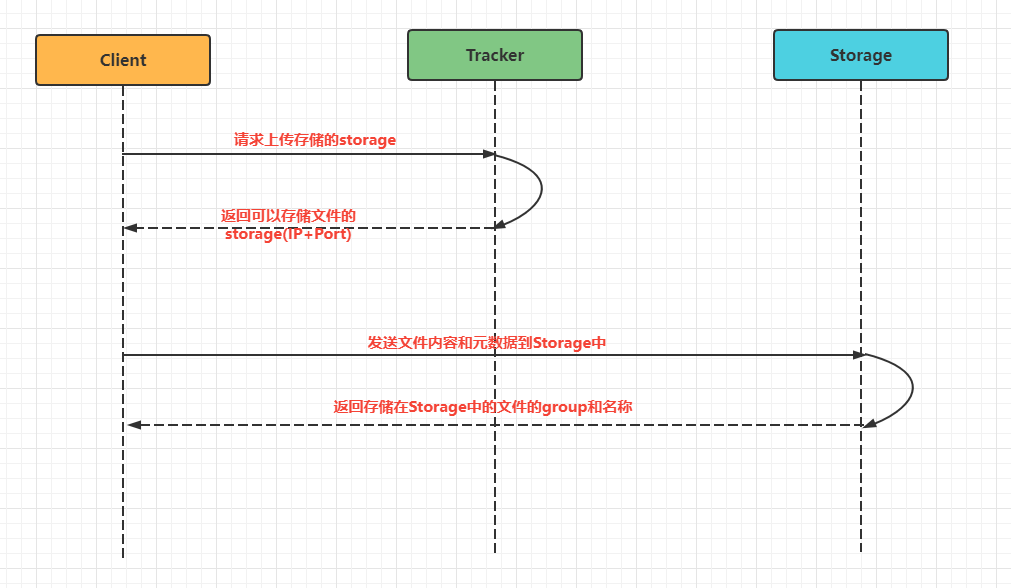
上傳流程的文字梳理為:
- 使用者端存取Tracker
- Tracker 返回Storage的ip和埠
- 使用者端直接存取Storage,把檔案內容和後設資料傳送過去。
- Storage返回檔案儲存id。包含了組名和檔名
首先建立一個普通的maven專案,然後引入對應的依賴
<dependencies>
    <dependency>
        <groupId>cn.bestwu</groupId>
        <artifactId>fastdfs-client-java</artifactId>
        <version>1.27</version>
    </dependency>
    <dependency>
        <groupId>org.apache.commons</groupId>
        <artifactId>commons-lang3</artifactId>
        <version>3.4</version>
    </dependency>
</dependencies>
然後編寫FastDFS的組態檔,內容如下:注意ip修改為你自己對應的ip即可
connect_timeout = 10
network_timeout = 30
charset = UTF-8
http.tracker_http_port = 8080
tracker_server = 192.168.56.100:22122

然後匯入對應的工具類,在工具類中完成了StorageClient的範例化,並提供了相關的上傳和下載的方法。
package com.bobo.fastdfs.config;

import org.apache.commons.lang3.StringUtils;
import org.csource.common.NameValuePair;
import org.csource.fastdfs.*;

import java.io.*;

public class FastDFSClient {
    private static final String CONF_FILENAME = Thread.currentThread().getContextClassLoader().getResource("").getPath() + "fdfs_client.conf";

    private static StorageClient storageClient = null;

    /**
     * 只載入一次.
     */
    static {
        try {
            ClientGlobal.init(CONF_FILENAME);
            TrackerClient trackerClient = new TrackerClient(ClientGlobal.g_tracker_group);
            TrackerServer trackerServer = trackerClient.getConnection();
            StorageServer storageServer = trackerClient.getStoreStorage(trackerServer);
            storageClient = new StorageClient(trackerServer, storageServer);
        } catch (Exception e) {
            e.printStackTrace();
        }
    }

    /**
     *
     * @param inputStream
     *    上傳的檔案輸入流
     * @param fileName
     *    上傳的檔案原始名
     * @return
     */
    public static String[] uploadFile(InputStream inputStream, String fileName) {
        try {
            // 檔案的後設資料
            NameValuePair[] meta_list = new NameValuePair[2];
            // 第一組後設資料,檔案的原始名稱
            meta_list[0] = new NameValuePair("file name", fileName);
            // 第二組後設資料
            meta_list[1] = new NameValuePair("file length", inputStream.available()+"");
            // 準備位元組陣列
            byte[] file_buff = null;
            if (inputStream != null) {
                // 檢視檔案的長度
                int len = inputStream.available();
                // 建立對應長度的位元組陣列
                file_buff = new byte[len];
                // 將輸入流中的位元組內容,讀到位元組陣列中。
                inputStream.read(file_buff);
            }
            // 上傳檔案。引數含義:要上傳的檔案的內容(使用位元組陣列傳遞),上傳的檔案的型別(擴充套件名),後設資料
            String[] fileids = storageClient.upload_file(file_buff, getFileExt(fileName), meta_list);
            return fileids;
        } catch (Exception ex) {
            ex.printStackTrace();
            return null;
        }
    }

    /**
     *
     * @param file
     *            檔案
     * @param fileName
     *            檔名
     * @return 返回Null則為失敗
     */
    public static String[] uploadFile(File file, String fileName) {
        FileInputStream fis = null;
        try {
            NameValuePair[] meta_list = null; // new NameValuePair[0];
            fis = new FileInputStream(file);
            byte[] file_buff = null;
            if (fis != null) {
                int len = fis.available();
                file_buff = new byte[len];
                fis.read(file_buff);
            }

            String[] fileids = storageClient.upload_file(file_buff, getFileExt(fileName), meta_list);
            return fileids;
        } catch (Exception ex) {
            return null;
        }finally{
            if (fis != null){
                try {
                    fis.close();
                } catch (IOException e) {
                    e.printStackTrace();
                }
            }
        }
    }

    /**
     * 根據組名和遠端檔名來刪除一個檔案
     *
     * @param groupName
     *            例如 "group1" 如果不指定該值,預設為group1
     * @param remoteFileName
     *            例如"M00/00/00/wKgxgk5HbLvfP86RAAAAChd9X1Y736.jpg"
     * @return 0為成功,非0為失敗,具體為錯誤程式碼
     */
    public static int deleteFile(String groupName, String remoteFileName) {
        try {
            int result = storageClient.delete_file(groupName == null ? "group1" : groupName, remoteFileName);
            return result;
        } catch (Exception ex) {
            return 0;
        }
    }

    /**
     * 修改一個已經存在的檔案
     *
     * @param oldGroupName
     *            舊的組名
     * @param oldFileName
     *            舊的檔名
     * @param file
     *            新檔案
     * @param fileName
     *            新檔名
     * @return 返回空則為失敗
     */
    public static String[] modifyFile(String oldGroupName, String oldFileName, File file, String fileName) {
        String[] fileids = null;
        try {
            // 先上傳
            fileids = uploadFile(file, fileName);
            if (fileids == null) {
                return null;
            }
            // 再刪除
            int delResult = deleteFile(oldGroupName, oldFileName);
            if (delResult != 0) {
                return null;
            }
        } catch (Exception ex) {
            return null;
        }
        return fileids;
    }

    /**
     * 檔案下載
     *
     * @param groupName 卷名
     * @param remoteFileName 檔名
     * @return 返回一個流
     */
    public static InputStream downloadFile(String groupName, String remoteFileName) {
        try {
            byte[] bytes = storageClient.download_file(groupName, remoteFileName);
            InputStream inputStream = new ByteArrayInputStream(bytes);
            return inputStream;
        } catch (Exception ex) {
            return null;
        }
    }

    public static NameValuePair[] getMetaDate(String groupName, String remoteFileName){
        try{
            NameValuePair[] nvp = storageClient.get_metadata(groupName, remoteFileName);
            return nvp;
        }catch(Exception ex){
            ex.printStackTrace();
            return null;
        }
    }

    /**
     * 獲取檔案字尾名(不帶點).
     *
     * @return 如:"jpg" or "".
     */
    private static String getFileExt(String fileName) {
        if (StringUtils.isBlank(fileName) || !fileName.contains(".")) {
            return "";
        } else {
            return fileName.substring(fileName.lastIndexOf(".") + 1); // 不帶最後的點
        }
    }

}
然後我們就可以來測試上傳的操作了。
    public static void main(String[] args) {
        try {
            File file = new File("D:/2.jpg");
            InputStream is = new FileInputStream(file);
            String fileName = UUID.randomUUID().toString()+".jpg";
            String[] result = FastDFSClient.uploadFile(is, fileName);
            System.out.println(Arrays.toString(result));
        } catch (Exception e) {
            e.printStackTrace();
        }
    }
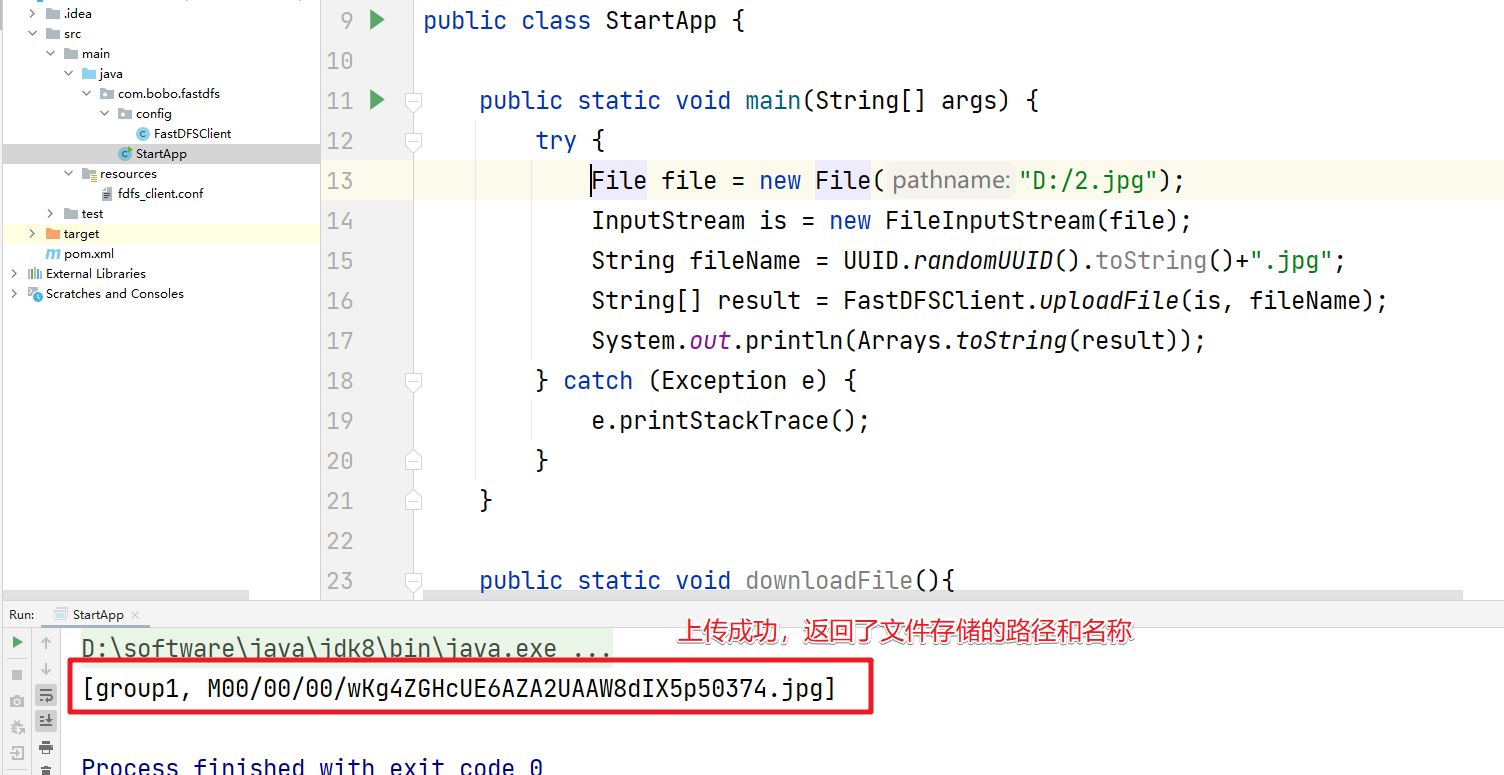
存取即可:http://192.168.56.100:8888/group1/M00/00/00/wKg4ZGHcUE6AZA2UAAW8dIX5p50374.jpg
返回後的字串的結構說明

1.2 檔案下載
檔案下載的流程,如下
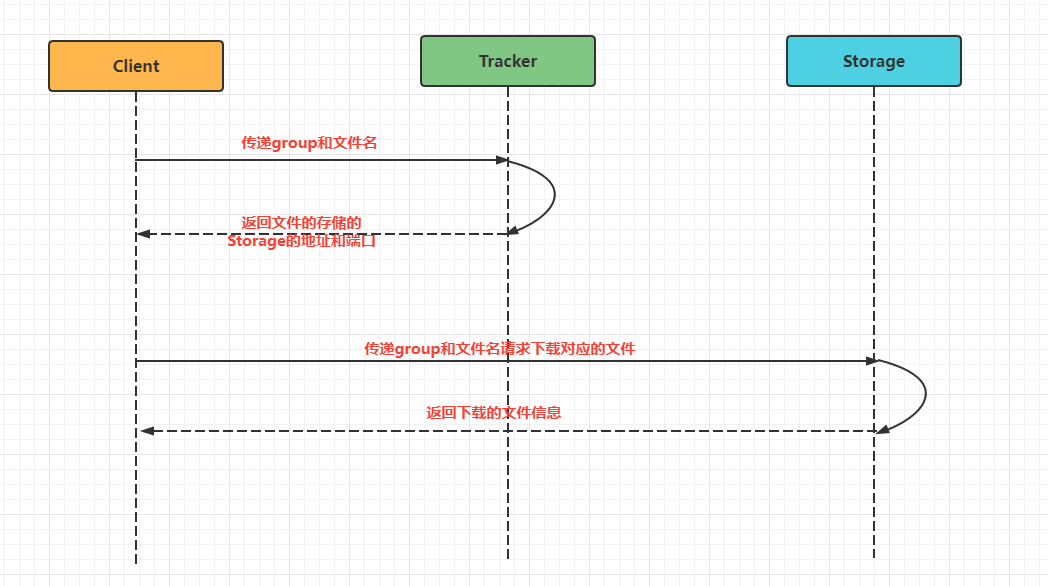
檔案下載的流程為:
- client詢問tracker需要下載的檔案的storage,引數為檔案的標識(group加檔名)。
- tracker根據使用者端的引數返回一臺可用的storage。
- client根據返回的storage直接完成對應的檔案的下載。
有了上面的基礎,檔案下載就非常簡單了,我們只需要根據前面上傳的檔案的group和檔案的儲存路徑就可以通過StorageClient中提供的downloadFile方法把對應的檔案下載下來了,具體的程式碼如下
    /**
     * 檔案下載
     */
    public static void downloadFile(){
        try {
            InputStream is = FastDFSClient
                    .downloadFile("group1", "M00/00/00/wKg4ZGHcUE6AZA2UAAW8dIX5p50374.jpg");
            OutputStream os = new FileOutputStream(new File("D:/12.jpg"));
            int index = 0 ;
            while((index = is.read())!=-1){
                os.write(index);
            }
            os.flush();
            os.close();
            is.close();
        } catch (Exception e) {
            e.printStackTrace();
        }
    }
2.SpringBoot整合
我們在實際工作中基本都是和SpringBoot整合在一起來使用的,那麼我們就來看看FastDFS是如何在SpringBoot專案中來使用的。首先建立一個普通的SpringBoot專案,然後匯入fastdfs-spring-boot-starter這個依賴。
    <dependencies>
        <dependency>
            <groupId>org.springframework.boot</groupId>
            <artifactId>spring-boot-starter-web</artifactId>
        </dependency>

        <dependency>
            <groupId>org.springframework.boot</groupId>
            <artifactId>spring-boot-starter-test</artifactId>
            <scope>test</scope>
        </dependency>

        <dependency>
            <groupId>com.luhuiguo</groupId>
            <artifactId>fastdfs-spring-boot-starter</artifactId>
            <version>0.2.0</version>
        </dependency>
    </dependencies>
既然是一個starter,那麼必然會在spring.factories檔案中提供對應的自動設定類。

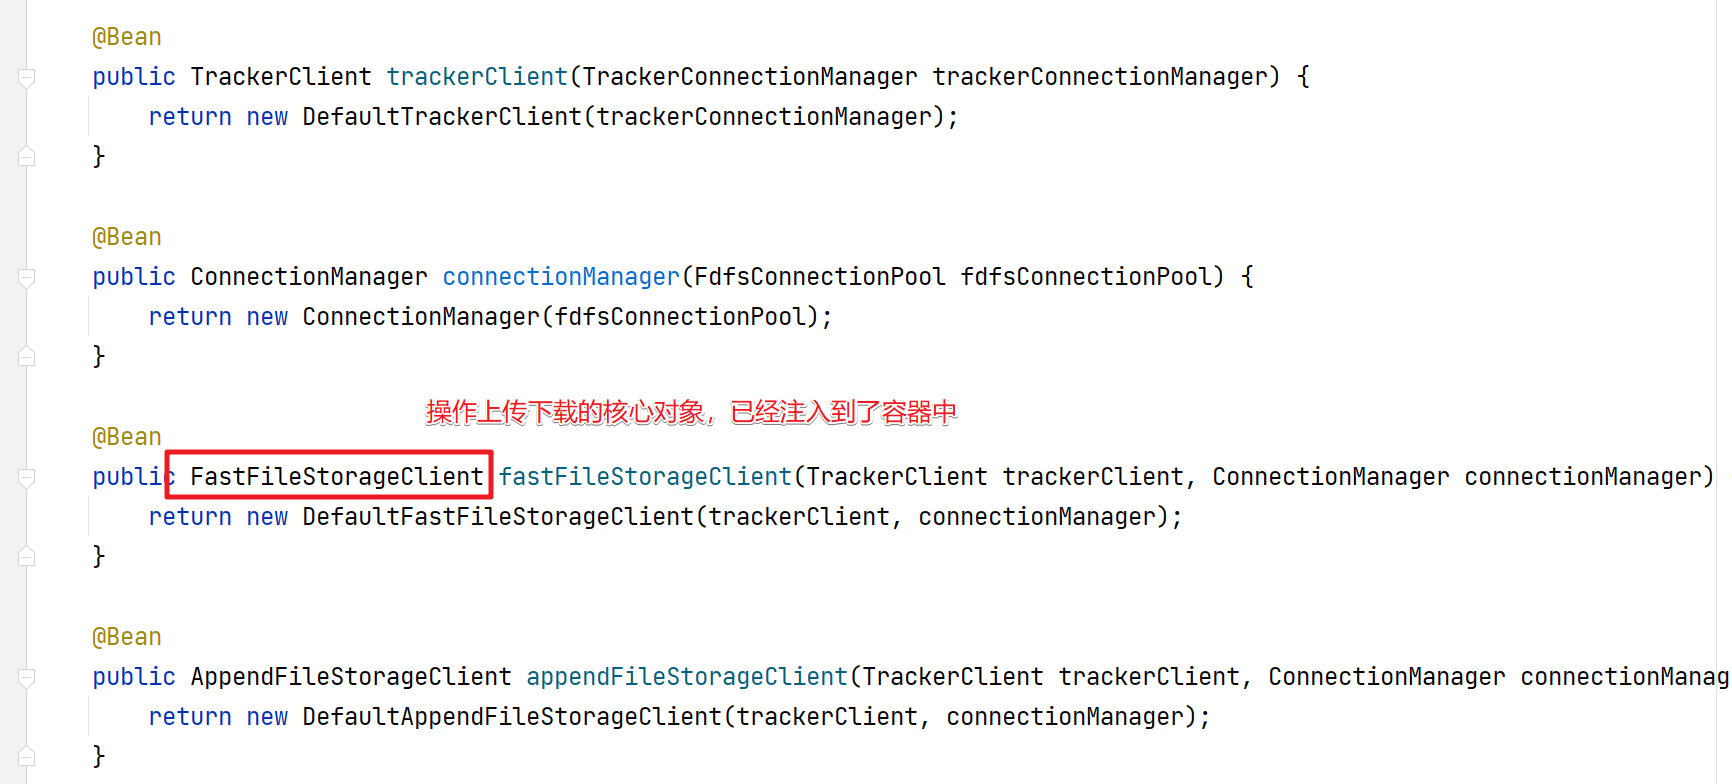
可以看到給我們提供的設定類為FdfsAutoConfiguration進入後可以看到幫我們注入了很多的核心物件。
然後可以看到系統提供的設定資訊,字首為 fdfs
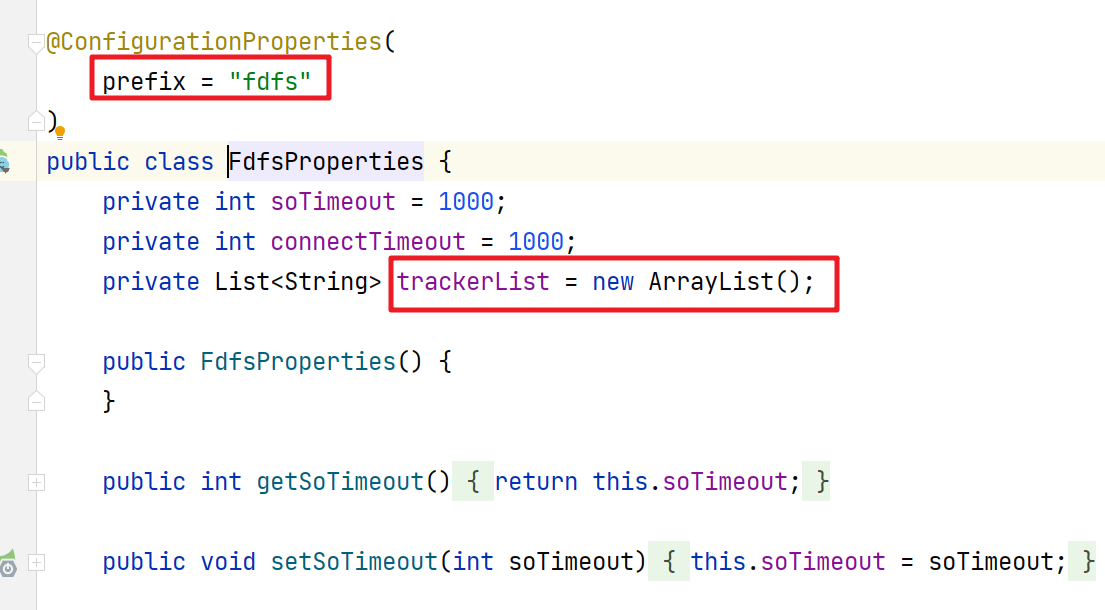
然後我們就可以在application.properties中設定FastDFS的設定資訊了。

設定完成後我們就可以測試檔案的上傳下載操作了
@SpringBootTest
class FastDfsSpringBootApplicationTests {

    @Autowired
    public FastFileStorageClient storageClient;


    @Test
    void contextLoads() throws Exception{
        File file = new File("d:\\2.jpg");
        StorePath path = storageClient.uploadFile(null,new FileInputStream(file),file.length(),file.getName());
        System.out.println(path.getFullPath());
    }

}
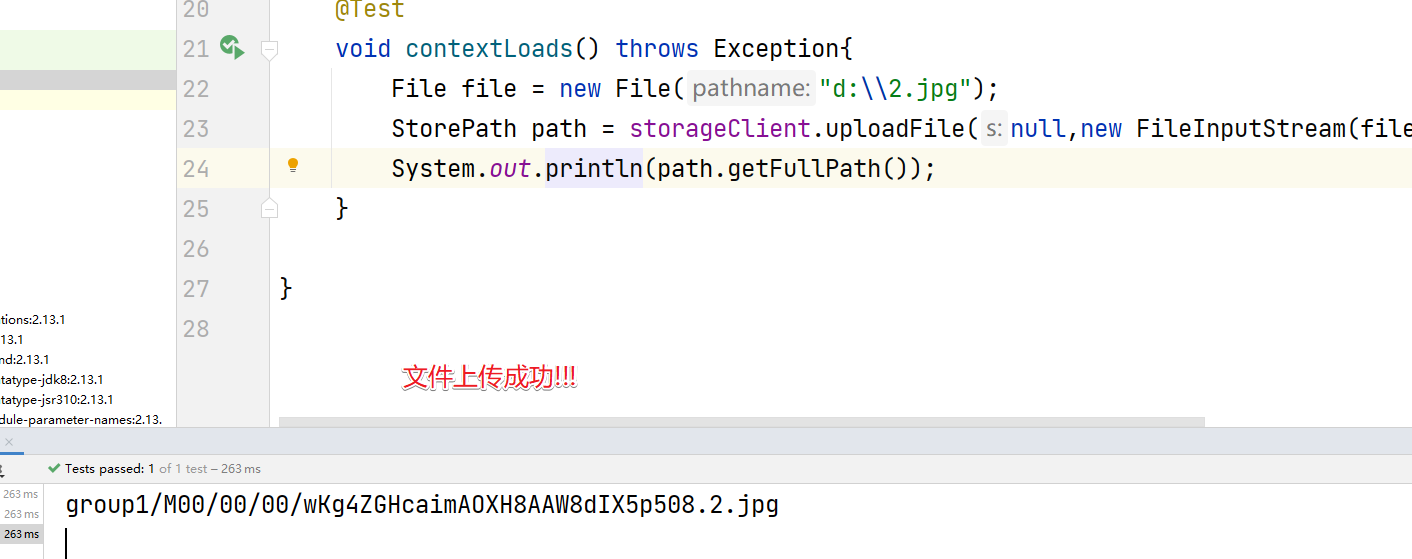
檔案操作成功
