擼完Spring原始碼,我為Spring寫了個分散式快取外掛,現已開源,快要裂開了!!(建議收藏)
大家好,我是冰河~~
經過三個月的時間,我終於擼完了Spring原始碼,快要裂開了!!隨後,開源了這個分散式快取框架!!!
框架地址如下所示:
GitHub:https://github.com/sunshinelyz/mykit-cache
接下來,我就為大家介紹下這個框架。如果這個框架對大家有點幫助,還請小夥伴們開啟Github和Gitee連結,給這個專案一個大大的Star,讓更多的小夥伴收益。也可以為這篇文章點贊、在看和轉發哦~~
框架簡述
mykit架構中獨立出來的mykit-cache元件,封裝了mykit架構下對於快取cache的各種操作,使用者只需要引入相關的Jar包,即可實現對快取的輕鬆操作。
框架結構描述
封裝了對於快取的操作,支援Memcached、Redis、Ehcache等分散式快取資料庫,同時支援Spring的註解,通過Spring的註解可實現設定快取的失效時間和主動重新整理快取。
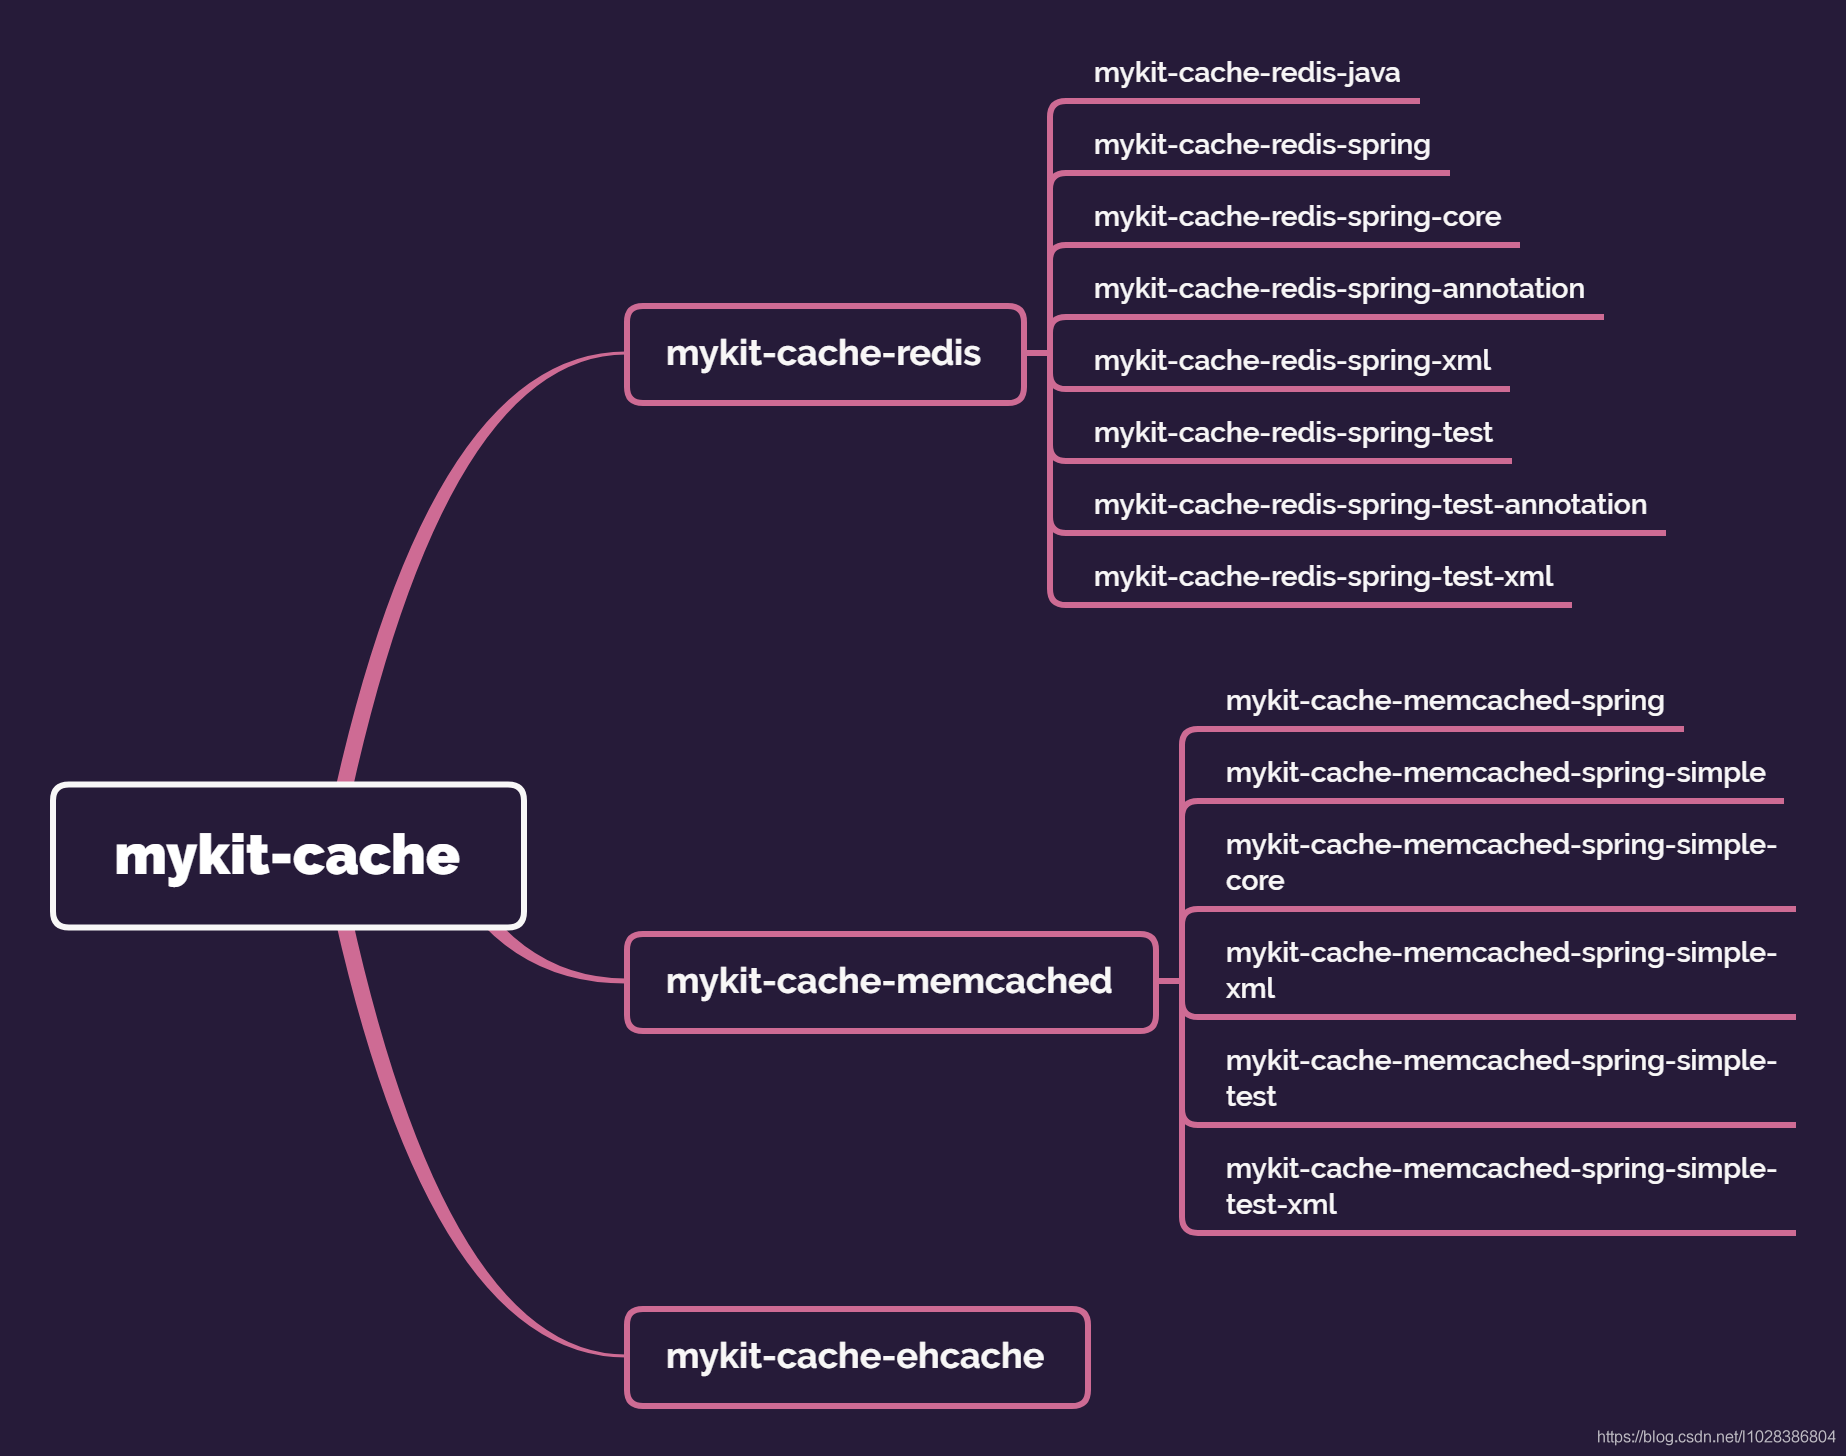
總體結構如下所示。

mykit-cache-memcached
mykit-cache架構下與Memcached快取相關的元件
mykit-cache-memcached-spring
mykit-cache-memcached 下主要與 Spring 整合 Memcached 操作相關的元件,支援通過註解設定快取有效時間
mykit-cache-memcached-spring-simple
mykit-cache-memcached-spring下主要使用simple-spring-memcached核心實現註解快取的元件,支援通過註解設定快取有效時間。
相容Memcached伺服器宕機或因其他原因無法連線Memcached伺服器的情況,主要方式為丟擲相關異常資訊後繼續執行原方法。
mykit-cache-memcached-spring-simple-core
mykit-cache-memcached-spring-simple下的核心模組,提供核心設定項
mykit-cache-memcached-spring-simple-xml
mykit-cache-memcached-spring-simple下以XML方式管理Spring容器的外掛類,提供Spring容器管理Memcached的核心設定,
其他專案或工程只需引入此外掛,同時在自身的Spring組態檔中載入此元件的Memcached的核心設定即可。
mykit-cache-memcached-spring-simple-test
通用測試工程,主要測試mykit-cache-memcached-spring下主要以simple-spring-memcached為核心的快取操作,此外掛模組主要提供主要的測試用例封裝類。
mykit-cache-memcached-spring-simple-test-xml
mykit-cache-memcached-spring下測試simple-spring-memcached為核心的快取操作的入口工程, 測試入口類為:io.mykit.cache.test.memcached.test.xml.MemcachedTest, 同時,需要將此工程 下的classpath:properties/memcached.properties檔案中的simple.memcache.server屬性設定為自身Memcached伺服器的IP和埠。
mykit-cache-redis
mykit-cache架構下與Redis快取相關的元件
mykit-cache-redis-java
mykit-cache-redis 下單獨以Java方式使用Redis快取的封裝。
mykit-cache-redis-spring
mykit-cache-redis 下主要與 Spring 整合 Redis操作相關的元件,支援通過註解設定快取有效時間和主動重新整理快取
mykit-cache-redis-spring-core
mykit-cache-redis-spring 下主要提供Spring整合Redis的通用工具方法等,核心實現由此模組提供
mykit-cache-redis-spring-annotation
mykit-cache-redis-spring 下主要與 Spring 整合 Redis操作相關的元件,支援通過註解設定快取有效時間和主動重新整理快取,主要以Java註解的形式實現Spring容器的管理操作,相容Redis叢集宕機或其他原因無法連線Redis叢集時的情況。
如果Redis叢集宕機或其他原因無法連線Redis叢集時,列印相關的紀錄檔,並繼續向下執行原有方法。
mykit-cache-redis-spring-xml
mykit-cache-redis-spring 下主要與 Spring 整合 Redis操作相關的元件,支援通過註解設定快取有效時間和主動重新整理快取,主要以XML設定的形式實現Spring容器的管理操作,不相容Redis叢集宕機或其他原因無法連線Redis叢集時的情況,如果Redis叢集宕機或其他原因無法連線Redis叢集時,丟擲異常,退出執行。
mykit-cache-redis-spring-test
mykit-cache-redis-spring 下測試Spring整合Redis的核心測試用例類,提供主要的測試封裝;
mykit-cache-redis-spring-test-annotation
mykit-cache-redis-spring 下測試以Java註解形式管理Spring容器的測試入口, 對mykit-cache-redis-spring-annotation提供單元測試用例。
測試入口為:io.mykit.cache.test.redis.spring.annotation.test.TestRedisConfig,執行測試方法前需要先根據自身的Redis叢集情況設定classpath:properties/redis.properties檔案,將redis.properties中的Redis叢集的節點IP和埠修改為自身的Redis叢集節點的IP和埠
mykit-cache-redis-spring-test-xml
mykit-cache-redis-spring 下測試以XML設定形式管理Spring容器的測試入口,mykit-cache-redis-spring-xml的測試模組,對mykit-cache-redis-spring-xml提供單元測試用例。
測試的入口為io.mykit.cache.test.redis.spring.test.xml.RedisTest, 執行測試方法前需要先根據自身的Redis叢集情況設定classpath:properties/redis.properties檔案,將redis.properties中的Redis叢集的節點IP和埠修改為自身的Redis叢集節點的IP和埠
mykit-cache-ehcache
mykit-cache架構下與ehcache快取相關的元件
mykit-cache-ehcache-spring
mykit-cache-ehcache 下主要與 Spring 整合Ehcache操作相關的元件,支援通過註解設定快取有效時間
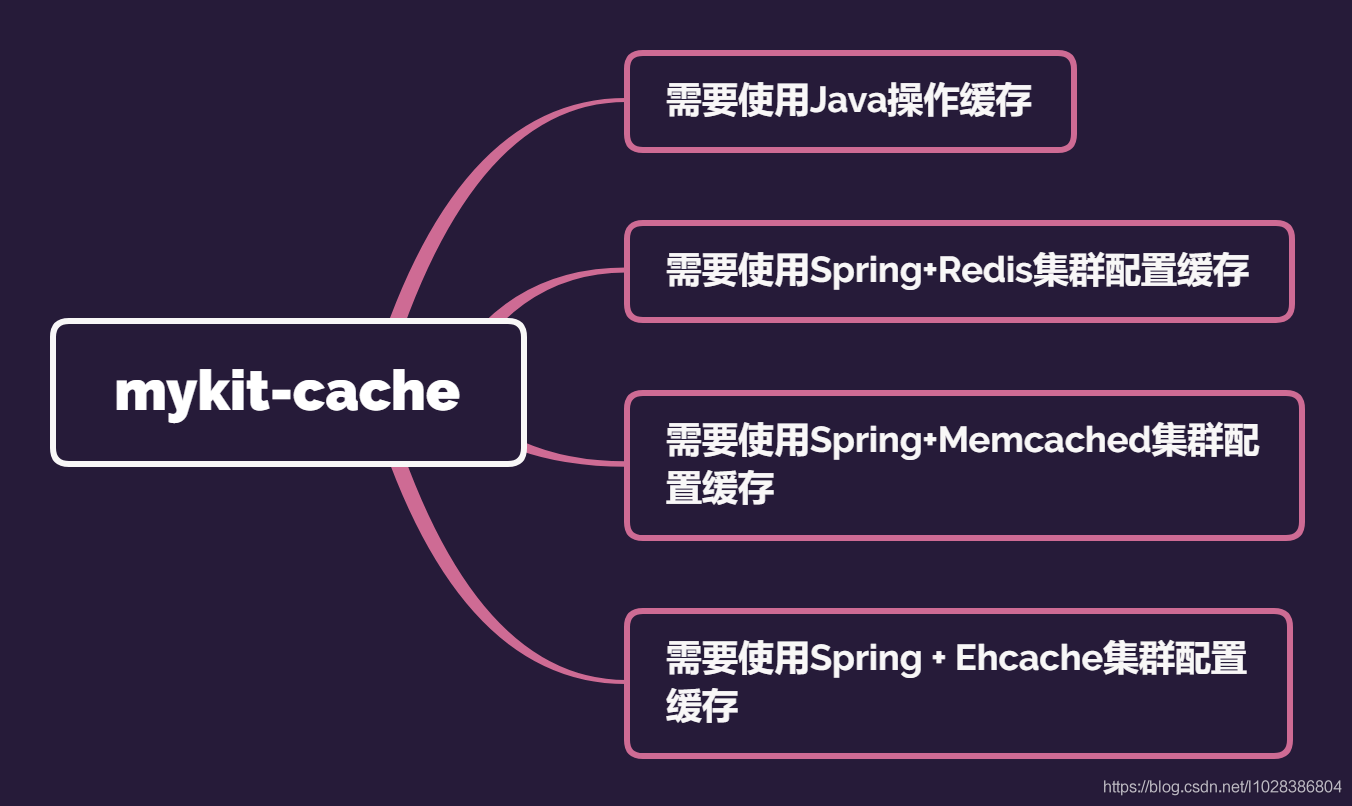
使用場景如下所示

1.需要使用Java直接操作Redis
1)在Maven的pom.xml檔案中加入如下設定:
<dependency>
    <groupId>io.mykit.cache</groupId>
    <artifactId>mykit-cache-redis-java</artifactId>
    <version>1.0.0-SNAPSHOT</version>
</dependency>
2)在專案的resources目錄下建立Redis的組態檔redis.properties檔案
如果是Redis單機模式,則redis.properties檔案的內容如下所示。
redis.host=10.2.2.231
redis.port=6379
redis.max_idle=200
redis.max_wait=10000
redis.max_total=1024
redis.timeout=3000
redis.test_on_borrow=true
如果是Redis叢集模式,則redis.properties檔案的內容如下所示。
#Redis叢集模式
redis.cluster.password=
redis.cluster.max.total=100
redis.cluster.max.idle=20
redis.cluster.min.idle=10
redis.cluster.timeout=2000
redis.cluster.maxAttempts=100
redis.cluster.redisDefaultExpiration=3600
redis.cluster.usePrefix=true
redis.cluster.blockWhenExhausted=true
redis.cluster.maxWaitMillis=3000
redis.cluster.testOnBorrow=false
redis.cluster.testOnReturn=false
redis.cluster.testWhileIdle=true
redis.cluster.minEvictableIdleTimeMillis=60000
redis.cluster.timeBetweenEvictionRunsMillis=30000
redis.cluster.numTestsPerEvictionRun=-1
redis.cluster.defaultExpirationKey=defaultExpirationKey
redis.cluster.expirationSecondTime=300
redis.cluster.preloadSecondTime=280

# virsual env
redis.cluster.node.one=192.168.175.151
redis.cluster.node.one.port=7001

redis.cluster.node.two=192.168.175.151
redis.cluster.node.two.port=7002

redis.cluster.node.three=192.168.175.151
redis.cluster.node.three.port=7003

redis.cluster.node.four=192.168.175.151
redis.cluster.node.four.port=7004

redis.cluster.node.five=192.168.175.151
redis.cluster.node.five.port=7005

redis.cluster.node.six=192.168.175.151
redis.cluster.node.six.port=7006

redis.cluster.node.seven=192.168.175.151
redis.cluster.node.seven.port=7006
注意:
設定redis.properties檔案時,可以修改Redis的IP和埠號,但是檔案中的Key必須與上述範例給出的Key相同,否則Redis使用者端無法連線到Redis伺服器。
3)在Java程式中使用Redis快取
如果設定的是單機模式,則使用如下方式使用Redis快取
Jedis jedis = RedisBuilder.getInstance();
jedis.set("name", "binghe");
String value = jedis.get("name");
System.out.println(value);
如果設定的是叢集環境,則使用如下方式使用Redis快取
JedisCluster jedisCluster = RedisClusterBuilder.getInstance();
jedisCluster.set("name", "binghe");
String value = jedisCluster.get("name");
System.out.println(value);
2.需要使用Spring+Redis叢集設定快取:
1)需要相容Redis叢集宕機或其他原因無法連線Redis叢集時的情況:
在Maven的pom.xml中加入如下設定即可:
 <dependency>
    <groupId>io.mykit.cache</groupId>
    <artifactId>mykit-cache-redis-spring-annotation</artifactId>
    <version>1.0.0-SNAPSHOT</version>
</dependency>
此時,還需要根據具體情況在自身專案的合適模組中建立Redis的設定類,主要的功能為提供以Java註解的形式設定Spring和Redis叢集整合的Spring容器管理。
範例程式為:mykit-cache-redis-spring-test-annotation測試模組中的io.mykit.cache.test.redis.spring.annotation.config.AnnotationConfig類。
package io.mykit.cache.test.redis.spring.annotation.config;

 import io.mykit.cache.redis.spring.annotation.config.CacheRedisConfig;
 import org.springframework.cache.annotation.EnableCaching;
 import org.springframework.context.annotation.ComponentScan;
 import org.springframework.context.annotation.Configuration;
 import org.springframework.context.annotation.EnableAspectJAutoProxy;
 import org.springframework.context.annotation.PropertySource;

 /**
  * @author binghe
  * @version 1.0.0
  * @description 提供以Java註解的形式設定Spring和Redis叢集整合的Spring容器管理
  */
 @Configuration
 @EnableCaching
 @EnableAspectJAutoProxy(proxyTargetClass = true)
 @ComponentScan(value = {"io.mykit.cache"})
 @PropertySource(value = {"classpath:properties/redis-default.properties", "classpath:properties/redis.properties"})
 public class AnnotationConfig extends CacheRedisConfig {
 }
2)不需要相容Redis叢集宕機或其他原因無法連線Redis叢集時的情況:
在Maven的pom.xml中加入如下設定即可:
<dependency>
    <groupId>io.mykit.cache</groupId>
    <artifactId>mykit-cache-redis-spring-xml</artifactId>
    <version>1.0.0-SNAPSHOT</version>
</dependency>
此時還需要根據具體情況在自身專案的spring組態檔中,進行相關的設定,主要的設定項有:開啟Spring註解掃描及代理,掃描的基本類中加入io.mykit.cache包,並按照順序載入
classpath*:properties/redis-default.properties, classpath*:properties/redis.properties檔案,具體範例為:mykit-cache-redis-spring-test-xml下的classpath:spring/spring-context.xml組態檔:
<?xml version="1.0" encoding="UTF-8"?>
<beans xmlns="http://www.springframework.org/schema/beans"
	   xmlns:xsi="http://www.w3.org/2001/XMLSchema-instance"
	   xmlns:p="http://www.springframework.org/schema/p"
	   xmlns:aop="http://www.springframework.org/schema/aop"
	   xmlns:context="http://www.springframework.org/schema/context"
	   xmlns:cache="http://www.springframework.org/schema/cache"
	   xsi:schemaLocation="http://www.springframework.org/schema/beans
                        http://www.springframework.org/schema/beans/spring-beans-4.2.xsd
                        http://www.springframework.org/schema/context
                        http://www.springframework.org/schema/context/spring-context-4.2.xsd
                        http://www.springframework.org/schema/aop
                        http://www.springframework.org/schema/aop/spring-aop-4.2.xsd
                        http://www.springframework.org/schema/cache
                        http://www.springframework.org/schema/cache/spring-cache-4.2.xsd">

	<context:annotation-config />
	<aop:aspectj-autoproxy/>
	<context:component-scan base-package="io.mykit.cache"/>
	   <!-- 引入組態檔 -->
	  <context:property-placeholder location="classpath*:properties/redis-default.properties, classpath*:properties/redis.properties" system-properties-mode="FALLBACK"/>
	  <context:annotation-config />
	  <context:component-scan base-package="io.mykit.cache" />
 	 <import resource="classpath:redis/spring-redis.xml"/>
</beans>
注意:
(1)無論需不需要相容Redis叢集宕機或其他原因無法連線Redis叢集時的情況,都需要在自身專案的classpath目錄下建立redis.properties檔案,設定自身Redis叢集節點的IP和埠。
目前,mykit-cache-redis-spring-annotation和mykit-cache-redis-spring-xml最多支援7臺Redis叢集,可根據自身實際情況擴充套件;
如果自身的Redis叢集不足7臺,可在redis.properties檔案中設定重複的Redis叢集節點的IP和埠;
(2)在自身專案的classpath目錄下建立redis.properties檔案,此檔名不是強制要求的,可使用其他的檔名代替,但是此檔名必須和spring組態檔中載入的redis組態檔名以及以Java註解形式管理Spring容器的設定類中載入的redis組態檔名保持一致;
(3)自定義的Redis叢集組態檔中的叢集節點IP和埠的設定項名稱必須和範例classpath:properties/redis.properties組態檔中的叢集節點IP和埠的設定項名稱相同;
(4)設定範例:
比如,在我自己專案中的classpath:properties下redis叢集的組態檔為redis.properties,具體內容如下:
#redis cluster config
redis.cluster.defaultExpirationKey=defaultExpirationKey
redis.cluster.expirationSecondTime=300000
redis.cluster.preloadSecondTime=280000

#node info
redis.cluster.node.one=10.2.2.231
redis.cluster.node.one.port=7001

redis.cluster.node.two=10.2.2.231
redis.cluster.node.two.port=7002

redis.cluster.node.three=10.2.2.231
redis.cluster.node.three.port=7003

redis.cluster.node.four=10.2.2.231
redis.cluster.node.four.port=7004

redis.cluster.node.five=10.2.2.231
redis.cluster.node.five.port=7005

redis.cluster.node.six=10.2.2.231
redis.cluster.node.six.port=7006

redis.cluster.node.seven=10.2.2.231
redis.cluster.node.seven.port=7006
則在我專案的spring組態檔中需要載入的組態檔為:
<context:property-placeholder location="classpath*:properties/redis-default.properties, classpath*:properties/redis.properties" system-properties-mode="FALLBACK"/>
或者在我專案的設定類中需要載入的組態檔註解為:
@PropertySource(value = {"classpath:properties/redis-default.properties", "classpath:properties/redis.properties"})
也就是說:classpath:properties/redis-default.properties檔案要寫到自定義的組態檔的前面,框架會先載入classpath:properties/redis-default.properties。
然後載入自定義的組態檔,如果自定義的組態檔中存在與classpath:properties/redis-default.properties檔案相同的屬性設定,則框架會用自定義的設定屬性覆蓋classpath:properties/redis-default.properties中相同的屬性
(5)具體使用
1)在相關的查詢方法上加上無key屬性的@Cacheable註解:
@Cacheable(value={"test#10#2"})
沒有設定@Cacheable的key屬性,此時的@Cacheable的key屬性值按照一定策略自定生成,即以當前類名(完整包名+類名)+方法名+方法型別列表+方法參數列的HashCode為當前@Cacheable的key屬性。具體的key生成策略類為mykit-cache-redis-spring-core中的io.mykit.cache.redis.spring.cache.CacheKeyGenerator類;
2)在相關的查詢方法上加上有key屬性的@Cacheable註解
@Cacheable(value={"test#10#2"} key="key" + ".#defaultValue")
設定了@Cacheable的key屬性,此時@Cacheable的key屬性值為key拼接引數defaultValue的值的結果的HashCode值。
注意:
(1)@Cacheable註解中沒有key屬性,框架會為@Cacheable生成Key屬性,也就是說key屬性不是必須的;
(2)@Cacheable註解沒有設定key屬性,則以當前類名(完整包名+類名)+方法名+方法型別列表+方法參數列的HashCode為當前@Cacheable的key屬性;
(3)@Cacheable註解設定了key屬性,則以當前key的HashCode作為當前@Cacheable的key屬性;
(4)@Cacheable的value屬性中我們設定的值為 test#10#2,此時表示@Cacheable的快取名稱為test,其中10表示快取有效時長(單位為秒),2表示距離快取失效的剩餘時長(單位為秒),
即@Cacheable的value屬性設定格式為:快取名稱#expireTime#reloadTime,框架規定必須以#作為分隔符
- expireTime:表示快取的有效時長,單位秒;
- reloadTime:表示距離快取失效的剩餘時長,單位秒;
- expireTime 需要大於 reloadTime,否則無意義
(5)@Cacheable的value屬性說明
- 以快取名稱#expireTime#reloadTime格式設定@Cacheable的value屬性後,框架會將查詢結果放到快取中,有效時長為expireTime秒,距離快取失效的剩餘時長為reloadTime秒;
- 當在將資料存入快取時,經過了0秒——(expireTime-reloadTime)秒時間範圍時,再次呼叫方法,則直接從快取中獲取資料;
- 當在將資料存入快取時,經過了reloadTime秒——expireTime秒時間範圍時,再次呼叫方法,框架會通過代理和反射的方式主動呼叫原方法從真正的資料來源獲取資料後重新整理快取;
- 當在將資料存入快取時,經過了超過expireTime秒的時間,則快取失效,再次呼叫方法,則執行原方法查詢資料,框架會自動將查詢結果存入快取;
- 當框架通過代理和反射的方式主動呼叫原方法從真正的資料來源獲取資料後重新整理快取時,為防止請求的多個執行緒同時執行重新整理快取的操作,框架提供了分散式鎖來保證只有一個執行緒執行重新整理快取操作;
- 框架主動呼叫原方法從真正的資料來源獲取資料後重新整理快取的操作與使用者的請求操作是非同步的,不會影響使用者請求的效能;
- 框架主動呼叫原方法從真正的資料來源獲取資料後重新整理快取的操作對使用者請求透明,即使用者感知不到框架主動重新整理快取的操作;
其他:
1)當 @Cacheable 的Value只設定了快取名稱,比如設定為@Cacheable(value=「test」)
此時的expireTime預設為redis組態檔的redis.cluster.expirationSecondTime屬性值,單位為秒;reloadTime預設為redis組態檔的redis.cluster.preloadSecondTime屬性值,單位為秒;
屬性值的載入順序為:優先載入自定義的redis組態檔的redis.cluster.expirationSecondTime屬性值和redis.cluster.preloadSecondTime屬性值,如果自定義的redis組態檔無相關的屬性值;則從框架預設的redis組態檔redis-default.properties檔案中載入;
2)當 @Cacheable 的Value設定快取名稱和失效時長,比如設定為@Cacheable(value=「test#10」)
此時的reloadTime預設為redis組態檔的redis.cluster.preloadSecondTime屬性值,單位為秒;
屬性值的載入順序為:優先載入自定義的redis組態檔的redis.cluster.preloadSecondTime屬性值,如果自定義的redis組態檔無相關的屬性值;則從框架預設的redis組態檔redis-default.properties檔案中載入;
3)當 @Cacheable 的Value設定快取名稱、失效時長和距離快取失效的剩餘時長,比如設定為:@Cacheable(value=「test#10#2」)
此時不會載入預設的expireTime和reloadTime,框架會直接使用@Cacheable註解中value屬性設定的expireTime和reloadTime;
4)無論@Cacheable的Value屬性是否設定了快取時長資訊,則都不會出現只設定reloadTime,沒有設定expireTime的情況,框架規定的value屬性格式為:快取名稱#expireTime#reloadTime
即只會出現的格式為:
- 快取名稱
- 快取名稱#expireTime
- 快取名稱#expireTime#reloadTime
不會存在單獨出現reloadTime的情況,會出現設定了快取名稱#expireTime,reloadTime使用組態檔預設的時長設定的情況;
注意事項
1.mykit-cache-redis-spring-xml參照和mykit-cache-redis-spring-annotation參照是互斥的,即在一個工程中mykit-cache-redis-spring-xml和mykit-cache-redis-spring-annotation只能同時參照一個;
2.mykit-cache-redis-spring-xml和mykit-cache-redis-spring-annotation的功能是一樣的,但是mykit-cache-redis-spring-annotation工程相容Redis叢集宕機或其他原因無法連線Redis叢集時的情況;
3.如果Redis叢集宕機或其他原因無法連線Redis叢集時,則mykit-cache-redis-spring-xml會丟擲異常,退出執行;而mykit-cache-redis-spring-annotation則會列印相關的異常資訊,繼續向下執行原來的方法。
4.如果你的專案中以XML設定的方式,設定了Spring容器和SpringMVC,而你想以相容Redis叢集宕機或其他原因連線不上Redis叢集的方式設定快取,可以經過如下設定:
1)在專案中新增如下設定類:
SpringContextConfig:設定Spring容器:
package io.mykit.cache.redis.spring.utils.config;

import org.springframework.cache.annotation.EnableCaching;
import org.springframework.context.annotation.ComponentScan;
import org.springframework.context.annotation.Configuration;
import org.springframework.context.annotation.EnableAspectJAutoProxy;
import org.springframework.context.annotation.ImportResource;
import org.springframework.context.annotation.PropertySource;

import io.mykit.cache.redis.spring.annotation.config.CacheRedisConfig;

/**
 * @ClassName SpringContextConfig
 * @Description Spring Java設定
 * @author binghe
 */
@Configuration
@EnableCaching
@EnableAspectJAutoProxy(proxyTargetClass = true)
@ComponentScan(value = {"io.mykit.cache"})
@PropertySource(value = {"classpath:properties/redis-default.properties", "classpath:properties/redis.properties"})
@ImportResource("classpath:spring/applicationContext.xml")
public class SpringContextConfig extends CacheRedisConfig{

}
SpringMVCConfig:設定SpringMVC:
package io.mykit.cache.redis.spring.utils.config;

import org.springframework.context.annotation.Configuration;
import org.springframework.context.annotation.ImportResource;

/**
 * @ClassName SpringMVCConfig
 * @Description SpringMVC Java設定
 * @author binghe
 */
@Configuration
@ImportResource("classpath:spring/SpringMVC-servlet.xml")
public class SpringMVCConfig {

}
2)web專案的web.xml修改如下:
<?xml version="1.0" encoding="UTF-8"?>
<web-app xmlns:xsi="http://www.w3.org/2001/XMLSchema-instance"
	xmlns="http://java.sun.com/xml/ns/javaee" xmlns:web="http://java.sun.com/xml/ns/javaee"
	xsi:schemaLocation="http://java.sun.com/xml/ns/javaee http://java.sun.com/xml/ns/javaee/web-app_3_0.xsd"
	version="3.0">
	  <!-- 設定spring監聽器 -->
	<listener>
		<listener-class>org.springframework.web.context.ContextLoaderListener</listener-class>
	</listener>

	<context-param>
		<param-name>contextClass</param-name>
		<param-value>
			org.springframework.web.context.support.AnnotationConfigWebApplicationContext
		</param-value>
    </context-param>

	<context-param>
		<param-name>contextConfigLocation</param-name>
		<param-value>io.mykit.cache.redis.spring.utils.config.SpringContextConfig</param-value>
	</context-param>
	<listener>
		<listener-class>org.springframework.web.util.IntrospectorCleanupListener</listener-class>
	</listener>

	<servlet>
		<servlet-name>SpringMVC</servlet-name>
		<servlet-class>org.springframework.web.servlet.DispatcherServlet</servlet-class>

		<init-param>
			<param-name>contextClass</param-name>
			<param-value>
				org.springframework.web.context.support.AnnotationConfigWebApplicationContext
			</param-value>
		</init-param>

		<init-param>
			<param-name>contextConfigLocation</param-name>
			<param-value>io.mykit.cache.redis.spring.utils.config.SpringMVCConfig</param-value>
		</init-param>
		<load-on-startup>1</load-on-startup>
	</servlet>
	<servlet-mapping>
		<servlet-name>SpringMVC</servlet-name>
		<url-pattern>/</url-pattern>
	</servlet-mapping>
</web-app>
3.需要使用Spring+Memcached叢集設定快取
1、需要在工程的pom.xml中參照
<dependency>
    <groupId>io.mykit.cache</groupId>
    <artifactId>mykit-cache-memcached-spring-simple-xml</artifactId>
    <version>1.0.0-SNAPSHOT</version>
</dependency>
注意:框架的此模組不支援主動重新整理快取,底層核心使用的是simple-spring-memcached核心。
2、使用方法
1)在自身專案的classpath:properties目錄下新建Memcached的組態檔,比如:memcached.properties檔案,設定連線Memcached的屬性;
屬性設定如下:
#simple memcached config
simple.memcache.server=127.0.0.1:12000
simple.memcache.consistenthashing=true
simple.memcache.connectionpoolsize=1
simple.memcache.optimizeget=false
simple.memcache.optimizemergebuffer=false
simple.memcache.mergefactor=50
simple.memcache.usebinaryprotocol=true
simple.memcache.connectiontimeout=3000
simple.memcache.operationtimeout=2000
simple.memcache.enableheartbeat=true
simple.memcache.failureMode=false
注意:自定義的memcached檔案的屬性,必須和memcached-default.properties預設設定的屬性key相同,也就是和上述設定的key相同,但可以不用覆蓋上述完整的設定,
可以只設定:
simple.memcache.server=192.168.209.121:12000
來覆蓋simple.memcache.server屬性
2)在自身專案的classpath目錄下新建spring組態檔,比如:spring-context.xml,設定內容如下:
<?xml version="1.0" encoding="UTF-8"?>
<beans xmlns="http://www.springframework.org/schema/beans"
	   xmlns:xsi="http://www.w3.org/2001/XMLSchema-instance"
	   xmlns:p="http://www.springframework.org/schema/p"
	   xmlns:aop="http://www.springframework.org/schema/aop"
	   xmlns:context="http://www.springframework.org/schema/context"
	   xmlns:cache="http://www.springframework.org/schema/cache"
	   xsi:schemaLocation="http://www.springframework.org/schema/beans
                        http://www.springframework.org/schema/beans/spring-beans-4.2.xsd
                        http://www.springframework.org/schema/context
                        http://www.springframework.org/schema/context/spring-context-4.2.xsd
                        http://www.springframework.org/schema/aop
                        http://www.springframework.org/schema/aop/spring-aop-4.2.xsd
                        http://www.springframework.org/schema/cache
                        http://www.springframework.org/schema/cache/spring-cache-4.2.xsd">

	<context:annotation-config />
	<aop:aspectj-autoproxy/>
	<context:component-scan base-package="io.mykit.cache"/>
	   <!-- 引入組態檔 -->
	  <context:property-placeholder location="classpath*:properties/memcached-default.properties, classpath*:properties/memcached.properties" system-properties-mode="FALLBACK"/>
	  <context:annotation-config />
	  <context:component-scan base-package="io.mykit.cache" />
 	 <import resource="classpath:memcached/memcached-simple.xml"/>
</beans>
根據上述設定載入properties檔案順序,框架會用自定義的memcached.properties檔案屬性覆蓋memcached-default.properties檔案的屬性。
如果memcached-default.properties檔案中存在memcached.properties中不存在的屬性,框架會用memcached-default.properties中預設的屬性。
至此,就可以使用simple-spring-memcached提供的註解來設定使用快取了。
3、simple-spring-memcached介紹
3-1、基本介紹
simple-spring-memcached本質上是採用了AOP的方式來實現快取的呼叫和管理,其核心元件宣告了一些Advice,當遇到相應的切入點時,會執行這些Advice來對memcached加以管理。
切入點是通過標籤的方式來進行宣告的,在專案開發時,通常在DAO的方法上加以相應的標籤描述,來表示元件對該方法的攔截 元件所提供的切入點主要包括以下幾種:
ReadThroughSingleCache、ReadThroughMultiCache、ReadThroughAssignCache
1)當遇到查詢方法宣告這些切入點時,元件首先會從快取中讀取資料,取到資料則跳過查詢方法,直接返回。 取不到資料在執行查詢方法,並將查詢結果放入快取,以便下一次獲取。 InvalidateSingleCache、InvalidateMultiCache、InvalidateAssignCache
2)當遇到刪除方法宣告這些切入點時,元件會刪除快取中的對應實體,以便下次從快取中讀取出的資料狀態是最新的 UpdateSingleCache、UpdateMultiCache、UpdateAssignCache
3-2、註解說明
各Annotation的詳細說明
- ReadThroughSingleCache
作用:讀取Cache中資料,如果不存在,則將讀取的資料存入Cachekey生成規則:ParameterValueKeyProvider指定的引數,如果該引數物件中包含CacheKeyMethod註解的方法,則呼叫其方法,否則呼叫toString方法
@ReadThroughSingleCache(namespace = "Alpha", expiration = 30)
public String getDateString(@ParameterValueKeyProvider final String key) {
   final Date now = new Date();
   try {
       Thread.sleep(1500);
   } catch (InterruptedException ex) {

   }
   return now.toString() + ":" + now.getTime();
}
- InvalidateSingleCache
作用:失效Cache中的資料
key生成規則:
1)使用 ParameterValueKeyProvider註解時,與ReadThroughSingleCache一致
2)使用 ReturnValueKeyProvider 註解時,key為返回的物件的CacheKeyMethod或toString方法生成
@InvalidateSingleCache(namespace = "Charlie")
public void updateRandomString(@ParameterValueKeyProvider final Long key) {
    // Nothing really to do here.
}

@InvalidateSingleCache(namespace = "Charlie")
@ReturnValueKeyProvider
public Long updateRandomStringAgain(final Long key) {
    return key;
}
- UpdateSingleCache
作用:更新Cache中的資料
key生成規則:ParameterValueKeyProvider指定
1)ParameterDataUpdateContent:方法引數中的資料,作為更新快取的資料
2)ReturnDataUpdateContent:方法呼叫後生成的資料,作為更新快取的資料
注:上述兩個註解,必須與Update*系列的註解一起使用
@UpdateSingleCache(namespace = "Alpha", expiration = 30)
public void overrideDateString(final int trash, @ParameterValueKeyProvider final String key,
       @ParameterDataUpdateContent final String overrideData) {
}

@UpdateSingleCache(namespace = "Bravo", expiration = 300)
@ReturnDataUpdateContent
public String updateTimestampValue(@ParameterValueKeyProvider final Long key) {
   try {
       Thread.sleep(100);
   } catch (InterruptedException ex) {
   }
   final Long now = new Date().getTime();
   final String result = now.toString() + "-U-" + key.toString();
   return result;
}
- ReadThroughAssignCache
作用:讀取Cache中資料,如果不存在,則將讀取的資料存入Cache
key生成規則: ReadThroughAssignCache 註解中的 assignedKey 欄位指定
@ReadThroughAssignCache(assignedKey = "SomePhatKey", namespace = "Echo", expiration = 3000)
public List<String> getAssignStrings() {
    try {
        Thread.sleep(500);
    } catch (InterruptedException ex) {
    }
    final List<String> results = new ArrayList<String>();
    final long extra = System.currentTimeMillis() % 20;
    final String base = System.currentTimeMillis() + "";
    for (int ix = 0; ix < 20 + extra; ix++) {
        results.add(ix + "-" + base);
    }
    return results;
}
- InvalidateAssignCache
作用:失效快取中指定key的資料
key生成規則:assignedKey 欄位指定
@InvalidateAssignCache(assignedKey = "SomePhatKey", namespace = "Echo")
public void invalidateAssignStrings() {

}
- UpdateAssignCache
作用:更新指定快取
key生成規則:assignedKey 欄位指定
@UpdateAssignCache(assignedKey = "SomePhatKey", namespace = "Echo", expiration = 3000)
public void updateAssignStrings(int bubpkus, @ParameterDataUpdateContent final List<String> newData) {

}
4.需要使用Spring + Ehcache叢集設定快取
框架此模組暫時不做實現,由於Spring與Ehcache的整合過於簡單,可自行實現Spring與Ehcache的整合,這個不提供封裝了。
spring4設定基於註解的ehcache快取
1. ehcache組態檔ehcache.xml
<?xml version="1.0" encoding="UTF-8"?>
<ehcache name="es">
    <diskStore path="java.io.tmpdir"/>
    <defaultCache
        maxElementsInMemory="10000"
		eternal="false"
		timeToIdleSeconds="30"
		timeToLiveSeconds="30"
		overflowToDisk="true">
    </defaultCache>

 <!-- 設定自定義快取
	maxElementsInMemory:快取中允許建立的最大物件數
	eternal:快取中物件是否為永久的,如果是,超時設定將被忽略,物件從不過期。
	timeToIdleSeconds:快取資料的鈍化時間,也就是在一個元素消亡之前, 兩次存取時間的最大時間間隔值,這隻能在元素不是永久駐留時有效,
	如果該值是 0 就意味著元素可以停頓無窮長的時間。
	timeToLiveSeconds:快取資料的生存時間,也就是一個元素從構建到消亡的最大時間間隔值,
	這隻能在元素不是永久駐留時有效,如果該值是0就意味著元素可以停頓無窮長的時間。
	overflowToDisk:記憶體不足時,是否啟用磁碟快取。
	memoryStoreEvictionPolicy:快取滿了之後的淘汰演演算法。
-->

<cache name="statisticServiceCache"
	maxElementsInMemory="1000"
	eternal="false"
	overflowToDisk="true"
	timeToIdleSeconds="900"
	timeToLiveSeconds="1800"
	diskPersistent="false"
	memoryStoreEvictionPolicy="LFU" />
</ehcache>
2.spring-cache註解及ehcache bean設定
<cache:annotation-driven cache-manager="cacheManager"/>
<!-- cacheManager工廠類,指定ehcache.xml的位置 -->
<bean id="ehcache" class="org.springframework.cache.ehcache.EhCacheManagerFactoryBean">
	<property name="configLocation"  value="/WEB-INF/ehcache.xml"/>
	<!-- <property name="shared"  value="true"/>   -->
</bean>
<!-- 宣告cacheManager -->
<bean id="cacheManager" class="org.springframework.cache.ehcache.EhCacheCacheManager">
	<property name="cacheManager" ref="ehcache" />
</bean>
3.確認開啟了spring的aop支援
<aop:aspectj-autoproxy/>
4.Spring的cache註解的使用
(1)@Cacheable
@Cacheable 主要的引數
- value
快取的名稱,在 spring 組態檔中定義,必須指定至少一個
例如:
@Cacheable(value=」mycache」) 或者
@Cacheable(value={」cache1」,」cache2」}
- key
快取的 key,可以為空,如果指定要按照 SpEL 表示式編寫,如果不指定,則預設按照方法的所有引數進行組合
例如:
@Cacheable(value=」testcache」,key=」#userName」)
- condition
快取的條件,可以為空,使用 SpEL 編寫,返回 true 或者 false,只有為 true 才進行快取
例如:
@Cacheable(value=」testcache」,condition=」#userName.length()
如下範例:
@Cacheable(value = "statisticServiceCache", key = "'activityChartData_' + #urlID")
public ResultInfo getActivityChartData(String urlID, Date startMonth,Date endMonth) {
    …
}
這個註解用於,在呼叫被註解的方法時,首先檢查當前快取系統中是否存在鍵值為key的快取。如果存在,則直接返回快取物件,不執行該方法。如果不存在,則呼叫該方法,並將得到的返回值寫入快取中。
(2)@CachePut
@CachePut 主要的引數
- value
快取的名稱,在 spring 組態檔中定義,必須指定至少一個
例如:
@Cacheable(value=」mycache」) 或者
@Cacheable(value={」cache1」,」cache2」}
- key
快取的 key,可以為空,如果指定要按照 SpEL 表示式編寫,如果不指定,則預設按照方法的所有引數進行組合
例如:
@Cacheable(value=」testcache」,key=」#userName」)
- condition
快取的條件,可以為空,使用 SpEL 編寫,返回 true 或者 false,只有為 true 才進行快取
例如:
@Cacheable(value=」testcache」,condition=」#userName.leng
@CachePut用於寫入快取,但是與@ Cacheable不同,@CachePut註解的方法始終執行,然後將方法的返回值寫入快取,此註解主要用於新增或更新快取。
(3) @CacheEvict
@CacheEvict 主要的引數
- value
快取的名稱,在 spring 組態檔中定義,必須指定至少一個
例如:
@CachEvict(value=」mycache」) 或者
@CachEvict(value={」cache1」,」cache2」}
- key
快取的 key,可以為空,如果指定要按照 SpEL 表示式編寫,如果不指定,則預設按照方法的所有引數進行組合
例如:
@CachEvict(value=」testcache」,key=」#userName」)
- condition
快取的條件,可以為空,使用 SpEL 編寫,返回 true 或者 false,只有為 true 才清空快取
例如:
@CachEvict(value=」testcache」, condition=」#userName.length()>2」)
- allEntries
是否清空所有快取內容,預設為 false,如果指定為 true,則方法呼叫後將立即清空所有快取
例如:
@CachEvict(value=」testcache」,allEntries=true)
- beforeInvocation
是否在方法執行前就清空,預設為 false,如果指定為 true,則在方法還沒有執行的時候就清空快取,預設情況下,如果方法執行丟擲異常,則不會清空快取
例如:
@CachEvict(value=」testcache」,beforeInvocation=true)
@CacheEvict用於刪除快取
注意事項
無論使用哪種模組,需要在相關的專案中設定ApplicationContext到SpringContextWrapper中。
範例程式碼如下:
package io.mykit.cache.test.redis.spring.utils;

import io.mykit.cache.redis.spring.context.SpringContextWrapper;
import lombok.extern.slf4j.Slf4j;
import org.springframework.context.ApplicationContext;
import org.springframework.context.ApplicationContextAware;
import org.springframework.stereotype.Component;
import redis.clients.util.Hashing;

/**
 * @author binghe
 * @version 1.0.0
 * @description 以靜態變數儲存Spring ApplicationContext, 可在任何程式碼任何地方任何時候中取出ApplicaitonContext.
 */
@Slf4j
@Component
public class SpringContext implements ApplicationContextAware {
    private static ApplicationContext applicationContext;

    /**
     * 實現ApplicationContextAware介面的context注入函數, 將其存入靜態變數.
     */
    @Override
    public void setApplicationContext(ApplicationContext applicationContext) {
        SpringContext.applicationContext = applicationContext; // NOSONAR
        log.debug(SpringContext.class.getName() + " 類載入的路徑:" + this.getClass().getResource("/").getPath() + ", hashcode:" + Hashing.MURMUR_HASH.hash(this.getClass().getResource("/").getPath()));
        log.debug(SpringContext.class.getName() + " applicationContext===>>>" + applicationContext);
        SpringContextWrapper.setApplicationContext(SpringContextWrapper.getContextKey(this.getClass()), applicationContext);
    }

    /**
     * 取得儲存在靜態變數中的ApplicationContext.
     * @return ApplicationContext物件
     */
    public static ApplicationContext getApplicationContext() {
        checkApplicationContext();
        return applicationContext;
    }

    /**
     * 從靜態變數ApplicationContext中取得Bean, 自動轉型為所賦值物件的型別.
     * @param name Spring中Bean的名稱
     * @return 泛型物件
     */
    @SuppressWarnings("unchecked")
    public static <T> T getBean(String name) {
        checkApplicationContext();
        return (T) applicationContext.getBean(name);
    }

    /**
     * 從靜態變數ApplicationContext中取得Bean, 自動轉型為所賦值物件的型別.
     * @param clazz 指定的clazz物件
     * @return 泛型物件
     */
    public static <T> T getBean(Class<T> clazz) {
        checkApplicationContext();
        return (T) applicationContext.getBean(clazz);
    }

    /**
     * 清除applicationContext靜態變數.
     */
    public static void cleanApplicationContext() {
        applicationContext = null;
    }

    private static void checkApplicationContext() {
        if (applicationContext == null) {
            throw new IllegalStateException("applicaitonContext未注入,請在applicationContext.xml中定義SpringContextHolder");
        }
    }
}
本專案還在開發中,目前未新增到Maven中央倉庫,後續開發完成會新增到Maven中央倉庫。
如果這個框架對大家有點幫助,還請小夥伴們開啟Github和Gitee連結,給這個專案一個大大的Star,讓更多的小夥伴收益。也可以為這篇文章點贊、在看和轉發哦~~
寫在最後
如果你想進大廠,想升職加薪,或者對自己現有的工作比較迷茫,都可以私信我交流,希望我的一些經歷能夠幫助到大家~~
推薦閱讀:
- 《實踐出真知:全網最強秒殺系統架構解密,不是所有的秒殺都是秒殺!!》
- 《從零到上億使用者,我是如何一步步優化MySQL資料庫的?(建議收藏)》
- 《我用多執行緒進一步優化了億級流量電商業務下的海量資料校對系統,效能再次提升了200%!!(全程乾貨,建議收藏)》
- 《我用多執行緒優化了億級流量電商業務下的海量資料校對系統,效能直接提升了200%!!(全程乾貨,建議收藏)》
- 《我用10張圖總結出了這份並行程式設計最佳學習路線!!(建議收藏)》
- 《高並行場景下一種比讀寫鎖更快的鎖,看完我徹底折服了!!(建議收藏)》
- 《全網最全效能優化總結!!(冰河吐血整理,建議收藏)》
- 《三天擼完了MyBatis,各位隨便問!!(冰河吐血整理,建議收藏)》
- 《奉勸那些剛參加工作的學弟學妹們:要想進大廠,這些並行程式設計知識是你必須要掌握的!完整學習路線!!(建議收藏)》
- 《奉勸那些剛參加工作的學弟學妹們:要想進大廠,這些核心技能是你必須要掌握的!完整學習路線!!(建議收藏)》
- 《奉勸那些剛參加工作的學弟學妹們:這些計算機與作業系統基礎知識越早知道越好!萬字長文太頂了!!(建議收藏)》
- 《我用三天時間開發了一款老少皆宜的國民級遊戲,支援播放音樂,現開放完整原始碼和註釋(建議收藏)!!》
- 《我是全網最硬核的高並行程式設計作者,CSDN最值得關注的博主,大家同意嗎?(建議收藏)》
- 《畢業五年,從月薪3000到年薪百萬,我掌握了哪些核心技能?(建議收藏)》
- 《我入侵了隔壁妹子的Wifi,發現。。。(全程實戰乾貨,建議收藏)》
- 《千萬不要輕易嘗試「熊貓燒香」,這不,我後悔了!》
- 《清明節偷偷訓練「熊貓燒香」,結果我的電腦為熊貓「獻身了」!》
- 《7.3萬字肝爆Java8新特性,我不信你能看完!(建議收藏)》
- 《在業務高峰期拔掉伺服器電源是一種怎樣的體驗?》
- 《全網最全Linux命令總結!!(史上最全,建議收藏)》
- 《用Python寫了個工具,完美破解了MySQL!!(建議收藏)》
- 《SimpleDateFormat類到底為啥不是執行緒安全的?(附六種解決方案,建議收藏)》
- 《MySQL 8中新增的這三大索引,直接讓MySQL起飛了,你竟然還不知道!!(建議收藏)》
- 《擼完Spring原始碼,我開源了這個分散式快取框架!!(建議收藏)》
- 《億級流量高並行秒殺系統商品「超賣」了,只因使用的JDK同步容器中存在這兩個巨大的坑!!(踩坑實錄,建議收藏)》
- 《奉勸那些剛參加工作的學弟學妹們:要想學好並行程式設計,這些並行容器的坑是你必須要注意的!!(建議收藏)》
- 《公司的報表工具太難用,我三天擼了個Excel工具,運營小姐姐直呼太好用了,現已開源!!(建議收藏)》
- 《奉勸那些剛參加工作的學弟學妹們:要想進大廠,這些並行程式設計核心技能是你必須要掌握的!!(建議收藏)》
好了,今天就到這兒吧,小夥伴們點贊、收藏、評論,一鍵三連走起呀,我是冰河,我們下期見~~
