Android-Fragment課堂學習(初步學習版筆記)
(初步學習記錄)
一 .Fragment是什麼
- Fragment是一種可以嵌入在Activity當中的UI片段,它能讓程式更加合理和充分地利用大螢幕的空間,因而在平板上應用得非常廣泛。
- 和Activity很像,同樣都能包含佈局,同樣都有自己的生命週期。
- 手機平板要兼顧,探究Fragment
二. Fragment的基本用法
通過一個範例來具體瞭解吧:
- 定義Fragment的佈局
新建一個左側Fragment的佈局left_fragment.xml,再新建一個右側Fragment的佈局right_fragment.xml,程式碼如下所示:
left_fragment.xml 要實現
<LinearLayout xmlns:android="http://schemas.android.com/apk/res/android"
    android:layout_width="match_parent"
    android:layout_height="match_parent"
    android:orientation="vertical">

<Button
    android:id="@+id/button"
    android:layout_width="wrap_content"
    android:layout_height="wrap_content"
    android:layout_gravity="center_horizontal"
    android:text="Button"
    />
</LinearLayout>
right_fragment.xml要實現
<LinearLayout xmlns:android="http://schemas.android.com/apk/res/android"
    android:layout_width="match_parent"
    android:layout_height="match_parent"
    android:orientation="vertical"
    android:background="#00ff00">

    <TextView
        android:layout_width="wrap_content"
        android:layout_height="wrap_content"
        android:layout_gravity="center_horizontal"
        android:textSize="24sp"
        android:text="This is right fragment"
        />
</LinearLayout>
- 建立Fragment
然後編寫LeftFragment和RightFragment中的程式碼,如下所示:
class LeftFragment : Fragment() {

    override fun onCreateView(inflater: LayoutInflater,
		container: ViewGroup?,
		savedInstanceState: Bundle?): View? {
        return inflater.inflate(R.layout.left_fragment, container, false)
    }

}
class RightFragment : Fragment() {

    override fun onCreateView(inflater: LayoutInflater,
		container: ViewGroup?,
		savedInstanceState: Bundle?): View? {
        return inflater.inflate(R.layout.right_fragment, container, false)
    }

}
- 在佈局中引入Fragment
接下來修改activity_main.xml,在佈局中引入Fragment。
<LinearLayout xmlns:android="http://schemas.android.com/apk/res/android"
    android:orientation="horizontal"
    android:layout_width="match_parent"
    android:layout_height="match_parent" >

    <fragment
        android:id="@+id/leftFrag"
        android:name="com.example.fragmenttest.LeftFragment"
        android:layout_width="0dp"
        android:layout_height="match_parent"
        android:layout_weight="1" />

    <fragment
        android:id="@+id/rightFrag"
        android:name="com.example.fragmenttest.RightFragment"
        android:layout_width="0dp"
        android:layout_height="match_parent"
        android:layout_weight="1" />

</LinearLayout>
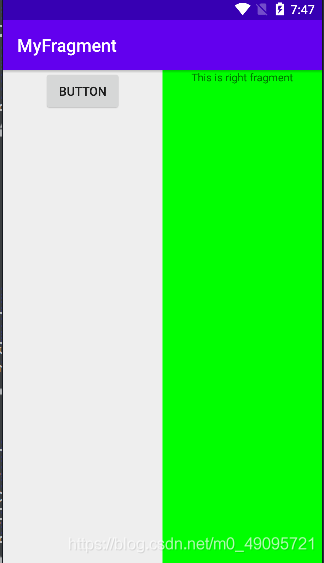
手機中效果是這樣的:

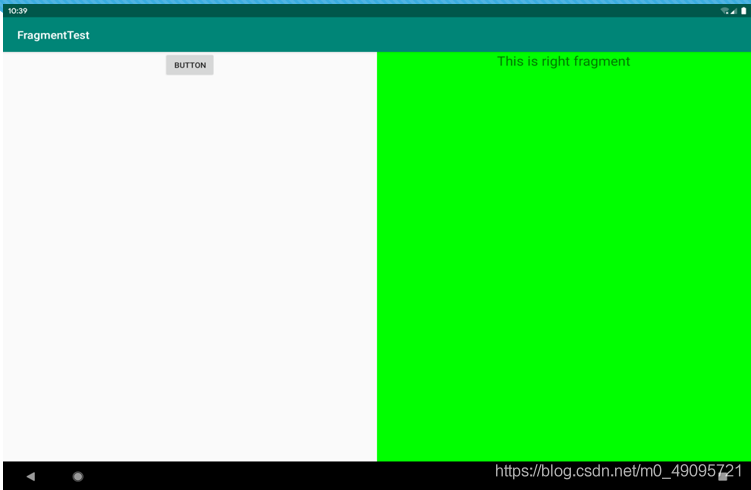
平板中效果如下:

- 動態新增Fragment
先需要準備一個佈局作為動態新增Fragment的視窗。
<LinearLayout xmlns:android="http://schemas.android.com/apk/res/android"
    android:orientation="horizontal"
    android:layout_width="match_parent"
    android:layout_height="match_parent" >
    <fragment
        android:id="@+id/leftFrag"
        android:name="com.example.fragmenttest.LeftFragment"
        android:layout_width="0dp"
        android:layout_height="match_parent"
        android:layout_weight="1" />

    <FrameLayout
        android:id="@+id/rightLayout"
        android:layout_width="0dp"
        android:layout_height="match_parent"
        android:layout_weight="1" >
    </FrameLayout>

</LinearLayout>
- 然後在程式碼中向FrameLayout裡新增內容,實現動態新增Fragment的功能。
class MainActivity : AppCompatActivity() {

    override fun onCreate(savedInstanceState: Bundle?) {
        super.onCreate(savedInstanceState)
        setContentView(R.layout.activity_main)
        button.setOnClickListener {
            replaceFragment(AnotherRightFragment())
        }
    }

    private fun replaceFragment(fragment: Fragment) {
        val fragmentManager = supportFragmentManager
        val transaction = fragmentManager.beginTransaction()
        transaction.replace(R.id.rightLayout, fragment)
        transaction.commit()
    }

}
AnotherRightFragment檔案:
class AnotherRightFragment : Fragment() {

    override fun onCreateView(inflater: LayoutInflater,
                              container: ViewGroup?,
                              savedInstanceState: Bundle?): View? {
        return inflater.inflate(R.layout.another_right_fragment, container, false)
    }

}
another_right_fragment佈局檔案:
<LinearLayout xmlns:android="http://schemas.android.com/apk/res/android"
    android:orientation="vertical"
    android:background="#ffff00"
    android:layout_width="match_parent"
    android:layout_height="match_parent">

    <TextView
        android:layout_width="wrap_content"
        android:layout_height="wrap_content"
        android:layout_gravity="center_horizontal"
        android:textSize="12sp"
        android:text="This is another right fragment"
    />

</LinearLayout>
動態新增Fragment的步驟
- 建立待新增Fragment的範例。
- 獲取FragmentManager,在Activity中可以直接調getSupportFragmentManager()方法獲取。
- 開啟一個事務,通過呼叫beginTransaction()方法開啟。
- 向容器內新增或替換Fragment,一般使用replace()方法實現,需要傳入容器的id和待新增的Fragment範例。
- 提交事務,呼叫commit()方法來完成。
在Fragment中實現返回棧
FragmentTransaction中提供了一個addToBackStack()方法,可以用於將一個事務新增到返回棧中,從而實現類似於Activity返回棧的效果。
class MainActivity : AppCompatActivity() {

    …

    private fun replaceFragment(fragment: Fragment) {
        val fragmentManager = supportFragmentManager
        val transaction = fragmentManager.beginTransaction()
        transaction.replace(R.id.rightLayout, fragment)
        transaction.addToBackStack(null)
        transaction.commit()
    }

}
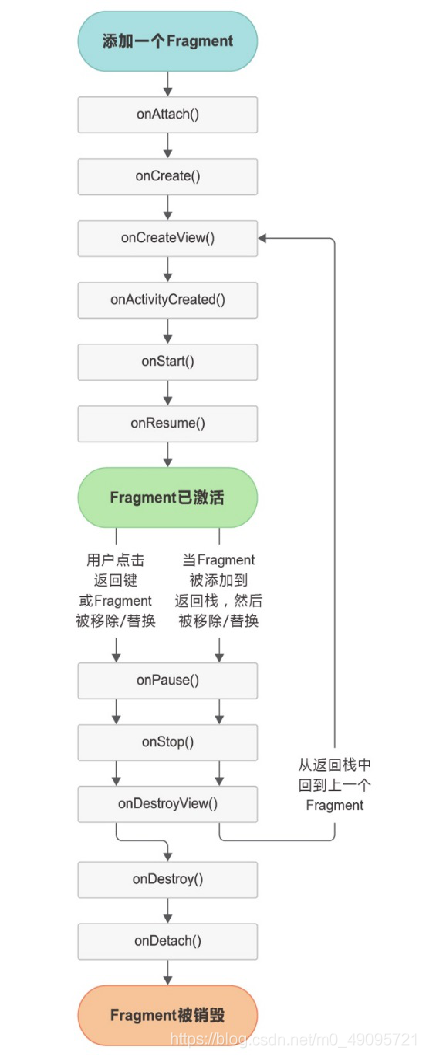
三.Fragment的生命週期
-
onAttach() 當Fragment和Activity建立關聯時呼叫。
-
onCreateView() 為Fragment建立檢視(載入佈局)時呼叫。
-
onActivityCreated() 確保與Fragment相關聯的Activity已經建立完畢時呼叫。
-
onDestroyView() 當與Fragment關聯的檢視被移除時呼叫。
-
onDetach() 當Fragment和Activity解除關聯時呼叫。
-

-
large限定符
很多平板應用採用的都是雙頁模式,那麼怎樣才能在執行時判斷程式應該是使用雙頁模式還是單頁模式呢?這就需要藉助限定符(qualifier)來實現了。
使用large限定符,那些螢幕被認為是large的裝置就會自動載入layout-large資料夾下的佈局,小螢幕的裝置則還是會載入layout資料夾下的佈局。

- 最小寬度限定符
使用large限定符可以成功解決單頁雙頁的判斷問題,不過很快又有一個新的問題出現了:large到底是指多大呢?有的時候我們希望可以更加靈活地為不同裝置載入佈局,不管它們是不是被系統認定為large,這時就可以使用最小寬度限定符(smallest-width qualifier)了。
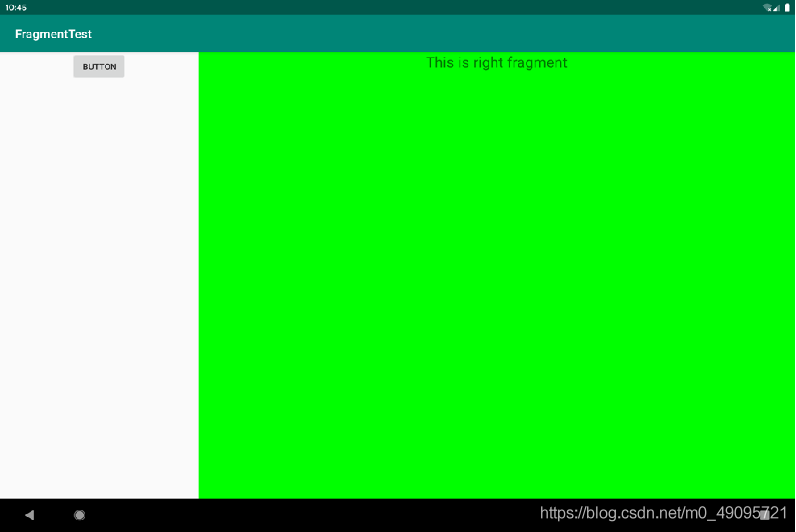
在res目錄下新建layout-sw600dp資料夾,這樣當程式執行在螢幕寬度大於等於600dp的裝置上時,會載入layout-sw600dp/activity_main佈局,當程式執行在螢幕寬度小於600dp的裝置上時,則仍然載入預設的layout/activity_main佈局