Android網路技術——簡單使用HttpURLConnection實現人與AI的聊天專案實戰
2020-10-25 10:01:53
前言
- HttpUrlConnection繼承自URLConnection,可用於向指定網站傳送GET請求、POST請求,所以在使用上相對簡單,並且易於擴充套件,推薦使用。
- HttpURLconnection是基於http協定的,支援get,post,put,delete等各種請求方式,最常用的就是get和post,下面針對這GET請求方式進行講解。
一、編寫聊天介面
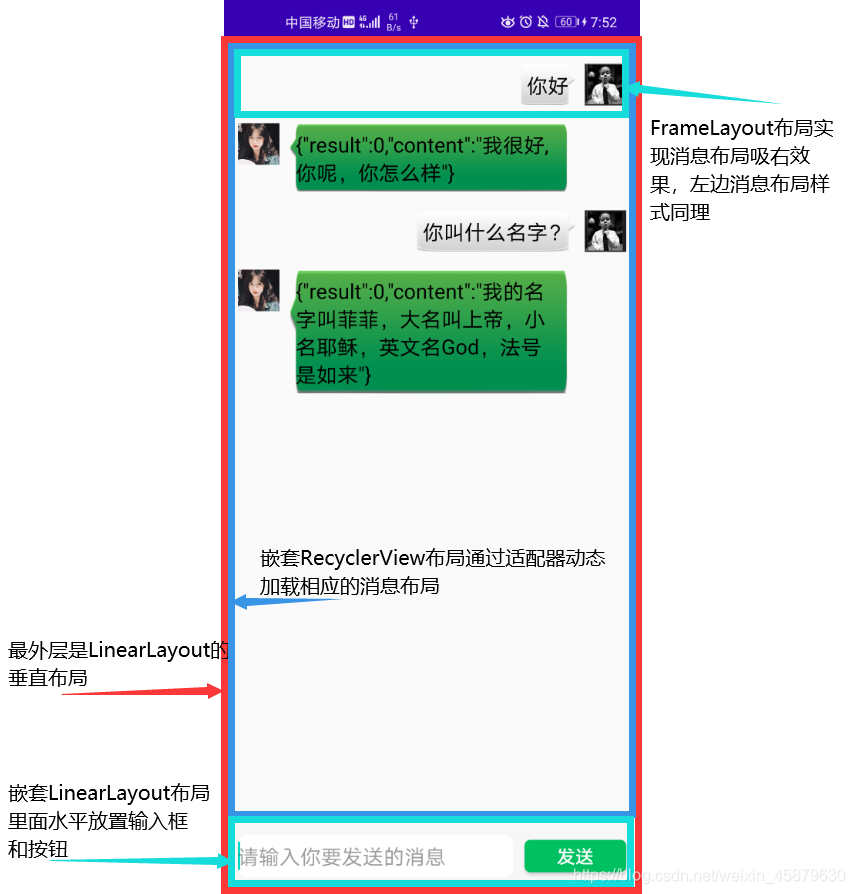
——介面佈局解析圖及效果圖——

1.1 主介面佈局程式碼
<?xml version="1.0" encoding="utf-8"?>
<LinearLayout xmlns:android="http://schemas.android.com/apk/res/android"
    android:layout_width="match_parent"
    android:layout_height="match_parent"
    android:orientation="vertical"
>
    <!--展示訊息列表RecyclerView-->
    <androidx.recyclerview.widget.RecyclerView
        android:id="@+id/rcv_chatMessage"
        android:layout_width="match_parent"
        android:layout_height="wrap_content"
        android:layout_weight="1"
        android:layout_marginLeft="12dp"
        android:layout_marginRight="12dp"
        android:layout_marginTop="8dp"
        />
    <LinearLayout
        android:layout_width="match_parent"
        android:layout_height="55dp"
        android:background="#F8F7F7"
        android:gravity="center"
        >
        <EditText
            android:id="@+id/ed_inputChatMessage"
            android:layout_width="wrap_content"
            android:layout_height="36dp"
            android:hint="請輸入你要傳送的訊息"
            android:maxLines="5"
            android:layout_weight="1"
            android:background="@drawable/edit_background"
            android:layout_marginLeft="12dp"
            />
        <Button
            android:id="@+id/btn_sendMessage"
            android:layout_width="wrap_content"
            android:layout_height="28dp"
            android:text="傳送"
            android:textColor="#fff"
            android:textSize="16sp"
            android:layout_marginLeft="10dp"
            android:layout_marginRight="12dp"
            android:background="@drawable/button_background"
            />
    </LinearLayout>
</LinearLayout>
1.2 訊息介面卡子佈局程式碼(通過判斷訊息型別來動態載入左右訊息佈局)
左邊訊息佈局
<?xml version="1.0" encoding="utf-8"?>
<FrameLayout xmlns:android="http://schemas.android.com/apk/res/android"
    android:layout_width="match_parent"
    android:layout_height="wrap_content"
    android:orientation="vertical"
    android:layout_marginRight="50dp"
    android:layout_marginTop="15dp"
    >
    <LinearLayout
        android:layout_width="wrap_content"
        android:layout_height="wrap_content"
        android:layout_gravity="left"
        >
        <!--使用者頭像-->
        <ImageView
            android:layout_width="36dp"
            android:layout_height="36dp"
            android:src="@drawable/head1"
            />
         <!--訊息內容-->
        <TextView
            android:id="@+id/tv_leftMsg"
            android:layout_width="wrap_content"
            android:layout_height="wrap_content"
            android:text="你好,小王"
            android:textSize="18sp"
            android:textColor="#000"
            android:padding="6dp"
            android:layout_marginLeft="8dp"
            android:layout_gravity="top"
            android:background="@drawable/message_left_original"
            />
    </LinearLayout>
</FrameLayout>
右邊訊息佈局
<?xml version="1.0" encoding="utf-8"?>
<FrameLayout xmlns:android="http://schemas.android.com/apk/res/android"
    android:layout_width="match_parent"
    android:layout_height="wrap_content"
    android:orientation="vertical"
    android:layout_marginLeft="50dp"
    android:layout_marginTop="15dp"
    >
    <LinearLayout
        android:layout_width="wrap_content"
        android:layout_height="wrap_content"
        android:layout_gravity="right"
        >
        <!--訊息內容-->
        <TextView
            android:id="@+id/tv_rightMsg"
            android:layout_width="wrap_content"
            android:layout_height="wrap_content"
            android:text="你好,AI"
            android:textSize="18sp"
            android:textColor="#000"
            android:padding="6dp"
            android:layout_marginRight="8dp"
            android:layout_gravity="top"
            android:background="@drawable/message_right_original"
            />
        <!--使用者頭像-->
        <ImageView
            android:layout_width="36dp"
            android:layout_height="36dp"
            android:src="@drawable/abc"
            />
    </LinearLayout>
</FrameLayout>
二、編寫邏輯程式碼
2.1 新增存取網路許可權(AndroidManifest.xml)
這是前提!這是前提!這是前提!
<uses-permission android:name="android.permission.INTERNET"/>
2.2 首先建立Message類作為訊息物件
package com.myapp.aichat;
/**
 * 訊息類
 */
public class Message {
    private String content;//訊息內容
    private int type;//訊息型別
    public final static int TYPE_RECEIVE=0;//接受的訊息
    public final static int TYPE_SEND=1;//傳送的訊息
    public Message() {
    }
    public Message(String content, int type) {
        this.content = content;
        this.type = type;
    }
    public String getContent() {
        return content;
    }
    public void setContent(String content) {
        this.content = content;
    }
    public int getType() {
        return type;
    }
    public void setType(int type) {
        this.type = type;
    }
}
2.3 RecyclerView的介面卡,用來動態展示不同型別的訊息
package com.myapp.adapter;
/**
 * RecyclerView的介面卡
 * 功能:通過不同訊息型別載入不同的訊息佈局
 */
public class AiAdapter extends RecyclerView.Adapter<AiAdapter.ViewHolder>{
    Context context;
    ArrayList<Message> msgList;
    public AiAdapter() {
    }
    public AiAdapter(Context context, ArrayList<Message> msgList){
        this.context=context;
        this.msgList=msgList;
    }
    @NonNull
    @Override
    public AiAdapter.ViewHolder onCreateViewHolder(@NonNull ViewGroup parent, int viewType) {
        View view;
        //判斷訊息型別,載入不同佈局
        if (viewType==Message.TYPE_RECEIVE){
            view = LayoutInflater.from(context).inflate(R.layout.left_layout,parent,false);
        }else {
            view = LayoutInflater.from(context).inflate(R.layout.right_layout,parent,false);
        }
        return new ViewHolder(view);
    }
    @Override
    public void onBindViewHolder(@NonNull AiAdapter.ViewHolder holder, int position) {
        //獲取當前的訊息物件
        Message msg=msgList.get(position);
        //判斷訊息型別,載入不同佈局
        if(msg.getType()==Message.TYPE_RECEIVE){
               holder.leftMsg.setText(msg.getContent());
        }else{
               holder.rightMsg.setText(msg.getContent());
        }
    }
    @Override
    public int getItemCount() {
        return msgList.size();
    }
    @Override
    public int getItemViewType(int position) {
        //通過資料中的訊息物件獲取訊息型別並返回
        Message msg=msgList.get(position);
        return msg.getType();
    }
    /**
     * 內部類的形式建立一個快取,避免重複建立檢視
     */
     class ViewHolder extends RecyclerView.ViewHolder {
        private TextView leftMsg;
        private TextView rightMsg;
        public ViewHolder(View view) {
            super(view);
            leftMsg=view.findViewById(R.id.tv_leftMsg);
            rightMsg=view.findViewById(R.id.tv_rightMsg);
        }
    }
}
2.4 詳解HttpURLConnection的使用流程
- 建立URL物件
URL url=new URL("https://api.qingyunke.com/api.php?key=free&appid=0&msg="+sendMsg);
- 通過URL物件呼叫openConnection方法獲得HttpURLConnection物件
HttpURLConnection connection= (HttpURLConnection) url.openConnection();
- HttpURLConnection物件設定其它連線屬性
//Http請求的方法,GET表示從伺服器獲取資料
connection.setRequestMethod("GET");
//設定連線超時時間
connection.setConnectTimeout(5000);
//設定讀取超時時間
connection.setReadTimeout(5000);
- HttpURLConnection物件呼叫getInputstream方法下向伺服器傳送http請求並獲取到伺服器返回的輸入流
InputStream inputStream=connection.getInputStream();
- 讀取輸入流,轉換成String字串
String line,receiveMsg ;
//一行一行的從流中取出訊息內容,直到為空
while ((line=bufferedReader.readLine())!=null)
{
        receiveMsg = receiveMsg+line;//拼接取出的內容
}
- 關閉流
connection.disconnect();
以上這些操作都可能因為網路等其他因素導致程式奔潰,所以要進行try/catch異常捕獲。
2.5 下面貼上HttpURLConnection通訊實現聊天的主類完整程式碼
package com.myapp.aichat;
/**
 * 簡單使用HttpURLConnection實現與人工智慧聊天主類
 */
public class AiChatActivity extends AppCompatActivity {
    RecyclerView chatMessage;
    EditText inputChatMessage;
    Button sendMessage;
    ArrayList msgList;
    AiAdapter aiAdapter;
    @Override
    protected void onCreate(Bundle savedInstanceState){
        super.onCreate(savedInstanceState);
        setContentView(R.layout.activity_ai_chat);
        //隱藏原生的標題列
        getSupportActionBar().hide();
        //獲取控制元件
        initView();
        sendMessage.setOnClickListener(new View.OnClickListener() {
            @Override
            public void onClick(View view){
                //獲取輸入框內容
                String sendMsg=inputChatMessage.getText().toString();
                if (sendMsg.equals("")){//判斷輸入框訊息是否為空
                    return;
                }
                //將要傳送的訊息儲存到物件中
                 Message message2=new Message();
                 message2.setContent(sendMsg);
                 message2.setType(1);
                 if (msgList==null){
                     msgList=new ArrayList<Message>();
                 }
                 //將訊息物件新增到List集合中
                 msgList.add(message2);
                 if (aiAdapter==null){
                     //給RecyclerView設定介面卡
                     LinearLayoutManager linearLayoutManager=new LinearLayoutManager(AiChatActivity.this);
                     chatMessage.setLayoutManager(linearLayoutManager);
                     aiAdapter=new AiAdapter(AiChatActivity.this,msgList);
                     chatMessage.setAdapter(aiAdapter);
                 }else {
                     //將插入的訊息資料更新到介面
                     aiAdapter.notifyItemInserted(msgList.size()-1);
                 }
                 inputChatMessage.setText("");
                /**
                 * 傳送訊息到伺服器(HttpURLConnection)
                 * sendMsg:要傳送的訊息內容
                 * aiAdapter:介面卡物件
                 */
                sendRequestHttpURLConnection(sendMsg,aiAdapter);
            }
        });
    }
    //傳送訊息到伺服器並接受返回內容和更新UI
    private void sendRequestHttpURLConnection(final String sendMsg, final AiAdapter aiAdapter) {
        new Thread(new Runnable() {
            HttpURLConnection connection;
            @Override
            public void run() {
            //try/catch異常捕獲,防止程式崩潰
                try {
                    String line;
                    //建立URL物件
                    //這裡用的是青雲客智慧聊天機器人的API,需要了解的存取這個官方網址:http://api.qingyunke.com
                    URL url=new URL("https://api.qingyunke.com/api.php?key=free&appid=0&msg="+sendMsg);
                    //通過URL物件呼叫openConnection()方法獲得HttpURLConnection物件
                    connection= (HttpURLConnection) url.openConnection();
                    //Http請求的方法,GET表示從伺服器獲取資料
                    connection.setRequestMethod("GET");
                    //設定連線超時時間
                    connection.setConnectTimeout(5000);
                    //設定讀取超時時間
                    connection.setReadTimeout(5000);
                    //獲取請求結果反饋碼
                    int isResultOK=connection.getResponseCode();
                    if (isResultOK==HttpURLConnection.HTTP_OK){
                        //getInputStream方法向伺服器傳送http請求並獲取到伺服器返回的輸入流
                        InputStream inputStream=connection.getInputStream();
                        //位元組字元轉換流
                        InputStreamReader inputStreamReader=new InputStreamReader(inputStream);
                        //位元組字元緩衝流
                        BufferedReader bufferedReader=new BufferedReader(inputStreamReader);
                        String receiveMsg = "";
                        //一行一行的從流中取出訊息內容,直到為空
                        while ((line=bufferedReader.readLine())!=null){
                            receiveMsg = receiveMsg+line;//拼接取出的內容
                        }
                        Message message3=new Message();
                        message3.setContent(receiveMsg);
                        message3.setType(0);
                        msgList.add(message3);
                        runOnUiThread(new Runnable() {
                            @Override
                            public void run() {
                                //將插入的訊息資料更新到介面
                                aiAdapter.notifyItemInserted(msgList.size()-1);
                        }
                        });
                    }else {
                        runOnUiThread(new Runnable() {
                            @Override
                            public void run() {
                                Toast.makeText(AiChatActivity.this,"網路連線失敗",Toast.LENGTH_SHORT).show();
                            }
                        });
                    }
                } catch (Exception e) {
                    e.printStackTrace();
                }finally {
                    //關閉流
                    connection.disconnect();
                }
            }
        }).start();
    }
    //獲取控制元件的方法
    private void initView() {
         chatMessage=this.findViewById(R.id.rcv_chatMessage);
         inputChatMessage=this.findViewById(R.id.ed_inputChatMessage);
         sendMessage=this.findViewById(R.id.btn_sendMessage);
    }
}
人與AI的聊天專案實戰就完成了,這其中的HttpURLConnection使用是非常簡單的,反而是專案的UI複雜了,說實話這一篇我感覺頭重腳輕了,當然如果只想瞭解HttpURLConnection的使用請直接看2.4 詳解HttpURLConnection的使用流程吧。