Tensorflow:TensorFlow基礎(二)
文章目錄
TensorFlow基礎(二)
1.張量的典型應用
1.1 標量
# 隨機模擬網路輸出
out = tf.random.uniform([4,10])
# 隨機構造樣本真實標籤
y = tf.constant([2,3,2,0])
# one-hot 編碼
y = tf.one_hot(y, depth=10)
# 計算每個樣本的 MSE
loss = tf.keras.losses.mse(y, out)
# 平均 MSE,loss 應是標量
loss = tf.reduce_mean(loss)
print(loss)
tf.Tensor(0.29024273, shape=(), dtype=float32)
1.2 向量
考慮 2 個輸出節點的網路層, 我們建立長度為 2 的偏置向量b,並累加在每個輸出節點上:
# z=wx,模擬獲得啟用函數的輸入 z
z = tf.random.normal([4,2])
# 建立偏置向量
b = tf.zeros([2])
# 累加上偏置向量
z = z + b
z
<tf.Tensor: shape=(4, 2), dtype=float32, numpy=
array([[ 0.31563172, -0.58949906],
       [ 0.90833205, -0.90002346],
       [-0.5645722 ,  1.5243807 ],
       [-0.46752235, -0.87098795]], dtype=float32)>
通過高層介面類 Dense()方式建立的網路層,張量 W 和 𝒃 儲存在類的內部,由類自動創
建並管理。可以通過全連線層的 bias 成員變數檢視偏置變數𝒃,例如建立輸入節點數為 4,
輸出節點數為 3 的線性層網路,那麼它的偏置向量 b 的長度應為 3:
# 建立一層 Wx+b,輸出節點為 3
fc = tf.keras.layers.Dense(3)
# 通過 build 函數建立 W,b 張量,輸入節點為 4
fc.build(input_shape=(2,4))
# 檢視偏置向量
fc.bias
<tf.Variable 'bias:0' shape=(3,) dtype=float32, numpy=array([0., 0., 0.], dtype=float32)>
1.3 矩陣
# 2 個樣本,特徵長度為 4 的張量
x = tf.random.normal([2,4])
# 定義 W 張量
w = tf.ones([4,3])
# 定義 b 張量
b = tf.zeros([3])
# X@W+b 運算
o = x@w+b
o
<tf.Tensor: shape=(2, 3), dtype=float32, numpy=
array([[ 0.24217486,  0.24217486,  0.24217486],
       [-2.0101817 , -2.0101817 , -2.0101817 ]], dtype=float32)>
# 定義全連線層的輸出節點為 3
fc = tf.keras.layers.Dense(3)
# 定義全連線層的輸入節點為 4
fc.build(input_shape=(2,4))
# 檢視權值矩陣 W
fc.kernel
<tf.Variable 'kernel:0' shape=(4, 3) dtype=float32, numpy=
array([[-0.39046913,  0.10637152,  0.10071242],
       [ 0.21714497, -0.6418654 , -0.30992925],
       [-0.55721366,  0.61090446,  0.89444256],
       [-0.36123437,  0.03711444, -0.08871335]], dtype=float32)>
2.索引與切片
2.1 索引
# 建立4維張量
x = tf.random.normal([2,2,2,2])
# 取第 1 張圖片的資料
x[0]
<tf.Tensor: shape=(2, 2, 2), dtype=float32, numpy=
array([[[ 0.34822315,  0.3984542 ],
        [-0.4846413 , -0.97909266]],

       [[ 0.8115266 ,  0.00483855],
        [-0.80532825, -0.00211781]]], dtype=float32)>
# 取第 1 張圖片的第 2 行
x[0][1]
<tf.Tensor: shape=(2, 2), dtype=float32, numpy=
array([[ 0.8115266 ,  0.00483855],
       [-0.80532825, -0.00211781]], dtype=float32)>
# 取第 1 張圖片,第 2 行,第 2 列的資料
x[0][1][1]
<tf.Tensor: shape=(2,), dtype=float32, numpy=array([-0.80532825, -0.00211781], dtype=float32)>
# 取第 1 張圖片,第 2 行,第 1 列的畫素, B 通道(第 2 個通道)顏色強度值
x[0][1][0][1]
<tf.Tensor: shape=(), dtype=float32, numpy=0.004838548>
# 取第 2 張圖片,第 2 行,第 2 列的資料
x[1,1,1]
<tf.Tensor: shape=(2,), dtype=float32, numpy=array([-0.44559637, 0.01962792], dtype=float32)>
2.2 切片
# 讀取第 1,2 張圖片
x[0:1]
<tf.Tensor: shape=(1, 2, 2, 2), dtype=float32, numpy=
array([[[[ 0.34822315,  0.3984542 ],
         [-0.4846413 , -0.97909266]],

        [[ 0.8115266 ,  0.00483855],
         [-0.80532825, -0.00211781]]]], dtype=float32)>
# 讀取第一張圖片
x[0,::]
<tf.Tensor: shape=(2, 2, 2), dtype=float32, numpy=
array([[[ 0.34822315,  0.3984542 ],
        [-0.4846413 , -0.97909266]],

       [[ 0.8115266 ,  0.00483855],
        [-0.80532825, -0.00211781]]], dtype=float32)>
# 逆序全部元素
x[::-1]
<tf.Tensor: id=331, shape=(9,), dtype=int32, numpy=array([8, 7, 6, 5, 4, 3, 2, 1, 0])>
讀取每張圖片的所有通道,其中行按著逆序隔行取樣,列按著逆序隔行取樣
x = tf.random.normal([2,4,4,4])
# 行、列逆序間隔取樣
x[0,::-2,::-2]
<tf.Tensor: shape=(2, 2, 4), dtype=float32, numpy=
array([[[ 2.304297  , -1.0442073 , -0.56854004, -0.7879971 ],
        [ 1.0789118 , -0.18602042,  0.9888905 , -0.6266968 ]],

       [[ 0.16137564,  0.4127967 ,  0.72044903, -0.7933607 ],
        [-1.5984349 ,  1.3255346 , -0.27378082, -0.17433397]]],
      dtype=float32)>
# 取 G 通道資料
x[:,:,:,1]
<tf.Tensor: shape=(2, 4, 4), dtype=float32, numpy=
array([[[-0.33024472, -1.1331698 ,  0.49589372, -0.78729445],
        [-1.2920703 ,  1.3255346 , -0.71679795,  0.4127967 ],
        [-0.57076746,  0.2409307 , -0.9696086 , -0.2732332 ],
        [-0.86820245, -0.18602042,  1.4539748 , -1.0442073 ]],

       [[-0.31168306, -0.9283122 , -0.54838717, -0.12986478],
        [-0.24761973,  0.6580482 ,  0.8283819 ,  0.8146409 ],
        [-1.1049583 , -0.24078842,  0.1042363 ,  0.29632303],
        [-0.00507268, -1.3736714 ,  0.01005635,  0.23007654]]],
      dtype=float32)>
# 讀取第 1~2 張圖片的 G/B 通道資料
# 高寬維度全部採集
x[0:2,...,1:]
<tf.Tensor: shape=(2, 4, 4, 3), dtype=float32, numpy=
array([[[[-0.33024472,  0.6283163 , -0.04996401],
         [-1.1331698 ,  0.60591996,  0.23778886],
         [ 0.49589372, -0.30366042,  1.1818023 ],
         [-0.78729445,  1.6598036 , -1.2402087 ]],

        [[-1.2920703 ,  0.74676615, -0.42908686],
         [ 1.3255346 , -0.27378082, -0.17433397],
         [-0.71679795, -0.11399374, -0.12879518],
         [ 0.4127967 ,  0.72044903, -0.7933607 ]],

        [[-0.57076746, -1.1609849 ,  1.6461061 ],
         [ 0.2409307 ,  1.5247557 , -1.5071423 ],
         [-0.9696086 ,  2.1981888 ,  0.6549159 ],
         [-0.2732332 ,  0.24407765,  0.05883753]],

        [[-0.86820245,  0.27632675,  0.68970746],
         [-0.18602042,  0.9888905 , -0.6266968 ],
         [ 1.4539748 ,  0.4892664 ,  0.34481934],
         [-1.0442073 , -0.56854004, -0.7879971 ]]],
       [[[-0.31168306, -0.4917958 , -0.5603941 ],
         [-0.9283122 , -0.25997722, -0.5569816 ],
         [-0.54838717, -1.1659151 ,  0.37025896],
         [-0.12986478, -0.43251887,  0.16835675]],

        [[-0.24761973,  0.7648886 , -0.9059888 ],
         [ 0.6580482 ,  0.14856052,  0.8848719 ],
         [ 0.8283819 ,  1.2512318 ,  0.21912369],
         [ 0.8146409 , -1.926621  ,  1.5576432 ]],

        [[-1.1049583 ,  0.3476432 , -0.20792682],
         [-0.24078842,  0.41281703,  0.665506  ],
         [ 0.1042363 , -0.40645656, -0.15254466],
         [ 0.29632303, -0.23996541, -1.9224465 ]],

        [[-0.00507268, -0.7571799 ,  0.12876898],
         [-1.3736714 ,  1.2115971 ,  0.55076367],
         [ 0.01005635, -0.43012097,  0.2410907 ],
         [ 0.23007654, -0.9896959 ,  2.7479093 ]]]], dtype=float32)>
3.維度變換
3.1 改變檢視
我們通過 tf.range()模擬生成一個向量資料,並通過 tf.reshape 檢視改變函數產生不同的檢視
# 生成向量
x = tf.range(24)
# 改變 x 的檢視,獲得 4D 張量,儲存並未改變
x = tf.reshape(x,[1,2,3,4])
x
<tf.Tensor: shape=(1, 2, 3, 4), dtype=int32, numpy=
array([[[[ 0,  1,  2,  3],
         [ 4,  5,  6,  7],
         [ 8,  9, 10, 11]],

        [[12, 13, 14, 15],
         [16, 17, 18, 19],
         [20, 21, 22, 23]]]])>
# 獲取張量的維度數和形狀列表
x.ndim,x.shape
(4, TensorShape([1, 2, 3, 4]))
通過 tf.reshape(x, new_shape),可以將張量的檢視任意地合法改變
tf.reshape(x,[2,-1])
<tf.Tensor: shape=(2, 12), dtype=int32, numpy=
array([[ 0,  1,  2,  3,  4,  5,  6,  7,  8,  9, 10, 11],
       [12, 13, 14, 15, 16, 17, 18, 19, 20, 21, 22, 23]])>
tf.reshape(x,[2,4,3])
<tf.Tensor: shape=(2, 4, 3), dtype=int32, numpy=
array([[[ 0,  1,  2],
        [ 3,  4,  5],
        [ 6,  7,  8],
        [ 9, 10, 11]],

       [[12, 13, 14],
        [15, 16, 17],
        [18, 19, 20],
        [21, 22, 23]]])>
tf.reshape(x,[2,-1,3])
<tf.Tensor: shape=(2, 4, 3), dtype=int32, numpy=
array([[[ 0,  1,  2],
        [ 3,  4,  5],
        [ 6,  7,  8],
        [ 9, 10, 11]],

       [[12, 13, 14],
        [15, 16, 17],
        [18, 19, 20],
        [21, 22, 23]]])>
3.2 增、刪維度
# 產生矩陣
x = tf.random.uniform([4,4],maxval=10,dtype=tf.int32)
x
<tf.Tensor: shape=(4, 4), dtype=int32, numpy=
array([[0, 6, 8, 7],
       [1, 5, 1, 7],
       [5, 9, 6, 0],
       [4, 5, 3, 9]])>
通過 tf.expand_dims(x, axis)可在指定的 axis 軸前可以插入一個新的維度
# axis=2 表示寬維度後面的一個維度
x = tf.expand_dims(x,axis=2)
x
<tf.Tensor: shape=(4, 4, 1), dtype=int32, numpy=
array([[[0],
        [6],
        [8],
        [7]],

       [[1],
        [5],
        [1],
        [7]],

       [[5],
        [9],
        [6],
        [0]],

       [[4],
        [5],
        [3],
        [9]]])>
tf.expand_dims(x,axis=0) # 高維度之前插入新維度
<tf.Tensor: shape=(1, 4, 4, 1), dtype=int32, numpy=
array([[[[0],
         [6],
         [8],
         [7]],

        [[1],
         [5],
         [1],
         [7]],

        [[5],
         [9],
         [6],
         [0]],

        [[4],
         [5],
         [3],
         [9]]]])>
x = tf.squeeze(x, axis=2) # 刪除圖片數量維度
x
<tf.Tensor: shape=(4, 4), dtype=int32, numpy=
array([[0, 6, 8, 7],
       [1, 5, 1, 7],
       [5, 9, 6, 0],
       [4, 5, 3, 9]])>
x = tf.random.uniform([1,4,4,1],maxval=10,dtype=tf.int32)
tf.squeeze(x) # 刪除所有長度為 1 的維度
<tf.Tensor: shape=(4, 4), dtype=int32, numpy=
array([[9, 9, 7, 6],
       [0, 3, 6, 8],
       [2, 7, 6, 9],
       [8, 8, 3, 5]])>
3.3 交換維度
x = tf.random.normal([1,2,3,4])
# 交換維度
tf.transpose(x,perm=[0,3,1,2])
<tf.Tensor: shape=(1, 4, 2, 3), dtype=float32, numpy=
array([[[[ 1.054216  ,  0.9930936 ,  0.02253438],
         [-0.8523428 ,  1.4335555 ,  1.3674371 ]],

        [[-1.3224561 , -0.56301004, -1.9799871 ],
         [ 0.6887363 ,  1.6728357 , -0.89002633]],

        [[ 0.5843838 , -0.412141  ,  1.8223515 ],
         [ 0.92986745,  0.21938261,  2.0599825 ]],

        [[ 1.7795099 , -1.6967453 , -1.856098  ],
         [-1.0092537 ,  0.02507956, -0.25849926]]]], dtype=float32)>
x = tf.random.normal([1,2,3,4])
# 交換維度
tf.transpose(x,perm=[0,2,1,3])
<tf.Tensor: shape=(1, 3, 2, 4), dtype=float32, numpy=
array([[[[ 0.04785682,  0.25443026,  1.5284601 ,  0.11894976],
         [ 0.04647516, -0.41432348, -0.85131294,  0.46643516]],

        [[-0.1527475 , -0.823387  ,  0.35662124, -0.6405889 ],
         [-0.08285429, -0.34229243,  2.2337375 ,  0.54682755]],

        [[ 1.7444025 ,  1.0962962 ,  0.07826549,  0.78326786],
         [ 0.6024326 ,  0.34614065,  1.8503569 , -0.41436443]]]],
      dtype=float32)>
3.4 複製資料
# 建立向量 b
b = tf.constant([1,2])
# 插入新維度,變成矩陣
b = tf.expand_dims(b, axis=0)
b
<tf.Tensor: shape=(1, 2), dtype=int32, numpy=array([[1, 2]])>
# 樣本維度上覆制一份
b = tf.tile(b, multiples=[2,1])
b
<tf.Tensor: id=414, shape=(2, 2), dtype=int32, numpy=
array([[1, 2],
       [1, 2]])>
x = tf.range(4)
# 建立 2 行 2 列矩陣
x=tf.reshape(x,[2,2])
x
<tf.Tensor: id=420, shape=(2, 2), dtype=int32, numpy=
array([[0, 1],
       [2, 3]])>
# 列維度複製一份
x = tf.tile(x,multiples=[1,2])
x
<tf.Tensor: id=422, shape=(2, 4), dtype=int32, numpy=
array([[0, 1, 0, 1],
       [2, 3, 2, 3]])>
# 行維度複製一份
x = tf.tile(x,multiples=[2,1])
x
<tf.Tensor: id=424, shape=(4, 4), dtype=int32, numpy=
array([[0, 1, 0, 1],
       [2, 3, 2, 3],
       [0, 1, 0, 1],
       [2, 3, 2, 3]])>
4.Broadcasting
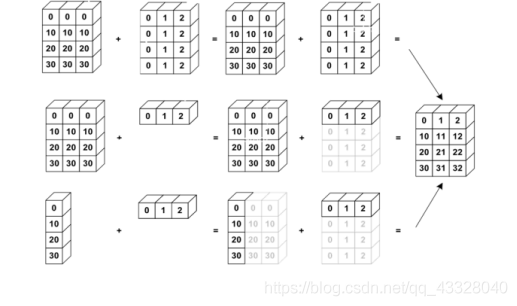
Broadcasting 也叫廣播機制(自動擴充套件也許更合適),它是一種輕量級張量複製的手段,
在邏輯上擴充套件張量資料的形狀,但是隻要在需要時才會執行實際儲存複製操作。對於大部
分場景,Broadcasting 機制都能通過優化手段避免實際複製資料而完成邏輯運算,從而相對
於 tf.tile 函數,減少了大量計算代價。

# 建立矩陣
A = tf.random.normal([4,3])
B = tf.random.normal([1,3])
# 擴充套件為 3D 張量
tf.broadcast_to(B, [4,1,3])
print(A + B)
tf.Tensor(
[[ 2.0599308  -1.7524832   2.020039  ]
 [ 0.67481816 -0.25245976 -1.6941655 ]
 [ 0.39008152 -1.2065786   0.28262126]
 [-0.19673708 -2.8015094   2.692475  ]], shape=(4, 3), dtype=float32)
A = tf.random.normal([32,2])
# 不符合 Broadcasting 條件
try:
    tf.broadcast_to(A, [2,32,32,4])
except Exception as e:
    print(e)
Incompatible shapes: [32,2] vs. [2,32,32,4] [Op:BroadcastTo]
5.數學運算
5.1 加、減、乘、除運算
a = tf.range(5)
b = tf.constant(2)
# 整除運算
a//b
<tf.Tensor: shape=(5,), dtype=int32, numpy=array([0, 0, 1, 1, 2])>
# 餘除運算
a%b
<tf.Tensor: shape=(5,), dtype=int32, numpy=array([0, 1, 0, 1, 0])>
5.2 乘方運算
x = tf.range(4)
# 乘方運算
tf.pow(x,3)
<tf.Tensor: shape=(4,), dtype=int32, numpy=array([ 0, 1, 8, 27])>
# 乘方運運算元
x**2
<tf.Tensor: shape=(4,), dtype=int32, numpy=array([0, 1, 4, 9])>
x=tf.constant([1.,4.,9.])
# 平方根
x**(0.5)
tf.Tensor([ 4. 16. 36.], shape=(3,), dtype=float32)
x = tf.range(5)
# 轉換為浮點數
x = tf.cast(x, dtype=tf.float32)
# 平方
x = tf.square(x)
# 平方根
tf.sqrt(x)
<tf.Tensor: shape=(5,), dtype=float32, numpy=array([0., 1., 2., 3., 4.], dtype=float32)>
5.3 指數和對數運算
x = tf.constant([1.,2.,3.])
# 指數運算
2**x
<tf.Tensor: shape=(3,), dtype=float32, numpy=array([2., 4., 8.], dtype=float32)>
# 自然指數運算
tf.exp(1.)
<tf.Tensor: shape=(), dtype=float32, numpy=2.7182817>
x = tf.exp(3.)
# 對數運算
tf.math.log(x)
<tf.Tensor: id=472, shape=(), dtype=float32, numpy=3.0>
x = tf.constant([1.,2.])
x = 10**x
# 換底公式
tf.math.log(x)/tf.math.log(10.)
<tf.Tensor: shape=(2,), dtype=float32, numpy=array([1., 2.], dtype=float32)>
5.4 矩陣相乘運算
神經網路中間包含了大量的矩陣相乘運算,前面我們已經介紹了通過@運運算元可以方
便的實現矩陣相乘,還可以通過 tf.matmul(a, b)實現。需要注意的是,TensorFlow 中的矩陣
相乘可以使用批次方式,也就是張量 a,b 的維度數可以大於 2。當張量 a,b 維度數大於 2
時,TensorFlow 會選擇 a,b 的最後兩個維度進行矩陣相乘,前面所有的維度都視作 Batch 維 度。
根據矩陣相乘的定義,a 和 b 能夠矩陣相乘的條件是,a 的倒數第一個維度長度(列)和 b 的倒數第二個維度長度(行)必須相等。比如張量 a shape:[4,3,28,32]可以與張量 b
shape:[4,3,32,2]進行矩陣相乘:
a = tf.random.normal([1,2,3,4])
b = tf.random.normal([1,2,4,3])
# 批次形式的矩陣相乘
a@b
<tf.Tensor: shape=(1, 2, 3, 3), dtype=float32, numpy=
array([[[[ 0.68976855, -0.6210845 , -0.5555833 ],
         [ 0.85787934,  2.1133952 , -4.354555  ],
         [-1.2786795 ,  2.2707722 ,  2.1012263 ]],

        [[ 1.6670487 ,  0.176045  ,  0.5425054 ],
         [-1.7086754 , -0.12377246, -0.5034031 ],
         [-0.47702566, -0.49839175,  0.3666957 ]]]], dtype=float32)>
矩陣相乘函數支援自動 Broadcasting 機制:
a = tf.random.normal([1,2,3])
b = tf.random.normal([3,2])
# 先自動擴充套件,再矩陣相乘
tf.matmul(a,b)
<tf.Tensor: shape=(1, 2, 2), dtype=float32, numpy=
array([[[ 0.00706174,  0.4290892 ],
        [-3.5093076 , -2.220005  ]]], dtype=float32)>
6.前向傳播實戰
三層神經網路的實現:
o𝑢𝑡 = 𝑟𝑒𝑙𝑢{𝑟𝑒𝑙𝑢{𝑟𝑒𝑙𝑢[𝑋@𝑊1 + 𝑏1]@𝑊2 + 𝑏2}@𝑊 + 𝑏 }
我們採用的資料集是 MNIST 手寫數點陣圖片集,輸入節點數為 784,第一層的輸出節點數是
256,第二層的輸出節點數是 128,第三層的輸出節點是 10,也就是當前樣本屬於 10 類別
的概率。
import matplotlib.pyplot as plt
import tensorflow as tf
import tensorflow.keras.datasets as datasets

plt.rcParams['font.size'] = 16
plt.rcParams['font.family'] = ['STKaiti']
plt.rcParams['axes.unicode_minus'] = False
載入資料集:
在前向計算時,首先將 shape 為[𝑏, 28,28]的輸入資料 Reshape 為[𝑏, 784],將真實的標註張量 y 轉變為 one-hot 編碼
def load_data():
    # 載入 MNIST 資料集
    (x, y), (x_val, y_val) = datasets.mnist.load_data()
    # 轉換為浮點張量, 並縮放到-1~1
    x = tf.convert_to_tensor(x, dtype=tf.float32) / 255.
    # 轉換為整形張量
    y = tf.convert_to_tensor(y, dtype=tf.int32)
    # one-hot 編碼
    y = tf.one_hot(y, depth=10)
    # 改變檢視, [b, 28, 28] => [b, 28*28]
    x = tf.reshape(x, (-1, 28 * 28))

    # 構建資料集物件
    train_dataset = tf.data.Dataset.from_tensor_slices((x, y))
    # 批次訓練
    train_dataset = train_dataset.batch(200)
    return train_dataset
a = load_data()
建立每個非線性函數的 w,b 引數張量:
def init_paramaters():
    # 每層的張量都需要被優化,故使用 Variable 型別,並使用截斷的正太分佈初始化權值張量
    # 偏置向量初始化為 0 即可
    # 第一層的引數
    w1 = tf.Variable(tf.random.truncated_normal([784, 256], stddev=0.1))
    b1 = tf.Variable(tf.zeros([256]))
    # 第二層的引數
    w2 = tf.Variable(tf.random.truncated_normal([256, 128], stddev=0.1))
    b2 = tf.Variable(tf.zeros([128]))
    # 第三層的引數
    w3 = tf.Variable(tf.random.truncated_normal([128, 10], stddev=0.1))
    b3 = tf.Variable(tf.zeros([10]))
    return w1, b1, w2, b2, w3, b3
def train_epoch(epoch, train_dataset, w1, b1, w2, b2, w3, b3, lr=0.001):
    for step, (x, y) in enumerate(train_dataset):
        with tf.GradientTape() as tape:
            # 第一層計算, [b, 784]@[784, 256] + [256] => [b, 256] + [256] => [b,256] + [b, 256]
            h1 = x @ w1 + tf.broadcast_to(b1, (x.shape[0], 256))
            h1 = tf.nn.relu(h1)  # 通過啟用函數

            # 第二層計算, [b, 256] => [b, 128]
            h2 = h1 @ w2 + b2
            h2 = tf.nn.relu(h2)
            # 輸出層計算, [b, 128] => [b, 10]
            out = h2 @ w3 + b3

            # 計算網路輸出與標籤之間的均方差, mse = mean(sum(y-out)^2)
            # [b, 10]
            loss = tf.square(y - out)
            # 誤差標量, mean: scalar
            loss = tf.reduce_mean(loss)

            # 自動梯度,需要求梯度的張量有[w1, b1, w2, b2, w3, b3]
            grads = tape.gradient(loss, [w1, b1, w2, b2, w3, b3])

        # 梯度更新, assign_sub 將當前值減去引數值,原地更新
        w1.assign_sub(lr * grads[0])
        b1.assign_sub(lr * grads[1])
        w2.assign_sub(lr * grads[2])
        b2.assign_sub(lr * grads[3])
        w3.assign_sub(lr * grads[4])
        b3.assign_sub(lr * grads[5])

    return loss.numpy()
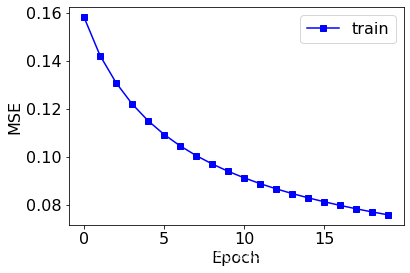
def train(epochs):
    losses = []
    train_dataset = load_data()
    w1, b1, w2, b2, w3, b3 = init_paramaters()
    for epoch in range(epochs):
        loss = train_epoch(epoch, train_dataset, w1, b1, w2, b2, w3, b3, lr=0.001)
        print('epoch:', epoch, 'loss:', loss)
        losses.append(loss)

    x = [i for i in range(0, epochs)]
    # 繪製曲線
    plt.plot(x, losses, color='blue', marker='s', label='train')
    plt.xlabel('Epoch')
    plt.ylabel('MSE')
    plt.legend()
    plt.show()
train(epochs=20)
epoch: 0 loss: 0.1580837
epoch: 1 loss: 0.14210287
epoch: 2 loss: 0.13077658
epoch: 3 loss: 0.12195561
epoch: 4 loss: 0.114933565
epoch: 5 loss: 0.10921349
epoch: 6 loss: 0.10445824
epoch: 7 loss: 0.10043198
epoch: 8 loss: 0.09693184
epoch: 9 loss: 0.0938519
epoch: 10 loss: 0.091136694
epoch: 11 loss: 0.08872058
epoch: 12 loss: 0.08654878
epoch: 13 loss: 0.08458985
epoch: 14 loss: 0.08280441
epoch: 15 loss: 0.08116647
epoch: 16 loss: 0.07964487
epoch: 17 loss: 0.07823177
epoch: 18 loss: 0.07691963
epoch: 19 loss: 0.07569754
