[FFmpeg萬能音訊播放器]android CMake專案准備階段(一)
2020-10-16 12:00:54
1.新建c++專案
2.設定NDK路徑 這裡建議設定NDK版本為:android-ndk-r15c
3.在SNKtool下安裝CMake
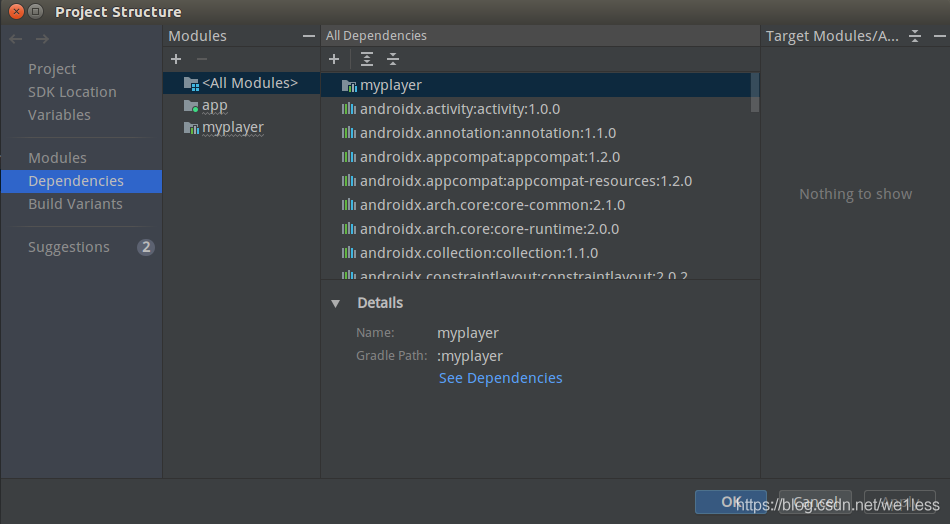
4.新建Module 並且新增Module (這個module主要用來載入庫與寫jni) new ->Module FIle ->ProjectStructure

5.在新建的module中寫Demo 也就是jni的java通訊類
package com.example.myplayer;

public class Demo {

    static {
        System.loadLibrary("native-lib");
        System.loadLibrary("avutil");
        System.loadLibrary("swresample");
        System.loadLibrary("avcodec");
        System.loadLibrary("avformat");
        System.loadLibrary("swscale");
        System.loadLibrary("postproc");
        System.loadLibrary("avfilter");
        System.loadLibrary("avdevice");
    }

    public native String stringFromJNI();

    public native String showDetial();
}
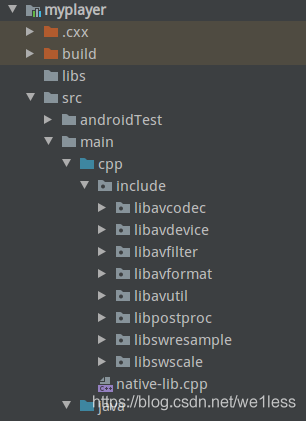
6.新建的module中 cpp資料夾下 將FFmpeg的標頭檔案新增進去

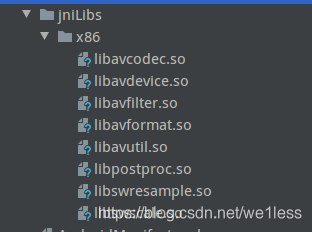
7.新建的module中 在main路勁下新建jniLibs目錄用來存放FFmpeg .so檔案庫
這裡如果沒有苦可以參考這篇https://blog.csdn.net/we1less/article/details/109039079

8.新建的module中 編寫build.gradle檔案
在 android { defaultConfig { 下新增
externalNativeBuild {
            cmake {
                cppFlags "-frtti -fexceptions"
                abiFilters "x86"
            }
        }
在 android { 下新增
externalNativeBuild {
        cmake {
            path "CMakeLists.txt"
            version "3.10.2"
        }
    }


sourceSets {
        main {
            jniLibs.srcDirs = ['src/main/jniLibs']
        }
    }
9.新建的module中 編寫CMakeLists.txt
cmake_minimum_required(VERSION 3.4.1)

include_directories(src/main/cpp/include)


add_library(
             native-lib
             SHARED
           ${CMAKE_SOURCE_DIR}/src/main/cpp/native-lib.cpp)


add_library( avcodec
        SHARED
        IMPORTED)

set_target_properties( avcodec
        PROPERTIES IMPORTED_LOCATION
        ${CMAKE_SOURCE_DIR}/src/main/jniLibs/${ANDROID_ABI}/libavcodec.so)

add_library( avdevice
             SHARED
             IMPORTED)

set_target_properties( avdevice
        PROPERTIES IMPORTED_LOCATION
        ${CMAKE_SOURCE_DIR}/src/main/jniLibs/${ANDROID_ABI}/libavdevice.so)

add_library( avfilter
             SHARED
             IMPORTED)

set_target_properties( avfilter
        PROPERTIES IMPORTED_LOCATION
        ${CMAKE_SOURCE_DIR}/src/main/jniLibs/${ANDROID_ABI}/libavfilter.so)

add_library( avformat
             SHARED
             IMPORTED)

set_target_properties( avformat
        PROPERTIES IMPORTED_LOCATION
        ${CMAKE_SOURCE_DIR}/src/main/jniLibs/${ANDROID_ABI}/libavformat.so)

add_library( avutil
             SHARED
             IMPORTED)

set_target_properties( avutil
        PROPERTIES IMPORTED_LOCATION
        ${CMAKE_SOURCE_DIR}/src/main/jniLibs/${ANDROID_ABI}/libavutil.so)

add_library( swresample
             SHARED
             IMPORTED)

set_target_properties( swresample
        PROPERTIES IMPORTED_LOCATION
        ${CMAKE_SOURCE_DIR}/src/main/jniLibs/${ANDROID_ABI}/libswresample.so)

add_library( swscale
             SHARED
             IMPORTED)

set_target_properties( swscale
        PROPERTIES IMPORTED_LOCATION
        ${CMAKE_SOURCE_DIR}/src/main/jniLibs/${ANDROID_ABI}/libswscale.so)

add_library( postproc
             SHARED
             IMPORTED)

set_target_properties( postproc
        PROPERTIES IMPORTED_LOCATION
        ${CMAKE_SOURCE_DIR}/src/main/jniLibs/${ANDROID_ABI}/libpostproc.so)

target_link_libraries(
                        native-lib
                        avcodec
                        avdevice
                        avfilter
                        avformat
                        avutil
                        swresample
                        swscale
                        postproc
                        log )
10.編寫cpp檔案
#include <jni.h>
#include <string>
#include <android/log.h>

extern "C"{
#include <libavcodec/avcodec.h>
#include <libavformat/avformat.h>
}


#define LOG_TAG "godv"
#define LOGD(...) __android_log_print(ANDROID_LOG_DEBUG, LOG_TAG, __VA_ARGS__)


extern "C"
JNIEXPORT jstring JNICALL
Java_com_example_myplayer_Demo_stringFromJNI(JNIEnv *env, jobject thiz) {
    std::string hello = "Hello godv";

    return env->NewStringUTF(hello.c_str());
}

extern "C"
JNIEXPORT jstring JNICALL
Java_com_example_myplayer_Demo_showDetial(JNIEnv *env, jobject thiz) {
    av_register_all();
    AVCodec *c_temp = av_codec_next(NULL);
    while (c_temp != NULL)
    {
        switch (c_temp->type)
        {
            case AVMEDIA_TYPE_VIDEO:
                LOGD("[Video]:%s", c_temp->name);
                break;
            case AVMEDIA_TYPE_AUDIO:
                LOGD("[Audio]:%s", c_temp->name);
                break;
            default:
                LOGD("[Other]:%s", c_temp->name);
                break;
        }
        c_temp = c_temp->next;
    }
    std::string hello = "Hello godv";
    return env->NewStringUTF(hello.c_str());
}
11.在mainactivity中呼叫
package com.example.godvmusic;

import androidx.appcompat.app.AppCompatActivity;

import android.os.Bundle;
import android.view.View;
import android.widget.TextView;

import com.example.myplayer.Demo;

public class MainActivity extends AppCompatActivity {

    private Demo mDemo;

    @Override
    protected void onCreate(Bundle savedInstanceState) {
        super.onCreate(savedInstanceState);
        setContentView(R.layout.activity_main);
        mDemo = new Demo();
    }

    public void run(View view){
        mDemo.showDetial();
    }
}
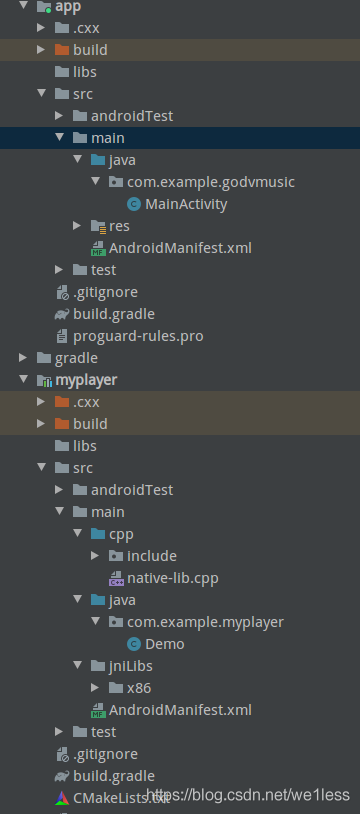
12.最後附上整個專案的結構圖
