以太坊區塊鏈 POA本地搭建多節點私有鏈
2020-10-13 11:00:56
前面的單個節點的設定參考其他教學搭建,這裡主要針對搭建多節點相互連通的問題進行總結。
我的geth版本號是
geth -version 1.9.22-stable-c71a7e26
(一)建立測試資料夾
mkdir test_mygeth
cd test_mygeth
mkdir bootdir boot1 boot2
(二)bootnode設定
sudo bootnode --genkey boot.key
sudo bootnode --nodekey boot.key

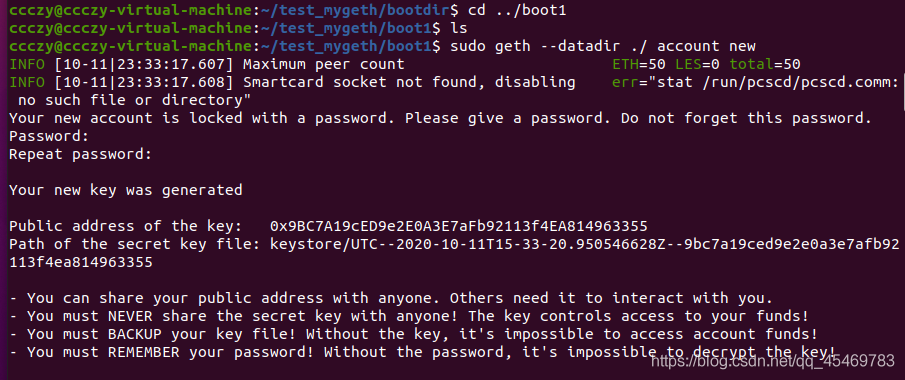
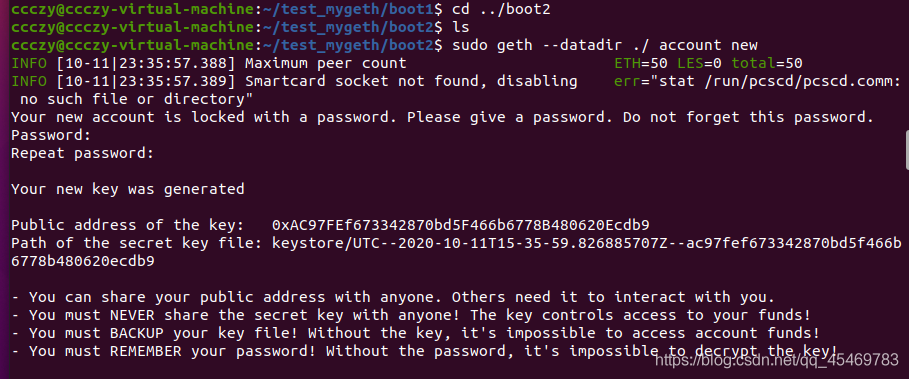
(三)分別在boot1和boot2目錄下建立一個新賬戶
sudo geth --datadir ./ account new


(四)使用puppeth建立test_genesis.json
ccczy@ccczy-virtual-machine:~/test_mygeth/boot1$ puppeth
+-----------------------------------------------------------+
| Welcome to puppeth, your Ethereum private network manager |
|                                                           |
| This tool lets you create a new Ethereum network down to  |
| the genesis block, bootnodes, miners and ethstats servers |
| without the hassle that it would normally entail.         |
|                                                           |
| Puppeth uses SSH to dial in to remote servers, and builds |
| its network components out of Docker containers using the |
| docker-compose toolset.                                   |
+-----------------------------------------------------------+

Please specify a network name to administer (no spaces, hyphens or capital letters please)
> test_genesis

Sweet, you can set this via --network=test_genesis next time!

INFO [10-11|23:36:44.845] Administering Ethereum network           name=test_genesis
WARN [10-11|23:36:44.910] No previous configurations found         path=/home/ccczy/.puppeth/test_genesis

What would you like to do? (default = stats)
 1. Show network stats
 2. Configure new genesis
 3. Track new remote server
 4. Deploy network components
> 2

What would you like to do? (default = create)
 1. Create new genesis from scratch
 2. Import already existing genesis
> 1

Which consensus engine to use? (default = clique)
 1. Ethash - proof-of-work
 2. Clique - proof-of-authority
> 2

How many seconds should blocks take? (default = 15)
> 3

Which accounts are allowed to seal? (mandatory at least one)
> 0xAC97FEf673342870bd5F466b6778B480620Ecdb9
> 0x9BC7A19cED9e2E0A3E7aFb92113f4EA814963355
> 0x

Which accounts should be pre-funded? (advisable at least one)
> 0x9BC7A19cED9e2E0A3E7aFb92113f4EA814963355
> 0xAC97FEf673342870bd5F466b6778B480620Ecdb9
> 0x

Should the precompile-addresses (0x1 .. 0xff) be pre-funded with 1 wei? (advisable yes)
>

Specify your chain/network ID if you want an explicit one (default = random)
> 456
INFO [10-11|23:38:16.130] Configured new genesis block

What would you like to do? (default = stats)
 1. Show network stats
 2. Manage existing genesis
 3. Track new remote server
 4. Deploy network components
> 2

 1. Modify existing configurations
 2. Export genesis configurations
 3. Remove genesis configuration
> 2

Which folder to save the genesis specs into? (default = current)
  Will create test_genesis.json, test_genesis-aleth.json, test_genesis-harmony.json, test_genesis-parity.json
> test_genesis.json
INFO [10-11|23:38:57.386] Saved native genesis chain spec          path=test_genesis.json/test_genesis.json
ERROR[10-11|23:38:57.386] Failed to create Aleth chain spec        err="unsupported consensus engine"
ERROR[10-11|23:38:57.419] Failed to create Parity chain spec       err="unsupported consensus engine"
INFO [10-11|23:38:57.420] Saved genesis chain spec                 client=harmony path=test_genesis.json/test_genesis-harmony.json

What would you like to do? (default = stats)
 1. Show network stats
 2. Manage existing genesis
 3. Track new remote server
 4. Deploy network components
> ^C
>
ccczy@ccczy-virtual-machine:~/test_mygeth/boot1$ ls
keystore  test_genesis.json

ccczy@ccczy-virtual-machine:~/test_mygeth/boot1$ ls -l test_genesis.json
總用量 48
-rw-r--r-- 1 ccczy ccczy 21827 10月 11 23:38 test_genesis-harmony.json
-rw-r--r-- 1 ccczy ccczy 21827 10月 11 23:38 test_genesis.json
會在test_genesis.json生成兩個json檔案,嘗試用test_genesis.json作為創世紀塊檔案頭
把test_genesis.json複製到boot1和boot2的目錄下

(五)用同一個genesis.json進行初始化
ccczy@ccczy-virtual-machine:~/test_mygeth/boot1$ sudo geth --datadir ./ init test_genesis.json
ccczy@ccczy-virtual-machine:~/test_mygeth/boot2$ sudo geth --datadir ./ init test_genesis.json
(六)啟動節點
sudo geth --datadir ./ --port 30321 --networkid 456 --rpc --rpcaddr 0.0.0.0 --rpcapi net,web3,eth,personal --rpcport 8110 --bootnodes "enode://45c611ce644da6f08214ca45a4ca6f4f6d5075a76fa2d57febb898a40bfb141b7eaf69cecc7984fdaca15838026c8967e026ab2cad46237bae86db35f958f32d@127.0.0.1:30301" --unlock "0x9BC7A19cED9e2E0A3E7aFb92113f4EA814963355" --allow-insecure-unlock --syncmode "full" console
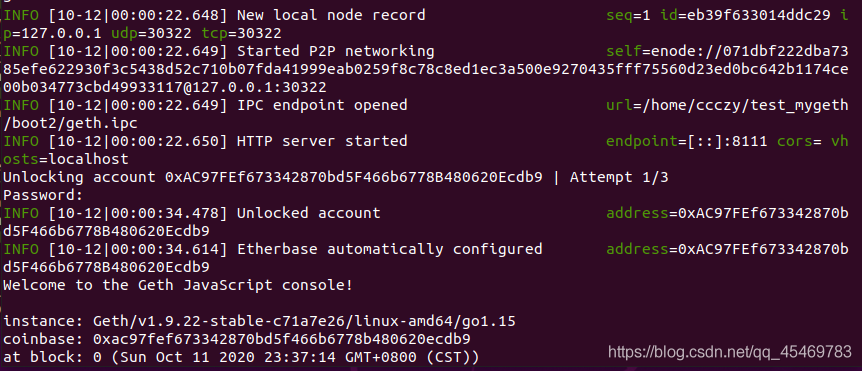
sudo geth --datadir ./ --port 30322 --networkid 456 --rpc --rpcaddr 0.0.0.0 --rpcapi net,web3,eth,personal --rpcport 8111 --bootnodes "enode://45c611ce644da6f08214ca45a4ca6f4f6d5075a76fa2d57febb898a40bfb141b7eaf69cecc7984fdaca15838026c8967e026ab2cad46237bae86db35f958f32d@127.0.0.1:30301" --unlock " 0xAC97FEf673342870bd5F466b6778B480620Ecdb9" --allow-insecure-unlock --syncmode "full" console
- -networkid 要與上面自己在puppeth時填寫的一致,我這裡填寫的是456
- 注意-port , -rpcport在兩個節點的值要設定成不一樣的,否則會提示埠佔用的問題。
(七)節點設定
啟動節點後在boot1和boot2開啟挖礦
miner.start(1)
使用add.Peer將節點二加入到節點一中
admin.addPeer("enode://071dbf222dba7385efe622930f3c5438d52c710b07fda41999eab0259f8c78c8ed1ec3a500e9270435fff75560d23ed0bc642b1174ce00b034773cbd49933117@127.0.0.1:30322")
- 節點的enode資訊在啟動節點後可以找到

# 使用net.peerCount 測試節點是否連線
net.peerCount

設定成功!
上述測試:主要參考大佬的方法 geth基於PoA共識機制構建聯盟鏈
總結
1.測試了一下,在啟動節點可以不使用--bootnode "enode:......也可以完成節點的連線🔗, 在啟動後使用命令 admin.addPeer("enode:.......")即可
2.enode尾部的資訊形式為@127.0.0.1:30322樣式
3.在兩個節點中networkid 一致,port、pcport需要不同