Java NIO學習,一次讀懂Java NIO
Java NIO 和 IO 的區別

緩衝區存取資料的兩個核心方法
put:存入資料到緩衝區
get:獲取緩衝區中的資料
緩衝區的四個核心屬性
capacity:容量,表示緩衝區中最大儲存資料的容量,一旦宣告不能改變
position:位置,表示緩衝區中正在運算元據的位置
limit:界限,表示緩衝區中可以運算元據的大小。(limit後的資料不能進行讀寫)
mark:標記,表示記錄當前position的位置,可以通過reset恢復到mark的位置
0 <= mark <= position <= limit <= capacity
直接緩衝區與非直接緩衝區
非直接緩衝區:通過allocate()方法分配的緩衝區,將緩衝區建立在JVM的記憶體中
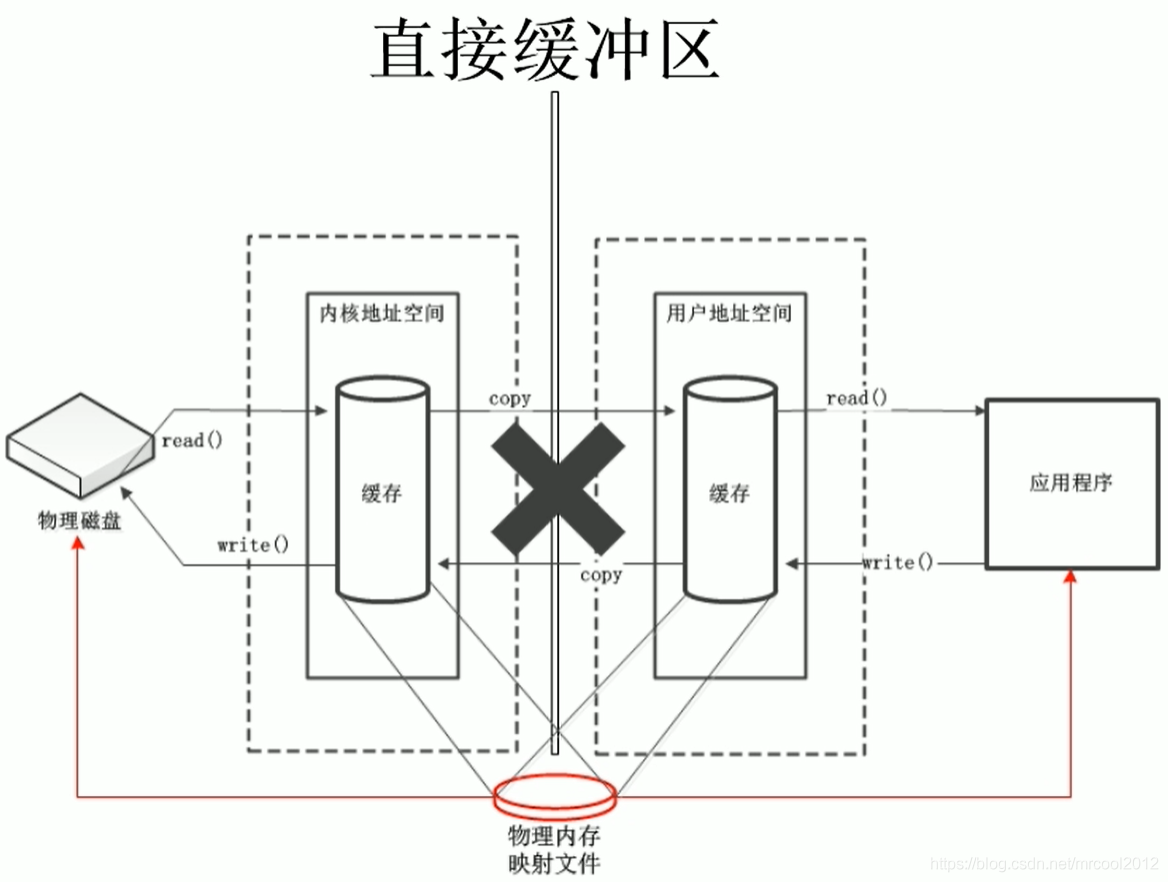
直接緩衝區:通過allocateDirect()方法分配的緩衝區,將緩衝區建立在作業系統的實體記憶體中。可以提高效率
非直接緩衝區工作原理圖

直接緩衝區工作原理圖
通道
通道(Channel):由java.nio.channels包定義的。channel表示IO源與目標開啟的連線。channel類似於傳統的「流」。只不過channel本身不能直接存取資料,channel只能與buffer進行互動,在Java NIO中負責緩衝區資料的傳輸。
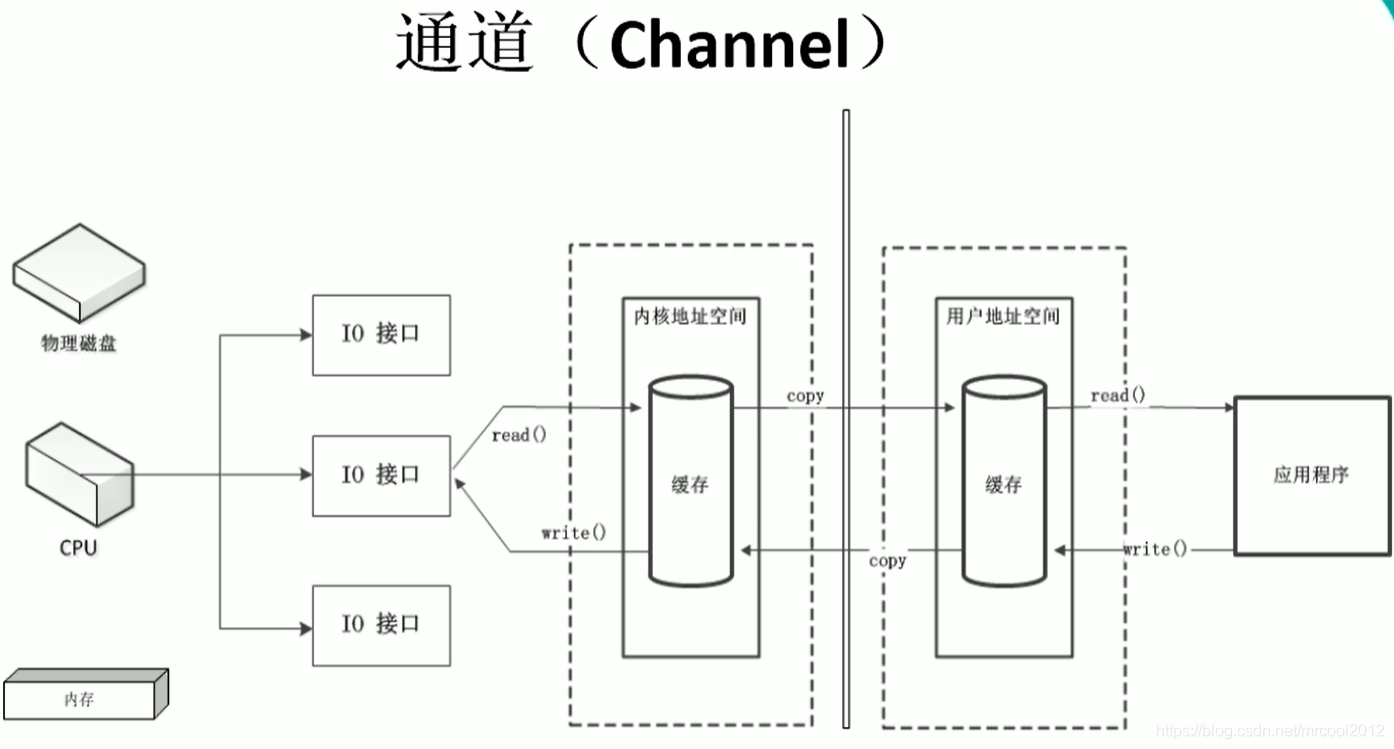
應用程式向系統發起讀寫請求,呼叫作業系統的IO介面,IO介面由CPU統一調配,當讀寫請求過大,會大大佔用CPU的資源,會嚴重影響效率,CPU要處理大量的IO請求,分配IO介面,就沒法做其他事情了。
CPU:中央處理器
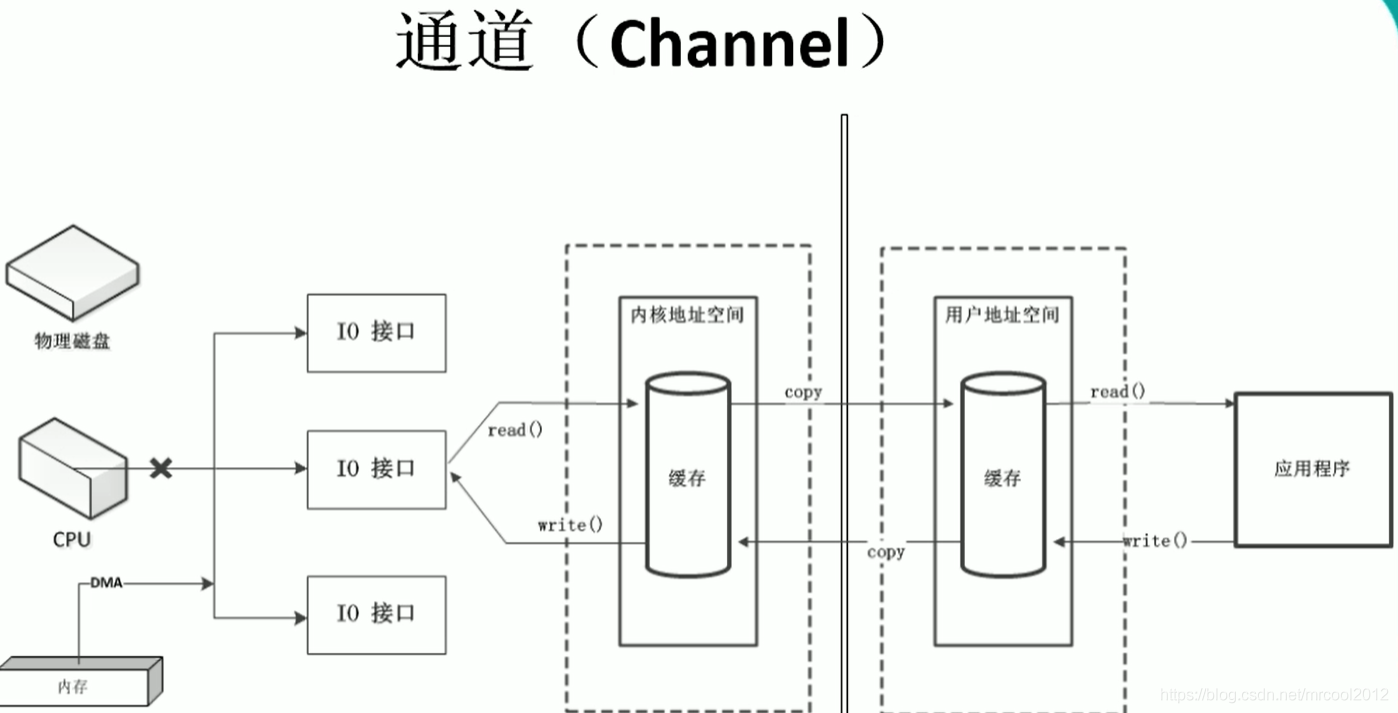
進行了修改,新增了DMA,直接記憶體;當應用程式向作業系統發起IO請求,首先DMA會向CPU申請許可權,如果CPU給與許可權,那麼後續的讀寫請求就全權由DMA負責操作;這樣的好處就是在執行IO請求時,CPU可以不進行干預,去處理其他事情
但是DMA仍然有缺點,比如當一個大型的應用程式發起大量的IO請求,DMA仍然要向CPU請求資源,影響效率
在IO介面和記憶體之間,會有一個DMA傳輸資料匯流排

通道,可以理解為一個完全獨立的處理器,專門用於IO操作;通道仍然依附於CPU,但是它有自己的一套指令,是獨立的處理器
通道的主要實現類
JDK1.7以後有三種方式
1、Java針對支援通道的類提供了getChannel()方法
本地IO:FileInputStream/FileOutputStream/RandomAccessFile
網路IO:Socket/ServerSocket/DatagramSocket
2、在JDK1.7中的NIO.2 針對各個通道提供了一個靜態方法 open()
3、在JDK1.7中的NIO.2 的Files工具列的newByteChannel()
//用非直接通道完成檔案的傳輸
@Test
public void test5(){
    FileInputStream fis = null;
    FileOutputStream fos = null;
    FileChannel inChannel = null;
    FileChannel outChannel = null;
    try {
        //獲取檔案流
        fis = new FileInputStream("E:\\休閒生活\\桌面桌布\\王麗坤.jpg");
        fos = new FileOutputStream("E:\\休閒生活\\桌面桌布\\2.jpg");


        // 1. 獲取通道
        inChannel = fis.getChannel();
        outChannel = fos.getChannel();


        // 2. 分配緩衝區
        ByteBuffer buf = ByteBuffer.allocate(1024);


        // 3. 讀取資料
        while (inChannel.read(buf) != -1){
            // 4. 切換讀模式
            buf.flip();
            // 5. 寫資料
            outChannel.write(buf);
            buf.clear();    // 緩衝區迴圈重複讀寫資料
        }
    } catch (IOException e) {
        e.printStackTrace();
    } finally {
        // 6. 關閉通道,關閉流
        if(inChannel!=null){
            try {
                inChannel.close();
            } catch (IOException e) {
                e.printStackTrace();
            }
        }
        if(outChannel!=null){
            try {
                outChannel.close();
            } catch (IOException e) {
                e.printStackTrace();
            }
        }
        if(fis!=null){
            try {
                fis.close();
            } catch (IOException e) {
                e.printStackTrace();
            }
        }
        if(fos!=null){
            try {
                fos.close();
            } catch (IOException e) {
                e.printStackTrace();
            }
        }
    }
}
//用直接通道完成檔案的傳輸
@Test
public void test6(){
FileChannel inChannel = null;
FileChannel outChannel = null;
try {
//FileChannel.open()的兩個引數:路徑path,模式
//StandardOpenOption.READ 讀模式
inChannel = FileChannel.open(Paths.get("E:\\休閒生活\\桌面桌布\\王麗坤.jpg"), StandardOpenOption.READ);
//StandardOpenOption.CREATE_NEW 建立模式,當路徑下有同名檔案時報錯,沒有就建立
//StandardOpenOption.CREATE 建立模式,當路徑下有同名檔案時會覆蓋,沒有就建立
outChannel = FileChannel.open(Paths.get("E:\\休閒生活\\桌面桌布\\2.jpg"), StandardOpenOption.READ,StandardOpenOption.WRITE,StandardOpenOption.CREATE_NEW);
// 記憶體對映檔案
MappedByteBuffer inMappedBuffer = inChannel.map(FileChannel.MapMode.READ_ONLY, 0, inChannel.size());
MappedByteBuffer outMappedBuffer = outChannel.map(FileChannel.MapMode.READ_WRITE, 0, inChannel.size());
//讀寫檔案
byte[] bytes = new byte[inMappedBuffer.limit()];
inMappedBuffer.get(bytes);
outMappedBuffer.put(bytes);
} catch (IOException e) {
e.printStackTrace();
} finally {
if(inChannel!=null){
try {
inChannel.close();
} catch (IOException e) {
e.printStackTrace();
}
}
if(outChannel!=null){
try {
outChannel.close();
} catch (IOException e) {
e.printStackTrace();
}
}
}
}通道間的資料傳輸
transferTo()
transferFrom()
    // 通道之間的資料傳輸
    @Test
    public void test7() throws IOException {
        FileChannel inChannel = FileChannel.open(Paths.get("E:\\學習視訊\\JavaNIO\\nio\\1. 尚矽谷_NIO_NIO 與 IO 區別.avi"), StandardOpenOption.READ);
        FileChannel outChannel = FileChannel.open(Paths.get("E:\\學習視訊\\JavaNIO\\nio\\1.avi"),StandardOpenOption.READ,StandardOpenOption.WRITE,StandardOpenOption.CREATE_NEW);

        inChannel.transferTo(0,inChannel.size(),outChannel);
//        outChannel.transferFrom(inChannel,0,inChannel.size());

        inChannel.close();
        outChannel.close();
    }
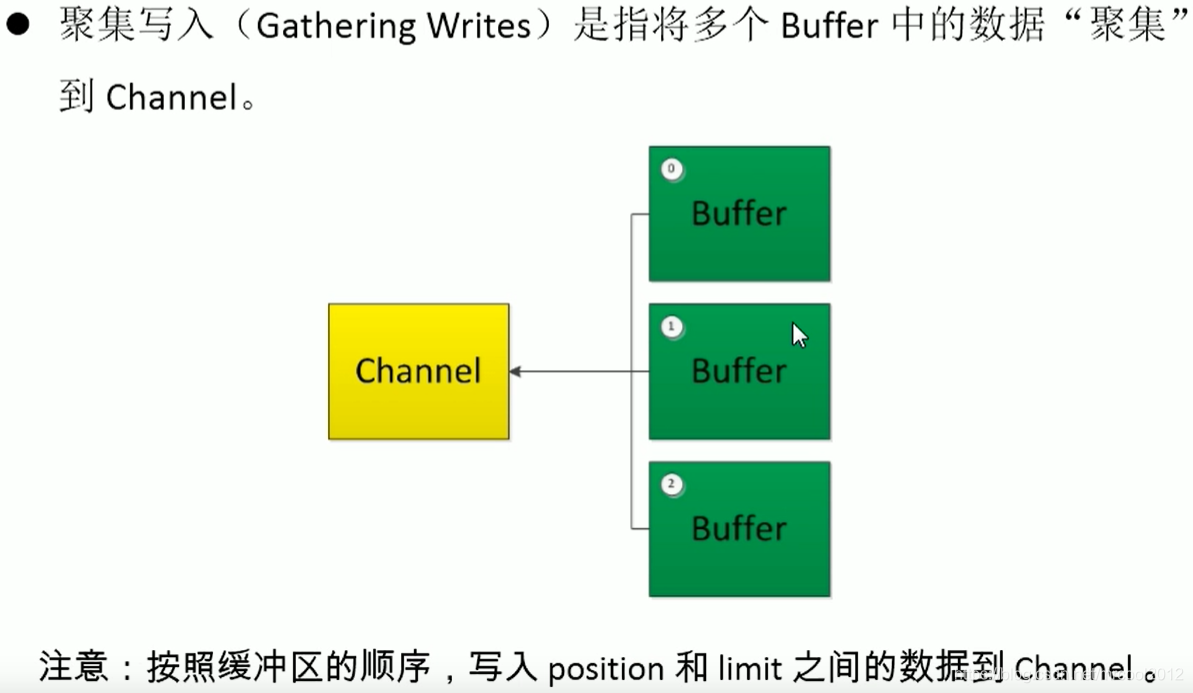
分散(Scatter)與聚集(Gather)
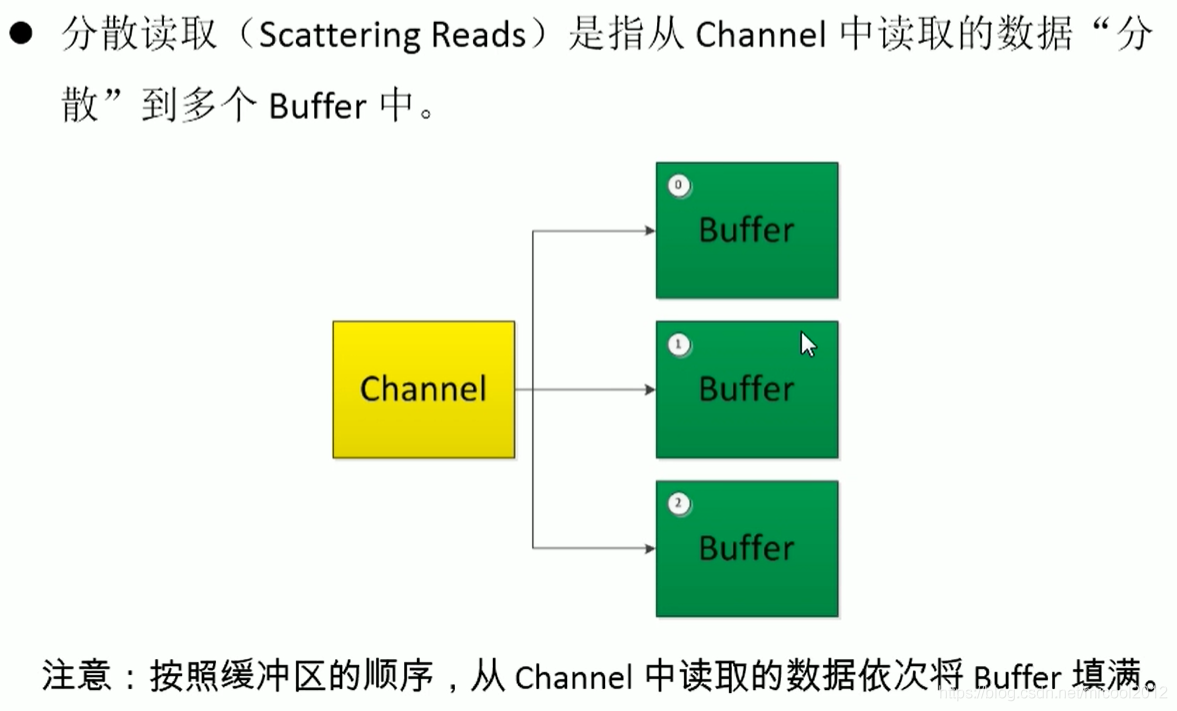
分散讀取:Scattering Reads,將通道中的資料分散到多個緩衝區中
聚集寫入:Gathering Writes,將多個緩衝區中的資料聚集到通道中
//分散與聚集
@Test
public void test8() throws IOException {
    RandomAccessFile file = new RandomAccessFile("C:\\Users\\FMM.000\\Desktop\\spring ioc流程.txt","rw");
    // 獲取通道
    FileChannel fileChannel = file.getChannel();
    // 分配指定大小的緩衝區
    ByteBuffer buf1 = ByteBuffer.allocate(100);
    ByteBuffer buf2 = ByteBuffer.allocate(1024);
    // 分散讀取
    ByteBuffer[] bufs = {buf1,buf2};
    fileChannel.read(bufs);


    for(ByteBuffer buffer : bufs){
        buffer.flip();
    }
    System.out.println(new String(bufs[0].array(),0,bufs[0].limit()));
    System.out.println("-------------------------------------");
    System.out.println(new String(bufs[1].array(),0,bufs[1].limit()));


    // 聚集寫入
    RandomAccessFile file1 = new RandomAccessFile("C:\\Users\\FMM.000\\Desktop\\ioc流程.txt","rw");
    FileChannel fileChannel1 = file1.getChannel();
    fileChannel1.write(bufs);
    // 關閉通道
    fileChannel.close();
    fileChannel1.close();
}// 編碼解碼
@Test
public void test10() throws CharacterCodingException {
Charset charset = Charset.forName("GBK");
// 獲取編碼器
CharsetEncoder encoder = charset.newEncoder();
// 獲取解碼器
CharsetDecoder decoder = charset.newDecoder();
CharBuffer charBuffer = CharBuffer.allocate(1024);
charBuffer.put("尚矽谷威武!");
// 切換讀模式
charBuffer.flip();
// 編碼
ByteBuffer buffer = encoder.encode(charBuffer);
for (int i = 0; i < 12; i++) {
System.out.println(buffer.get());
}
// 解碼
buffer.flip();
CharBuffer cb = decoder.decode(buffer);
System.out.println(cb.toString());
System.out.println("============================");
buffer.flip();
Charset cs = Charset.forName("UTF-8");
CharBuffer cBuf = cs.decode(buffer);
System.out.println(cBuf.toString());
}使用NIO完成網路通訊的三大核心:
1、通道(Channel):負責連線
java.nio.channels.Channel 介面:
|--SelectableChannel
|--SocketChannel
|--ServerSocketChannel //上兩個是TCP
|--DatagramChannel //UDP,都是用於網路 IO
|--Pipe.SinkChannel
|--Pipi.SourceChannel
2、緩衝區(Buffer):負責資料的存取
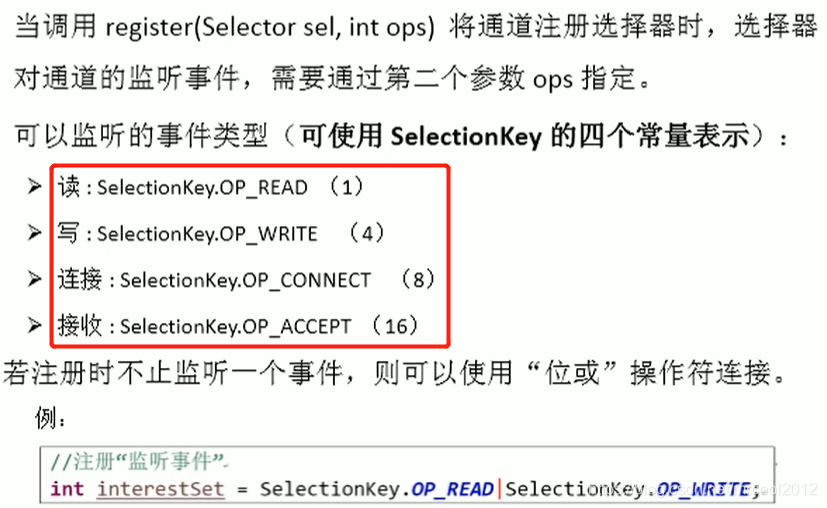
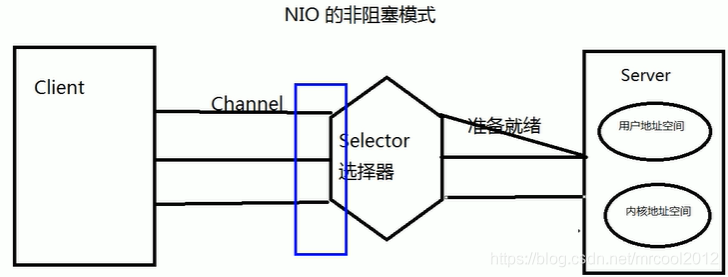
3、選擇器(Selector):是 SelectableChannel 的多路複用器,用於監控 SelectableChannel 的 IO 狀況
SelectionKey:表示 SelectableChannel 和 Selector 之間的註冊關係。每次向選擇器註冊通道時就會選澤一個事件(選擇鍵)

範例1:阻塞式IO
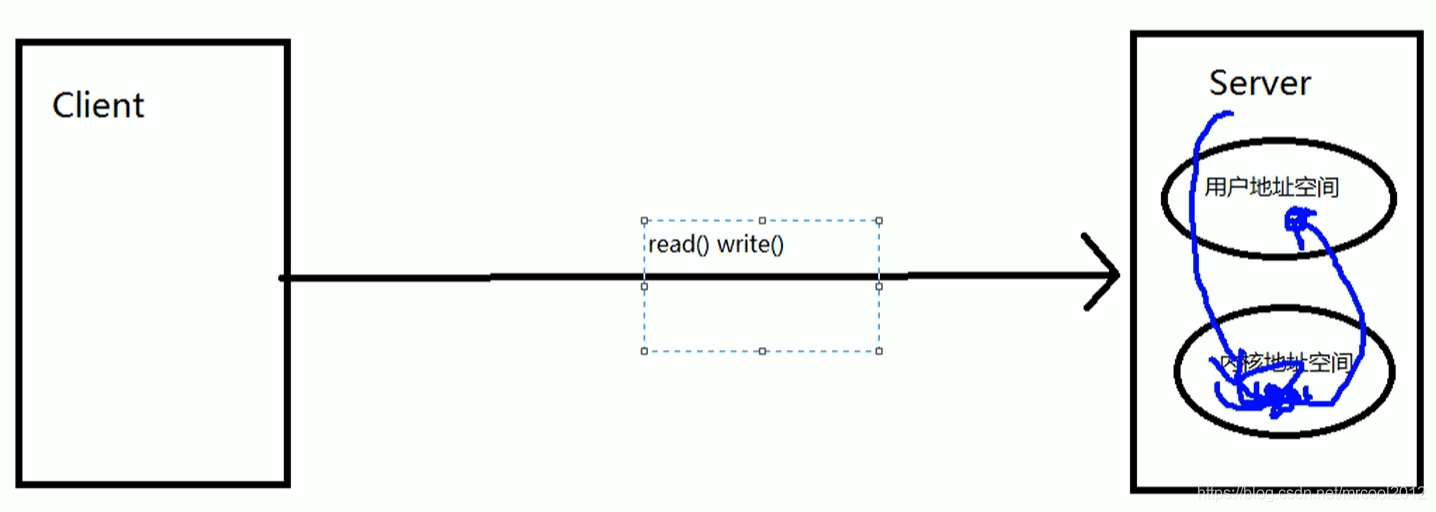
當client端向server端傳送請求時,如果server端不能確定client請求的讀/寫的資料,server端會處於阻塞狀態,阻塞狀態下server端下的此執行緒不能做其他操作,一直等待,當server有client端需要讀/寫的資料時,會將資料讀/寫給使用者,然後釋放資源
// 模擬網路IO,使用者端
@Test
public void nioClient(){
    SocketChannel socketChannel = null;
    FileChannel fileChannel = null;
    try {
        // 1. 獲取通道
        socketChannel = SocketChannel.open(new InetSocketAddress("127.0.0.1",9898));

        fileChannel = FileChannel.open(Paths.get("E:\\休閒生活\\桌面桌布\\無情的戰爭.jpg"), StandardOpenOption.READ);
        // 2. 分配指定大小緩衝區
        ByteBuffer buf = ByteBuffer.allocate(1024);
        // 3. 讀取本地檔案,並行送到伺服器
        while (fileChannel.read(buf)!=-1){
            buf.flip();
            socketChannel.write(buf);
            buf.clear();
        }

    } catch (Exception e) {
        e.printStackTrace();
    } finally {
        // 關閉通道
        try {
            if(fileChannel!=null){
                fileChannel.close();
            }
            if (socketChannel!=null){
                socketChannel.close();
            }
        } catch (IOException e) {
            e.printStackTrace();
        }
    }
}


// 伺服器端
@Test
public void nioServer(){
    ServerSocketChannel ssChannel = null;
    FileChannel outChannel = null;
    try {
        // 1. 獲取通道
        ssChannel = ServerSocketChannel.open();
        outChannel = FileChannel.open(Paths.get("E:\\休閒生活\\桌面桌布\\2.jpg"),StandardOpenOption.WRITE,StandardOpenOption.CREATE);
        // 2. 繫結連線
        ssChannel.bind(new InetSocketAddress(9898));
        // 3. 獲取使用者端通道
        SocketChannel sChannel = ssChannel.accept();
        // 4. 分配指定大小的緩衝區
        ByteBuffer buf = ByteBuffer.allocate(1024);
        // 5. 接收使用者端資料,並儲存到本地
        while (sChannel.read(buf)!=-1){
            buf.flip();
            outChannel.write(buf);
            buf.clear();
        }


    } catch (IOException e) {
        e.printStackTrace();
    } finally {
        // 關閉通道
        try {
            if(outChannel!=null){
                outChannel.close();
            }
            if(ssChannel!=null){
                ssChannel.close();
            }
        } catch (Exception e){
            e.printStackTrace();
        }
    }
}
非阻塞式IO
範例1:非阻塞式IO
public class TestNonBlockingIO {


    @Test
    public void client() throws IOException {
        //獲取通道
        SocketChannel sChannel = SocketChannel.open(new InetSocketAddress("127.0.0.1", 9898));
        //切換成非阻塞式
        sChannel.configureBlocking(false);
        //分配指定大小的緩衝區
        ByteBuffer buf = ByteBuffer.allocate(1024);
        //傳送資料給伺服器端
//        buf.put(LocalDateTime.now().toString().getBytes());
        Scanner scanner = new Scanner(System.in);
        while (scanner.hasNext()){
            String str = scanner.next();
            buf.put((new Date().toString() +"\n" + str).getBytes());
            buf.flip();
            sChannel.write(buf);
            buf.clear();
        }


        //關閉通道
        sChannel.close();
    }


    @Test
    public void server() throws IOException {
        // 1. 獲取通道
        ServerSocketChannel ssChannel = ServerSocketChannel.open();
        // 2. 切換非阻塞式
        ssChannel.configureBlocking(false);
        // 3. 繫結連線
        ssChannel.bind(new InetSocketAddress(9898));
        // 4. 獲取選擇器
        Selector selector = Selector.open();
        // 5. 將通道註冊到選擇器上,並指定「監聽連線事件」
        ssChannel.register(selector, SelectionKey.OP_ACCEPT);
        // 6. 輪詢式的獲取選擇器上以及「準備就緒」的事件
        while (selector.select()>0){
            // 7. 獲取當前選擇器中所有註冊的「選擇鍵(已就緒的監聽事件)」
            Iterator<SelectionKey> it = selector.selectedKeys().iterator();
            while (it.hasNext()){
                // 8. 獲取準備「就緒」的事件
                SelectionKey sk = it.next();
                // 9. 判斷具體是什麼事件準備就緒
                if(sk.isAcceptable()){
                    // 10. 若「接收就緒」,獲取使用者端連線
                    SocketChannel sChannel = ssChannel.accept();
                    // 11. 切換非阻塞模式
                    sChannel.configureBlocking(false);
                    // 12. 將該通道註冊到選擇器上
                    sChannel.register(selector,SelectionKey.OP_READ);
                } else if(sk.isReadable()){
                    // 13. 獲取當前選擇器上「讀就緒」狀態的通道
                    SocketChannel sChannel = (SocketChannel) sk.channel();
                    // 14. 讀取資料
                    ByteBuffer buf = ByteBuffer.allocate(1024);
                    int len = 0;
                    while ((len = sChannel.read(buf))>0){
                        buf.flip();
                        System.out.println(new String(buf.array(),0,len));
                        buf.clear();
                    }
                }
                // 15. 取消選擇鍵,SelectionKey
                it.remove();
            }
        }
    }
}