Android 電影排行榜app製作(可加入觀看清單儲存)
Android 電影排行榜app製作(可加入觀看清單儲存)
第一步:在xml檔案上進行主介面的佈局
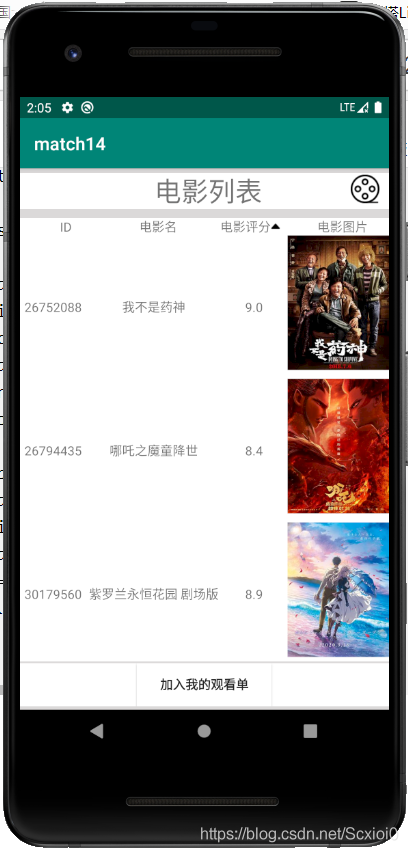
採用LinearLayout佈局,新增ImageView控制元件(電影小圖示)實現跳轉到觀看清單的頁面,在新增ImageView控制元件(向下和向下的圖示)來實現列表的倒序和正序,之後新增RecycleView控制元件使內容在列表上顯示,並使用SwipeRefreshLayout控制元件,下拉選單實現資料的更新,在新增按鈕來實現喜歡的電影點選加入我們的觀看清單。
注:在使用RecycleView時需要下載第三方庫,找到build.grade檔案,輸入以下程式碼:
	implementation 'com.android.support:design:28.0.0'
    implementation 'com.android.support:support-v4:28.0.0'
    implementation 'com.android.support:appcompat-v7:28.0.0'
程式碼如下:
<?xml version="1.0" encoding="utf-8"?>
<LinearLayout xmlns:android="http://schemas.android.com/apk/res/android"
    xmlns:tools="http://schemas.android.com/tools"
    android:layout_width="match_parent"
    android:layout_height="match_parent"
    android:background="#DBD9D9"
    android:orientation="vertical"
    tools:context=".MainActivity">

    <LinearLayout
        android:layout_width="match_parent"
        android:layout_height="wrap_content"
        android:layout_marginTop="5dp"
        android:background="#FFF"
        android:orientation="horizontal">

        <TextView
            android:layout_width="0dp"
            android:layout_weight="4"
            android:layout_height="wrap_content"
            android:text="電影列表"
            android:layout_marginLeft="150dp"
            android:textSize="30sp" />


        <ImageView
            android:id="@+id/i1"
            android:layout_width="0dp"
            android:layout_weight="1"
            android:layout_marginTop="2dp"
            android:layout_height="wrap_content"
            android:src="@mipmap/movie" />
    </LinearLayout>
    <LinearLayout
        android:layout_width="match_parent"
        android:layout_height="wrap_content"
        android:layout_marginTop="10dp"
        android:background="#FFF"
        android:orientation="vertical">
    <LinearLayout
        android:layout_width="match_parent"
        android:layout_height="wrap_content"
        android:orientation="horizontal"
        android:gravity="center"
        android:background="#FFF">
        <TextView
            android:id="@+id/id1"
            android:layout_width="0dp"
            android:layout_weight="1"
            android:layout_height="wrap_content"
            android:gravity="center"
            android:text="ID"/>
        <TextView
            android:layout_width="0dp"
            android:layout_weight="1"
            android:layout_height="wrap_content"
            android:gravity="center"
            android:text="電影名"/>
        <LinearLayout
            android:layout_width="0dp"
            android:layout_weight="1"
            android:gravity="center"
            android:layout_height="wrap_content"
            android:orientation="horizontal">
        <TextView
            android:layout_width="wrap_content"
            android:layout_height="wrap_content"
            android:text="電影評分"/>
        <ImageView
            android:id="@+id/i2"
            android:layout_width="wrap_content"
            android:layout_height="wrap_content"
            android:src="@mipmap/up"/>
        </LinearLayout>
        <TextView
            android:layout_width="0dp"
            android:layout_weight="1"
            android:gravity="center"
            android:layout_height="wrap_content"
            android:text="電影圖片"/>
    </LinearLayout>

    </LinearLayout>
    <androidx.swiperefreshlayout.widget.SwipeRefreshLayout
        android:id="@+id/s1"
        android:layout_height="475dp"
        android:layout_width="wrap_content">

        <androidx.recyclerview.widget.RecyclerView
            android:id="@+id/r1"
            android:layout_width="match_parent"
            android:background="#FFF"
            android:layout_height="wrap_content" />

    </androidx.swiperefreshlayout.widget.SwipeRefreshLayout>
    <LinearLayout
        android:layout_width="match_parent"
        android:layout_height="wrap_content"
        android:gravity="center"
        android:background="#FFF"
        android:layout_marginTop="2dp"
        android:orientation="horizontal">
    <Button
        android:id="@+id/b1"
        android:layout_width="150dp"
        android:layout_height="wrap_content"
        android:background="#FFF"
        android:textStyle="bold"
        android:text="加入我的觀看單"/>
    </LinearLayout>
</LinearLayout>
介面截圖:
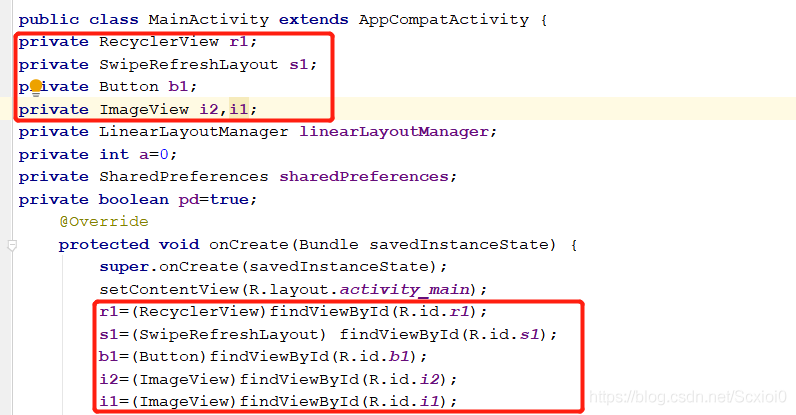
第二步:找到控制元件的ID並繫結
第三步:解析url資料
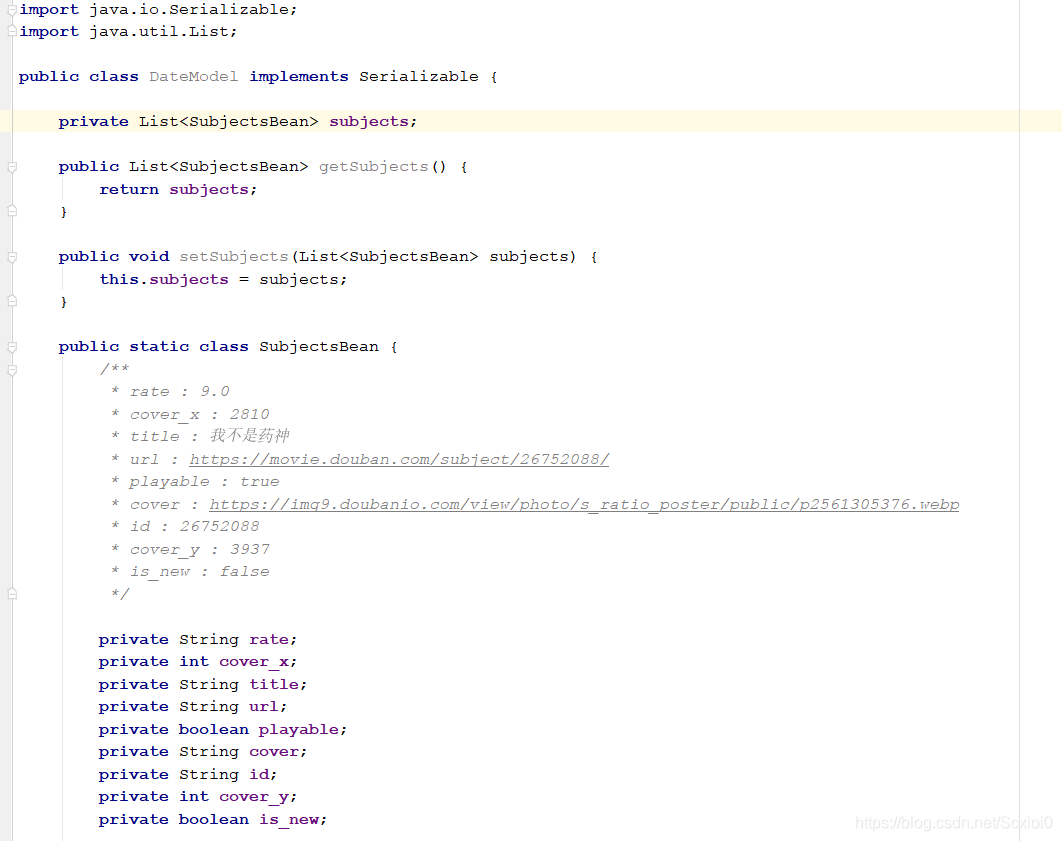
第一:定義一個類DataModel.class
public class DateModel implements Serializable {
}
使用快捷鍵(Alt+s)貼上全部過去資料,之後一直點選OK
在網路請求之前在AndroidManifest.xml檔案中新增網路許可權
<uses-permission android:name="android.permission.INTERNET"/>
第二:完成網路的請求
定義之前需要使用到okhttp3和gson第三方庫,找到build.grade檔案,輸入以下程式碼:
    implementation 'com.squareup.okhttp3:okhttp:3.12.1'
    debugImplementation 'com.squareup.okhttp3:logging-interceptor:3.12.1'
    implementation 'com.google.code.gson:gson:2.8.5'
定義一個請求介面
public void requestDate()
{
}
在該介面進行網路請求
 public void requestDate()
    {

        String url="https://movie.douban.com/j/search_subjects?type=movie&tag=%E8%B1%86%E7%93%A3%E9%AB%98%E5%88%86&sort=recommend&page_limit=200&page_start=0";
        OkHttpClient okHttpClient=new OkHttpClient();
        final Request request=new Request.Builder()
                .url(url)
                .get()
                .build();
        Call call=okHttpClient.newCall(request);
        call.enqueue(new Callback() {
            @Override
            public void onFailure(Call call, IOException e) {
                runOnUiThread(new Runnable() {
                    @Override
                    public void run() {
                        Toast.makeText(MainActivity.this,"網路連線失敗",Toast.LENGTH_SHORT).show();
                    }
                });
            }

            @Override
            public void onResponse(Call call, Response response) throws IOException {
                String result=response.body().string();
                Gson gson=new Gson();
                final DateModel dateModel=gson.fromJson(result,DateModel.class);
                runOnUiThread(new Runnable() {
                    @Override
                    public void run() {
                        Toast.makeText(MainActivity.this,"網路連線成功",Toast.LENGTH_SHORT).show();
                        getDate(dateModel);
                    }
                });
            }
        });
    }
第四步:完成列表的相關操作
首先定義列表的佈局,在res的檔案下layou建立一個xml檔案,實現佈局
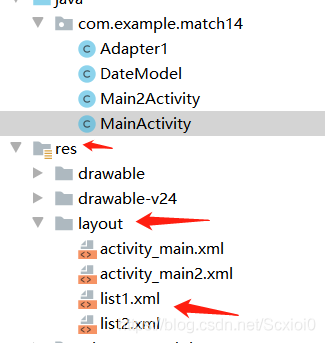
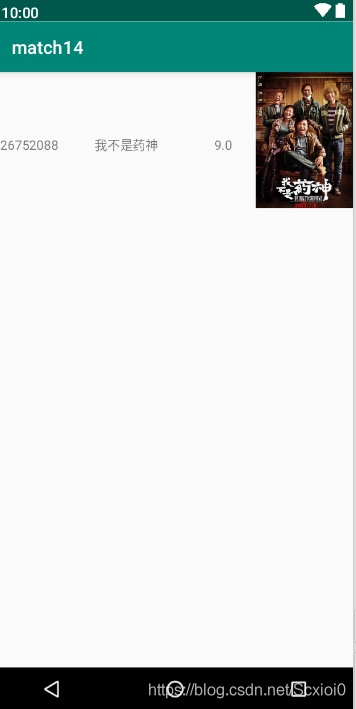
佈局採用的是LinearLayout,3個TextView控制元件顯示內容,ImageView顯示圖片,程式碼如下:
<?xml version="1.0" encoding="utf-8"?>
<LinearLayout xmlns:android="http://schemas.android.com/apk/res/android"
    android:orientation="horizontal"
    android:layout_width="match_parent"
    android:layout_height="160dp">
    <TextView
        android:id="@+id/t1"
        android:layout_width="0dp"
        android:layout_weight="1"
        android:layout_gravity="center"
        android:gravity="center"
        android:layout_height="wrap_content"
        android:text="26752088"/>
    <TextView
        android:id="@+id/t2"
        android:layout_width="0dp"
        android:layout_weight="2"
        android:gravity="center"
        android:layout_height="wrap_content"
        android:layout_gravity="center"
        android:text="我不是藥神"/>
    <TextView
        android:id="@+id/t3"
        android:layout_width="0dp"
        android:layout_weight="1"
        android:layout_height="wrap_content"
        android:layout_gravity="center"
        android:gravity="center"
        android:text="9.0"/>
    <ImageView
        android:id="@+id/i1"
        android:layout_width="0dp"
        android:layout_weight="1.5"
        android:layout_height="150dp"
        android:scaleType="fitXY"
        android:src="@mipmap/photo1"/>
</LinearLayout>
介面截圖:
第二:定義一個Adapter1的類來實現列表的功能
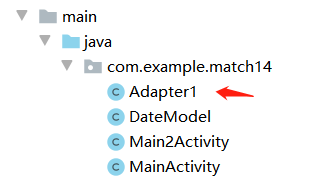
public class Adapter1 {
}
在該類中繼承RecyclerView.Adapter
public class Adapter1 extends RecyclerView.Adapter {
}
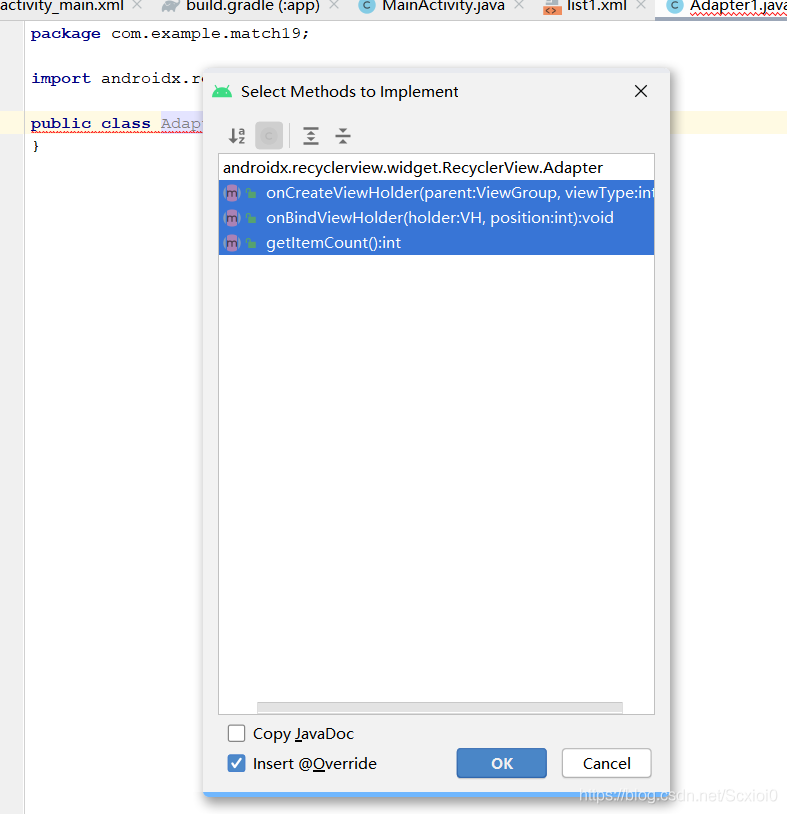
之後把滑鼠移至Adapter1,在鍵盤按Alt+Enter 選擇第一個,最後選擇ok
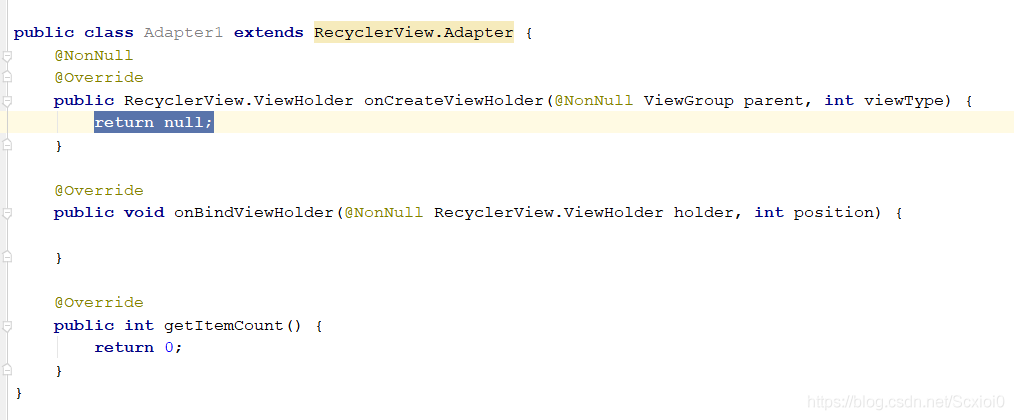
在倒數第二個花括號中定義一個類
public class ViewHolder extends RecyclerView.ViewHolder
    {
    }
之後把滑鼠移至RecyclerView.ViewHolder,在鍵盤按Alt+Enter,選擇第一個,按確定

在該類中填寫控制元件的id
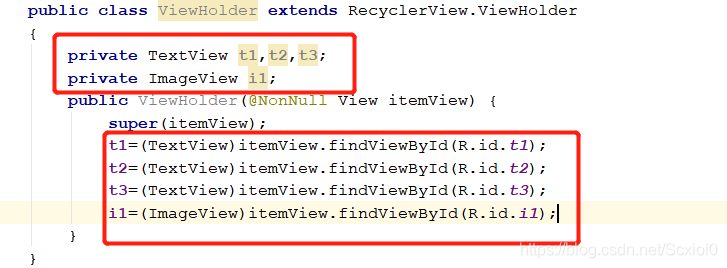
將Json的資料放進列表

更改當前的值
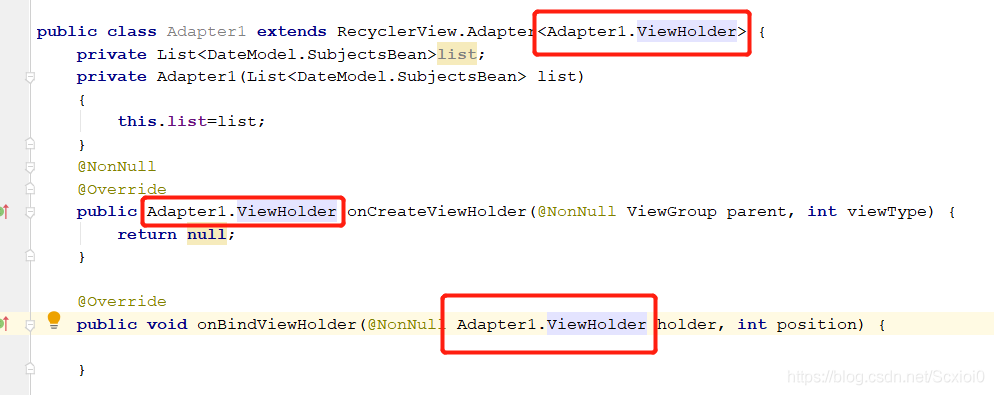
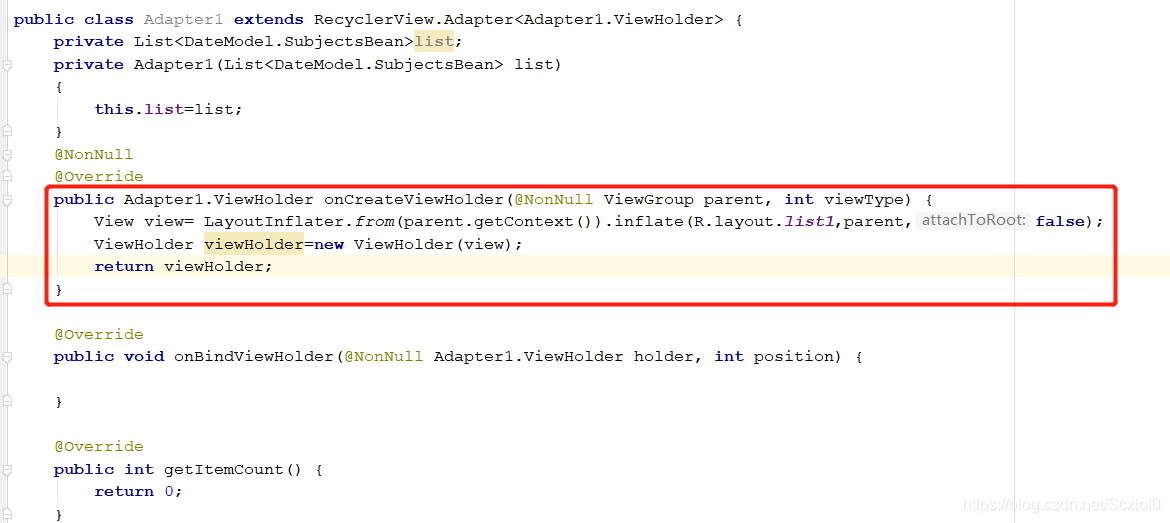
找到Adapter1.ViewHolder onCreateViewHolder的函數,繫結xml並返回當前的值
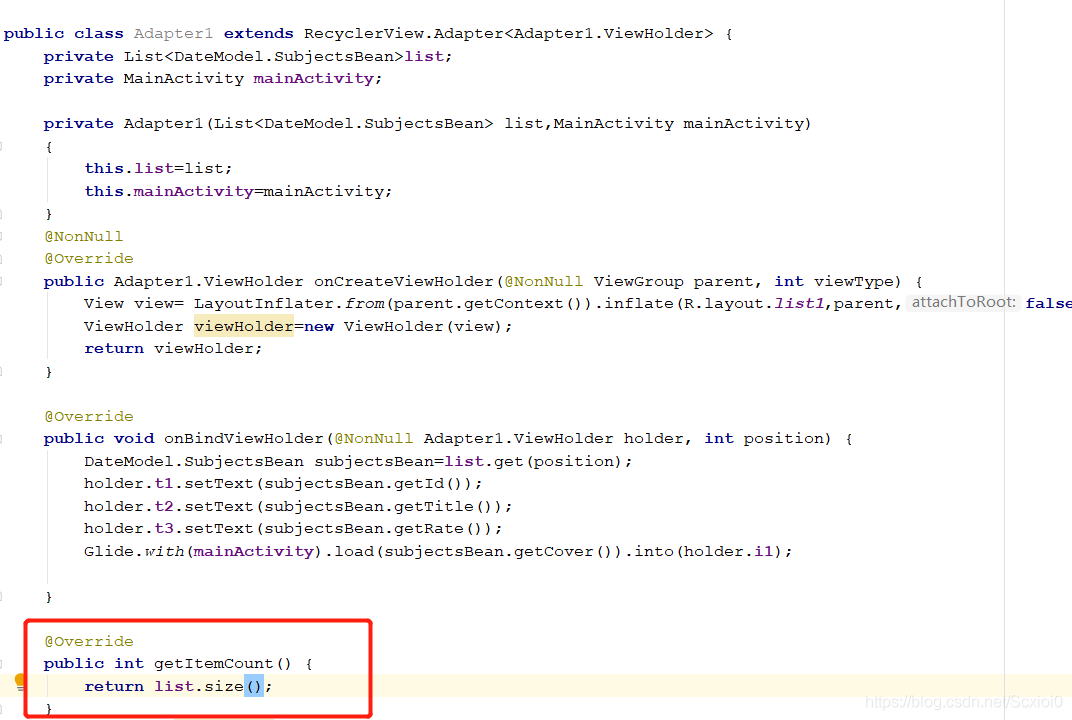
找到onBindViewHolder函數,將獲取到的JSON資料傳遞到指定的控制元件

第4個控制元件,ImageView線上網路圖片顯示,需要下載第三方庫,找到build.grade檔案,輸入以下語句
    implementation 'com.github.bumptech.glide:glide:4.9.0'
    annotationProcessor 'com.github.bumptech.glide:compiler:4.9.0'
找到onBindViewHolder函數,繼續將獲取到的JSON資料傳遞到ImageView控制元件,在傳遞之前需要定義一個介面

返回資料的長度
新增列表監聽器,在倒數第二個花括號定義一個類
public interface OnItemClickListener
    {
        void onClick(String a,String b,String c,String d);
    }
使用監聽器
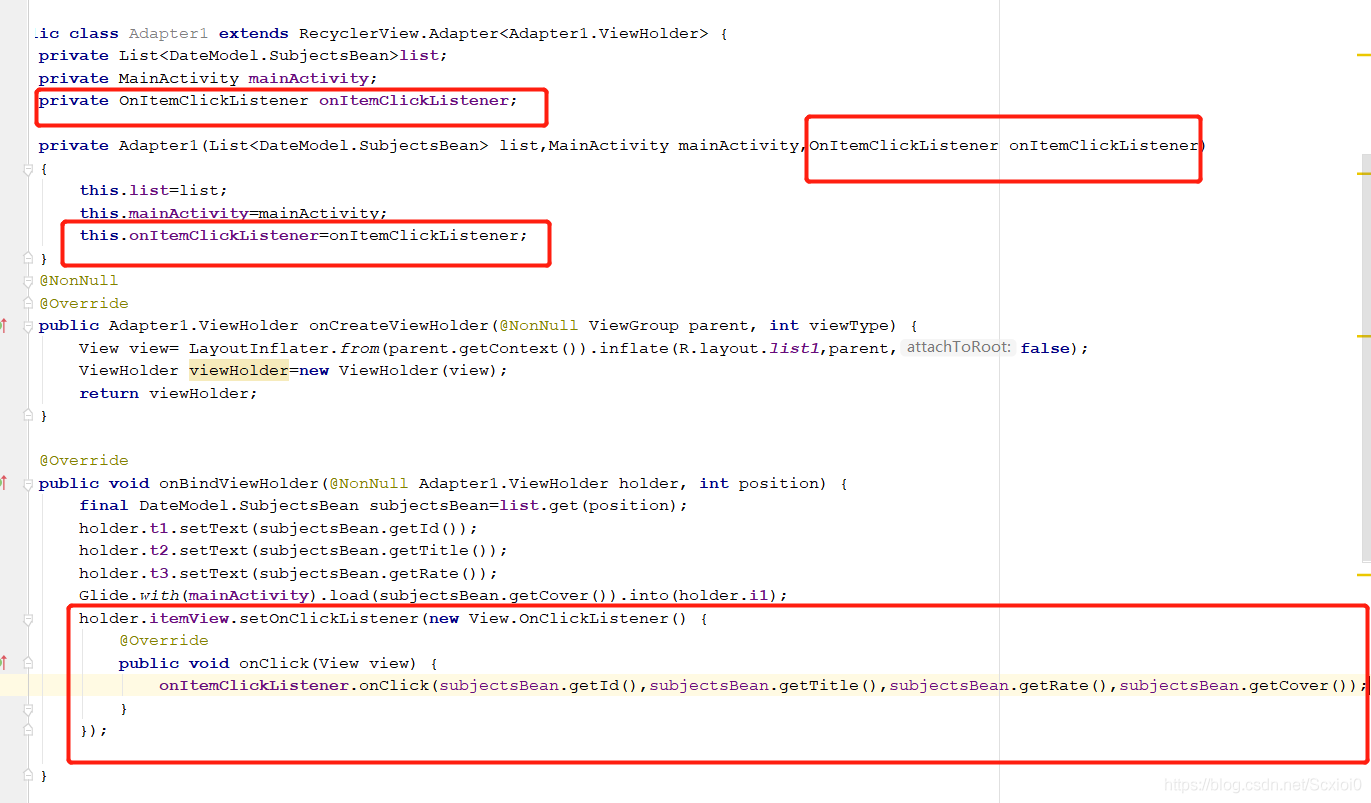
第五步:返回MainActivity.java檔案,選擇列表顯示的樣式並提取解析後的相關資料。
列表顯示的樣式輸入以下程式碼:
private LinearLayoutManager linearLayoutManager;
linearLayoutManager=new LinearLayoutManager(this);
linearLayoutManager.setOrientation(LinearLayoutManager.VERTICAL);
r1.setLayoutManager(linearLayoutManager);
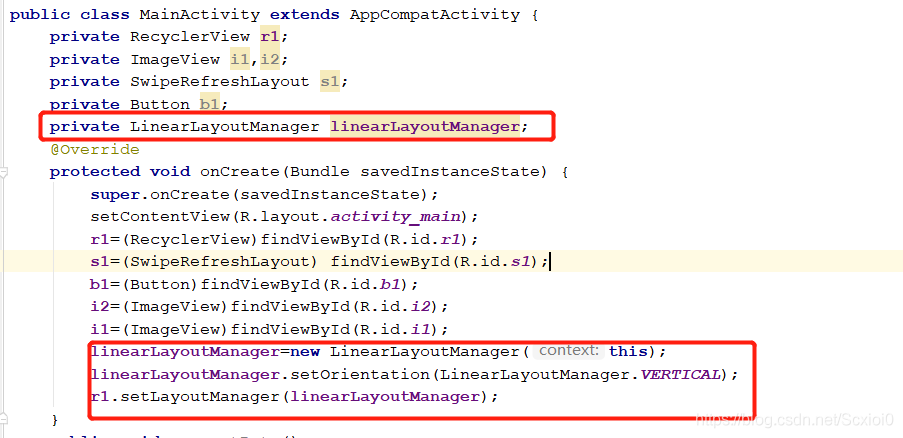
提取解析後的相關資料
定義一個解析介面
public void getDate(DateModel dateModel)
{
}
public void getDate(DateModel dateModel)
    {
        if(dateModel==null||dateModel.getSubjects()==null)
        {
            Toast.makeText(MainActivity.this,"失敗",Toast.LENGTH_SHORT).show();
            return;
        }
        Toast.makeText(MainActivity.this,"成功",Toast.LENGTH_SHORT).show();
        Adapter1 adapter1=new Adapter1(dateModel.getSubjects(),MainActivity.this,new Adapter1.OnItemClickListener() {
            @Override
            public void onClick(String a, String b, String c, String d) {

            }
        });
        r1.setAdapter(adapter1);
    }
第六步:完成下拉重新整理資料
        s1.setOnRefreshListener(new SwipeRefreshLayout.OnRefreshListener() {
            @Override
            public void onRefresh() {
                new Handler().postDelayed(new Runnable() {
                    @Override
                    public void run() {
                        requestDate();
                    }
                },1000);
            }
        });
1秒重新整理過後,停止重新整理

第七步:列表的倒序和正序功能的實現
找到ImageView控制元件(i2)新增監聽器,並判斷向上和向下的圖片來回切換,首先新增一個int型別的數a=0,記錄點選了多少次,a%2==0向上,其他的向下

        i2.setOnClickListener(new View.OnClickListener() {
            @Override
            public void onClick(View view) {
                a++;
                if(a%2==0)
                {
                    i2.setImageResource(R.mipmap.up);//圖片向上
                }
                else
                {
                    i2.setImageResource(R.mipmap.down);//圖片向下
                }
            }
        });
實現倒序和正序
i2.setOnClickListener(new View.OnClickListener() {
            @Override
            public void onClick(View view) {
                a++;
                if(a%2==0)
                {
                    i2.setImageResource(R.mipmap.up);//圖片向上
                    linearLayoutManager.setStackFromEnd(false);//列表從底部開始展示,反轉後由上面開始展示
                    linearLayoutManager.setReverseLayout(false);//列表翻轉

                }
                else
                {
                    i2.setImageResource(R.mipmap.down);//圖片向下
                    linearLayoutManager.setStackFromEnd(true);//列表從頂部開始展示,反轉後由下面開始展示
                    linearLayoutManager.setReverseLayout(true);//列表翻轉
                }
            }
        });
    }
第八步:實現功能(將自己喜歡的電影加入觀看清單並儲存)
找到getDate函數

儲存我點選的電影(SharedPreferences儲存),點選按鈕顯示我獲取到的電影資料
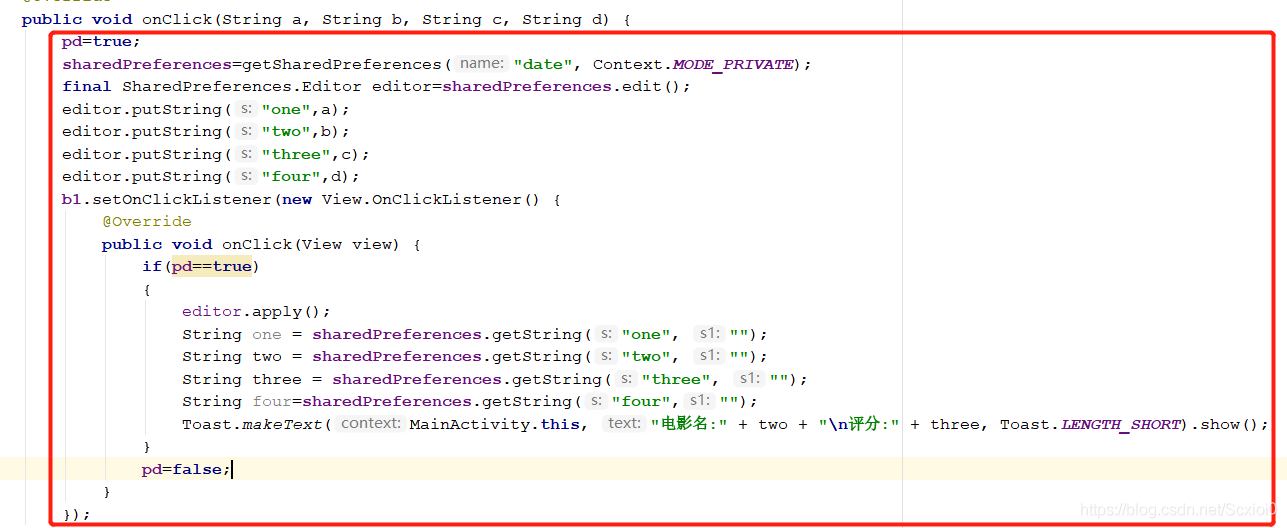
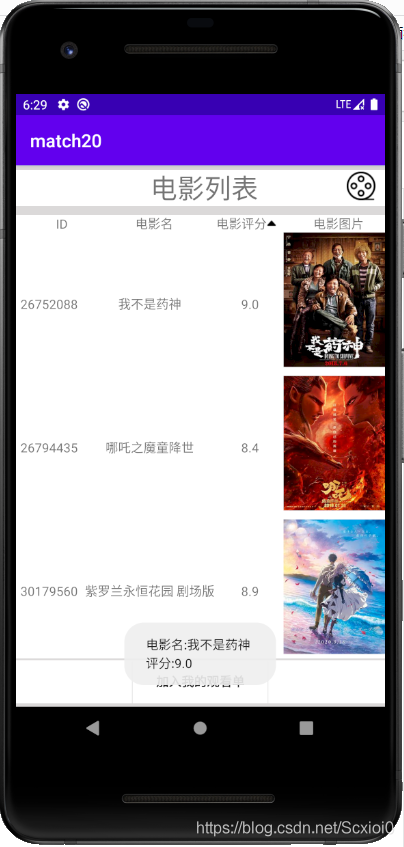
加入觀影清單(內部檔案儲存,優點:內容可以追加)
try {
OutputStream out1 = openFileOutput("myfile1", MODE_APPEND);//建立檔案
String str1 = one + ",";//用句號分隔開
out1.write(str1.getBytes());//寫入資料
out1.flush();
out1.close();
OutputStream out2 = openFileOutput("myfile2", MODE_APPEND);//建立檔案
String str2 = two + ",";//用句號分隔開
out2.write(str2.getBytes());//寫入資料
out2.flush();
out2.close();
OutputStream out3=openFileOutput("myfile3",MODE_APPEND);//建立檔案
String str3=three+",";//用句號分隔開
out3.write(str3.getBytes());;//寫入資料
out3.flush();
out3.close();
Toast.makeText(MainActivity.this,"成功加入觀影清單",Toast.LENGTH_SHORT).show();
}
catch (Exception e)
{
      e.printStackTrace();
      Toast.makeText(MainActivity.this,"加入觀影清單失敗",Toast.LENGTH_SHORT).show();
 }
第九步:顯示已加入觀看清單的電影
建立兩個xml檔案,來實現子頁面的佈局和列表的佈局。在建立一個MainActivity2檔案,來完成功能的實現
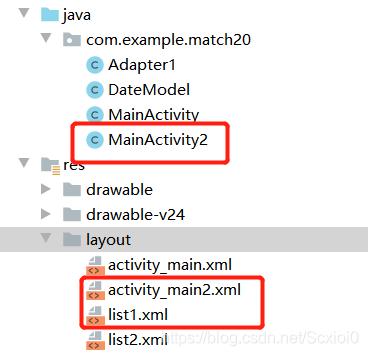
返回MainActivity檔案,點選電影圖示實現介面的跳轉

子頁面佈局,列表採用(ListView)來完成,程式碼如下:
<?xml version="1.0" encoding="utf-8"?>
<LinearLayout xmlns:android="http://schemas.android.com/apk/res/android"
    xmlns:tools="http://schemas.android.com/tools"
    android:layout_width="match_parent"
    android:layout_height="match_parent"
    android:orientation="vertical">

    <LinearLayout
        android:layout_width="wrap_content"
        android:layout_height="wrap_content"
        android:orientation="horizontal">


        <TextView
            android:layout_width="match_parent"
            android:layout_height="wrap_content"
            android:layout_marginLeft="150dp"
            android:text="電影清單"
            android:textSize="40sp" />
        <TextView
            android:id="@+id/qk"
            android:layout_width="wrap_content"
            android:layout_height="wrap_content"
            android:layout_marginLeft="50dp"
            android:text="清空" />
    </LinearLayout>

    <LinearLayout
        android:layout_width="match_parent"
        android:layout_height="wrap_content"
        android:layout_marginTop="20dp"
        android:background="#FFF"
        android:gravity="center"
        android:orientation="horizontal">

        <TextView
            android:layout_width="0dp"
            android:layout_height="wrap_content"
            android:layout_weight="1"
            android:gravity="center"
            android:text="ID" />

        <TextView
            android:layout_width="0dp"
            android:layout_height="wrap_content"
            android:layout_weight="1"
            android:gravity="center"
            android:text="電影名" />

        <LinearLayout
            android:layout_width="0dp"
            android:layout_height="wrap_content"
            android:layout_weight="1"
            android:gravity="center"
            android:orientation="horizontal">

            <TextView
                android:layout_width="wrap_content"
                android:layout_height="wrap_content"
                android:text="電影評分" />
        </LinearLayout>

    </LinearLayout>

    <ListView
        android:id="@+id/l1"
        android:layout_width="match_parent"
        android:layout_height="wrap_content"
        android:layout_marginTop="10dp" />

</LinearLayout>
介面截圖:
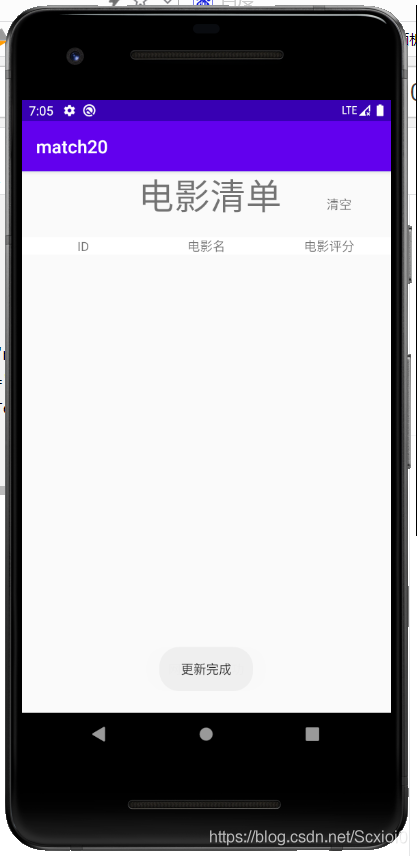
列表佈局,程式碼如下:
<?xml version="1.0" encoding="utf-8"?>
<LinearLayout xmlns:android="http://schemas.android.com/apk/res/android"
    android:orientation="horizontal"
    android:layout_width="match_parent"
    android:layout_height="80dp">
    <TextView
        android:id="@+id/v1"
        android:layout_width="0dp"
        android:layout_weight="1"
        android:gravity="center"
        android:layout_gravity="center"
        android:layout_height="wrap_content"
        android:text="213213"/>
    <TextView
        android:id="@+id/v2"
        android:layout_width="0dp"
        android:layout_weight="1"
        android:gravity="center"
        android:layout_gravity="center"
        android:layout_height="wrap_content"
        android:text="我不是藥神"/>

    <TextView
        android:id="@+id/v3"
        android:layout_width="0dp"
        android:layout_weight="1"
        android:gravity="center"
        android:layout_gravity="center"
        android:layout_height="wrap_content"
        android:text="9.0"/>


</LinearLayout>
介面如下:
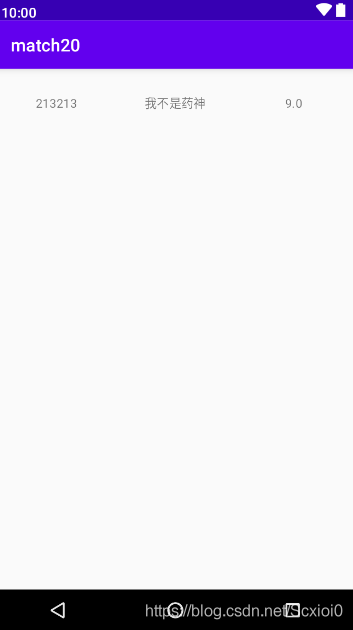
開啟MainActivity2檔案,來完成功能的實現
找到控制元件的ID並繫結
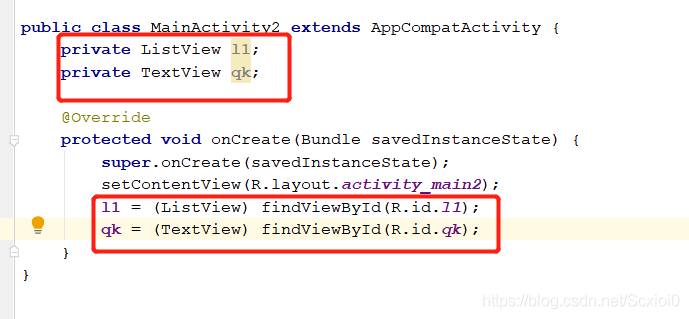
ListView的使用
第一步:
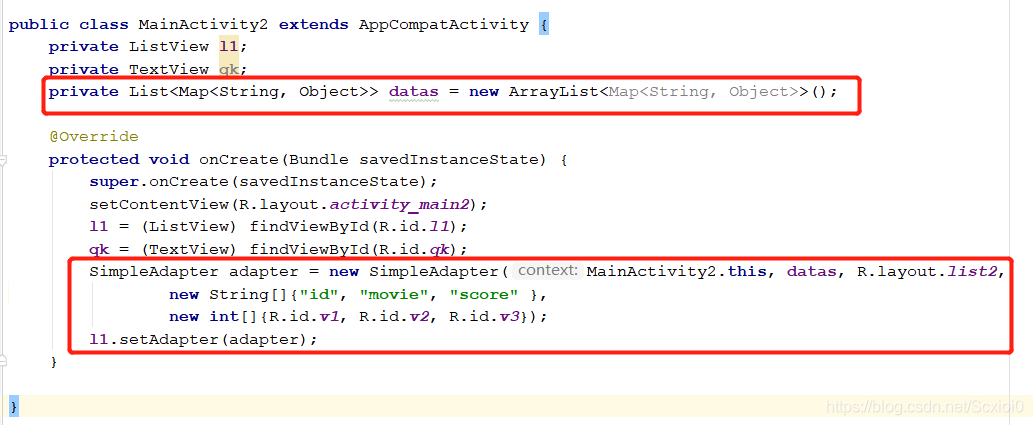
第二步:獲取資料
新增3個String型別的陣列來存放資料

		StringBuffer str1=new StringBuffer();
        StringBuffer str2=new StringBuffer();
        StringBuffer str3=new StringBuffer();
        try {
            InputStream is1=openFileInput("myfile1");
            InputStream is2=openFileInput("myfile2");
            InputStream is3=openFileInput("myfile3");
            BufferedReader br1=new BufferedReader(new InputStreamReader(is1));
            BufferedReader br2=new BufferedReader(new InputStreamReader(is2));
            BufferedReader br3=new BufferedReader(new InputStreamReader(is3));
            String count1=null;
            String count2=null;
            String count3=null;
            while((count1=br1.readLine())!=null)
            {
                str1.append(count1);
            }
            while((count2=br2.readLine())!=null)
            {
                str2.append(count2);
            }
            while((count3=br3.readLine())!=null)
            {
                str3.append(count3);
            }
            a=str1.toString().substring(0,str1.length()-1).split(",");//獲取到資料,最後一個","不新增到陣列,之後檢測到","分割新增到陣列中
            b=str2.toString().substring(0,str2.length()-1).split(",");
            c=str3.toString().substring(0,str3.length()-1).split(",");
            Toast.makeText(MainActivity2.this, "獲取成功", Toast.LENGTH_SHORT).show();
            br1.close();
            br2.close();
            br3.close();
//            for(int i=0;i<=a.length;i++)
//            {
//                System.out.println(a[i]);
//                System.out.println(b[i]);
//                System.out.println(c[i]);
//            }
        }
        catch (Exception e)
        {
            e.printStackTrace();
            Toast.makeText(MainActivity2.this, "獲取失敗", Toast.LENGTH_SHORT).show();
        }
第三步:準備資料
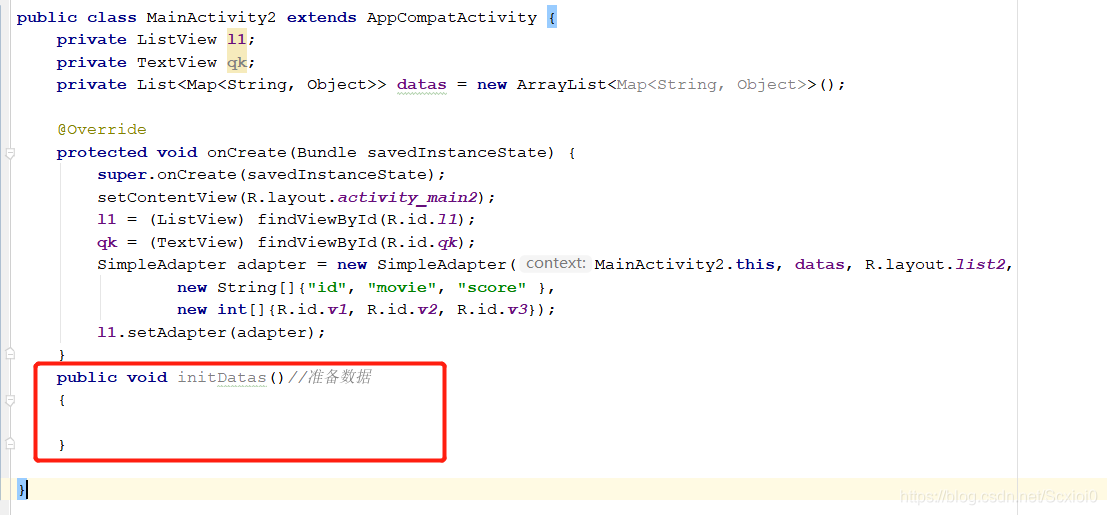
    public void initDatas()//準備資料
    {
        for(int i=0;i<a.length;i++)
        {
            Map map=new HashMap();
            map.put("id",a[i]);
            map.put("movie",b[i]);
            map.put("score",c[i]);
            datas.add(map);
        }
    }
第四步:顯示資料
新增try catch語句,防止內容為空時,卡退

第五步:列表監聽器

l1.setOnItemClickListener(new AdapterView.OnItemClickListener() {
            @Override
            public void onItemClick(AdapterView<?> adapterView, View view, int i, long l) {
                TextView v1=(TextView)view.findViewById(R.id.v1);
                TextView v2=(TextView)view.findViewById(R.id.v2);
                TextView v3=(TextView)view.findViewById(R.id.v3);
                Toast.makeText(MainActivity2.this,v2.getText()+"\n"+v3.getText(),Toast.LENGTH_SHORT).show();
            }
        });
第六步:清空內容的監聽器
        qk.setOnClickListener(new View.OnClickListener() {
            @Override
            public void onClick(View view) {
                boolean b = deleteFile("myfile1");
                deleteFile("myfile2");
                deleteFile("myfile3");
                if (b == true) {
                    Toast.makeText(getApplicationContext(), "刪除成功", Toast.LENGTH_SHORT).show();
                } else {
                    Toast.makeText(getApplicationContext(), "刪除失敗", Toast.LENGTH_SHORT).show();
                }
            }
        });
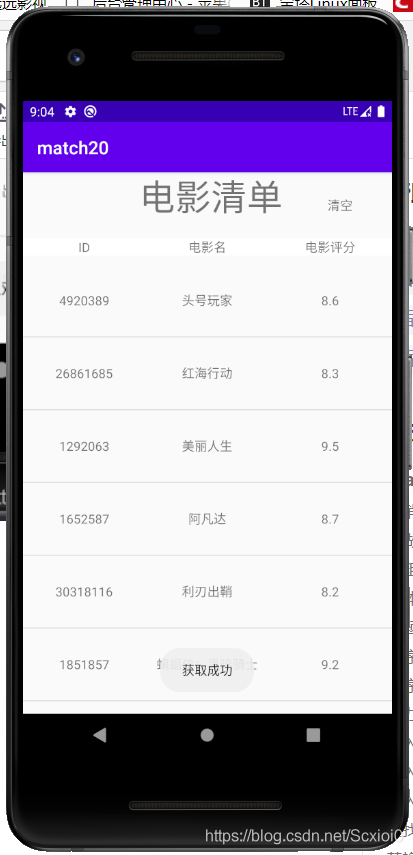
介面截圖:
以下是本專案的原始碼:
https://download.csdn.net/download/Scxioi0/12912922