Maven建立SSH工程(快速入門)原始碼
一、Maven工程拆分與聚合
1、工程的拆分
一個完整的早期開發好的crm專案,現在要使用maven工程對它進行分析,這個時候就可以將dao拆解出來,形成獨立的工程,同樣service,action也都進行這樣從拆分
2、工程的聚合
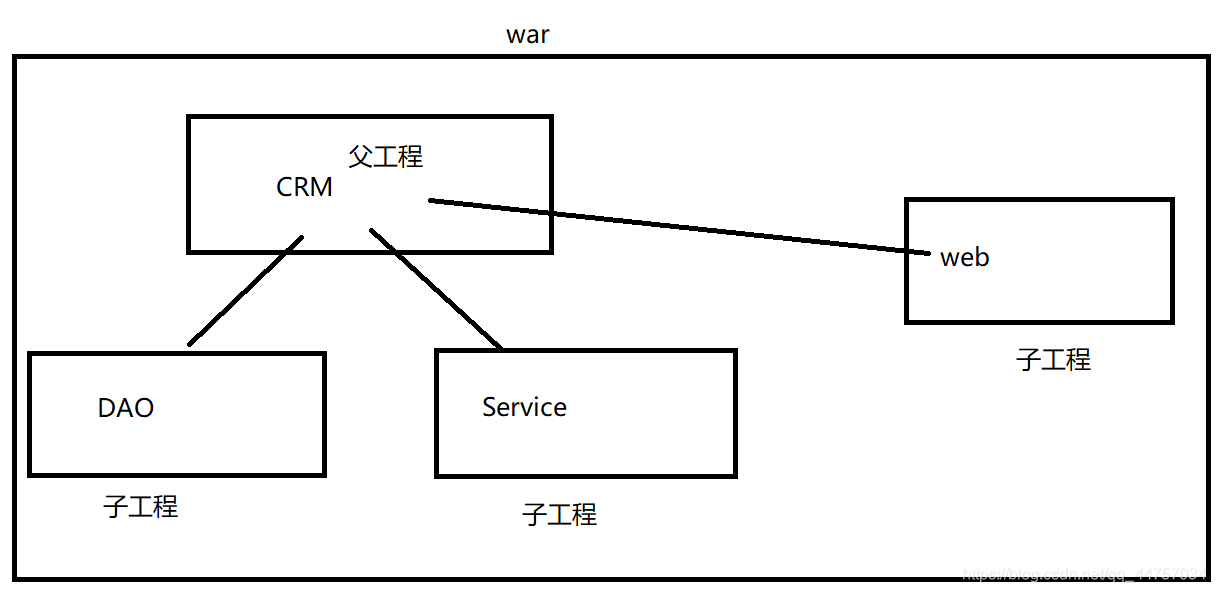
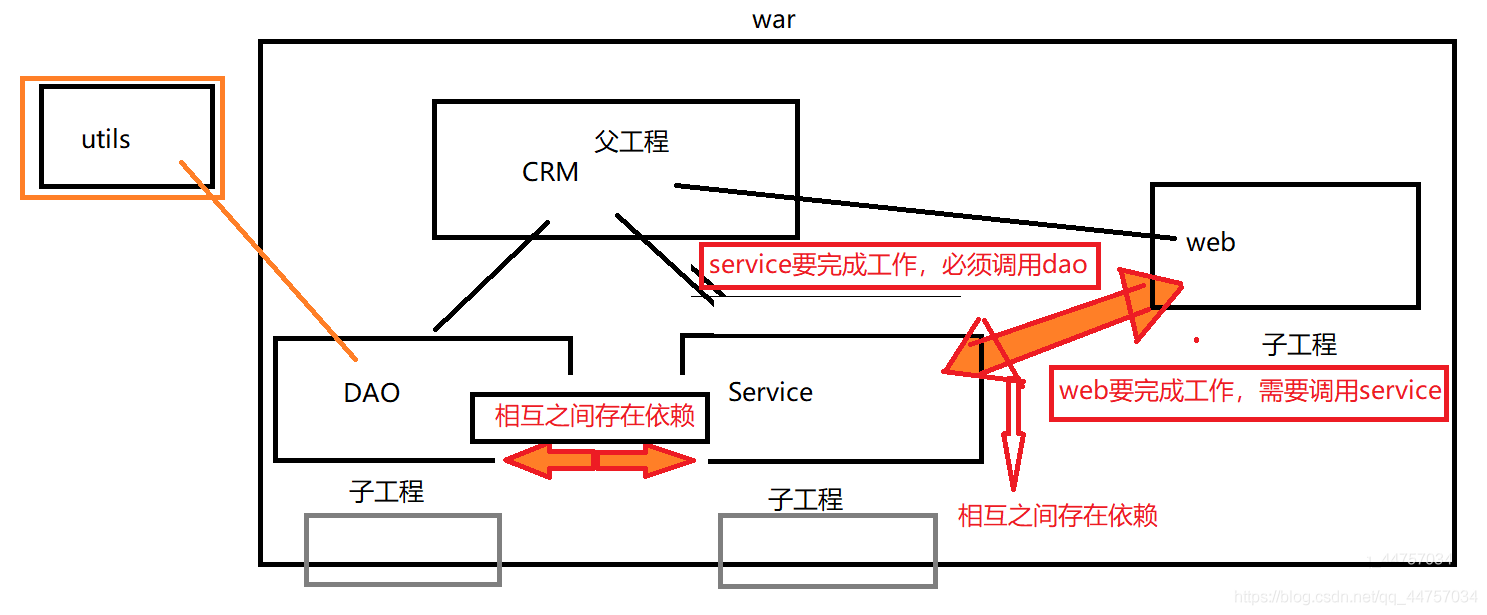
拆分後的工程之間相互存在依賴
3、繼承的理解
類似java當中的類,都是為了消除重複。子類繼承父類別,父類別裡面有的方法和屬性在子類當中就不需要再定義和實現了,使用的時候直接呼叫父類別就可以,我們把crm拆分後,有一個父工程,子工程(crm06_dao,crm06_service,crm06_web)要用到的依賴都可以在父工程(crm06)的pox.xml當中先定義好,將來的子工程在開發的時候就不需要再引入座標了。
4、開發步驟(詳細步驟)
(1)建立maven父工程crm06,打包方式為pom
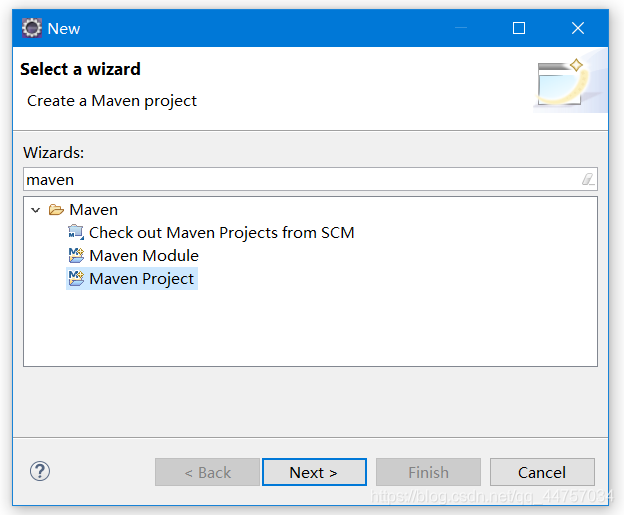
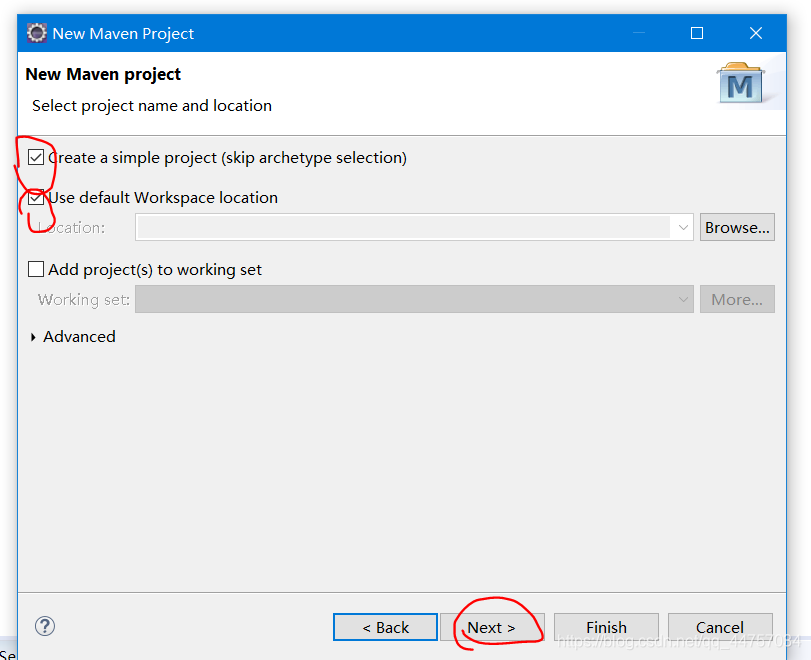
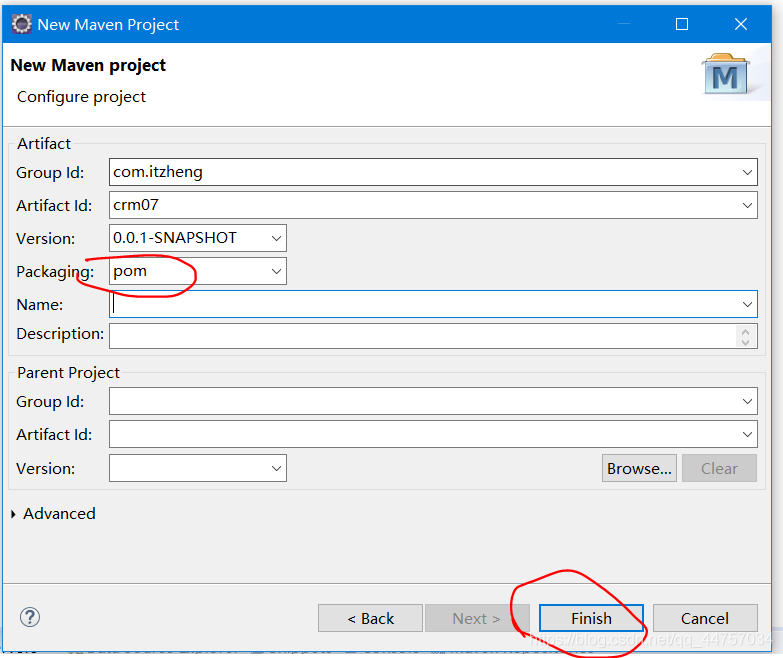

(2)在父工程的基礎上建立子工程(dao層)
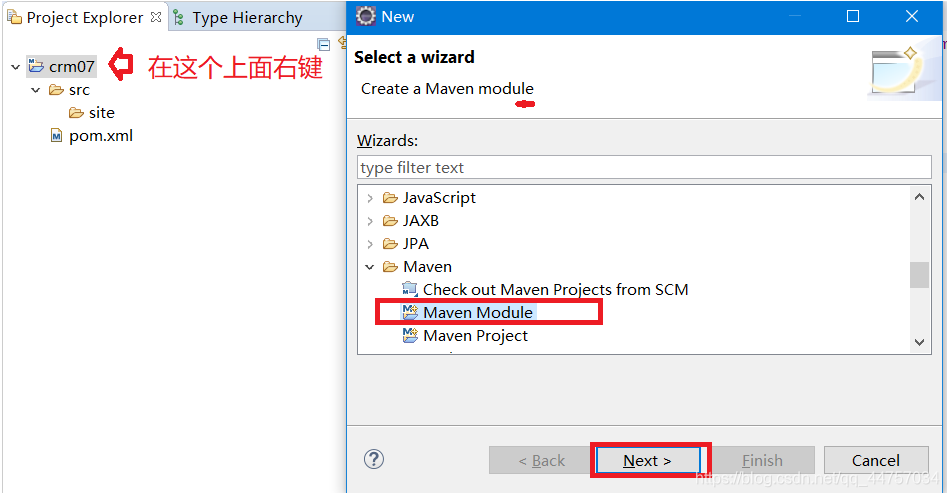
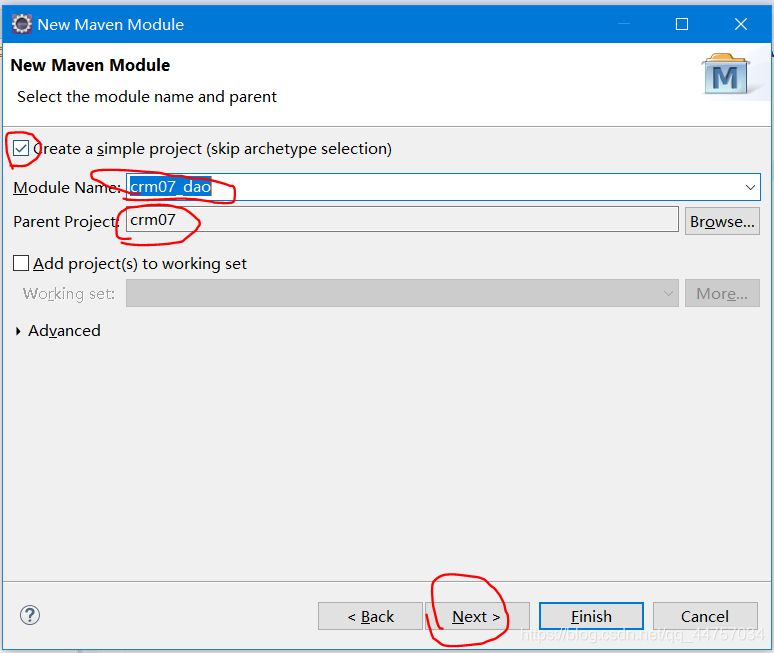
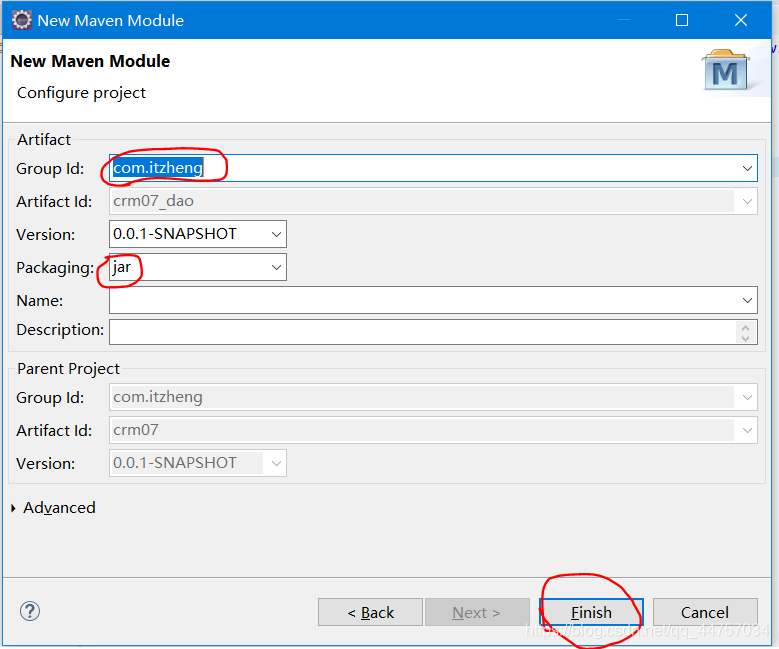
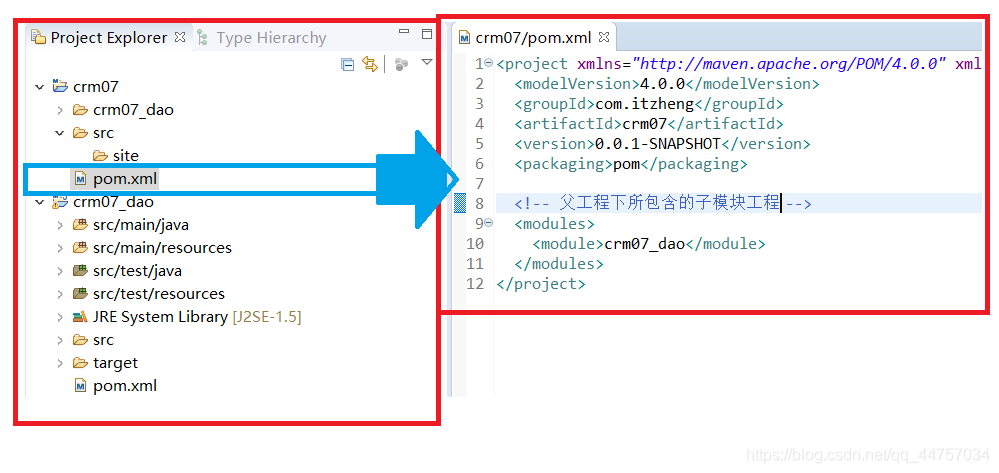
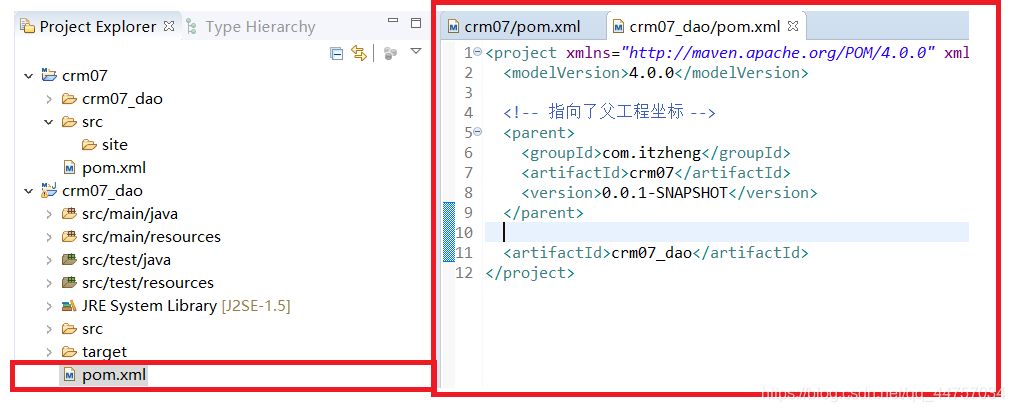
(3)在父工程的基礎上建立子工程(service層)
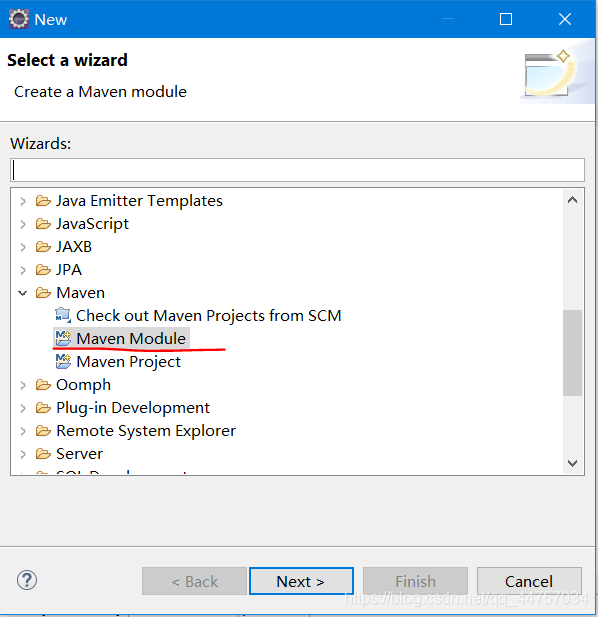
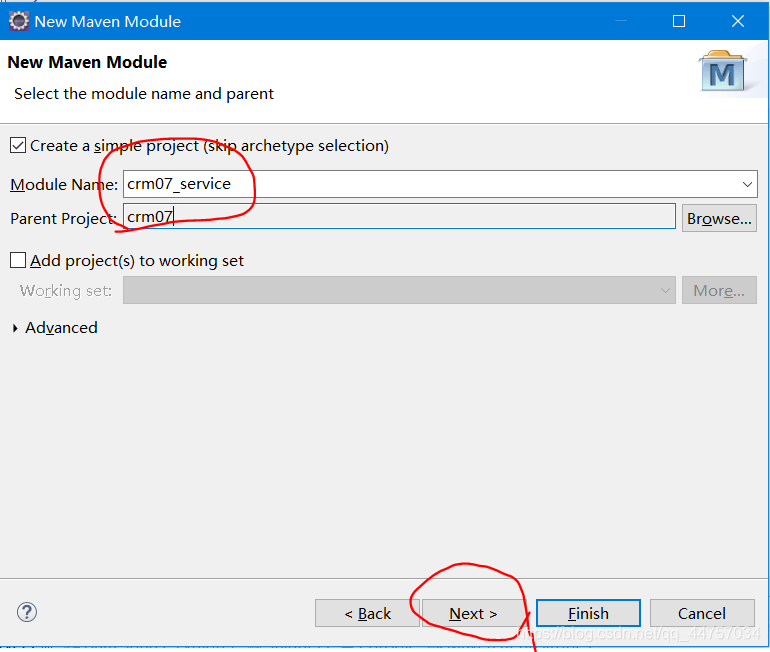
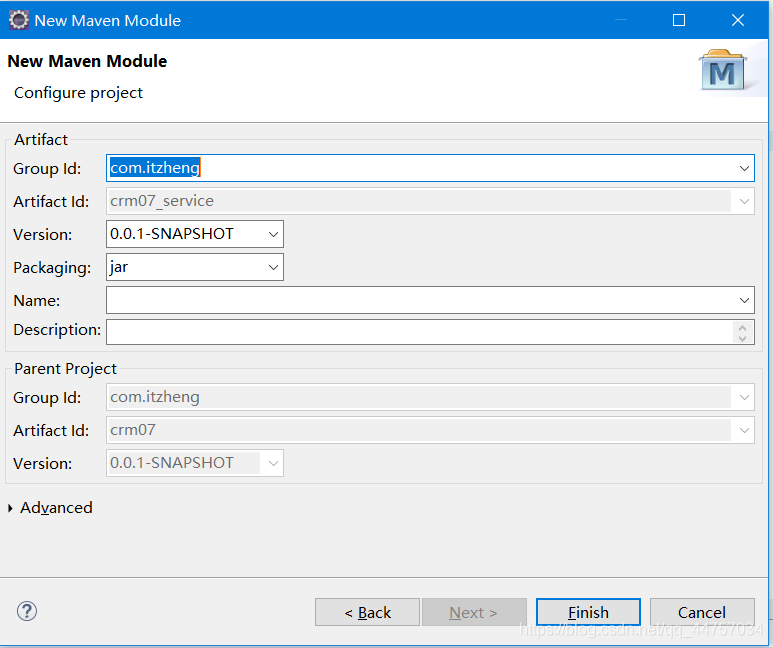
點選Finish
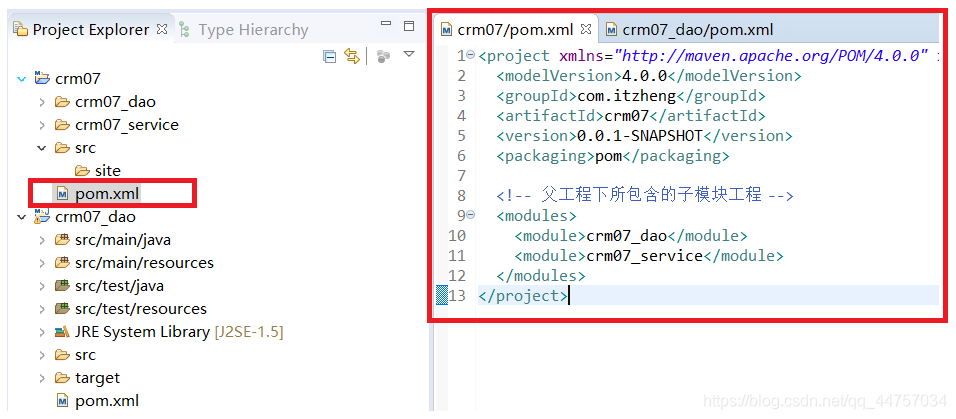
可以在crm07的目錄下的pom.xml當中看到父工程下所包含的子工程多了一個
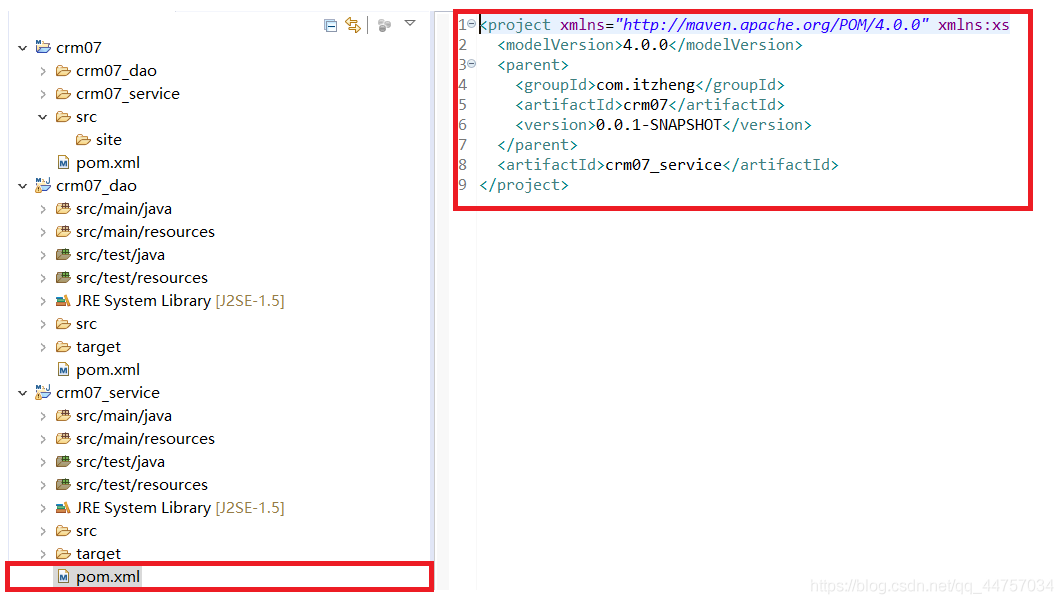
在service當中可以看到指向了父工程目錄
(4)在父工程的基礎上建立子工程(dao層)
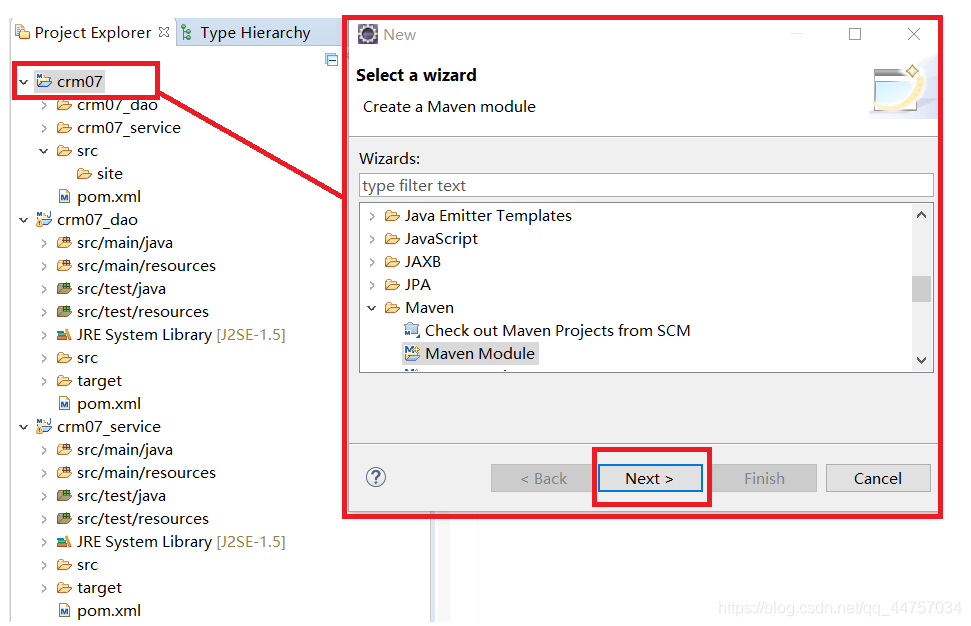
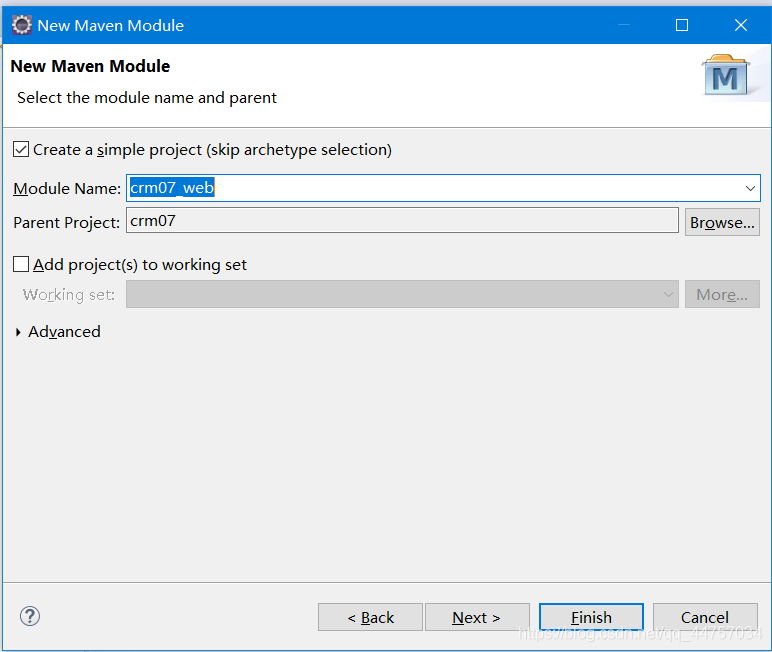
點選Finish
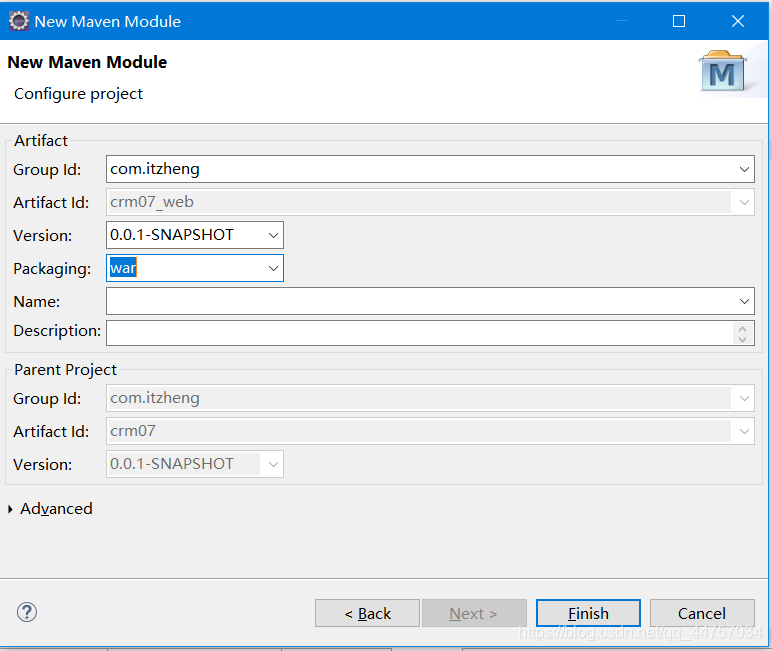
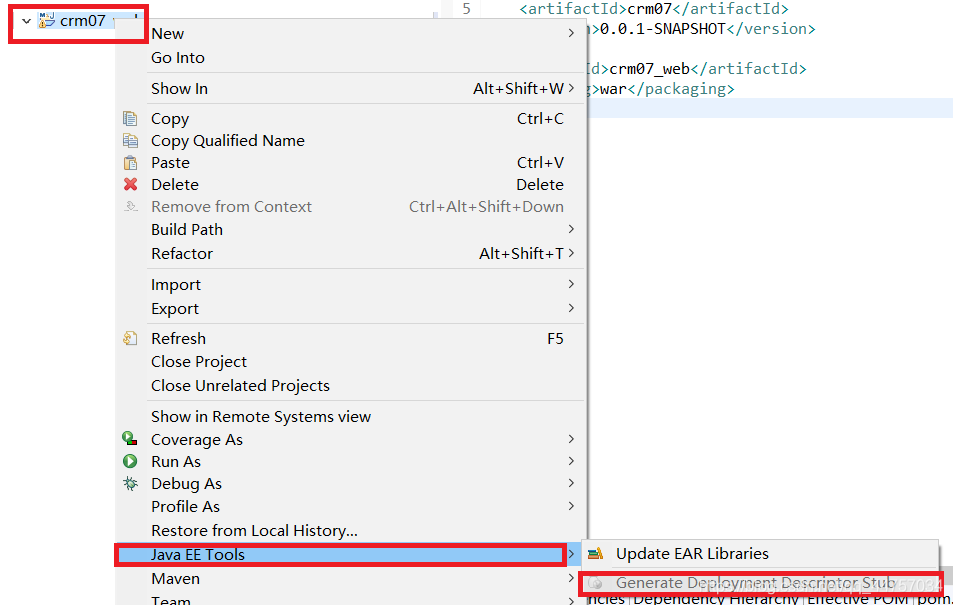
指向對應的父工程
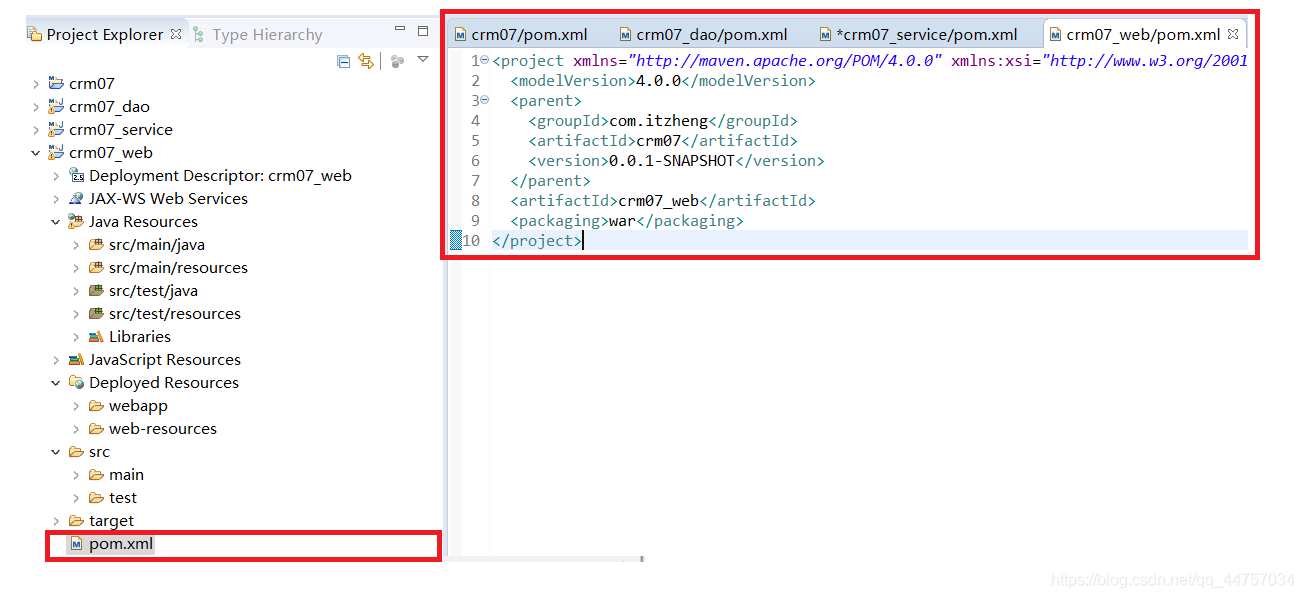
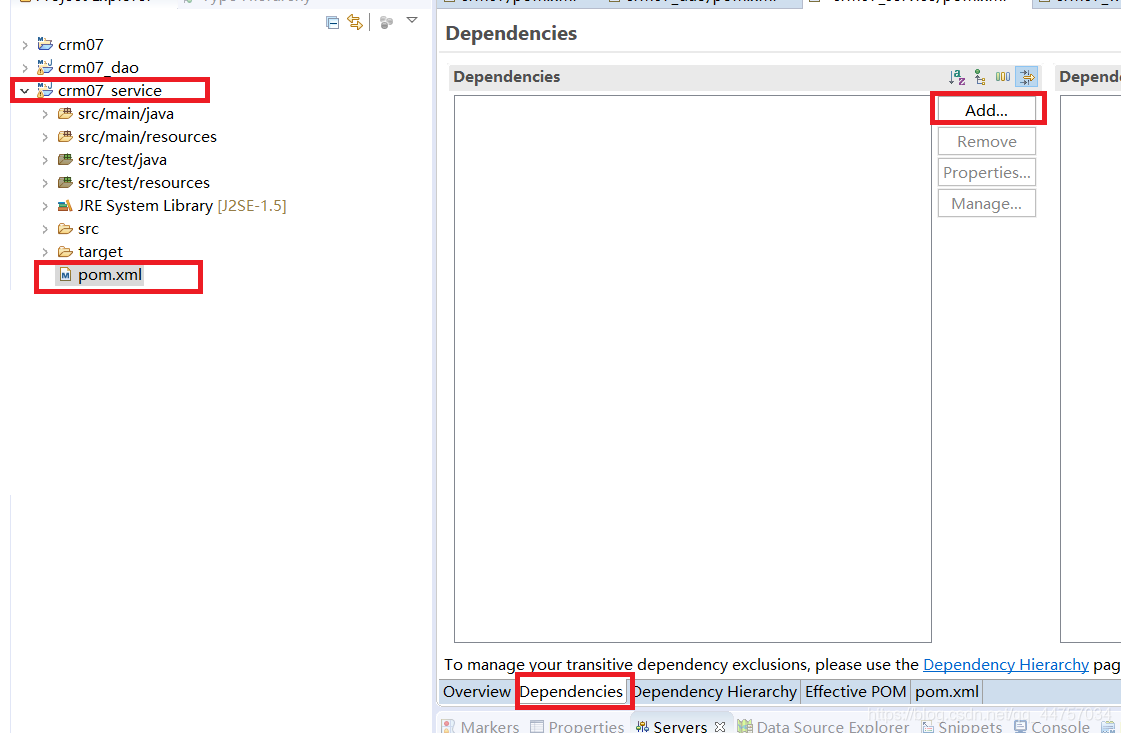
(5)在service 層新增依賴
(6)在dao下建立介面
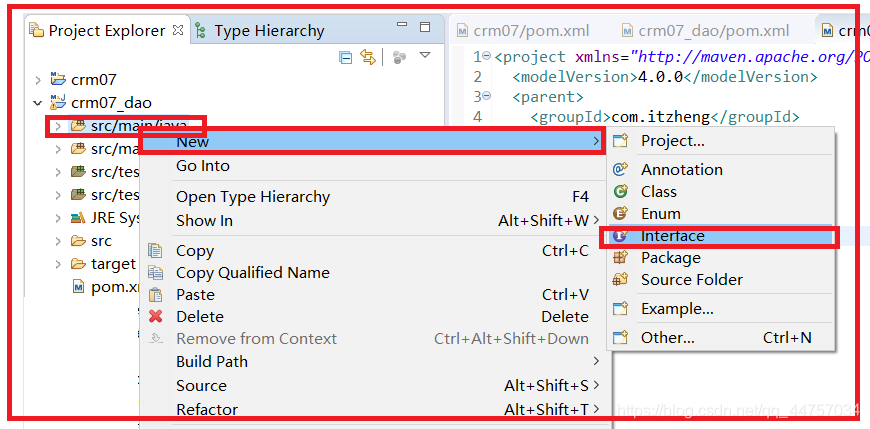
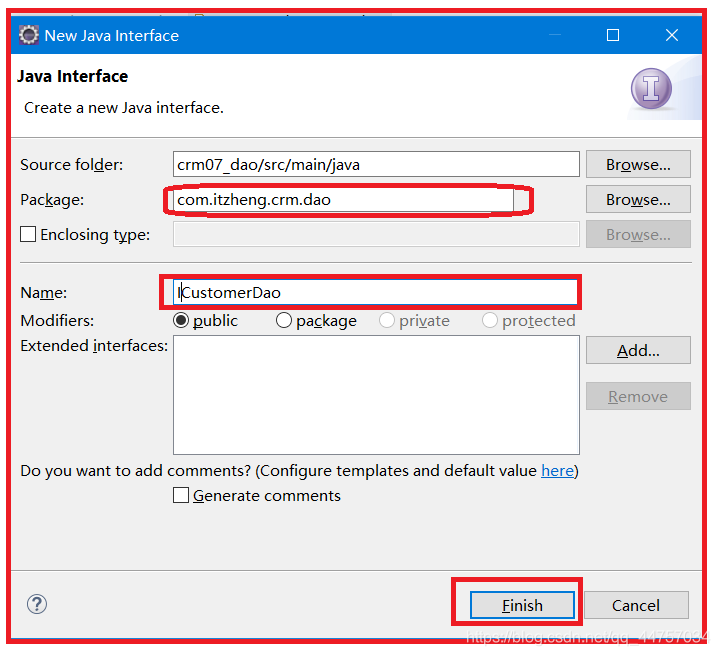
介面建立成功

(7)實現dao的介面
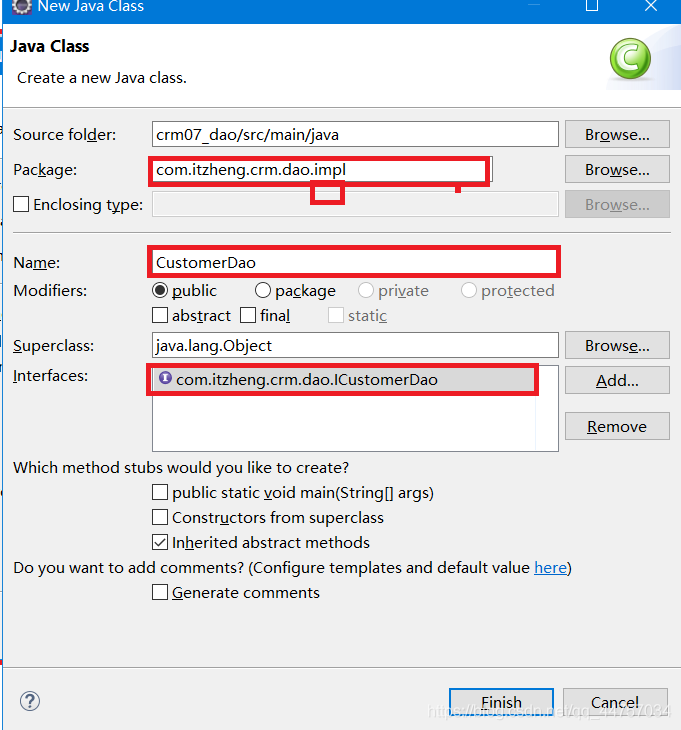
實現成功

(8)在service下建立介面
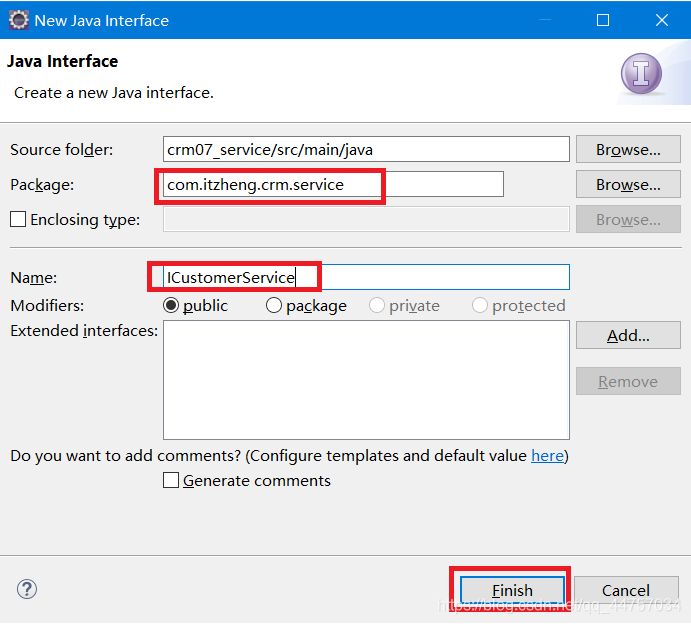
(9)實現service的介面

(10)在實現類當中寫入如下程式碼,會發現報錯
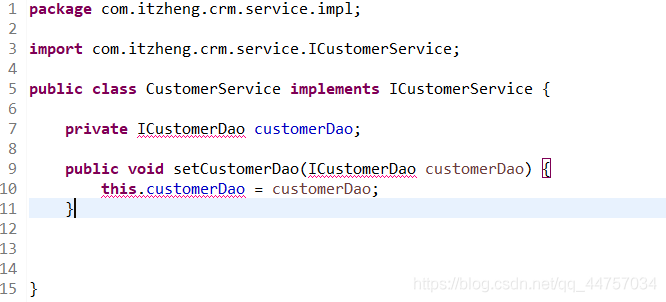
(11)需要在service當中新增對dao的依賴
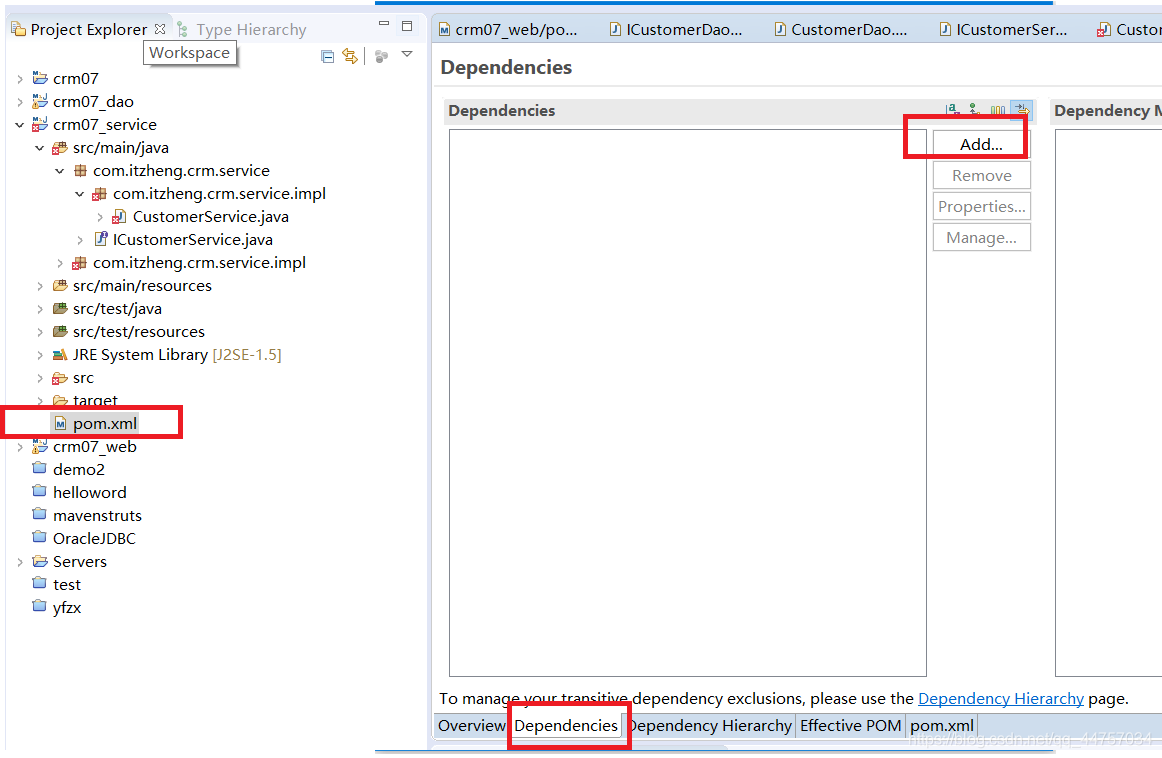
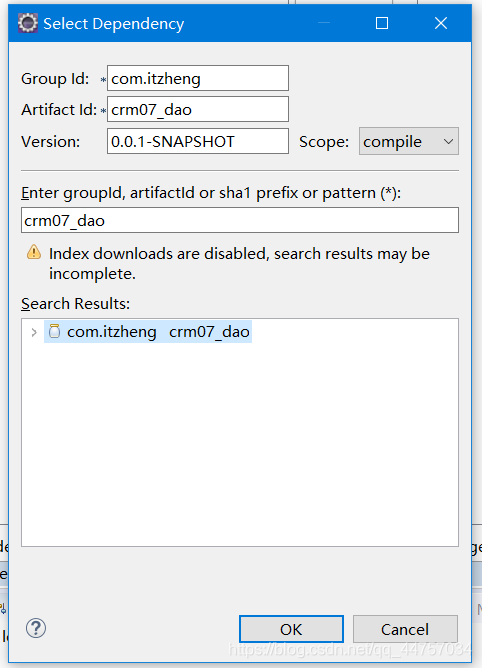
引入地址後,並導包專案將不會報錯
package com.itzheng.crm.service.impl;
import com.itzheng.crm.dao.ICustomerDao;
import com.itzheng.crm.service.ICustomerService;
public class CustomerService implements ICustomerService {
	private ICustomerDao customerDao;
	public void setCustomerDao(ICustomerDao customerDao) {
		this.customerDao = customerDao;
	}
}
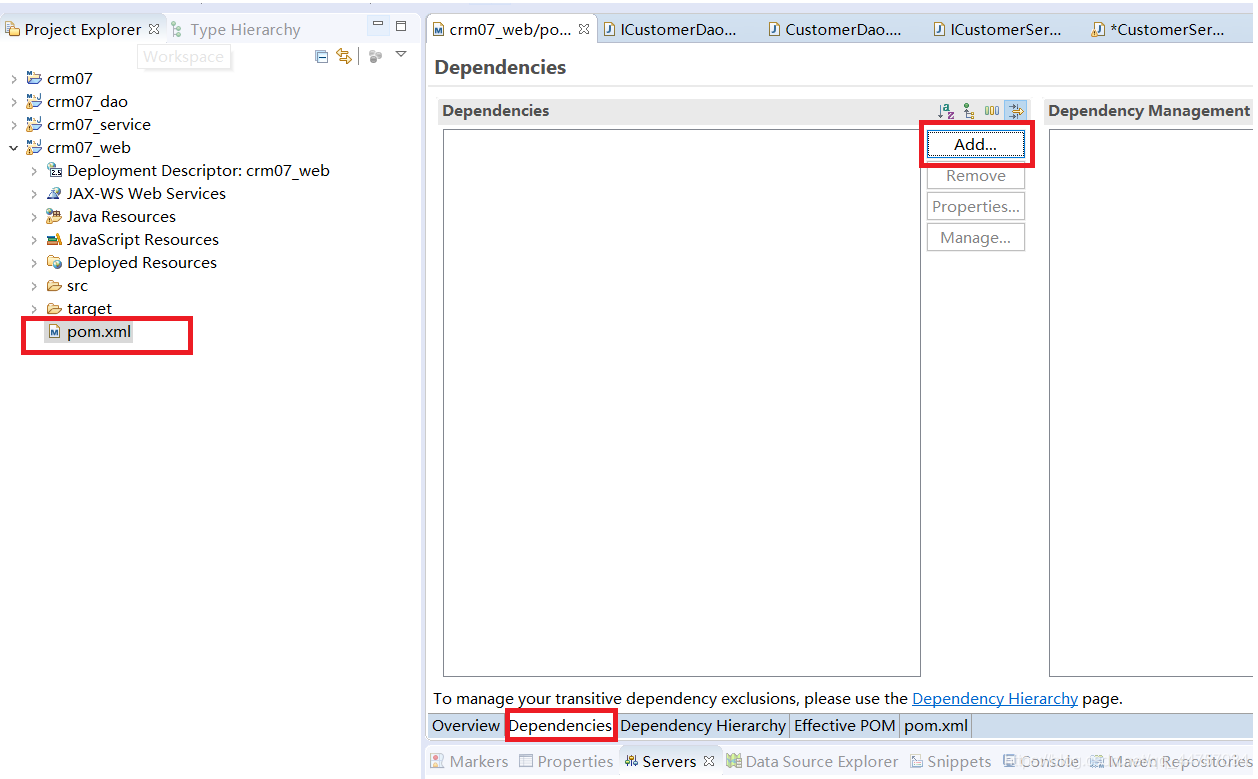
(12)web層呼叫service層,在crm07_web當中的pom.xml當中
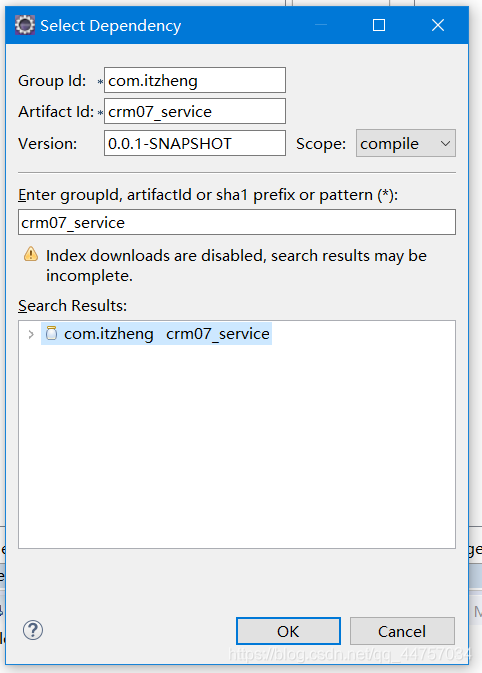
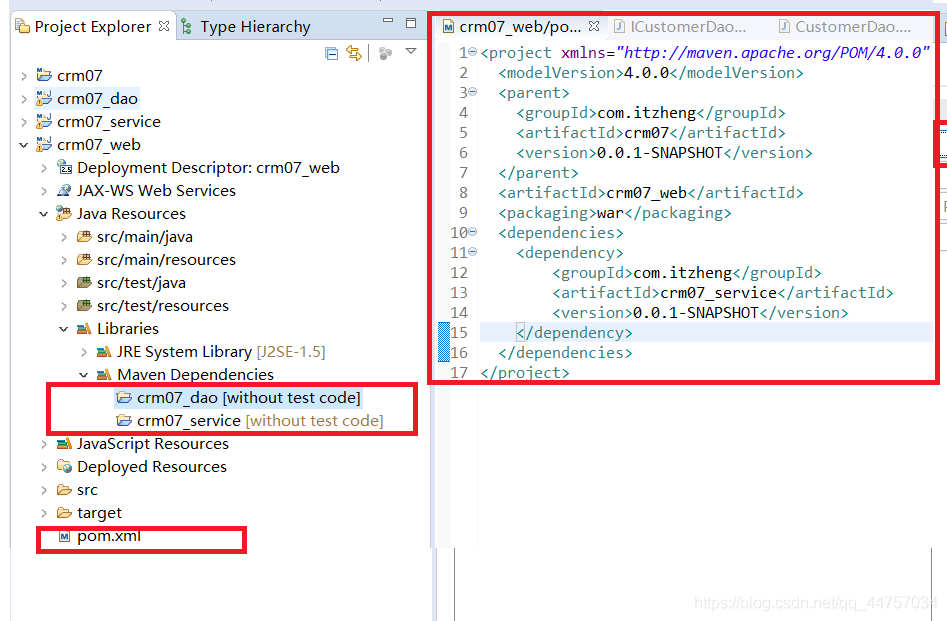
同時引入了crm07_dao和crm07_service,在上面設定引入的時候只引入了service因為service依賴於dao所以dao也被引入了進來
5、新增struts2的核心jar
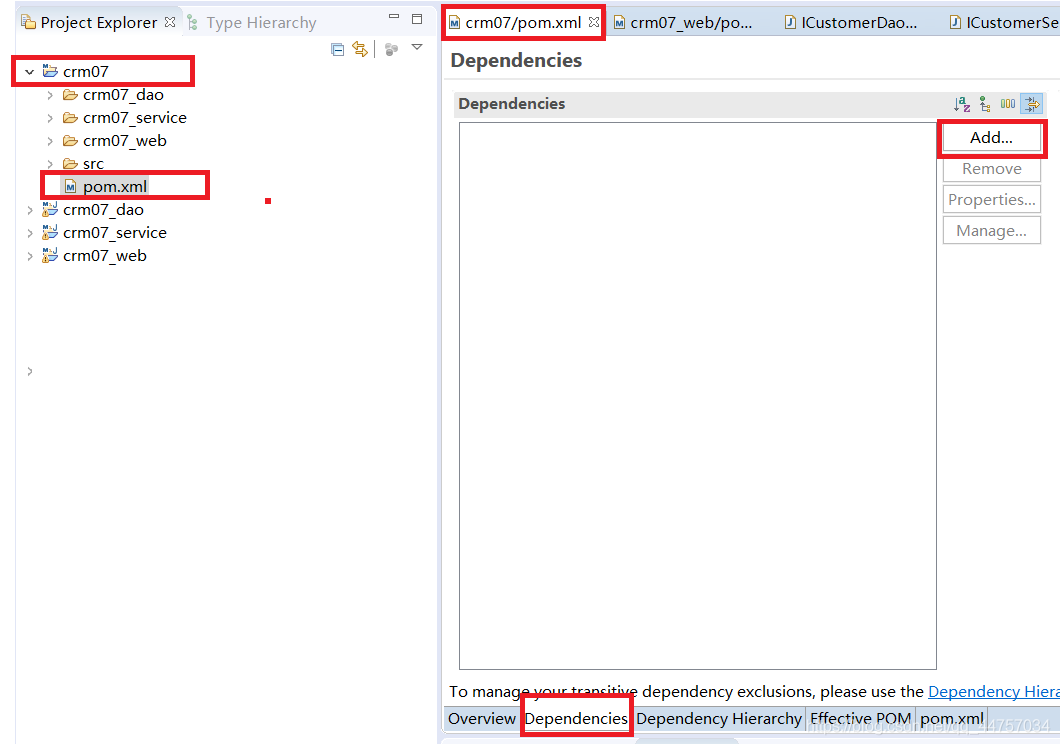
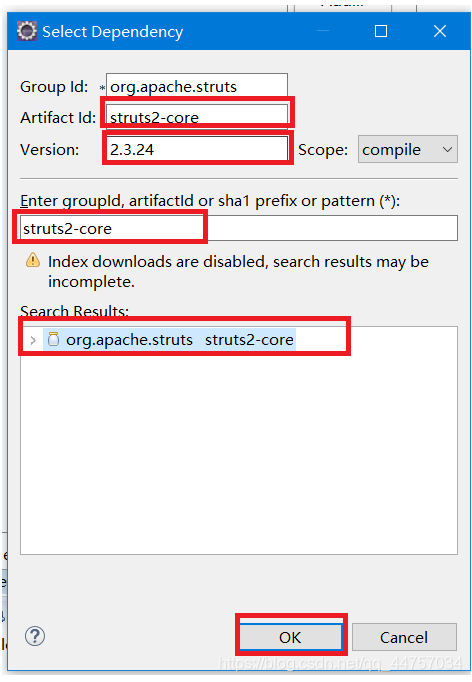
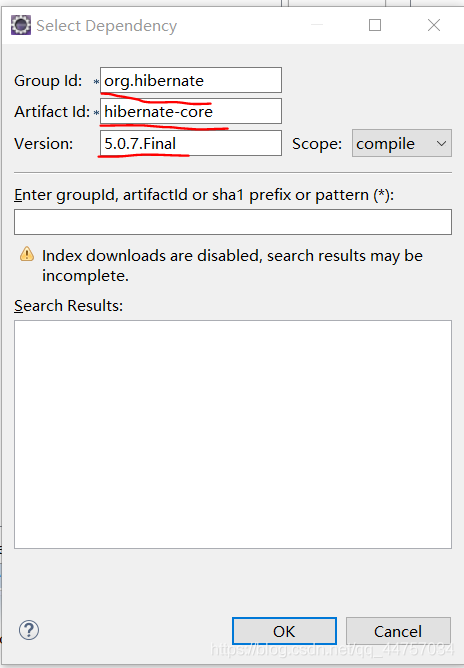
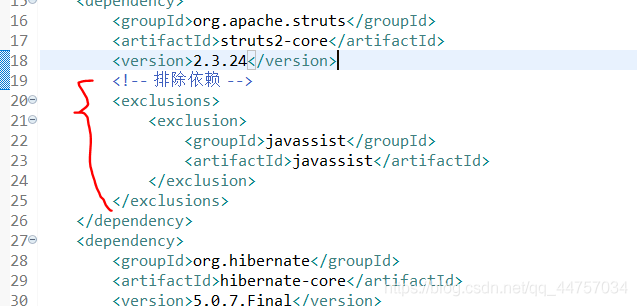
6、檢視pom.xml的依賴關係(通過Exclude排除jar包衝突依賴)
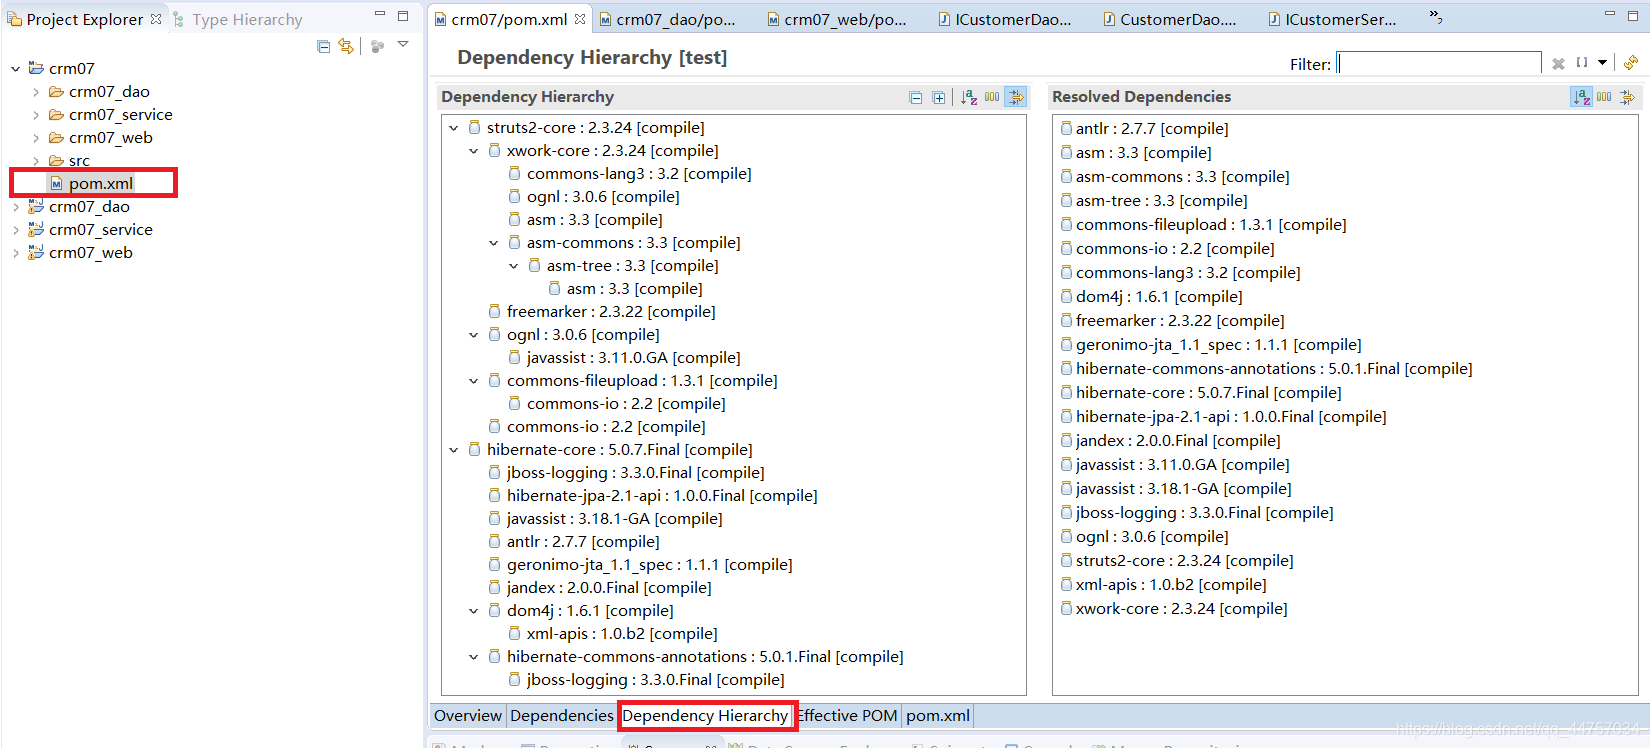
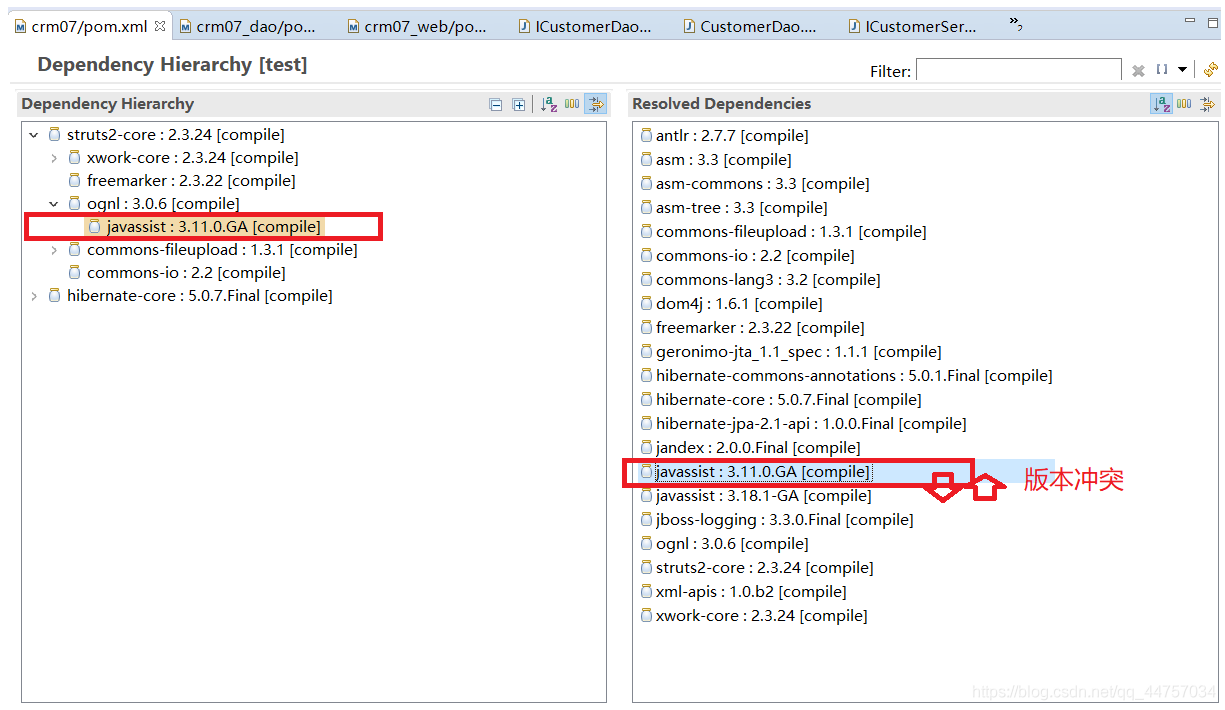
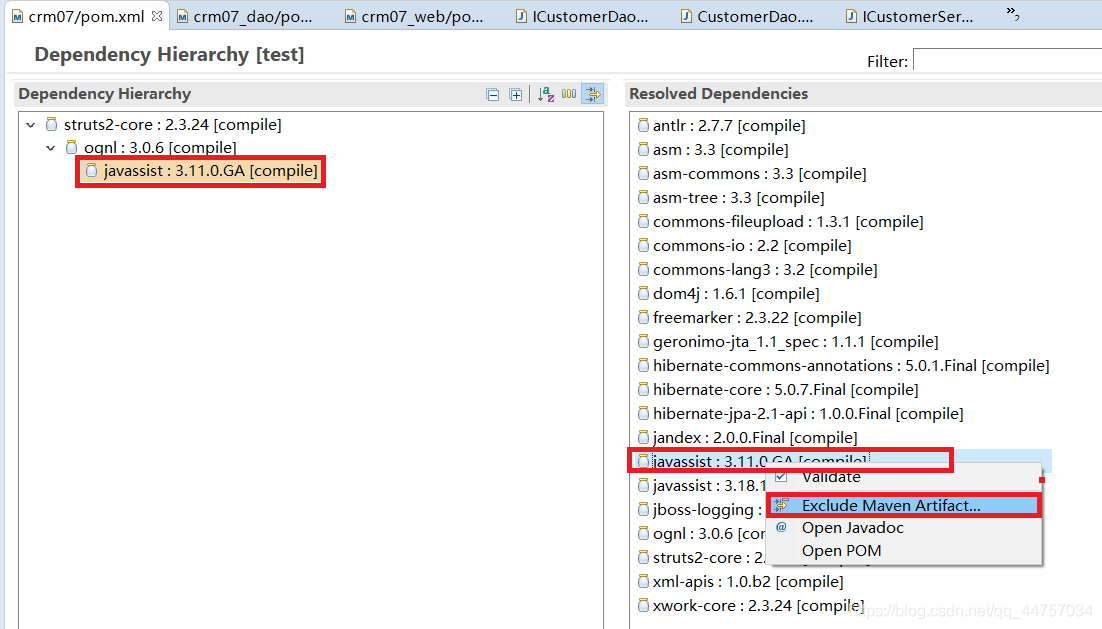
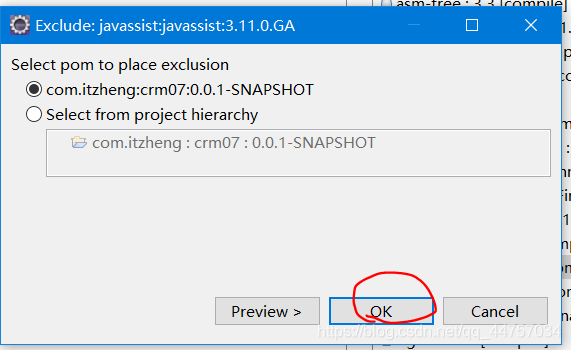
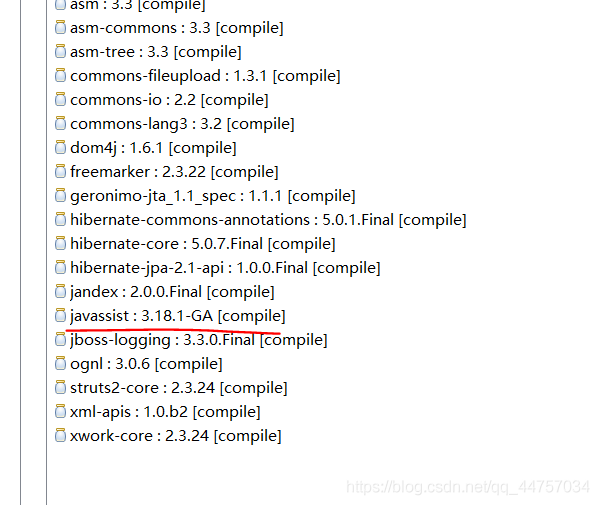
只剩下了最高版本
pom.xml當中的struct2的設定多了一個設定
7、依賴傳遞範圍
子模組crm06_dao中新增junit的依賴,scope為test,但是在crm06_service中並不能使用junit
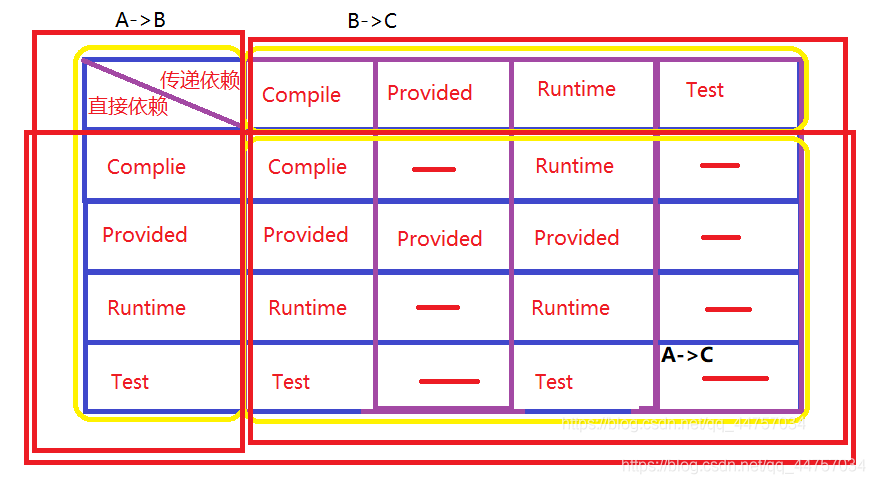
1、縱座標:直接依賴 A依賴B,B是A的直接依賴。 在A的pom.xml中新增B的座標
2、橫座標:傳遞依賴 B依賴C,C是A的傳遞依賴
3、中間部分:傳遞依賴的範圍,A依賴C的範圍。
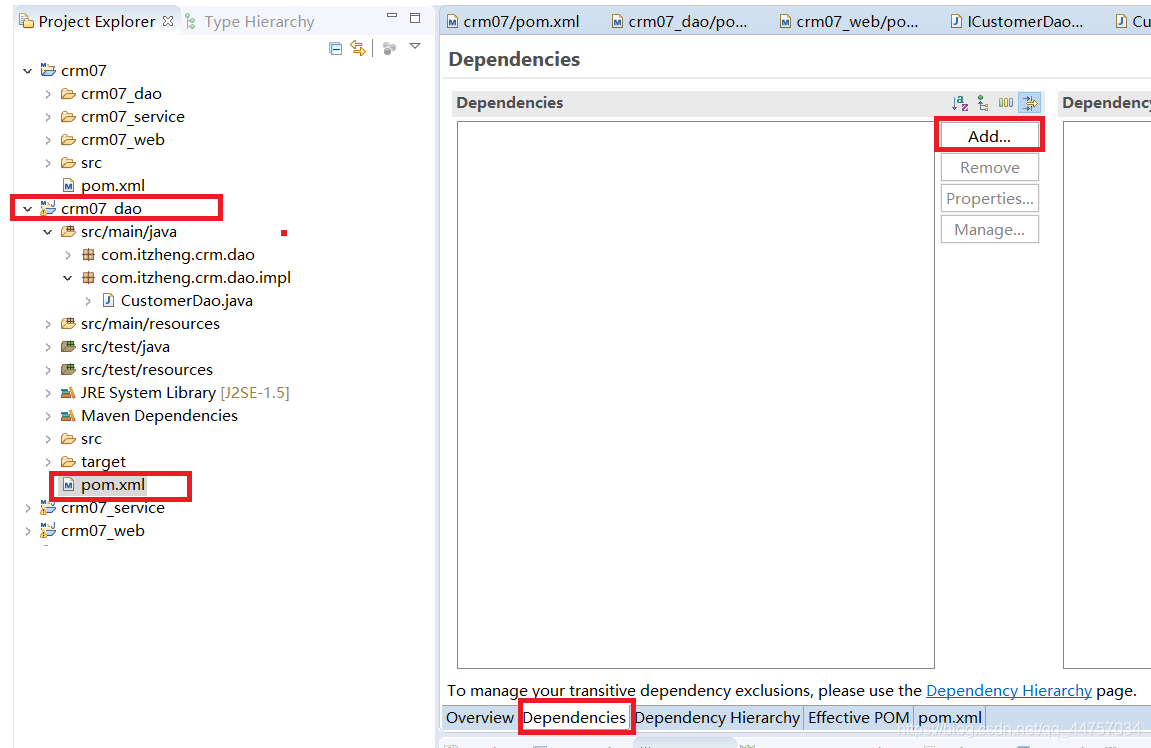
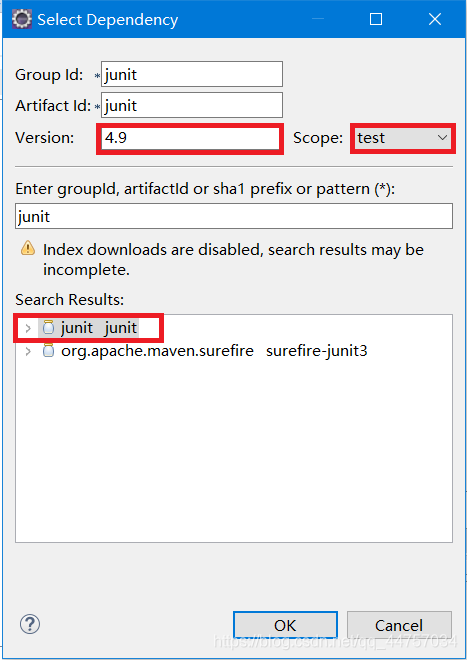
(1)編寫測試用例在dao當中,在pom.xml當中
在crm07_dao下的pom.xml當中
(2)service依賴dao但是,在dao引入junit測試後色service當中沒有,如果想讓junit在業務層也可以呼叫
在crm07_dao當中的pom.xml當中刪除下面這一句
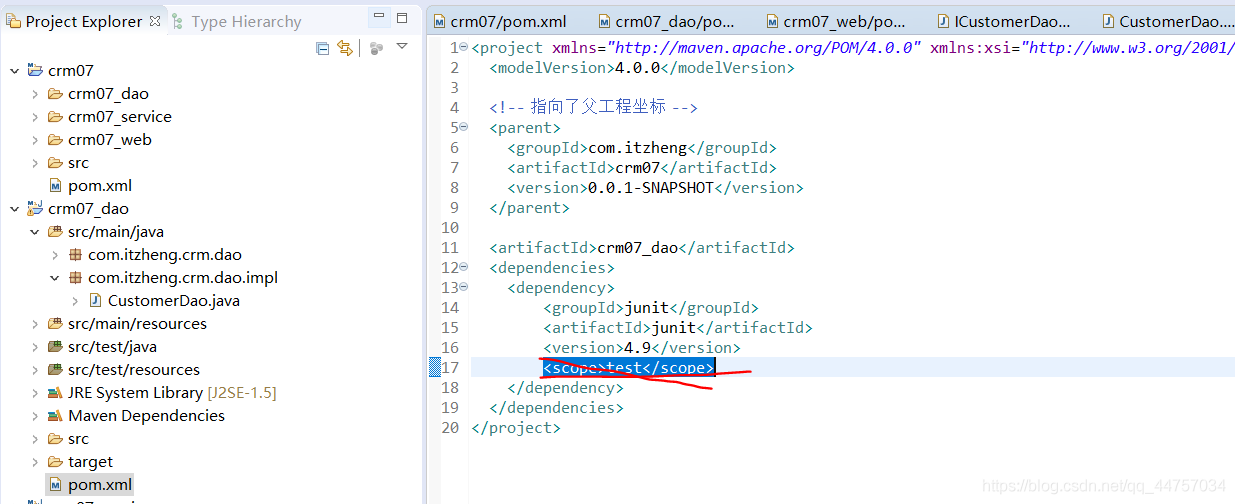
刪除之後可以在service當中看到junit的jar
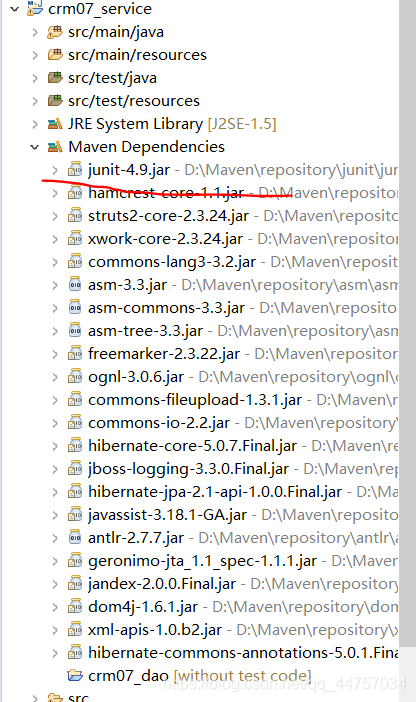
解決辦法: 如果在依賴傳遞的過程當中,導致jar包的丟失,我們的做法很簡單,就是再匯入一次座標
8、依賴的兩個原則
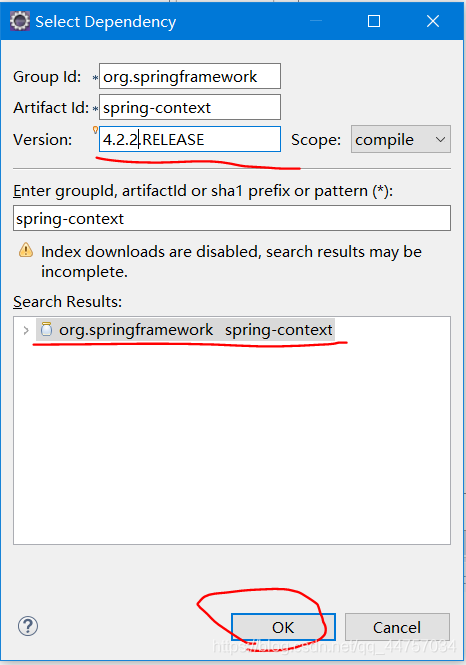
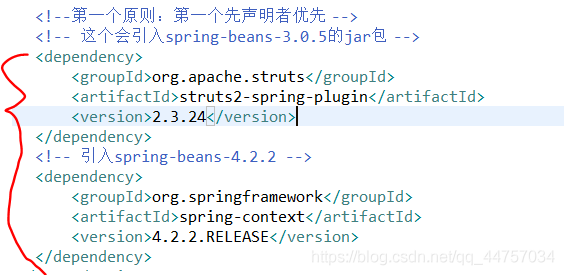
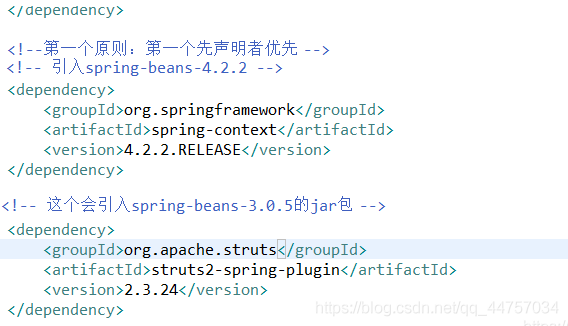
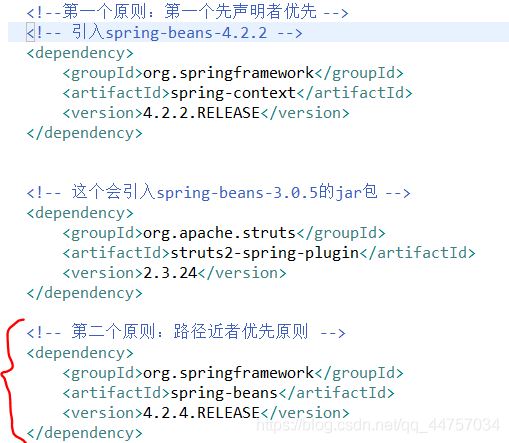
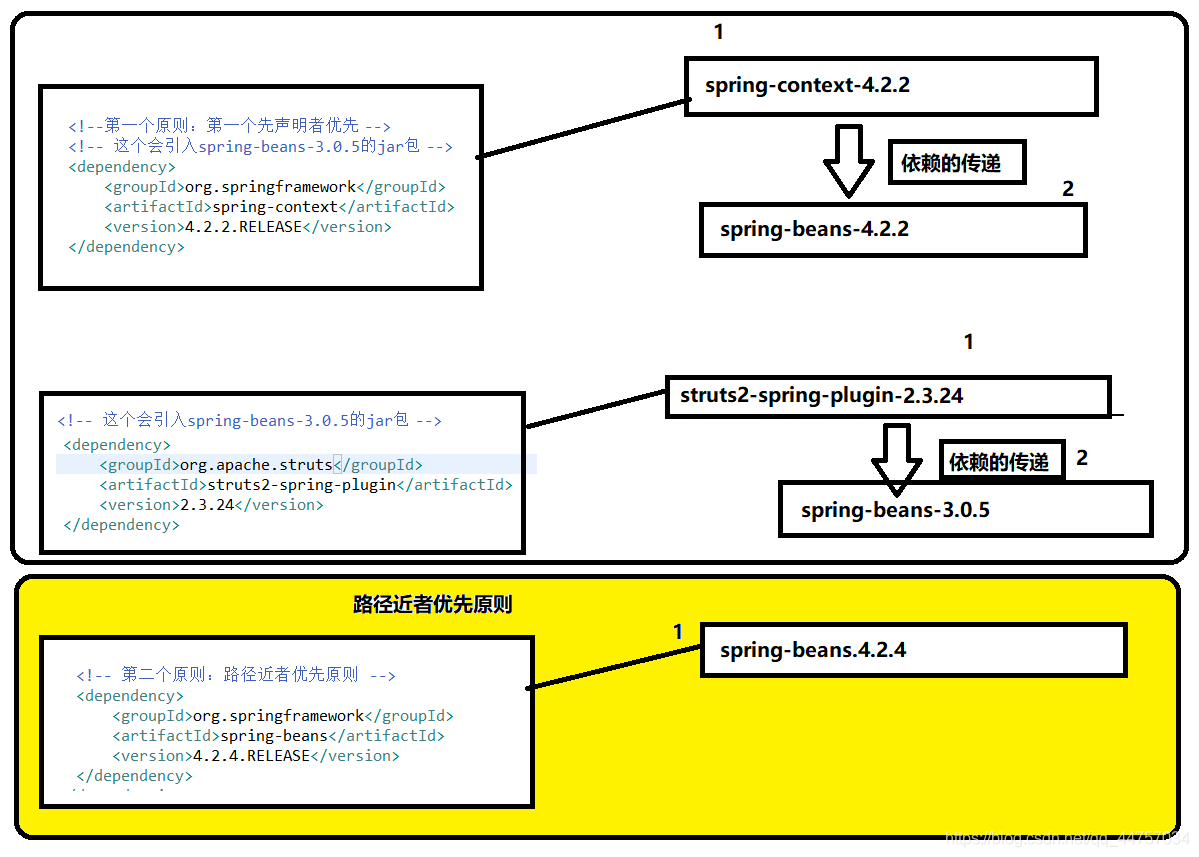
(一)第一個原則:第一個先宣告者優先
(1)在父工程當中新增依賴
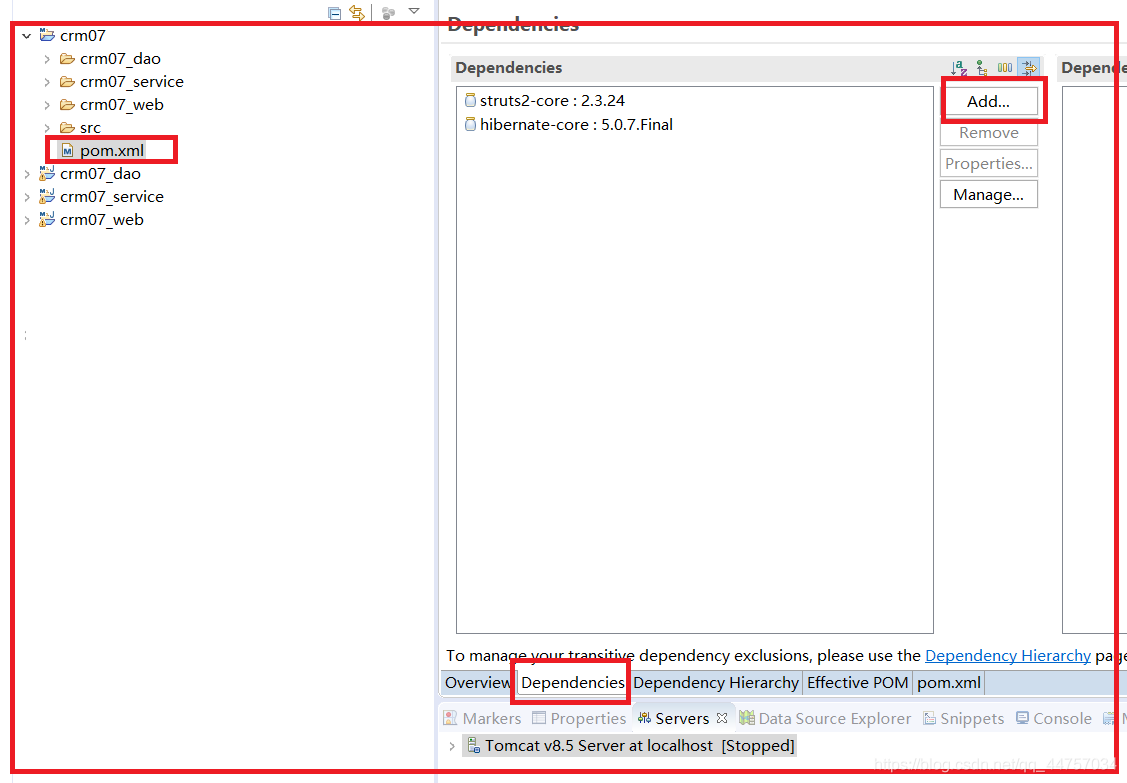
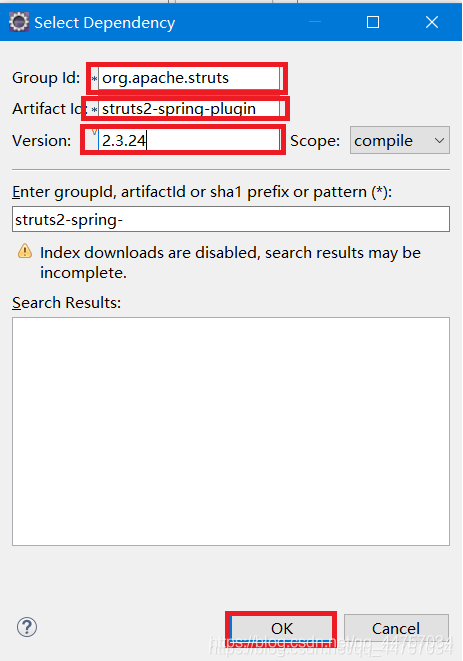
(2)在crm07/pom.xml當中
(3)在pom.xml當中更改一下對應的,兩個spring的順序
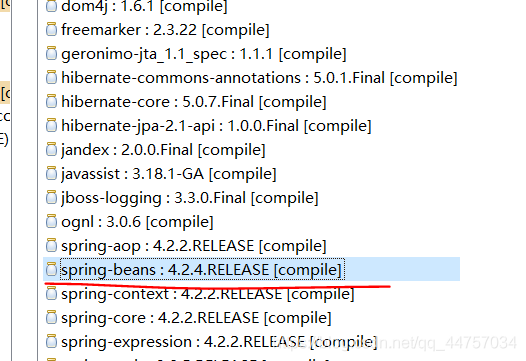
優先順序會改變
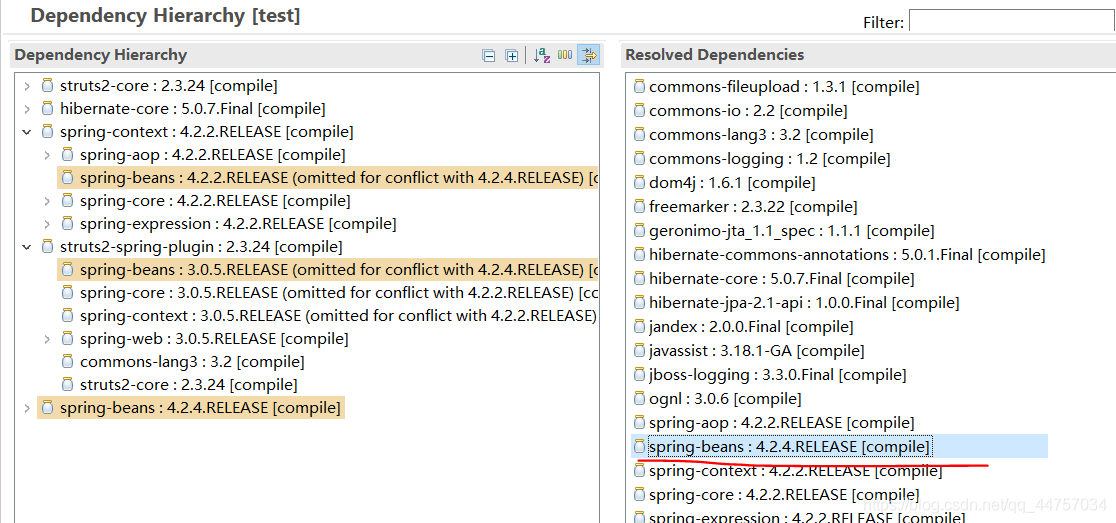
(二)第二個原則:路徑近者優先原則
(1)實驗如果上面引入的不是自己合適的,再次引入一個新的
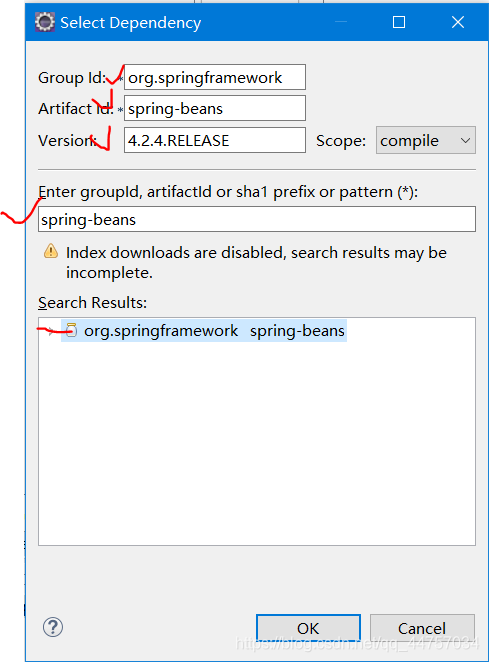
生效版本變為後新增的版本
9、版本的鎖定
(1)刪除dao層當中的junit依賴
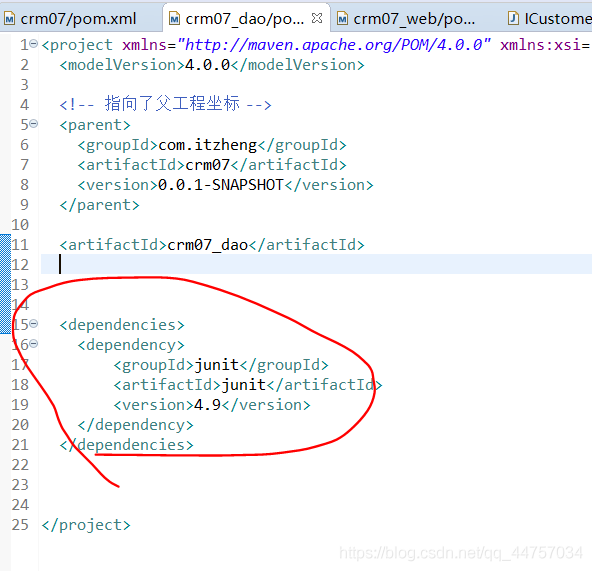
(2)在父工程當中新增對應的junit

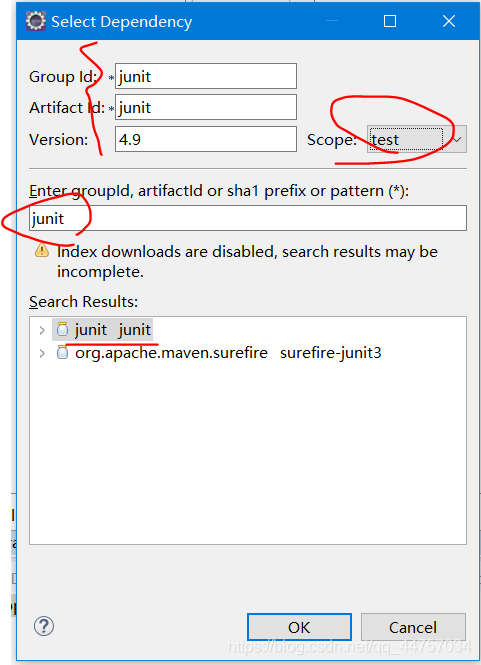
(3)在子工程下面會自動引入和父工程一樣的junit的jar
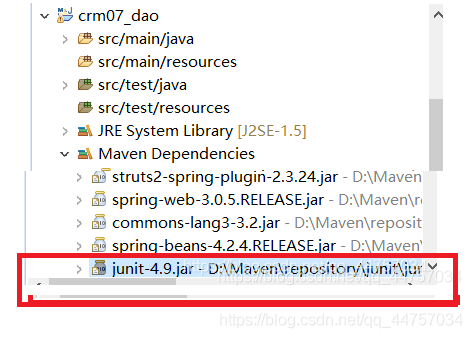
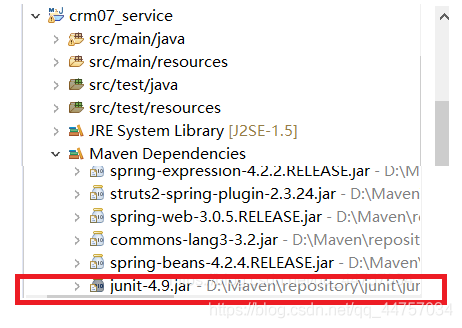
(4)這個時候在上面的會有三個專案有三個junit,
(一)這個時候需要通過版本的鎖定來解決這個問題
在父工程的pom.xml當中、
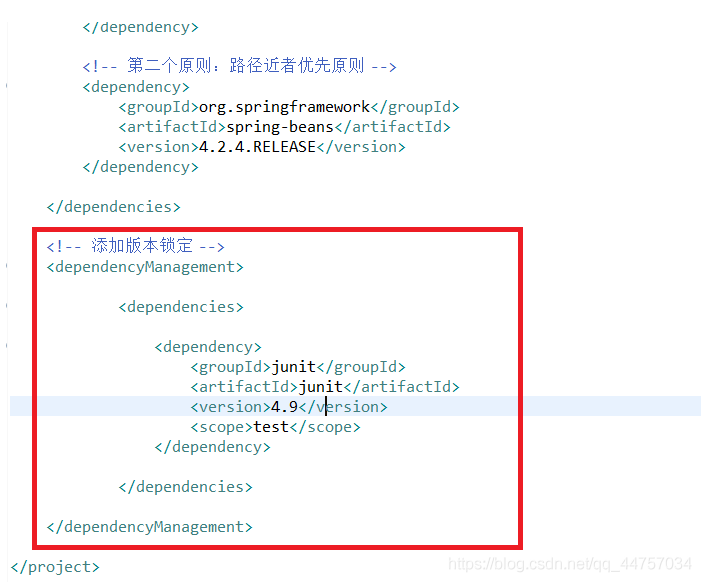
<!-- 新增版本鎖定 -->
	<dependencyManagement>
			<dependencies>
				<dependency>
					<groupId>junit</groupId>
					<artifactId>junit</artifactId>
					<version>4.9</version>
					<scope>test</scope>
				</dependency>
			</dependencies>
	</dependencyManagement>
(二)新增版本鎖定以後
子工程當中的junit的jar會消失
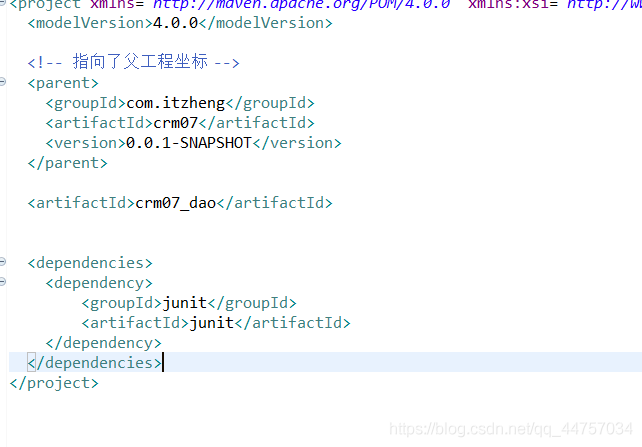
(三)在子工程當中新增junit,選擇對應鎖定版本的junit
在dao當中新增對應的junit
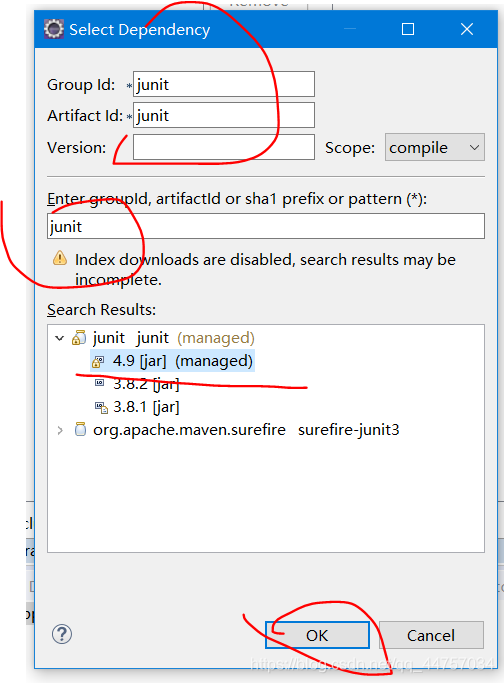
在子工程的pom.xml當中
10、整合SSH其他jar包
(1)在crm07/pom.xml當中
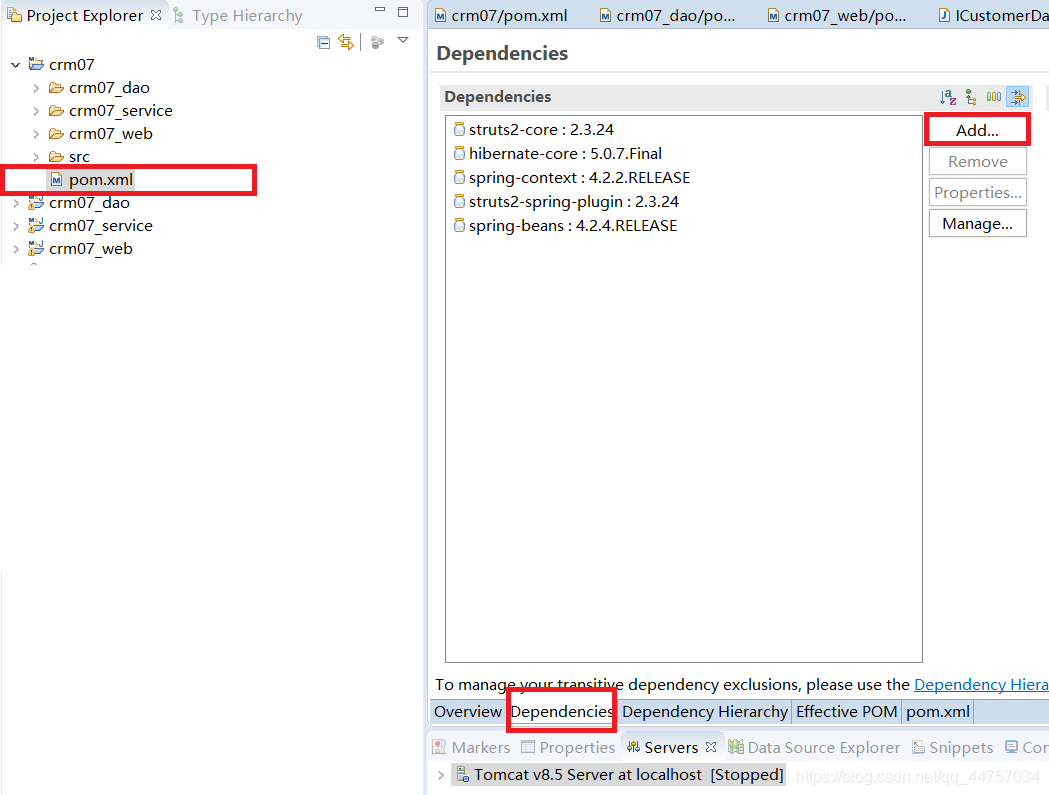
(2)新增其他SSH相關jar
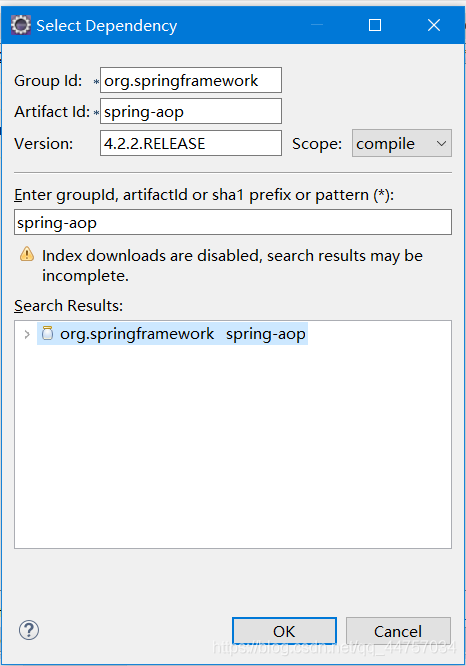
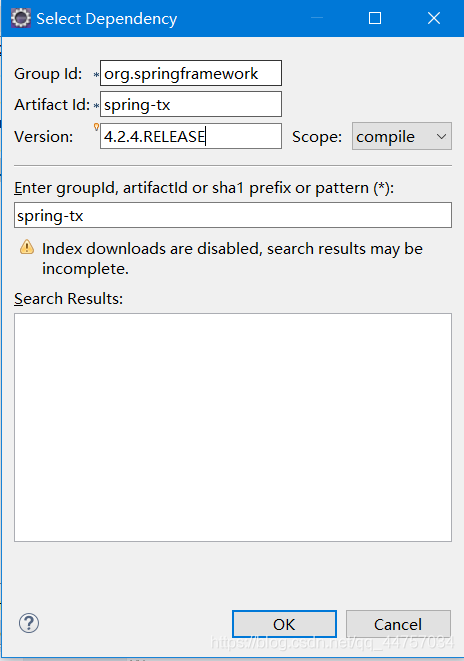
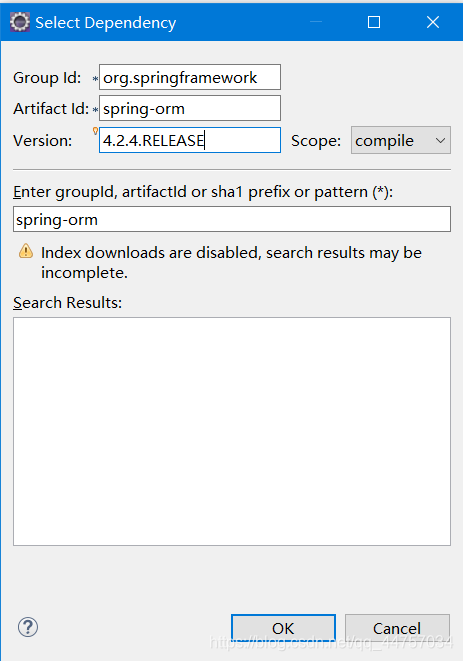
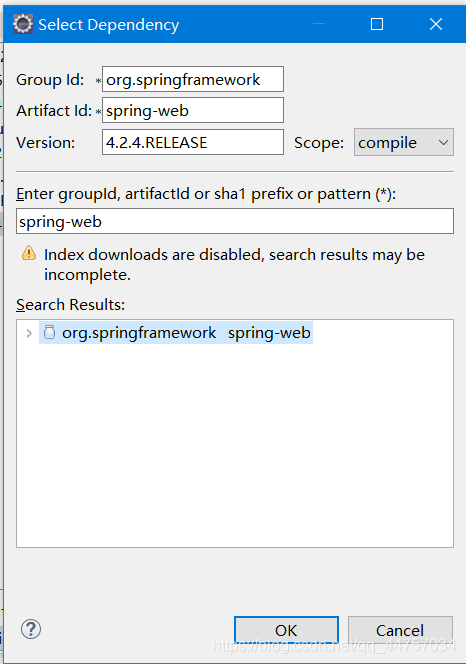
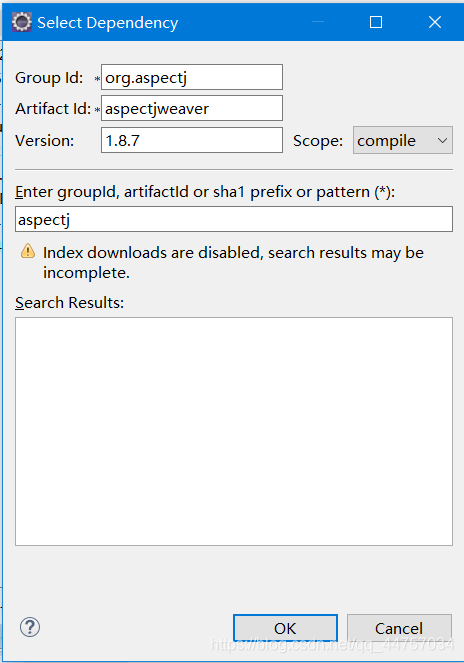
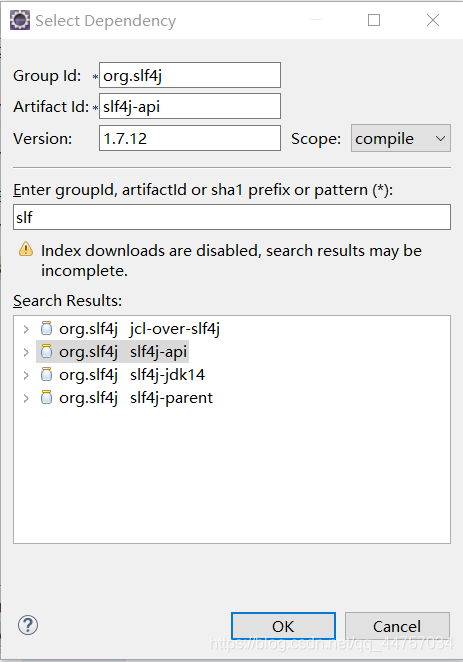
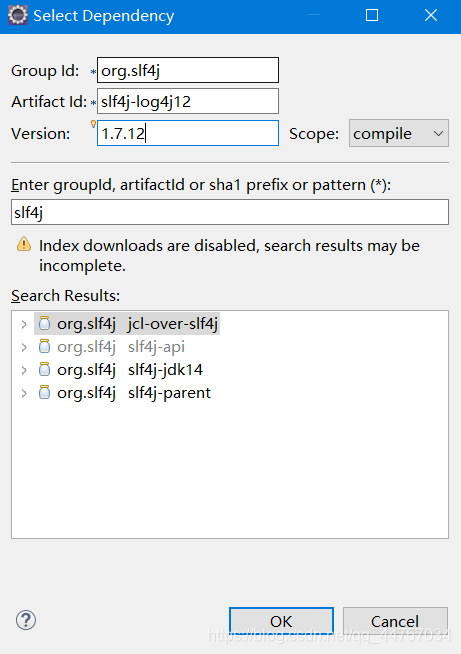
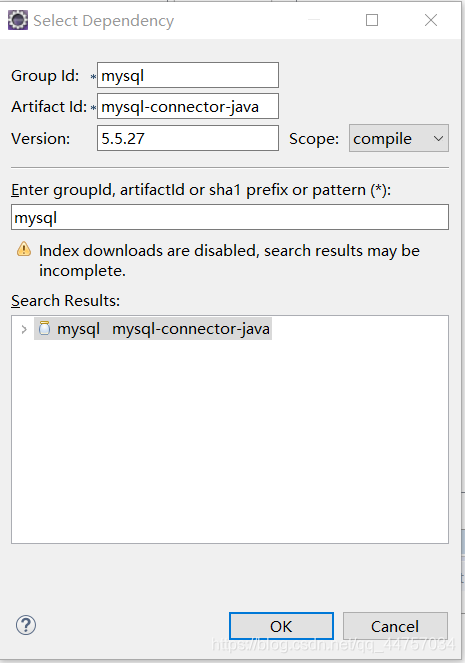
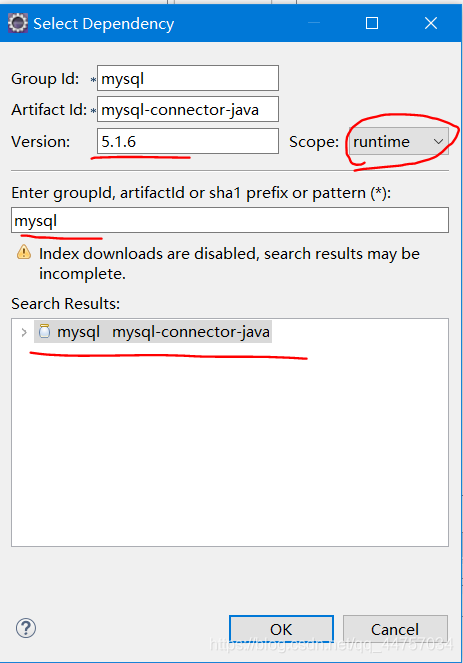
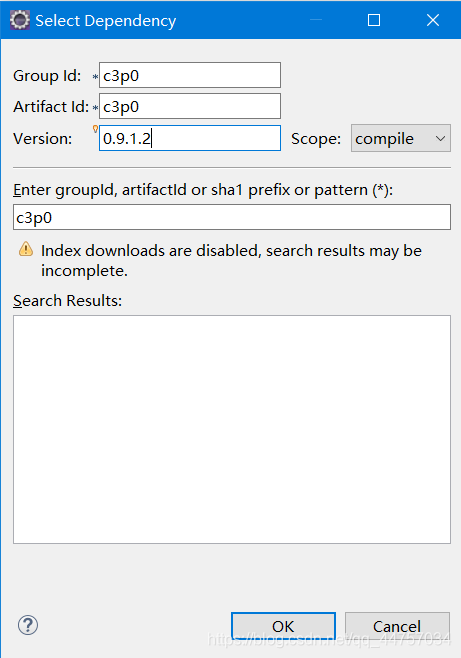
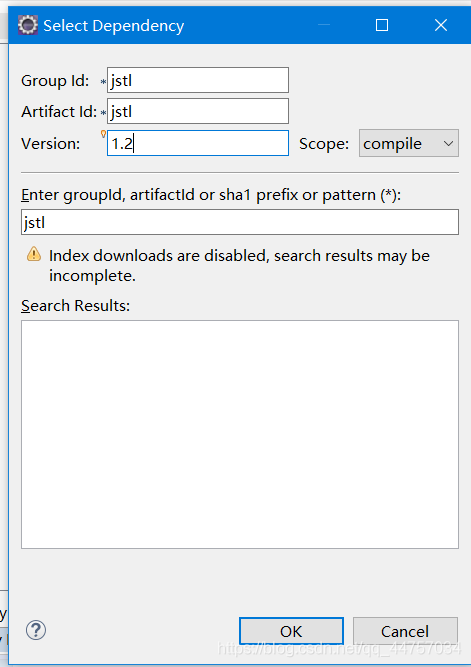
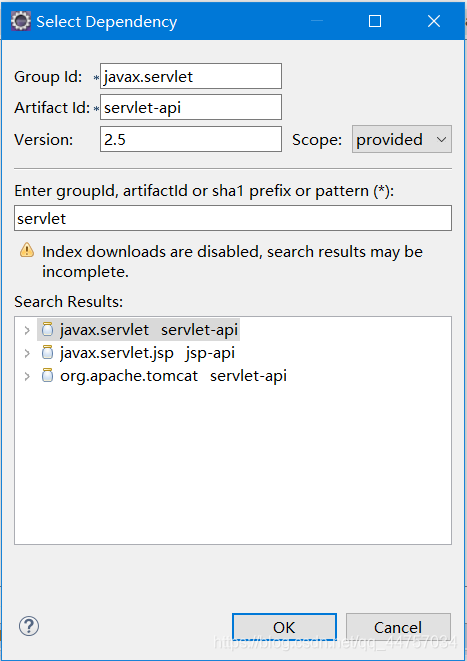
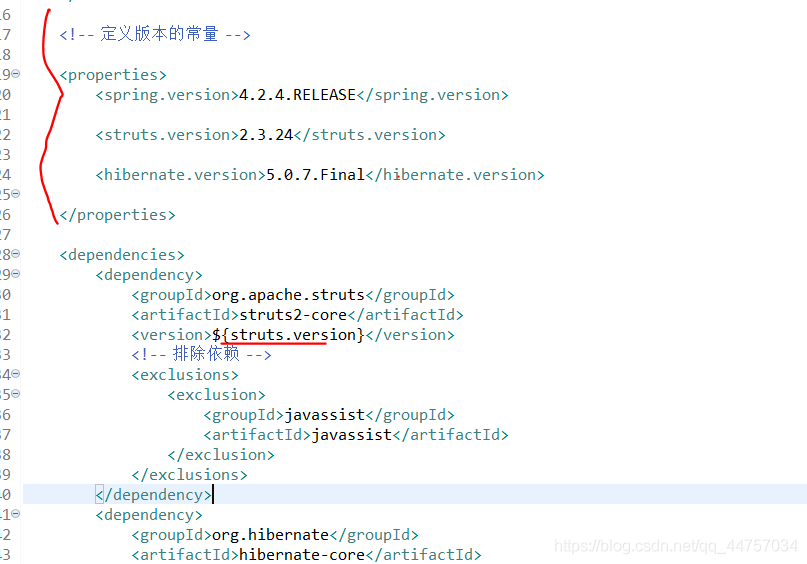
11、在crm/pom.xml當中定義版本常數
(1)設定對應的值

(2)替換對應的變數Ctrl + F
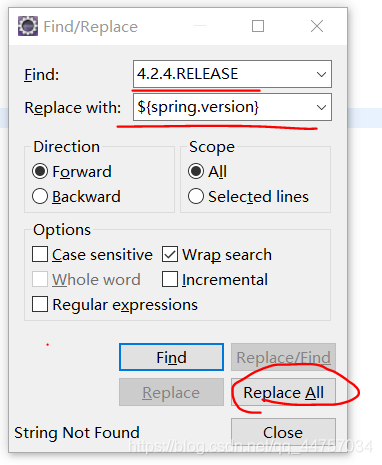
通過定義版本編號常數的方式可以定義替換pom.xml當中的內容
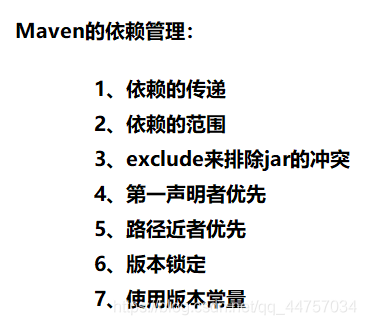
12、依賴管理總結
13、dao層的開發
(1)crm07_dao
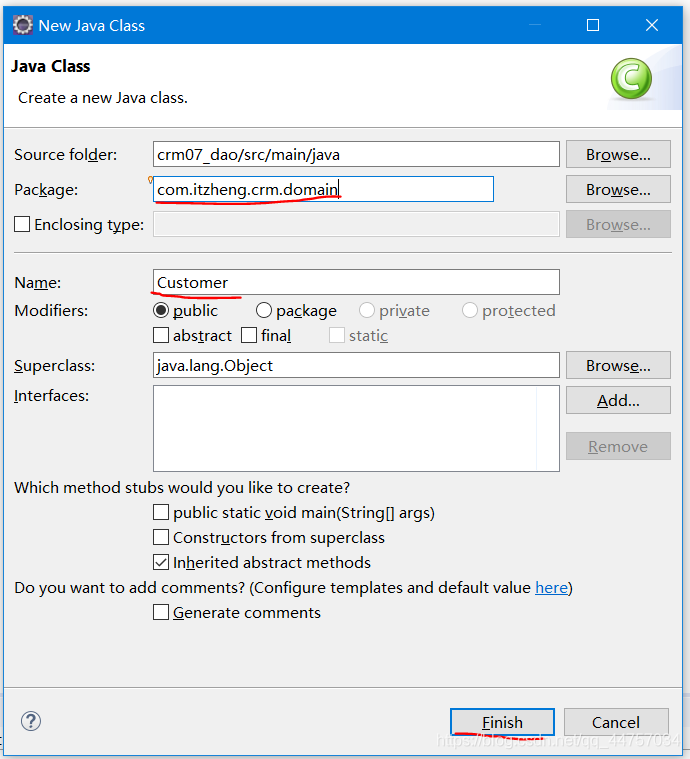
package com.itzheng.crm.domain;
import java.io.Serializable;
/**
 * PO(Persistence Object)持久化類
 * 7個規範
 * 1. 公有類
 * 2. 公有無參構造
 * 3. 私有屬性
 * 4. 公有的getter與setter
 * 5. 實現java.io.Serializable介面
 * 6. 不能用final修飾
 * 7. 如果是基礎型別,要使用它的包裝類
 * @author Administrator
 */
package com.itzheng.crm.domain;

import java.io.Serializable;

/**
 * PO(Persistence Object)持久化類 7個規範 1. 公有類 2. 公有無參構造 3. 私有屬性 4. 公有的getter與setter
 * 5. 實現java.io.Serializable介面 6. 不能用final修飾 7. 如果是基礎型別,要使用它的包裝類
 *
 * @author Administrator
 *
 */
public class Customer implements Serializable {

	private Long cust_id;
	private String cust_name;
	/*
	 * private String cust_source; private String cust_industry; private String
	 * cust_level;
	 */
	private String cust_phone;
	private String cust_mobile;

	private String cust_image;// 客戶資質的圖片

	public Long getCust_id() {
		return cust_id;
	}

	public void setCust_id(Long cust_id) {
		this.cust_id = cust_id;
	}

	public String getCust_name() {
		return cust_name;
	}

	public void setCust_name(String cust_name) {
		this.cust_name = cust_name;
	}

	public String getCust_phone() {
		return cust_phone;
	}

	public void setCust_phone(String cust_phone) {
		this.cust_phone = cust_phone;
	}

	public String getCust_mobile() {
		return cust_mobile;
	}

	public void setCust_mobile(String cust_mobile) {
		this.cust_mobile = cust_mobile;
	}

	public String getCust_image() {
		return cust_image;
	}

	public void setCust_image(String cust_image) {
		this.cust_image = cust_image;
	}

	@Override
	public String toString() {
		return "Customer [cust_id=" + cust_id + ", cust_name=" + cust_name + ", cust_phone=" + cust_phone
				+ ", cust_mobile=" + cust_mobile + ", cust_image=" + cust_image + "]";
	}

}
(2)組態檔(在src/main/resources下建立xml檔案)
a、先建立和dao層一模一樣的包
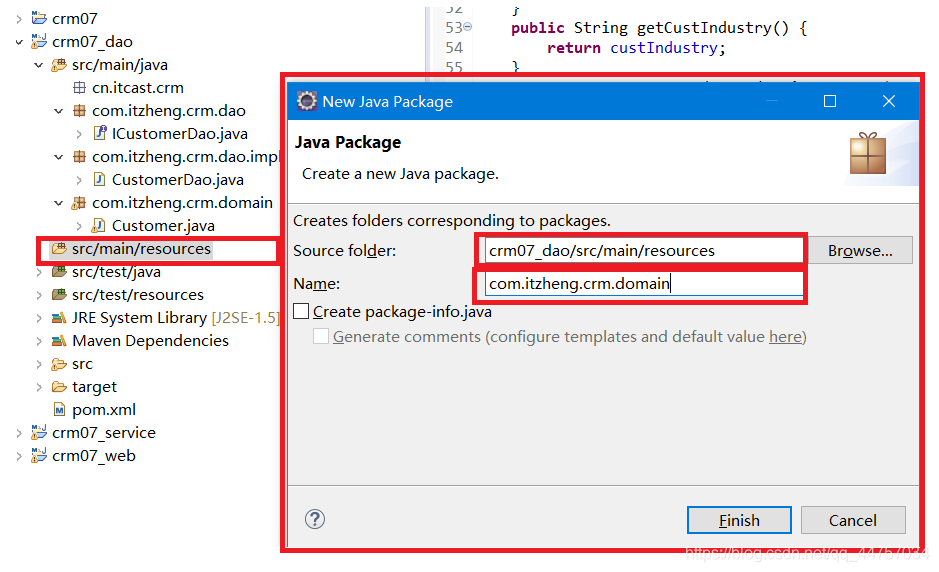
b、在建立好的包當中建立xml檔案
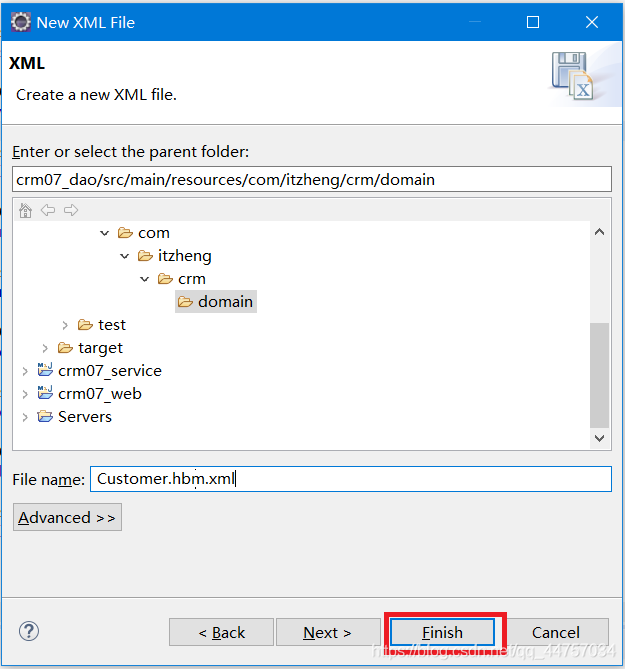
編寫對映檔案
c、建立Hibernate的對映檔案
<?xml version="1.0" encoding="UTF-8"?>
<!DOCTYPE hibernate-mapping PUBLIC
	"-//Hibernate/Hibernate Mapping DTD 3.0//EN"
	"http://www.hibernate.org/dtd/hibernate-mapping-3.0.dtd" >
<hibernate-mapping>
	<class name="com.itzheng.crm.domain.Customer" table="cst_customer">
		<!-- 建立類中的屬性與表中的主鍵對應 -->
		<id name="cust_id" column="cust_id">
			<!-- 主鍵生成策略 -->
			<generator class="native" />
		</id>
		<!-- 建立類中的普通的屬性和表的欄位的對應對映 -->
		<property name="cust_name" column="cust_name" />

		<property name="cust_phone" column="cust_phone" />
		<property name="cust_mobile" column="cust_mobile" />
		<property name="cust_image" column="cust_image" />
    </class>
</hibernate-mapping>
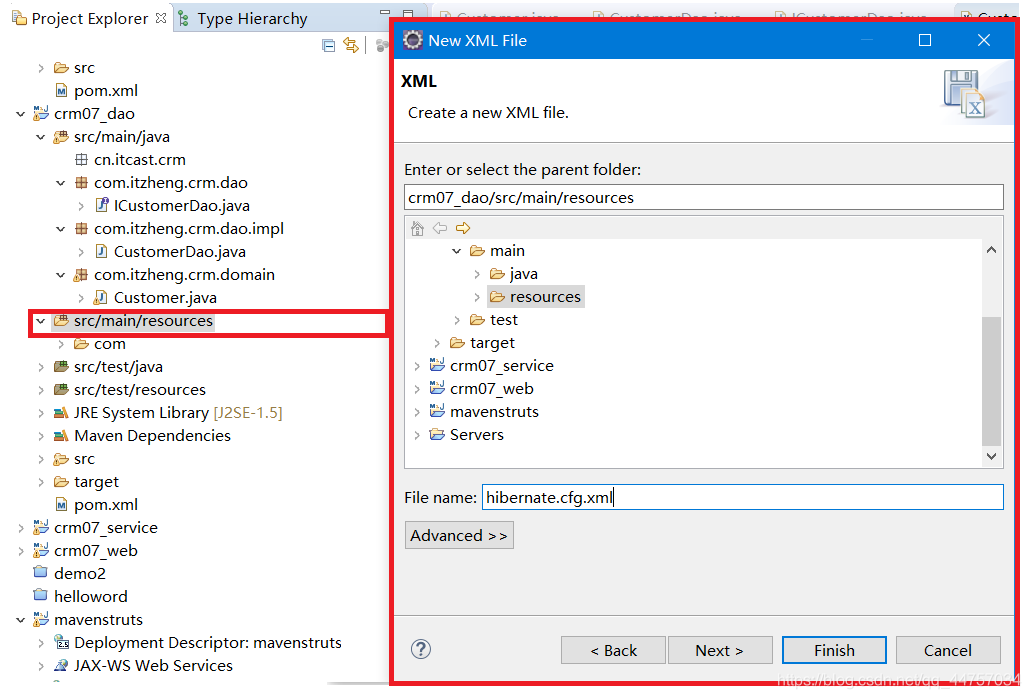
<?xml version="1.0" encoding="UTF-8"?>
<!DOCTYPE hibernate-configuration PUBLIC "-//Hibernate/Hibernate Configuration DTD 3.0//EN" "http://www.hibernate.org/dtd/hibernate-configuration-3.0.dtd" >
<hibernate-configuration>
	<session-factory>
		<!-- 方言 -->
		<property name="dialert">org.hibernate.dialect.Oracle11gDialect</property>
		<property name="show_sql">true</property>
		<property name="format_sql">false</property>
		<property name="hbm2ddl.auto">none</property>
		<!-- 懶載入 -->
		<property name="hibernate.enable_lazy_load_no_trans">true</property>
		<!-- 實體類的驗證 -->
		<property name="javax.persistence.validation.mode">none</property>
	</session-factory>
</hibernate-configuration>
d、建立spring的檔案
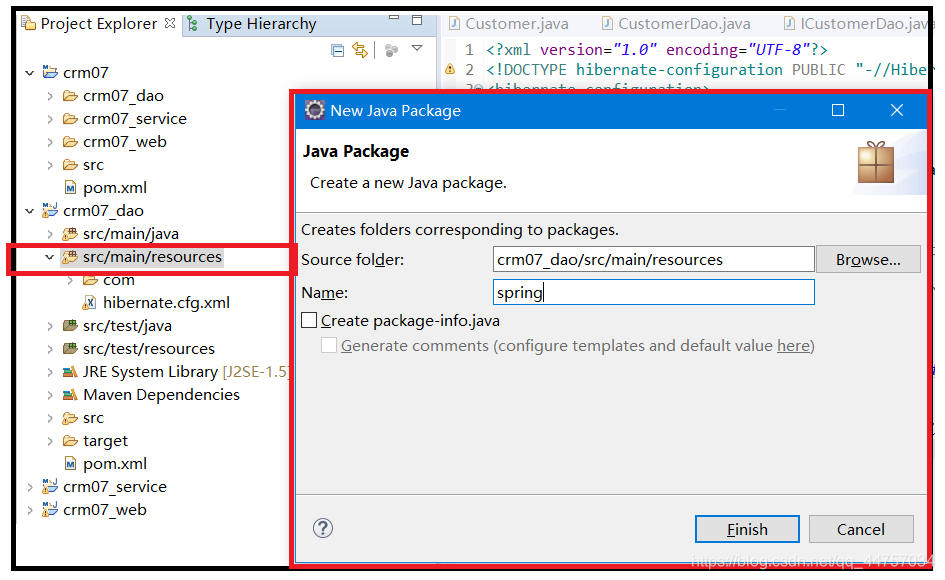
e、在spring下建立spring的xml對映檔案
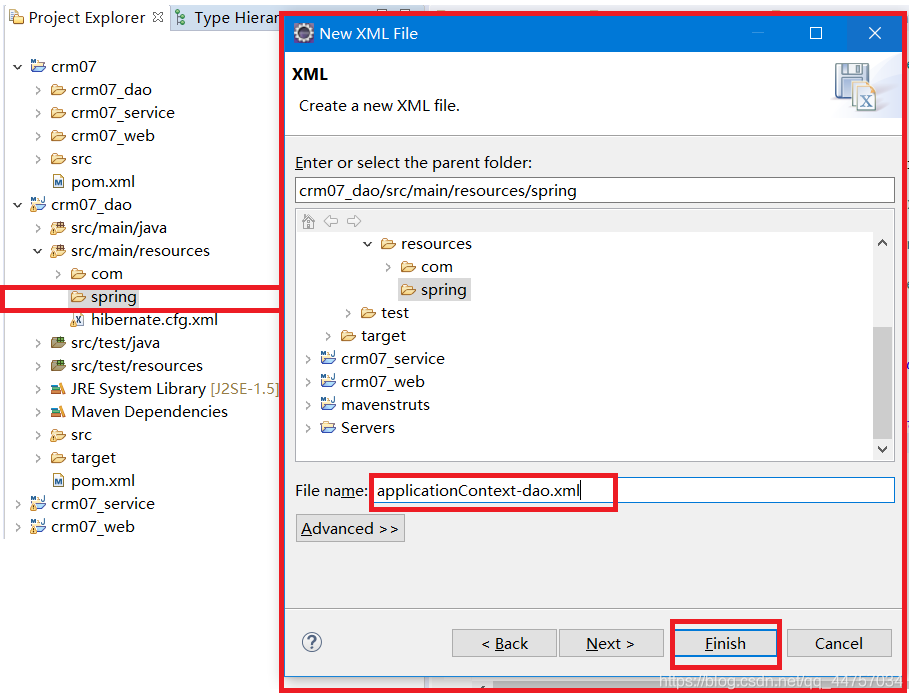
<?xml version="1.0" encoding="UTF-8"?>
<beans xmlns="http://www.springframework.org/schema/beans"
	xmlns:xsi="http://www.w3.org/2001/XMLSchema-instance"
	xmlns:context="http://www.springframework.org/schema/context"
	xmlns:aop="http://www.springframework.org/schema/aop"
	xmlns:tx="http://www.springframework.org/schema/tx"
	xsi:schemaLocation="
		http://www.springframework.org/schema/beans http://www.springframework.org/schema/beans/spring-beans.xsd
		http://www.springframework.org/schema/context http://www.springframework.org/schema/context/spring-context.xsd
		http://www.springframework.org/schema/aop http://www.springframework.org/schema/aop/spring-aop.xsd
		http://www.springframework.org/schema/tx http://www.springframework.org/schema/tx/spring-tx.xsd ">
	<!-- 資料來源 -->
	<bean id="dataSource" class="com.mchange.v2.c3p0.ComboPooledDataSource">
		<property name="driverClass" value="com.mysql.jdbc.Driver"></property>
		<property name="jdbcUrl" value="jdbc:mysql://localhost:3306/crm?characterEncoding=utf-8"></property>
		<property name="user" value="root" ></property>
		<property name="password" value="root" ></property>
	</bean>
	<!-- sessionFactory;SessionFactory介面負責初始化Hibernate。它充當資料儲存源的代理,並負責建立Session物件。	-->
	<bean id="sessionFactory" class="org.springframework.orm.hibernate5.LocalSessionFactoryBean">
		<property name="dataSource" ref="dataSource"></property>
		<property name="configLocation" value="classpath:hibernate.cfg.xml" ></property>
		<property name="mappingLocations" value="classpath:com/itzheng/crm/domain/*.hbm.xml" ></property>
	</bean>
	<!-- 資料存取層 -->
	<bean id="customerDao" class="com.itzheng.crm.dao.impl.CustomerDao">
		<property name="sessionFactory" ref="sessionFactory" ></property>
	</bean>
</beans>
d、完善CustomerDao類
package com.itzheng.crm.dao.impl;
import java.util.List;
import org.springframework.orm.hibernate5.support.HibernateDaoSupport;
import com.itzheng.crm.dao.ICustomerDao;
import com.itzheng.crm.domain.Customer;
public class CustomerDao extends HibernateDaoSupport implements ICustomerDao {
	public List<Customer> findAll() {
		return (List<Customer>) getHibernateTemplate().find("from Customer");
	}
}
e、建立好測試類
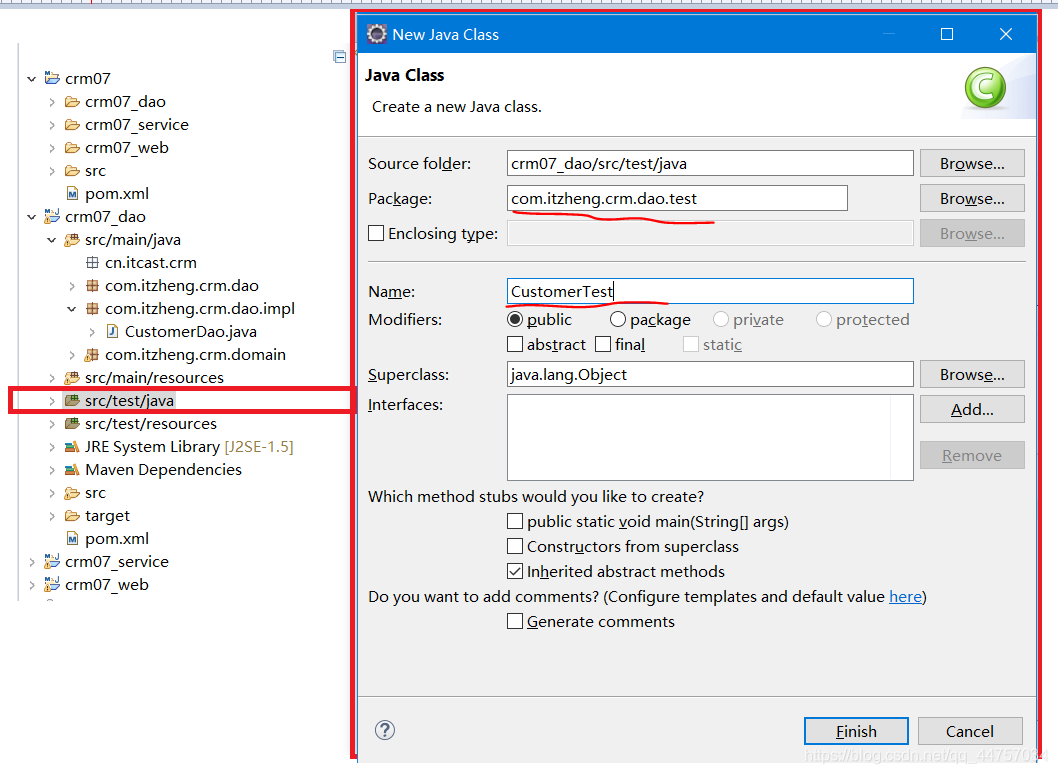
package com.itzheng.crm.dao.test;
import org.junit.Test;
import org.springframework.context.ApplicationContext;
import org.springframework.context.support.ClassPathXmlApplicationContext;
import com.itzheng.crm.dao.impl.CustomerDao;
public class CustomerTest {
	@Test
	public void tt() {
		ApplicationContext ac = new ClassPathXmlApplicationContext("classpath:spring/applicationContext-dao.xml");

		CustomerDao customerDao = (CustomerDao)ac.getBean("customerDao");

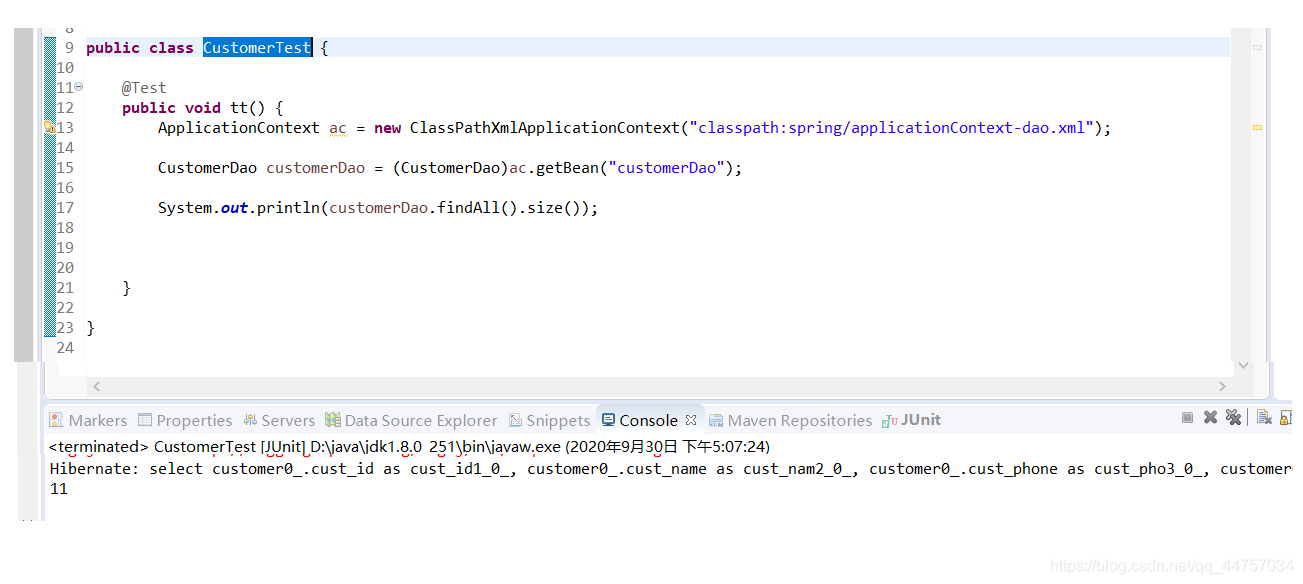
		System.out.println(customerDao.findAll().size());

	}
}
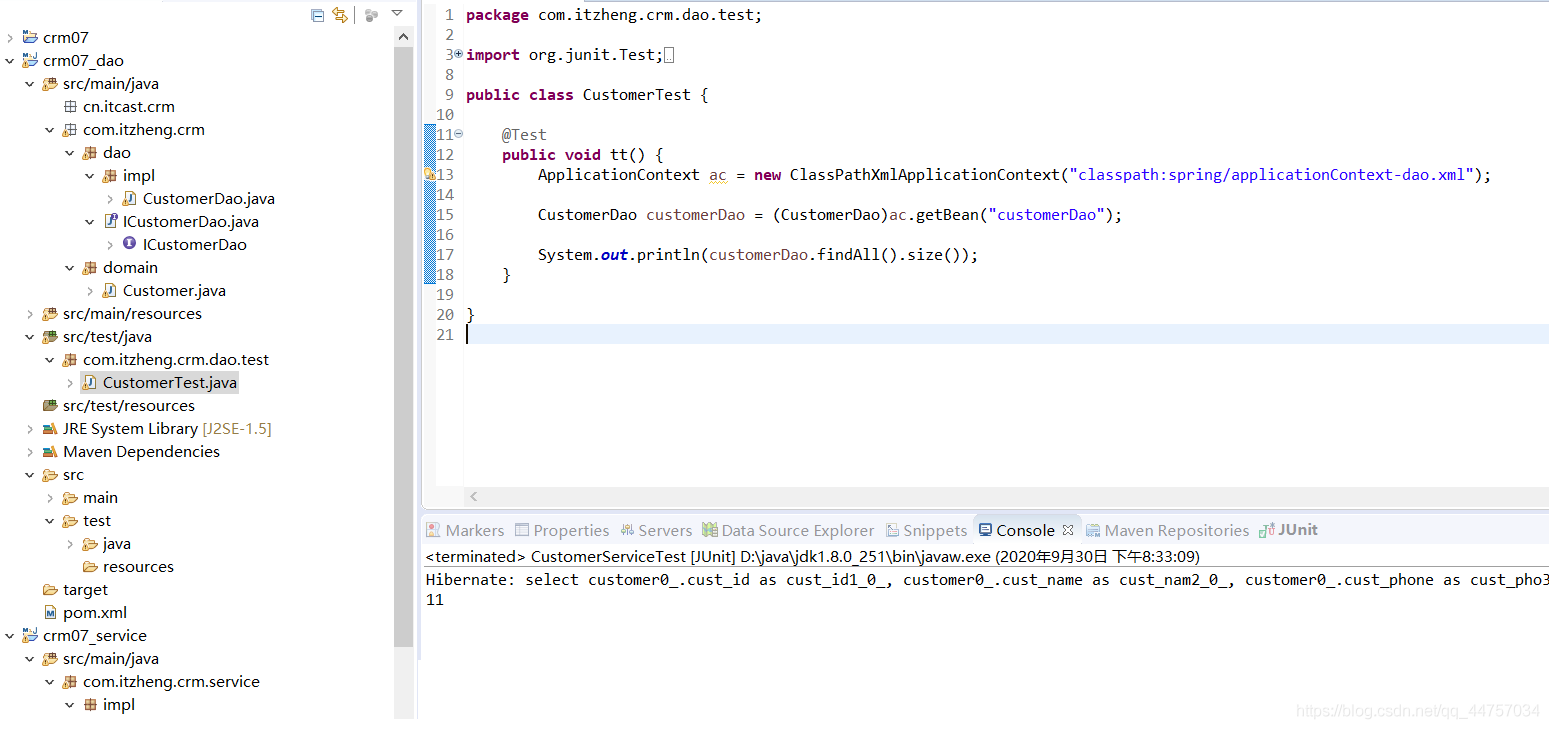
查詢成功
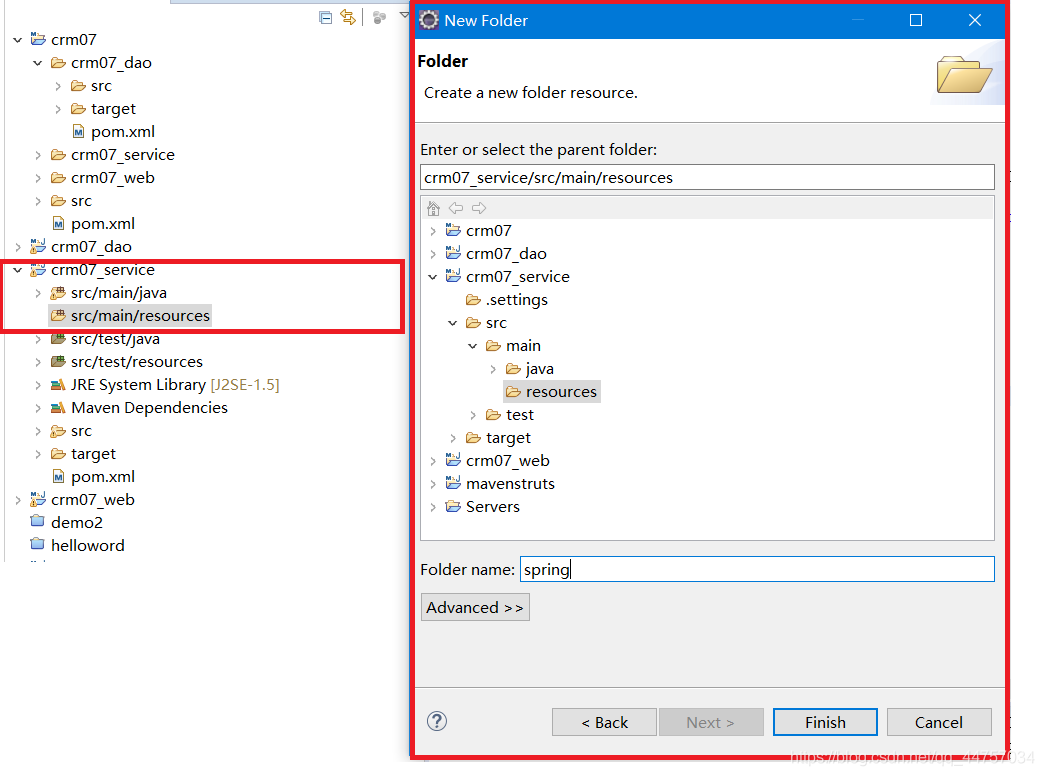
14、service層的開發
(1)建立spring檔案
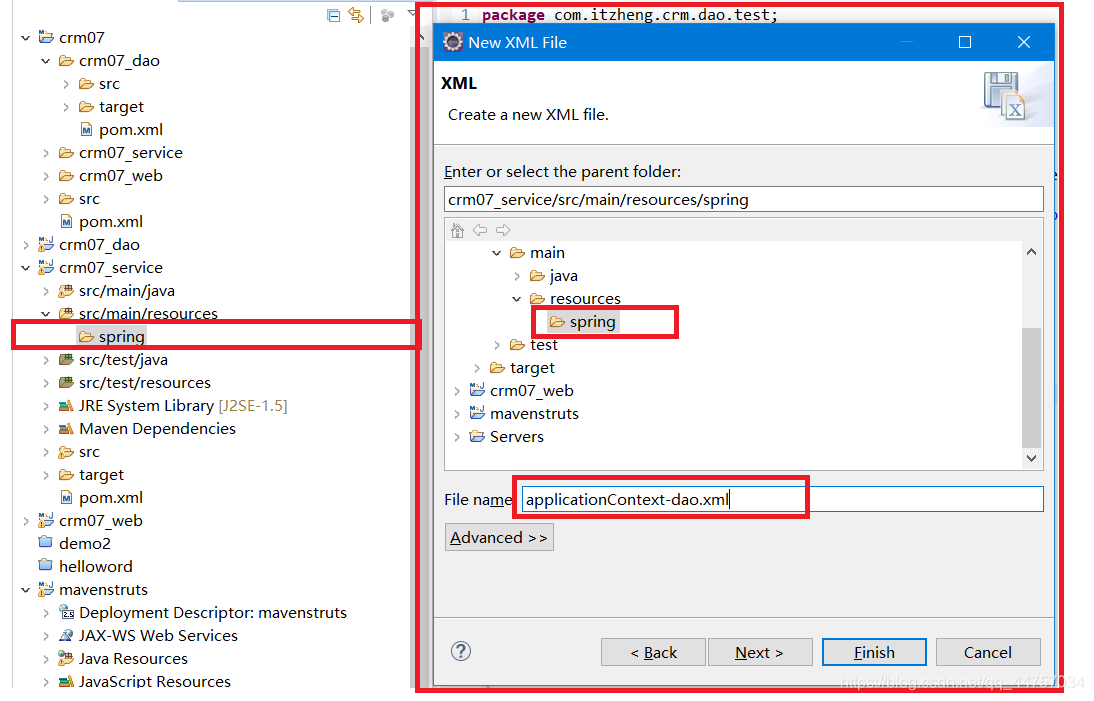
<?xml version="1.0" encoding="UTF-8"?>
<beans xmlns="http://www.springframework.org/schema/beans"
	xmlns:xsi="http://www.w3.org/2001/XMLSchema-instance"
	xmlns:context="http://www.springframework.org/schema/context"
	xmlns:aop="http://www.springframework.org/schema/aop"
	xmlns:tx="http://www.springframework.org/schema/tx"
	xsi:schemaLocation="
		http://www.springframework.org/schema/beans http://www.springframework.org/schema/beans/spring-beans.xsd
		http://www.springframework.org/schema/context http://www.springframework.org/schema/context/spring-context.xsd
		http://www.springframework.org/schema/aop http://www.springframework.org/schema/aop/spring-aop.xsd
		http://www.springframework.org/schema/tx http://www.springframework.org/schema/tx/spring-tx.xsd ">
	<bean id="transactionManager" class="org.springframework.orm.hibernate5.HibernateTransactionManager">
		<property name="sessionFactory" ref="sessionFactory"></property>
	</bean>
	<!-- 通知 -->
	<tx:advice id="advice" transaction-manager="transactionManager" >
		<tx:attributes>
				<tx:method name="add*" propagation="REQUIRED" />
				<tx:method name="save*" propagation="REQUIRED" />
				<tx:method name="update*" propagation="REQUIRED" />
				<tx:method name="delete*" propagation="REQUIRED" />
				<tx:method name="*" read-only="true" />
		</tx:attributes>
	</tx:advice>
	<!-- 切面 -->
	<aop:config>
		<aop:pointcut expression="execution(* com.itzheng.crm.service.impl.*.*(..))" id="myPointCut"/>
		<aop:advisor advice-ref="advice" pointcut-ref="myPointCut" />
	</aop:config>
	<!-- 業務 -->
	<bean id="customerService" class="com.itzheng.crm.service.impl.CustomerService">
		<property name="customerDao" ref="customerDao" ></property>
	</bean>
</beans>
(2)建立測試類
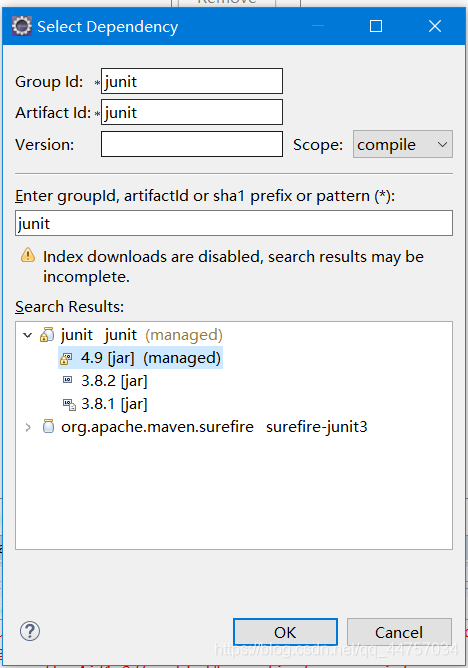
a、在service/pom.xml當中新增junit的設定

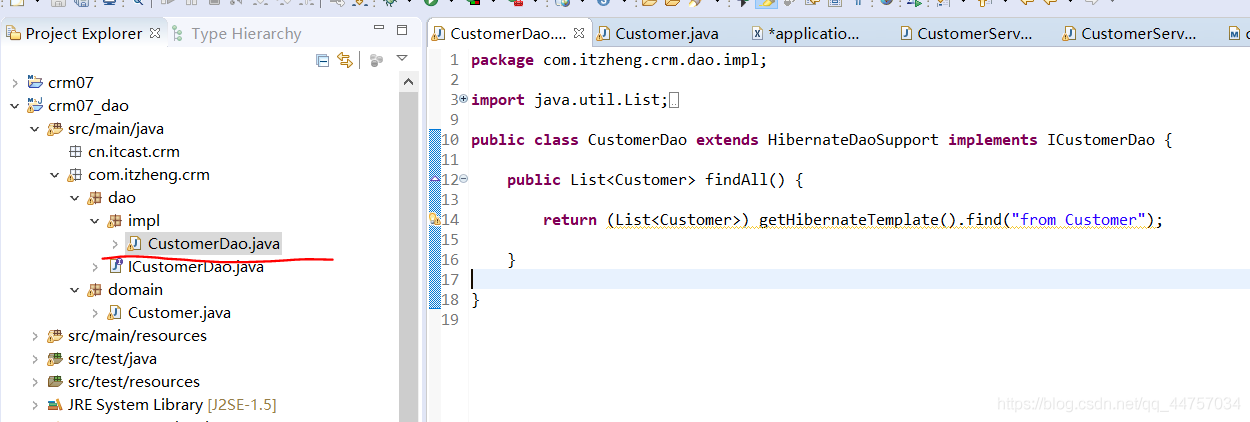
b、完善dao層的內容
package com.itzheng.crm.dao;
import java.util.List;
import com.itzheng.crm.domain.Customer;
public interface ICustomerDao {
	public List<Customer> findAll();
}

package com.itzheng.crm.dao.impl;
import java.util.List;
import org.springframework.orm.hibernate5.support.HibernateDaoSupport;
import com.itzheng.crm.dao.ICustomerDao;
import com.itzheng.crm.domain.Customer;
public class CustomerDao extends HibernateDaoSupport implements ICustomerDao {
	public List<Customer> findAll() {
		return (List<Customer>) getHibernateTemplate().find("from Customer");
	}
}
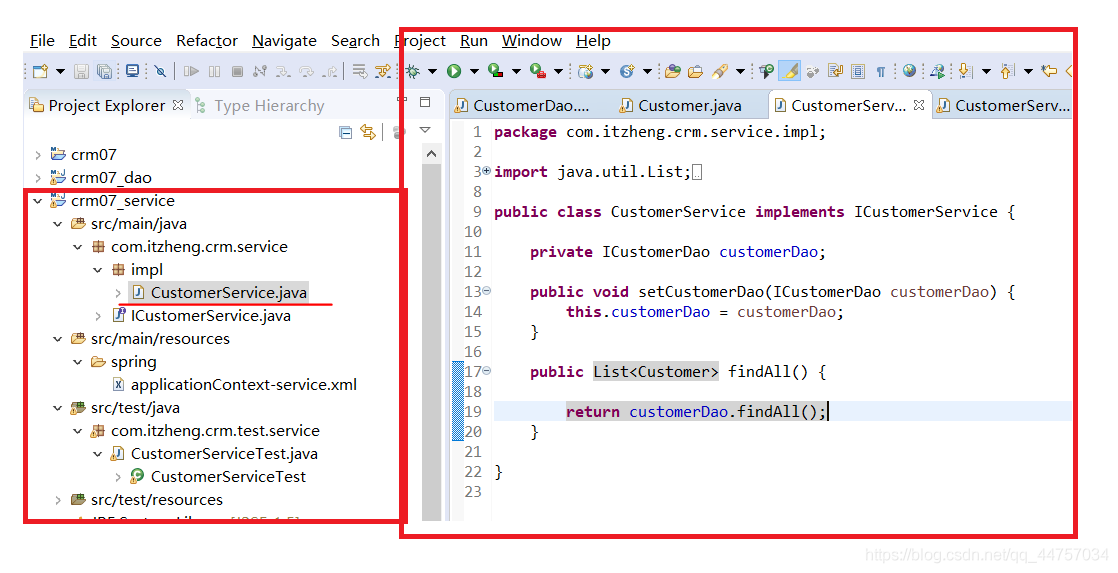
c、完善業務層的內容
package com.itzheng.crm.service.impl;
import java.util.List;
import com.itzheng.crm.dao.ICustomerDao;
import com.itzheng.crm.domain.Customer;
import com.itzheng.crm.service.ICustomerService;
public class CustomerService implements ICustomerService {
	private ICustomerDao customerDao;
	public void setCustomerDao(ICustomerDao customerDao) {
		this.customerDao = customerDao;
	}
	public List<Customer> findAll() {
		return customerDao.findAll();
	}
}
d、建立測試類
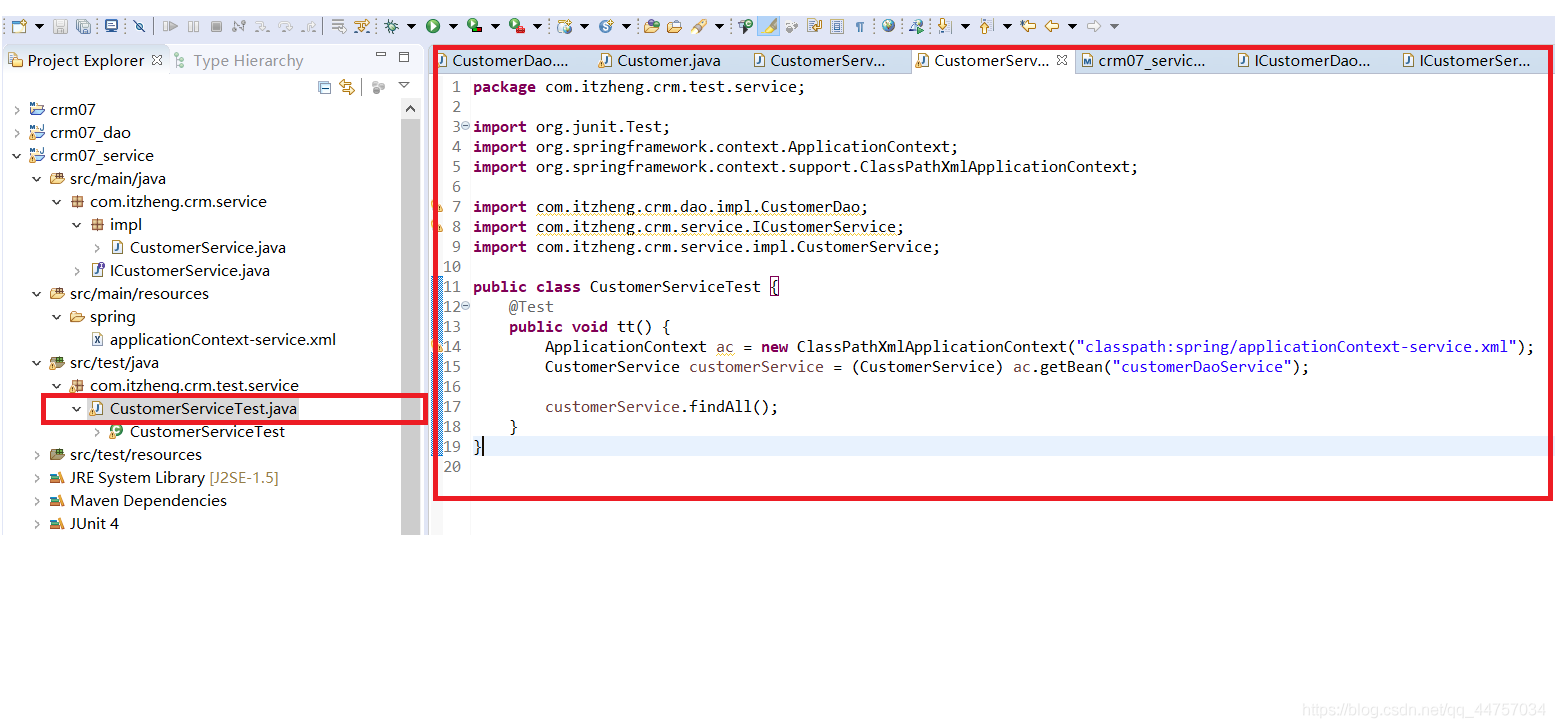
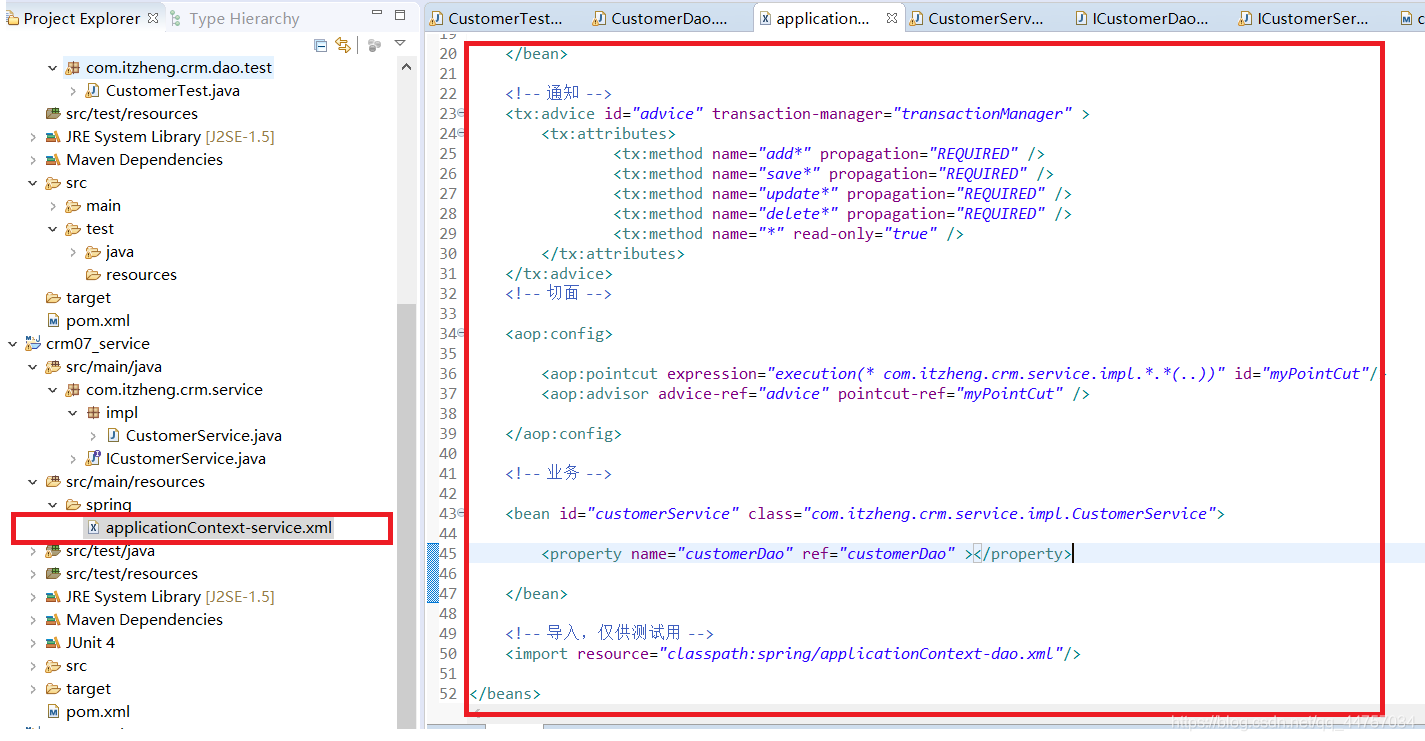
(3)在applicationContext-service.xml當中匯入dao層的applicationContext-dao.xml
	<!-- 匯入,僅供測試用 -->
	<import resource="classpath:spring/applicationContext-dao.xml"/>
(4)執行測試類
package com.itzheng.crm.dao.test;
import org.junit.Test;
import org.springframework.context.ApplicationContext;
import org.springframework.context.support.ClassPathXmlApplicationContext;
import com.itzheng.crm.dao.impl.CustomerDao;
public class CustomerTest {
	@Test
	public void tt() {
		ApplicationContext ac = new ClassPathXmlApplicationContext("classpath:spring/applicationContext-dao.xml");
		CustomerDao customerDao = (CustomerDao)ac.getBean("customerDao");
		System.out.println(customerDao.findAll().size());
	}
}
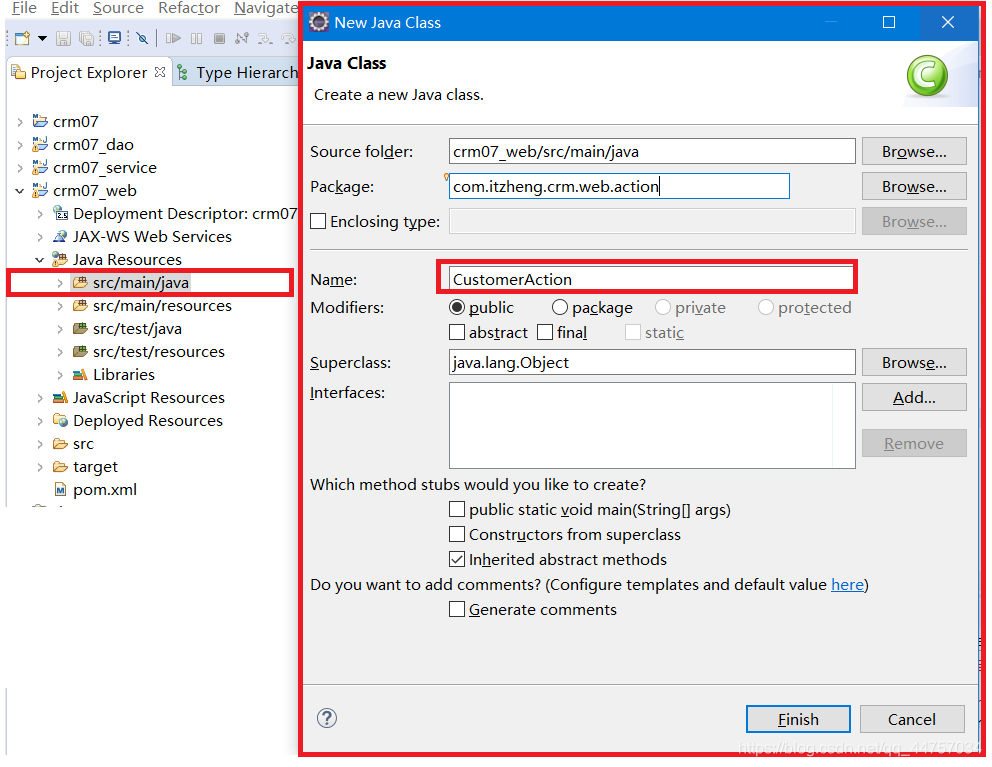
15、web層的開發
(1)在src/main/java下建立CustomerAction
(2)建立整個目錄結構
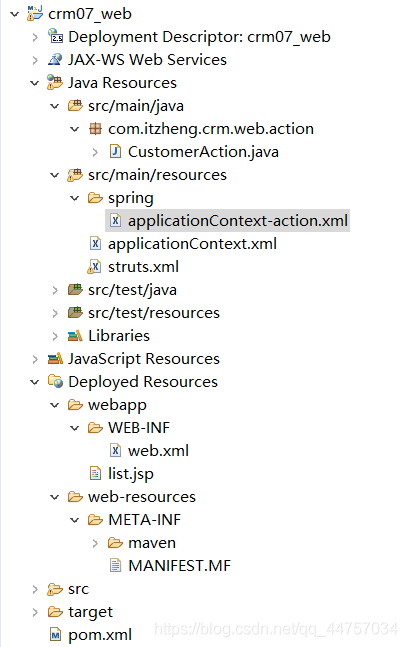
(3)建立CustomerAction
package com.itzheng.crm.web.action;
import java.util.List;
import com.itzheng.crm.domain.Customer;
import com.itzheng.crm.service.impl.CustomerService;
import com.opensymphony.xwork2.ActionContext;
public class CustomerAction {
	private CustomerService customerService;
	public void setCustomerService(CustomerService customerService) {
		this.customerService = customerService;
	}
	public String list() {
		//查詢所有
		List<Customer> customerList = customerService.findAll();
		//所有的客戶資訊都放入到值棧當中
		ActionContext.getContext().put("list", customerList);
		//返回list.jsp頁面
		return "list";
	}
}
(4)建立list.jsp頁面
<%@ page language="java" contentType="text/html; charset=UTF-8"
    pageEncoding="UTF-8"%>
<%@ taglib prefix="c" uri="http://java.sun.com/jsp/jstl/core"  %>
<!DOCTYPE html>
<html>
<head>
<meta charset="UTF-8">
<title>Insert title here</title>
</head>
<body>
<c:forEach  items="${list }" var="customer"  >
	${ customer.cust_id } --> ${ customer.cust_name } <br>
</c:forEach>
</body>
</html>
(5) 建立applicationContext-action.xml
<?xml version="1.0" encoding="UTF-8"?>
<beans xmlns="http://www.springframework.org/schema/beans"
	xmlns:xsi="http://www.w3.org/2001/XMLSchema-instance"
	xmlns:context="http://www.springframework.org/schema/context"
	xmlns:aop="http://www.springframework.org/schema/aop"
	xmlns:tx="http://www.springframework.org/schema/tx"
	xsi:schemaLocation="
		http://www.springframework.org/schema/beans http://www.springframework.org/schema/beans/spring-beans.xsd
		http://www.springframework.org/schema/context http://www.springframework.org/schema/context/spring-context.xsd
		http://www.springframework.org/schema/aop http://www.springframework.org/schema/aop/spring-aop.xsd
		http://www.springframework.org/schema/tx http://www.springframework.org/schema/tx/spring-tx.xsd ">
	<bean id="customerAction" class="com.itzheng.crm.web.action.CustomerAction">
		<property name="customerService" ref="customerService" ></property>
	</bean>
</beans>
(6) 建立applicationContext.xml, 載入所有的spring上下文
<?xml version="1.0" encoding="UTF-8"?>
<beans xmlns="http://www.springframework.org/schema/beans"
	xmlns:xsi="http://www.w3.org/2001/XMLSchema-instance"
	xmlns:context="http://www.springframework.org/schema/context"
	xmlns:aop="http://www.springframework.org/schema/aop"
	xmlns:tx="http://www.springframework.org/schema/tx"
	xsi:schemaLocation="
		http://www.springframework.org/schema/beans http://www.springframework.org/schema/beans/spring-beans.xsd
		http://www.springframework.org/schema/context http://www.springframework.org/schema/context/spring-context.xsd
		http://www.springframework.org/schema/aop http://www.springframework.org/schema/aop/spring-aop.xsd
		http://www.springframework.org/schema/tx http://www.springframework.org/schema/tx/spring-tx.xsd ">
	<import resource="classpath:spring/applicationContext-dao.xml" />
	<import resource="classpath:spring/applicationContext-service.xml" />
	<import resource="classpath:spring/applicationContext-action.xml" />
</beans>
(7) 建立struts.xml
<?xml version="1.0" encoding="UTF-8"?>
<!DOCTYPE struts PUBLIC
	"-//Apache Software Foundation//DTD Struts Configuration 2.3//EN"
	"http: // struts.apache.org/dtds/struts-2.3.dtd" >
<struts>
	<package name="default" namespace="/" extends="struts-default">
		<action name="customer_*" class="customerAction" method="{1}">
			<result name="list">/list.jsp</result>
		</action>
	</package>
</struts>
(8) 設定web.xml
<?xml version="1.0" encoding="UTF-8"?>
<web-app xmlns:xsi="http://www.w3.org/2001/XMLSchema-instance"
	xmlns="http://java.sun.com/xml/ns/javaee"
	xsi:schemaLocation="http://java.sun.com/xml/ns/javaee http://java.sun.com/xml/ns/javaee/web-app_2_5.xsd"
	version="2.5">


	<!-- spring上下文組態檔路徑 -->

	<context-param>

		<param-name>contextConfigLocation</param-name>
		<param-value>classpath:applicationContext.xml</param-value>

	</context-param>

	<!-- 載入spring上下文 -->

	<listener>

		<listener-class>org.springframework.web.context.ContextLoaderListener</listener-class>

	</listener>


	<!-- Hibernate lazy load -->
	<filter>
		<filter-name>openSessionInView</filter-name>
		<filter-class>org.springframework.orm.hibernate5.support.OpenSessionInViewFilter</filter-class>
	</filter>
	<filter-mapping>
		<filter-name>openSessionInView</filter-name>
		<url-pattern>/*</url-pattern>
	</filter-mapping>

	<!-- struts2 -->

	<filter>
		<filter-name>struts</filter-name>
		<filter-class>org.apache.struts2.dispatcher.ng.filter.StrutsPrepareAndExecuteFilter</filter-class>

	</filter>

	<filter-mapping>
		<filter-name>struts</filter-name>
		<url-pattern>/*</url-pattern>

	</filter-mapping>

</web-app>
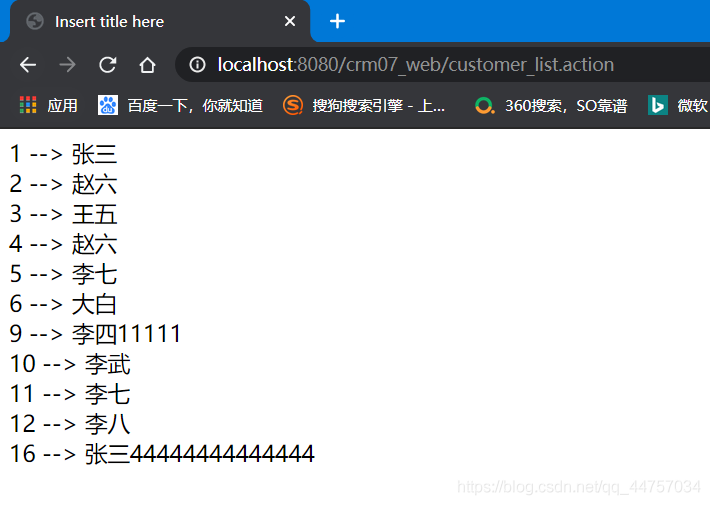
16、執行專案
存取成功
