6.Fabric區塊瀏覽器的部署
Fabric 2.0 區塊瀏覽器
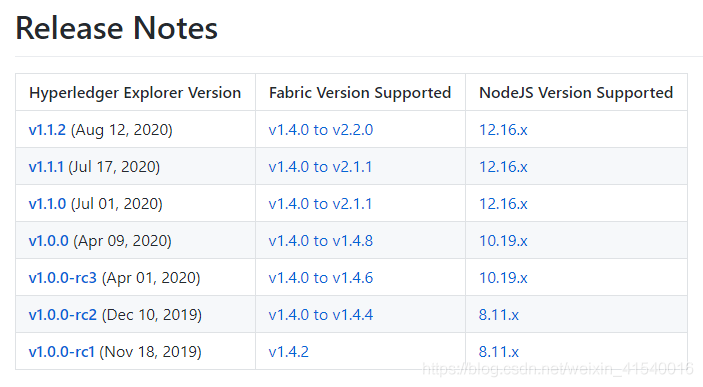
Fabric使用的版本是V2.0.0,瀏覽器的版本是v1.1.2,在官網中可以查詢到fabric與block-explorer的版本對應
官網地址:https://github.com/hyperledger/blockchain-explorer/blob/v1.1.2/README.md
瀏覽器版本與fabric版本的對應關係

文章目錄
前提
本文基於docker部署, 並以CA元件已經完全實現,並需要對CA有一定的瞭解,至少能夠區分出tls證書和msp證書才可以進行部署.使用的證書,全部是通過CA服務獲取的,也就是自定義的證書,當然對於block-explorer我也還有很多沒有弄清楚的地方,還需深入學習,然後再完善檔案
提示:以下是本篇文章正文內容,下面案例可供參考
一、目標
通過本文,能夠以自定義部署的fabric網路為基礎, 實現部署單機版瀏覽器
二、部署步驟
1.映象準備
區塊鏈瀏覽器會使用到 hyperledger/explorer映象和 hyperledger/explorer-db映象
使用docker獲取 hyperledger/explorer 映象
我的docker源使用的是
https://download.docker.com/linux/centos/docker-ce.repo

# 拉取 hyperledger/explorer 映象,其中版本需要對應你的fabric版本
docker pull hyperledger/explorer:1.1.2
# 拉取 hyperledger/explorer-db 資料庫映象
docker pull hyperledger/explorer-db:latest
2.檔案准備
部署瀏覽器需要用到一下三個檔案
config.json : 多網路組態檔
first-network.json : 網路組態檔,包含身份的指定
docker-compose.yaml : 部署設定
block-explorer原始碼下載地址
上述的三個檔案在原始碼位置
config.json在原始碼中的路徑為block-explorer/examples/net1/config.json
first-network.json在原始碼中的路徑為block-explorer/examples/net1/connection-profile/first-network.json
docker-compose.yaml在原始碼中的路徑為block-explorer/docker-compose.yaml
建議: 關於設定的說明在block-explorer/README-CONFIG.md檔案中有說明,建議先閱讀此說明
我在這三個檔案中的修改並不多,我會指原始檔和修改後的檔案
1.config.json
{
	"network-configs": {
		"first-network": {
			# 原設定 "name": "first-network", 此設定為你的docker network 名稱
			"name": "dev",
			# 原設定 "profile": "./connection-profile/first-network.json"
			# 指定first-network.json 的具體路徑
			"profile": "/usr/local/home/explor/first-network.json"
		}
	},
	"license": "Apache-2.0"
}
2.first-network.json
{
	# 原設定 "name": "first-network", 指定的docker network名稱
	"name": "first-network",
	"version": "1.0.0",
	"client": {
		"tlsEnable": true,
		"adminCredential": {
			# 原設定 "id": "exploreradmin", 登入瀏覽器的賬號
			"id": "admin",
			# 原設定 "password": "exploreradminpw" 登入瀏覽器的密碼
			"password": "admin"
		},
		# 是否開啟免密登入到瀏覽器 false表示免密存取瀏覽器
		"enableAuthentication": true,
		# 身份MSPID 與configtx.yaml中的Organizations:orgx:ID 對應
		"organization": "Org1MSP",
		"connection": {
			"timeout": {
				"peer": {
					"endorser": "300"
				},
				"orderer": "300"
			}
		}
	},
	"channels": {
	    # 通道名稱
		"mychannel": {
			"peers": {
				# 原設定 "peer0.org1.example.com": {}
				"peer1-org1": {}
			},
			"connection": {
				"timeout": {
					"peer": {
						"endorser": "6000",
						"eventHub": "6000",
						"eventReg": "6000"
					}
				}
			}
		}
	},
	"organizations": {
	    # 原設定 "Org1MSP" 身份MSPID
		"Org1MSP": {
			"mspid": "Org1MSP",
			# org1的admin下的msp/keystore/下的證書,證書的名字必須以_sk結尾
			"adminPrivateKey": {
				"path": "/usr/local/home/org1/admin/msp/keystore/priv_sk"
			},
			# 原設定 "peers": ["peer0.org1.example.com"], 節點名稱
			"peers": ["peer1-org1"],
			# org1的admin下的msp/signcerts下的證書
			"signedCert": {
				"path": "/usr/local/home/org1/admin/msp/signcerts/cert.pem"
			}
		}
	},
	"peers": {
		# 原設定 "peer0.org1.example.com": 節點名稱
		"peer1-org1": {
		    # tls證書路徑,也就是 tls-ca啟動時生成的ca-cert.pem檔案
			"tlsCACerts": {
				"path": "/usr/local/home/tls-ca/crypto/ca-cert.pem"
			},
			# 節點地址
			"url": "grpcs://peer1-org1:7051"
		}
	}
}
3.docker-compose.yaml
# SPDX-License-Identifier: Apache-2.0
version: '2.1'

volumes:
  pgdata:
  walletstore:

networks:
  byfn:
    external:
      name: dev

services:

  explorerdb.mynetwork.com:
    image: hyperledger/explorer-db:latest
    container_name: explorerdb.mynetwork.com
    hostname: explorerdb.mynetwork.com
    environment:
      - DATABASE_DATABASE=fabricexplorer
      # 賬號密碼 需要與下面的設定對應
      - DATABASE_USERNAME=admin
      - DATABASE_PASSWORD=admin
    healthcheck:
      test: "pg_isready -h localhost -p 5432 -q -U postgres"
      interval: 30s
      timeout: 10s
      retries: 5
    volumes:
      - pgdata:/var/lib/postgresql/data
    networks:
      - byfn

  explorer.mynetwork.com:
    image: hyperledger/explorer:1.1.2
    container_name: explorer.mynetwork.com
    hostname: explorer.mynetwork.com
    environment:
      - DATABASE_HOST=explorerdb.mynetwork.com
      - DATABASE_DATABASE=fabricexplorer
      # 賬號密碼 需要與上面的設定對應
      - DATABASE_USERNAME=admin
      - DATABASE_PASSWD=admin
      - LOG_LEVEL_APP=debug
      - LOG_LEVEL_DB=debug
      - LOG_LEVEL_CONSOLE=debug
      - LOG_CONSOLE_STDOUT=true
      # 瀏覽器是否開啟遠端存取, true表示只有部署的機器可以存取
      - DISCOVERY_AS_LOCALHOST=false
    volumes:
      - /usr/local/home/explor:/usr/local/home/explor
      # config.json組態檔掛載進容器
      - /usr/local/home/explor/config.json:/opt/explorer/app/platform/fabric/config.json
      - /usr/local/home/explor/:/opt/explorer/app/platform/fabric/
      # 我證書的根目錄
      - /usr/local/home/:/usr/local/home
      - walletstore:/opt/wallet
    command: sh -c "node /opt/explorer/main.js && tail -f /dev/null"
    ports:
      - 8080:8080
    depends_on:
      explorerdb.mynetwork.com:
        condition: service_healthy
    networks:
      - byfn
3.部署
啟動瀏覽器
docker-compose -f docker-compose.yaml up -d
關閉瀏覽器
docker-compose -f node4.yaml down --volumes --remove-orphans
注意: 刪除容器一定要用 docker-compose命令關閉或刪除容器,因為資料庫會外掛檔案,如果使用docker rm -f 刪除 則不會刪除外掛檔案,引起其他很多問題,所以一定要通過docker-compose關閉服務
4.存取
需要開放伺服器的8080埠用於存取區塊瀏覽器  network = config.json中的name user = first-network.json中的 client:adminCredential:id passwork = first-network.json中的 client:adminCredential:passwork 
總結
使用docker部署整體感覺來說還不算複雜,但是需要對證書有很好的的理解,另外經過親測,啟動瀏覽器後新增通道並部署新的鏈碼,瀏覽器也會自動載入,至於瀏覽器載入資料的機制還不知道,後續在研究
待完成
1.瀏覽器原始碼剖析
2.瀏覽器資料同步機制
3.瀏覽器叢集部署