Vue專案中使用非同步元件來優化效能

在使用JavaScript框架建立大型應用程式時,考慮元件結構非常重要。通過考慮元件結構,可以避免在執行時載入每個元件並減慢應用程式的速度。在構建應用程式時,您還可以避免向使用者返回不必要的資料或建立整體糟糕的使用者體驗。
React和Angular等框架分別使用React.lazy()和路由模型來考慮元件結構。
在這篇文章中,我們將實現兩個演示,看看Vue如何使用非同步元件,通過使用延遲載入和程式碼分割技術來減少應用程式的載入時間。
在Vue中建立元件
為了理解它是如何工作的,讓我們從建立一個基本元件開始。
導航到您的終端,安裝Vue的CLI,並建立一個專案:
npm install -g vue/cli
vue create book-project
#choose the default setting when prompted
在我們的新專案資料夾中,讓我們替換預設檔案的內容,其中包括helloworld.vue和app.vue。我們將從建立圖書捐贈頁面開始。將helloworld.vue重新命名為book.vue,並將其內容替換為以下內容:
<!--Book.vue-->
<template>
  <h1>Donate Books</h1>
</template>
然後,用以下內容替換App.vue的內容:
<!--App.vue-->
<template>
  <div>
    <book></book>
  </div>
</template>

<script>
  Import Book from "./components/Book"
  export default {
    components: {
      Book
    }
  }
</script>

<style>
#app {
  font-family: 'Avenir', Helvetica, Arial, sans-serif;
  -webkit-font-smoothing: antialiased;
  -moz-osx-font-smoothing: grayscale;
  text-align: center;
  color: #2c3e50;
  margin-top: 60px;
}
</style>在上面的程式碼塊中,您會注意到Book元件是靜態匯入的。 這意味著Book元件在每次載入應用程式時都會載入。
接下來,在終端中執行npm run serve,導航至localhost:8080,然後檢視您的基本元件:

現在,每次載入應用程式時載入Book元件似乎不是一個重要的效能問題。但是,隨著應用程式越來越大,在執行時載入每個元件將變得很麻煩。
您的使用者不會與應用程式中的每個功能都進行互動,因此只提供他們需要的功能是有意義的。問題是,如何只載入使用者需要的內容?
這就是延遲載入和程式碼分割技術發揮作用的地方。延遲載入會延遲元件的初始載入,在使用者導航到位於頁面上的位置之前,會阻止載入影象等資源。
程式碼分割是webpack最初提供的一個特性。Webpack允許您將程式碼分割成僅在需要時使用的各種包。
Vue通過一個稱為動態匯入的特性執行程式碼分解。
此匯入使用webpack(或任何模組繫結器,如Parcel)非同步載入元件。它的語法包含一個承諾,幷包裝在一個箭頭函數:
// dynamic import
import("./components/Book").then(Book => {
  // Insert the Book module here
});
讓我們實現這個在我們的App.vue元件:
<template>
  <div>
    <book></book>
  </div>
</template>

<script>
export default {
  components: {
    Book: () => import("./components/Book")
  }
};
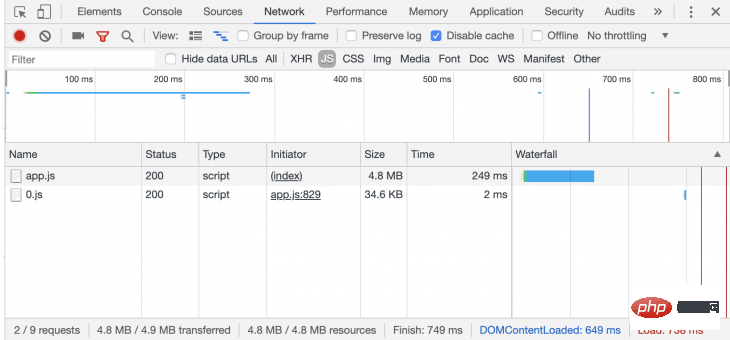
</script>在上面的程式碼範例中,import()函數返回Book元件,這使我們能夠非同步載入它。 如果我們在瀏覽器devtools中檢視「網路」標籤,則有一個由App.js發起的名為0.js的檔案。 該檔案包含我們的非同步元件:

使用非同步元件建立一個Vue應用程式
讓我們繼續構建一個基本的圖書捐贈應用程式,以展示如何利用非同步元件。最後,我們只想在使用者單擊Donate按鈕時載入Donate元件。
首先,讓我們導航到終端並在我們的專案資料夾中安裝vue-material。我們將使用這個樣式的應用程式:
cd book-project
npm i vue-material
我們將在應用程式中包括vue-material匯入它在src/main.js:
import Vue from 'vue'
import App from './App.vue'
Vue.config.productionTip = false
import VueMaterial from 'vue-material'
import 'vue-material/dist/vue-material.min.css'
import 'vue-material/dist/theme/default.css'
Vue.use(VueMaterial)
new Vue({
  render: h => h(App),
}).$mount('#app')現在,讓我們來構建之前建立的Book元件:
<!--Book.vue-->
    <template>
     <div id="app">
      <md-card md-with-hover v-for="(book, key) in books" v-bind:key="key">
          <md-ripple>
            <md-card-header>
              <div class="md-title">{{book.name}}</div>
              <div class="md-subhead">{{book.genre}}</div>
            </md-card-header>
            <md-card-actions>
        <md-button type="primary" @click="addBook(key)">Donate to improve {{book.genre}}</md-button>
            </md-card-actions>
          </md-ripple>
        </md-card>
        <div v-if="show">
          <md-card-content>
         <donate v-bind:selectList="selectList"></donate>
          </md-card-content>
    </div>
        <md-button @click="show = true" id="donate">Donate {{selectList.length}} book(s)</md-button>
      </div>
    </template>

    <script>
      export default {
      name: 'RegularButtons',
      methods: {
        addBook (key) {
          if(!this.selectList.includes(key)) {
            this.selectList.push(key);
          }
        }
      },
      components: {
        donate: () => import('./Donate')
      },
      data: () => ({
        books: [
          { name: 'Using Creatine', genre: 'Workouts' },
          { name: 'Learn Parkour', genre: 'Sports' },
          { name: 'Snorkelling', genre: 'Diving' },
        ],
        selectList: [],
        show: false
      })
    }
</script>在上面的程式碼塊中,圖書列表從圖書陣列中檢索並顯示。如果使用者單擊每本書的按鈕,addBook()方法將選擇的書推入selectList陣列,並顯示捐贈圖書的總數。
還有一個單獨的按鈕,專門用於載入非同步元件。它的引數show設定為true。這使得v-if語句能夠顯示donate元件,該元件包含所選書籍的數量。
donate元件已經通過<script>標記中的components屬性動態匯入。
讓我們建立donate元件。在src/components資料夾中,建立一個名為Donate的新檔案。並輸入下面的程式碼範例:
<template>
      <div title="Donate Books" key="donate">
          <p v-for="(x, y) in this.selectList" :key="y">
          Tip: {{books[Number(x)].name}} is about {{books[Number(x)].genre}}
          </p>
      </div>
</template>
<script>
export default {
  props: ['selectList'],
  data: () => ({
    books: [
      { name: 'Using Creatine', genre: 'Workouts' },
      { name: 'Learn Parkour', genre: 'Sports' },
      { name: 'Snorkelling', genre: 'Underwater' },
    ]
  })
}
</script>導航到您的終端並執行npm run serve。
如果應用程式編譯成功,在瀏覽器中開啟localhost:8080。當你在Devtools中檢視網路標籤時點選應用程式,當你點選Donate按鈕時,Donate元件才會載入。
非同步元件的錯誤處理
非同步元件需要儘可能簡單,以便快速載入。但是,在我們的非同步元件中定義載入和錯誤元件有助於處理載入狀態並在需要時顯示錯誤訊息。
In src/components, let's create two components: LoadingState.vue and ErrorState.vue:
<!--LoadingState.vue-->
    <template>
      <p><em>Loading...</em></p>
    </template>
<!--ErrorState.vue-->
<template>
<p>Could not display books. Kindly check your internet conection.</p>
</template>現在,在App.vue中,我們將匯入兩個元件並將它們新增到Book元件中:
<!--App.vue-->
<script>
import LoadingState from "./components/LoadingState"
import ErrorState from "./components/ErrorState"
const Book = import("./components/Book")
export default {
  components: {
    Book: () => ({
// Book is our default component
      component: Book,
// LoadingState is the component that is displayed while our default component
// is loading
      loading: LoadingState,
// ErrorState is the component that is displayed should our default component have an // error while loading
      error: ErrorState,
// A delay is set up before the loading component is shown
      delay: 100,
// Should this timeout be reached, the default component is considered to have failed // to load
      timeout: 2000
    })
  }
};
</script>
載入和錯誤狀態不會出現,除非你有一個非常緩慢或錯誤的網際網路連線。為了測試它們是否工作正常,我們將timeout屬性設定為0,並嘗試載入應用程式。
結論
使用非同步元件構建大型應用程式是保持最佳效能的關鍵。非同步元件不僅可以確保由於更快的載入時間,您的保留率會更高,而且還可以幫助您更有效地檢測錯誤,因為元件的作用域是作為函數傳遞的。如果你想看看這個演示的原始碼,你可以在GitHub上找到它。
相關推薦:
更多程式設計相關知識,請存取:!!
以上就是Vue專案中使用非同步元件來優化效能的詳細內容,更多請關注TW511.COM其它相關文章!