2006-京淘Day04
1.Ajax加強
1.1 Ajax特點
使用ajax特點為: 區域性重新整理,非同步響應.
同步缺點: 如果進行了同步的請求,那麼使用者不可以做任何的操作,只能等待任務的完成. 使用者的友好性差.
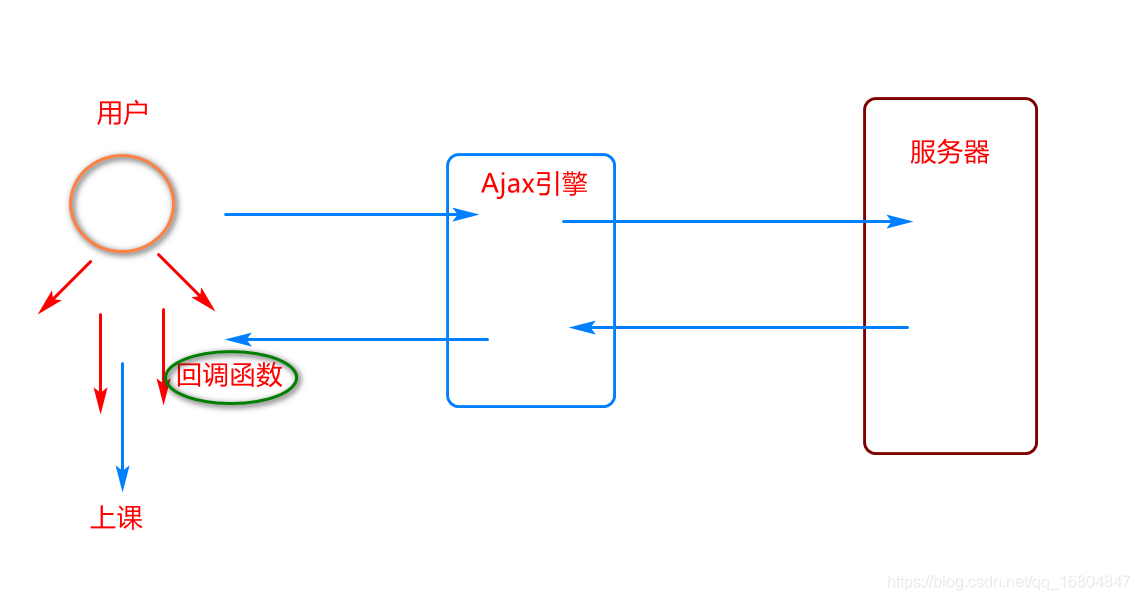
1.2 關於Ajax呼叫說明
<%@ page language="java" contentType="text/html; charset=utf-8" pageEncoding="utf-8"%>
<%@ taglib uri="http://java.sun.com/jsp/jstl/core" prefix="c"%>
<!DOCTYPE html PUBLIC "-//W3C//DTD HTML 4.01 Transitional//EN" "http://www.w3.org/TR/html4/loose.dtd">
<html>
<head>
<title>您好Springboot</title>
<script type="text/javascript" src="/js/jquery-3.4.1.min.js"></script>
<script type="text/javascript">
     /**
          for語法1:
            for(let i=0;i<xxx.length;i++){
                .....
            }

          for語法2:   index  代表下標
           for(let index in data){
                console.log("測試for迴圈")
                let user = data[index];
                alert(user.name);
           }

           for語法3:   user當前迴圈遍歷的物件
               for(let user of data){
                    console.log("for迴圈測試:"+user.name);
               }

           **/


	$(function(){

		$.ajax({
			type : "get",
			url  : "/findAjax",
			//dataType : "text/json/html/xml",		//返回值型別
			async : false,	//關閉非同步操作,改為同步的請求
			success : function(data){
				let trs = "";
	            for(let user of data){
	               let id = user.id;
	               let name = user.name;
	               let age = user.age;
	               let sex = user.sex;
	               trs += "<tr align='center'><td>"+id+"</td><td>"+name+"</td><td>"+age+"</td><td>"+sex+"</td></tr>"
	            }
	            $("#tab1").append(trs);
			},
			error : function(){
				alert("請求異常!!!!");
			}
		})


        //1. $.get(url,data,回撥函數)
        //findAjax查詢後端userList集合資訊.
       /*  $.get("/findAjax",function(data){

            $(data).foreach(function(index,user){
				console.log(user);
               })

            let trs = "";
            for(let user of data){
               let id = user.id;
               let name = user.name;
               let age = user.age;
               let sex = user.sex;
               trs += "<tr align='center'><td>"+id+"</td><td>"+name+"</td><td>"+age+"</td><td>"+sex+"</td></tr>"
            }
            $("#tab1").append(trs);
        }); */

	});

</script>


</head>
<body>
	<table id="tab1" border="1px" width="65%" align="center">
		<tr>
			<td colspan="6" align="center"><h3>學生資訊</h3></td>
		</tr>
		<tr>
			<th>編號</th>
			<th>姓名</th>
			<th>年齡</th>
			<th>性別</th>
		</tr>
	</table>
</body>
</html>
2. 京淘專案架構設計
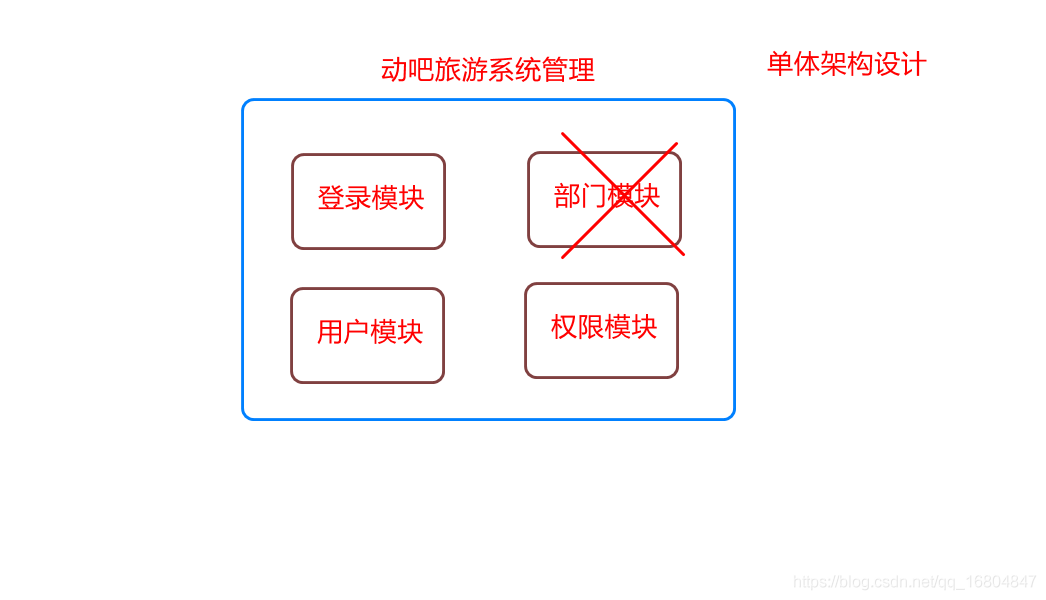
2.1 傳統專案架構設計問題
說明:由於單體專案將所有的模組都寫到了一起,將來如果其中一個模組出現了問題,將導致整個專案不能正常的執行.
2.2 分散式架構設計
2.2.1 分散式介紹
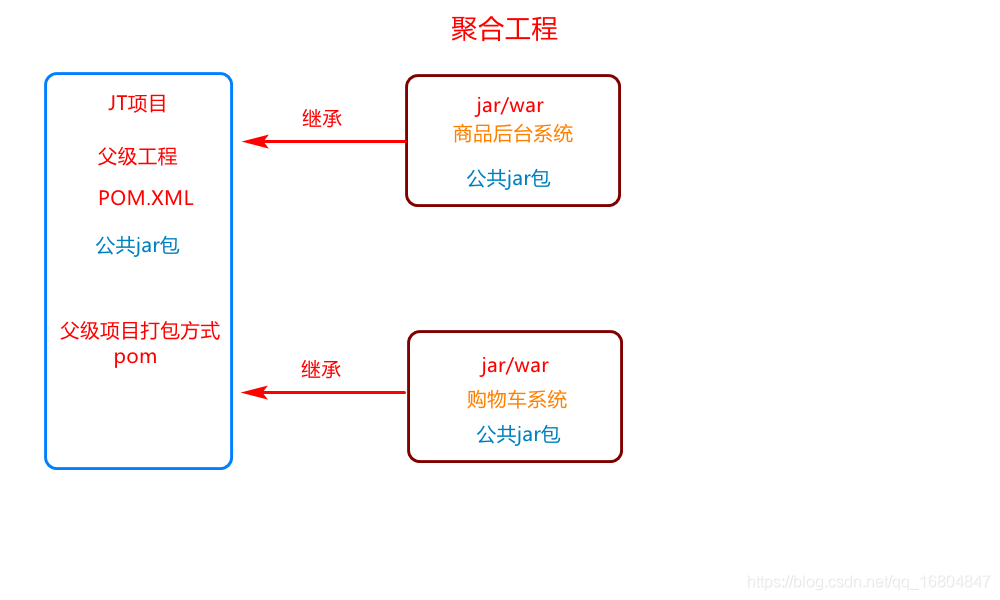
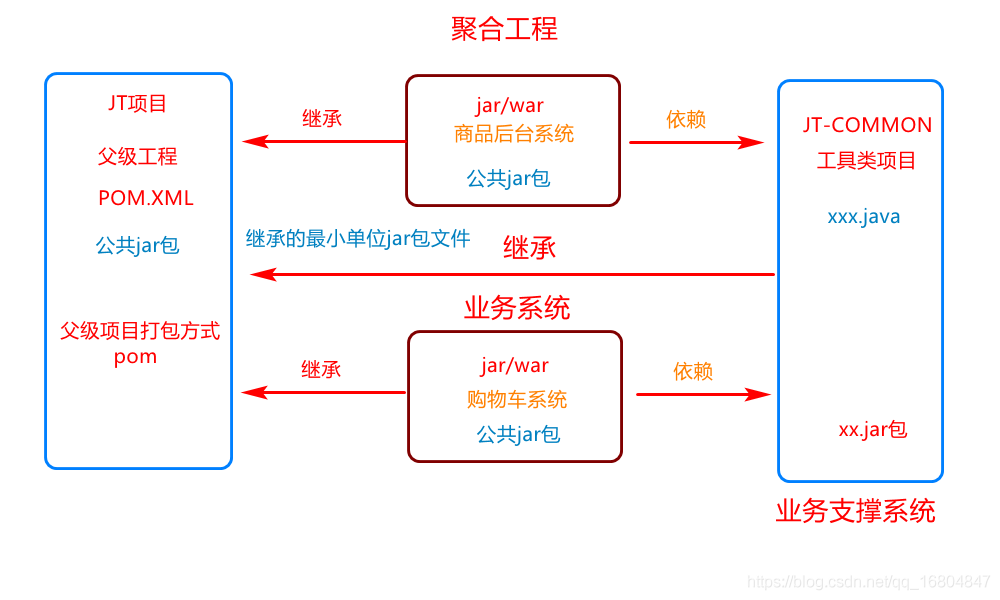
由於傳統專案導致各個模組之間的耦合性較高.所以需要採用分散式的思想將專案進行拆分.
核心理念: 化整為零 將專案按照某些特定的規則進行拆分.
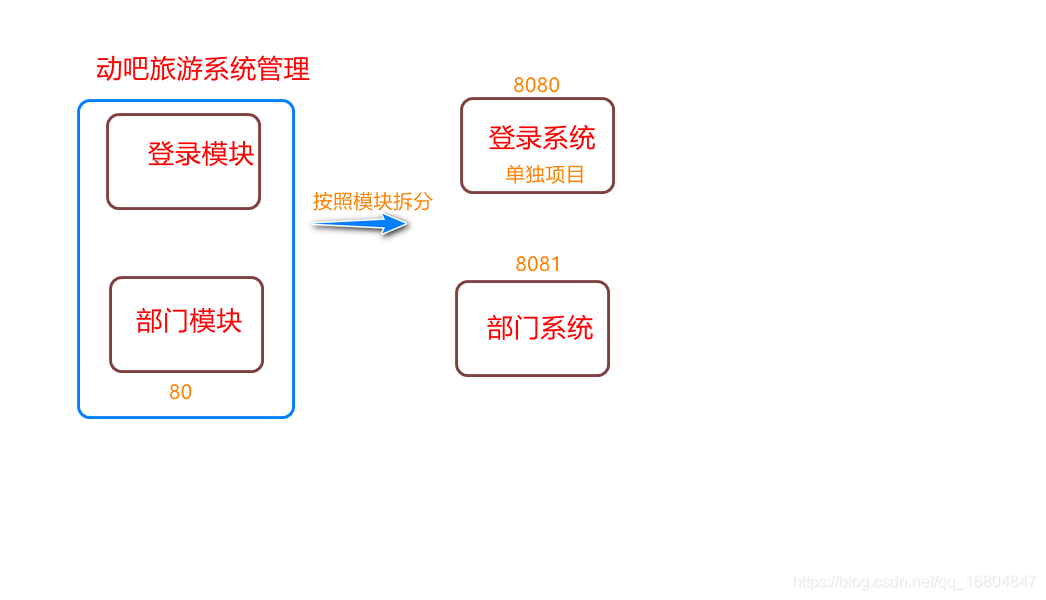
2.2.2 按照功能模組拆分
說明:由於單體專案的耦合性高,所以需要按照功能模組進行拆分.降低系統架構的耦合性
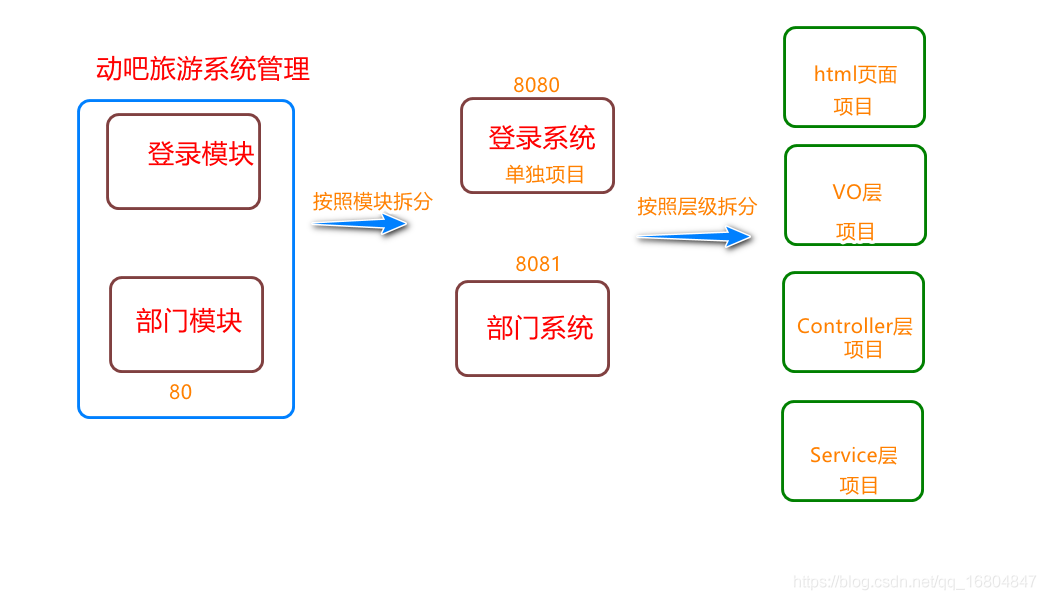
2.2.3 按照層級拆分
在按照模組拆分的基礎之上,將專案按照層級拆分,將粒度控制的更加的具體.分工更加的明確,有效的提高軟體的開發效率.
2.3 分散式思想帶來的問題
2.3.1 分散式思想jar包如何維護?
2.3.2 分散式思想中工具api如何管理?
2.4 建立父級工程
2.4.1 建立專案
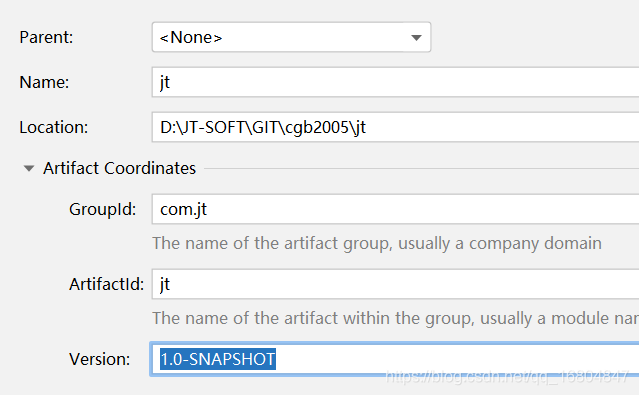
2.4.2 編輯 pom.xml檔案
<?xml version="1.0" encoding="UTF-8"?>
<project xmlns="http://maven.apache.org/POM/4.0.0"
         xmlns:xsi="http://www.w3.org/2001/XMLSchema-instance"
         xsi:schemaLocation="http://maven.apache.org/POM/4.0.0 http://maven.apache.org/xsd/maven-4.0.0.xsd">
    <modelVersion>4.0.0</modelVersion>
    <groupId>com.jt</groupId>
    <artifactId>jt</artifactId>
    <version>1.0-SNAPSHOT</version>
    <!--定義父級工程打包型別-->
    <packaging>pom</packaging>


    <!--1.引入springBoot 父級專案-->
    <parent>
        <groupId>org.springframework.boot</groupId>
        <artifactId>spring-boot-starter-parent</artifactId>
        <version>2.3.4.RELEASE</version>
        <relativePath/> <!-- lookup parent from repository -->
    </parent>

    <!--2.引入屬性的設定-->
    <properties>
        <java.version>1.8</java.version>
        <!--跳過測試類打包-->
        <skipTests>true</skipTests>
    </properties>

    <!--3.在父級專案中新增jar包檔案-->
    <dependencies>
        <dependency>
            <groupId>org.springframework.boot</groupId>
            <artifactId>spring-boot-starter-web</artifactId>
        </dependency>

        <dependency>
            <groupId>org.springframework.boot</groupId>
            <artifactId>spring-boot-starter-test</artifactId>
            <scope>test</scope>
            <exclusions>
                <exclusion>
                    <groupId>org.junit.vintage</groupId>
                    <artifactId>junit-vintage-engine</artifactId>
                </exclusion>
            </exclusions>
        </dependency>

        <!--引入外掛lombok 自動的set/get/構造方法外掛  -->
        <dependency>
            <groupId>org.projectlombok</groupId>
            <artifactId>lombok</artifactId>
        </dependency>

        <!--引入資料庫驅動 -->
        <dependency>
            <groupId>mysql</groupId>
            <artifactId>mysql-connector-java</artifactId>
            <scope>runtime</scope>
        </dependency>

        <!--springBoot資料庫連線  -->
        <dependency>
            <groupId>org.springframework.boot</groupId>
            <artifactId>spring-boot-starter-jdbc</artifactId>
        </dependency>

        <!--spring整合mybatis-plus -->
        <dependency>
            <groupId>com.baomidou</groupId>
            <artifactId>mybatis-plus-boot-starter</artifactId>
            <version>3.2.0</version>
        </dependency>

        <!--springBoot整合JSP新增依賴  -->
        <!--servlet依賴 -->
        <dependency>
            <groupId>javax.servlet</groupId>
            <artifactId>javax.servlet-api</artifactId>
        </dependency>

        <!--jstl依賴 -->
        <dependency>
            <groupId>javax.servlet</groupId>
            <artifactId>jstl</artifactId>
        </dependency>

        <!--使jsp頁面生效 -->
        <dependency>
            <groupId>org.apache.tomcat.embed</groupId>
            <artifactId>tomcat-embed-jasper</artifactId>
        </dependency>

        <!--支援熱部署 -->
        <dependency>
            <groupId>org.springframework.boot</groupId>
            <artifactId>spring-boot-devtools</artifactId>
        </dependency>

        <!--新增httpClient jar包 -->
        <dependency>
            <groupId>org.apache.httpcomponents</groupId>
            <artifactId>httpclient</artifactId>
        </dependency>

        <!--引入dubbo設定 -->
        <!--<dependency>
            <groupId>com.alibaba.boot</groupId>
            <artifactId>dubbo-spring-boot-starter</artifactId>
            <version>0.2.0</version>
        </dependency>-->

        <!--新增Quartz的支援 -->
       <!-- <dependency>
            <groupId>org.springframework.boot</groupId>
            <artifactId>spring-boot-starter-quartz</artifactId>
        </dependency>-->

        <!-- 引入aop支援 -->
        <dependency>
            <groupId>org.springframework.boot</groupId>
            <artifactId>spring-boot-starter-aop</artifactId>
        </dependency>

        <!--spring整合redis -->
        <dependency>
            <groupId>redis.clients</groupId>
            <artifactId>jedis</artifactId>
        </dependency>
        <dependency>
            <groupId>org.springframework.data</groupId>
            <artifactId>spring-data-redis</artifactId>
        </dependency>
    </dependencies>

    <!--父級工程只是專案的管理者不會在其中編輯程式碼 所以不要新增build-->


</project>
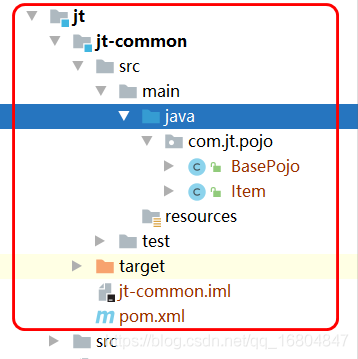
2.5 編輯工具API專案 jt-common
2.5.1 建立專案
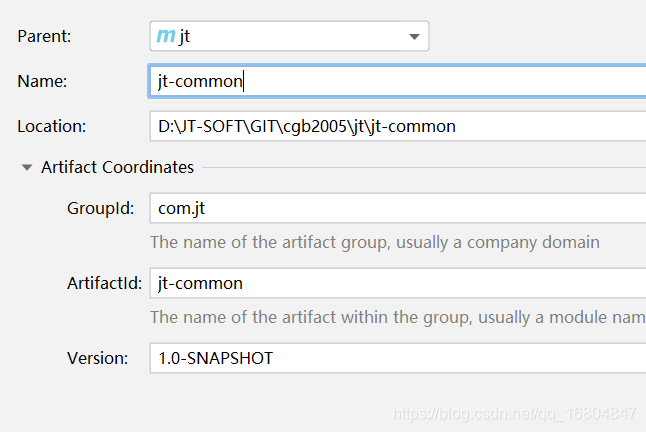
2.5.2 匯入src檔案
說明:將課前資料中的jt-common中的src匯入專案即可
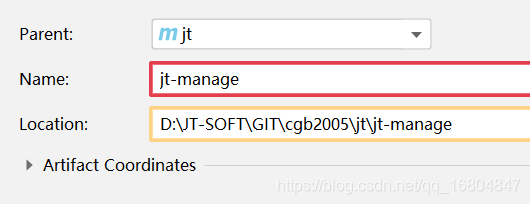
2.6 定義jt-manage專案
2.6.1 建立專案
2.6.2 編輯pom.xml檔案
注意新增繼承/依賴/外掛
<?xml version="1.0" encoding="UTF-8"?>
<project xmlns="http://maven.apache.org/POM/4.0.0"
         xmlns:xsi="http://www.w3.org/2001/XMLSchema-instance"
         xsi:schemaLocation="http://maven.apache.org/POM/4.0.0 http://maven.apache.org/xsd/maven-4.0.0.xsd">
    <modelVersion>4.0.0</modelVersion>
    <artifactId>jt-manage</artifactId>
    <!--指定打包方式-->
    <packaging>war</packaging>


    <!--指定父級專案-->
    <parent>
        <artifactId>jt</artifactId>
        <groupId>com.jt</groupId>
        <version>1.0-SNAPSHOT</version>
    </parent>

    <!--2.新增依賴資訊-->
    <dependencies>
        <dependency>
            <groupId>com.jt</groupId>
            <artifactId>jt-common</artifactId>
            <version>1.0-SNAPSHOT</version>
        </dependency>
    </dependencies>

    <!--3.新增外掛-->
    <build>
        <plugins>
            <plugin>
                <groupId>org.springframework.boot</groupId>
                <artifactId>spring-boot-maven-plugin</artifactId>
            </plugin>
        </plugins>
    </build>

</project>
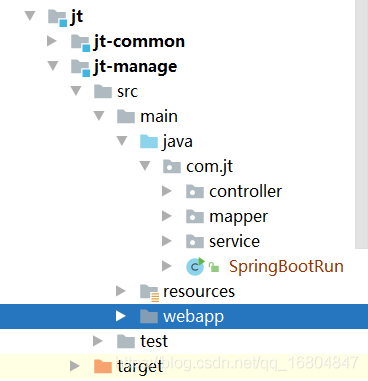
2.6.3 匯入src檔案
說明:將課前資料中的jt-manage中的src檔案匯入即可
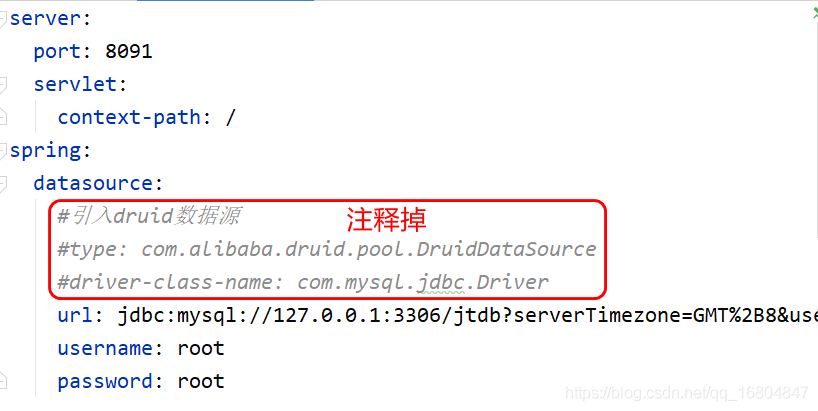
2.6.4 修改YML組態檔
2.6.5 啟動項設定
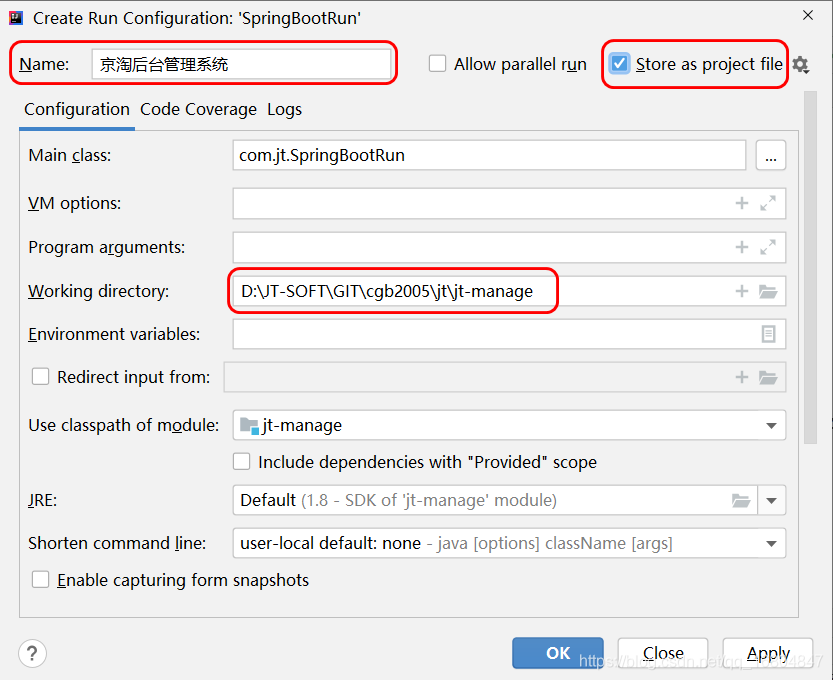
2.6.6 存取測試
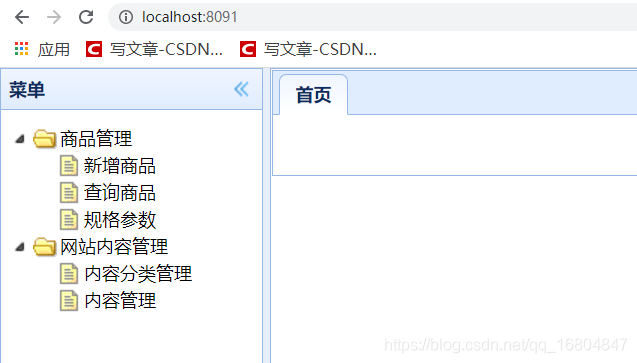
2.7 專案預設頁面跳轉說明
步驟:
1. http://localhost:8091/
2. 預設機制http://localhost:8091/index請求… 被springBoot程式優化過了.
3. 利用預設工具API
WelcomePageHandlerMapping : Adding welcome page template: index
動態的發起的/index請求,之後配合檢視解析器形成動態的頁面路徑:
/WEB-INF/views/index.jsp
注意事項:
當使用SpringBoot程式時,可以通過預設值存取,但是系統的首頁的名稱必須為index.xxxx
3 關於京淘頁面學習
3.1 EasyUI框架
easyui是一種基於jQuery、Angular.、Vue和React的使用者介面外掛集合。
easyui為建立現代化,互動,JavaScript應用程式,提供必要的功能。
使用easyui你不需要寫很多程式碼,你只需要通過編寫一些簡單HTML標記,就可以定義使用者介面。
easyui是個完美支援HTML5網頁的完整框架。
easyui節省您網頁開發的時間和規模。
easyui很簡單但功能強大的。
3.2 EasyUI入門案例
3.2.1 匯入函數類庫
<!--引入jquery的js,EasyUI的執行需要依賴於jQuery  -->
<script type="text/javascript"
	src="/js/jquery-easyui-1.4.1/jquery.min.js"></script>
<!--easyUI的js主檔案  -->
<script type="text/javascript"
	src="/js/jquery-easyui-1.4.1/jquery.easyui.min.js"></script>
<!--國際化的js檔案  -->
<script type="text/javascript"
	src="/js/jquery-easyui-1.4.1/locale/easyui-lang-zh_CN.js"></script>
<!--引入easyUI的樣式  -->
<link rel="stylesheet" type="text/css"
	href="/js/jquery-easyui-1.4.1/themes/icon.css" />
<link rel="stylesheet" type="text/css"
	href="/js/jquery-easyui-1.4.1/themes/default/easyui.css" />
3.2.2 編輯頁面程式碼
<body>
		<!--easyUI入門案例  只要引入特定的樣式就可以有對應的功能-->
		<div class="easyui-draggable">拖動DIV</div>
		<div class="easyui-draggable">測試div</div>
	</body>
3.3 關於後臺頁面說明
3.3.1 關於頁面佈局說明
<body class="easyui-layout">

   <-- data-options 是UI框架的特定的屬性 -->
   <div data-options="region:'west',title:'選單',split:true" style="width:25%;"></div>
   <div data-options="region:'center',title:'首頁'"></div>

</body>
3.3.2 樹形結構展現
<ul class="easyui-tree">

  	<li>
  	<span>商品管理</span>
	  	<ul>
	  		<li>商品查詢</li>
	  		<li>商品新增</li>
	  		<li>商品編輯</li>
	  		<li>
	  		    <span>三級標題</span>
	  		    <ul>
	  		        <li>11</li>
	  		        <li>22</li>
	  		        <li>33</li>
	  		    </ul>
	  		</li>
	  	</ul>
  	</li>
  	</ul>
3.3.3 索引標籤技術
function addTab(title, url){
    if ($('#tt').tabs('exists', title)){
        $('#tt').tabs('select', title);
    } else {
        //iframe  畫中畫的效果
        var url2 = "https://map.baidu.com/search/%E5%85%A8%E5%9B%BD/@12959219.601961922,4825334.624608941,5z?querytype=s&wd=%E5%85%A8%E5%9B%BD&c=1&provider=pc-aladin&pn=0&device_ratio=1&da_src=shareurl";
        var content = '<iframe scrolling="auto" frameborder="0"  src="'+url2+'" style="width:100%;height:100%;"></iframe>';
        $('#tt').tabs('add',{
            title:title,
            content:content,
            closable:true
        });
    }
}
4 京淘後臺商品業務實現
4.1 表設計
create table tb_item
(
   id                   bigint(10) not null auto_increment comment '商品ID,也是商品編號',
   title                varchar(100),
   sell_point           varchar(150),
   price                bigint(20) comment '單位為:分',
   num                  int(10),
   barcode              varchar(30),
   image                varchar(500) comment '最多5張圖片',
   cid                  bigint(10),
   status               int(1) default 1 comment '預設值為1,可選值:1正常,2下架,3刪除',
   created              datetime,
   updated              datetime comment '列表排序時按修改時間排序,所以在新增時需要設定此值。',
   primary key (id)
);
4.2 編輯POJO
@JsonIgnoreProperties(ignoreUnknown=true) //表示JSON轉化時忽略未知屬性
@TableName("tb_item")
@Data
@Accessors(chain=true)
public class Item extends BasePojo{
	@TableId(type=IdType.AUTO)
	private Long id;				//商品id
	private String title;			//商品標題
	private String sellPoint;		//商品賣點資訊
	private Long   price;			//商品價格 0.98 * 100 = 98 /100 = 0.98
	private Integer num;			//商品數量
	private String barcode;			//條形碼
	private String image;			//商品圖片資訊   1.jpg,2.jpg,3.jpg
	private Long   cid;				//表示商品的分類id
	private Integer status;			//1正常,2下架

	//為了滿足頁面呼叫需求,新增get方法
	public String[] getImages(){

		return image.split(",");
	}
}
4.3 通用頁面跳轉實現
4.3.1 頁面url標識
				<ul>
	         		<li data-options="attributes:{'url':'/page/item-add'}">新增商品</li>
	         		<li data-options="attributes:{'url':'/page/item-list'}">查詢商品</li>
	         		<li data-options="attributes:{'url':'/page/item-param-list'}">規格引數</li>
	         	</ul>
4.3.2 編輯IndexController
package com.jt.controller;

import org.springframework.stereotype.Controller;
import org.springframework.web.bind.annotation.*;

@Controller
public class IndexController {

	/*@RequestMapping("/index")
	public String index(){

		return "index";
	}*/

	/**
	 * 業務需求:
	 * 		實現使用者頁面的跳轉
	 * 	url:  http://localhost:8091/page/item-add    頁面:item-add
	 * 		  http://localhost:8091/page/item-list	 頁面:item-list
	 *
	 * 	能否利用一個方法實現通用頁面的跳轉功能!!!!
	 *  實現的思路: 如果能夠動態的獲取url中的引數就可以實現頁面的跳轉. restFul風格....
	 *  restFul語法:
	 *  	1. 引數必須使用"/"分隔
	 *  	2. 引數必須使用{}形式包裹
	 *  	3. 引數接收時需要使用 @PathVariable 獲取
	 *
	 *  restFul風格用法2:
	 *  	利用不同的請求的型別,定義不同的業務功能!!
	 *  	type="GET",   	查詢業務
	 *  	type="POST",  	新增操作
	 *  	type="PUT",	  	更新操作
	 *  	type="DELETE" 	刪除操作
	 * @return
	 */

	//@RequestMapping(value = "/page/{moduleName}",method = RequestMethod.GET)
	@GetMapping("/page/{moduleName}")
	/*@PutMapping
	@DeleteMapping
	@PostMapping*/
	public String module(@PathVariable String moduleName) {

		return moduleName;
	}
}
4.4 EasyUI中表格資料展現說明
4.4.1 頁面標識
<table class="easyui-datagrid" style="width:500px;height:300px" data-options="url:'datagrid_data.json',method:'get',fitColumns:true,singleSelect:true,pagination:true">
				<thead>
					<tr>
						<th data-options="field:'code',width:100">Code</th>
						<th data-options="field:'name',width:100">Name</th>
						<th data-options="field:'price',width:100,align:'right'">Price</th>
					</tr>
				</thead>
			</table>
4.4.2 返回值結果
{
	"total":2000,
	"rows":[
		{"code":"A","name":"果汁","price":"20"},
		{"code":"B","name":"漢堡","price":"30"},
		{"code":"C","name":"雞柳","price":"40"},
		{"code":"D","name":"可樂","price":"50"},
		{"code":"E","name":"薯條","price":"10"},
		{"code":"F","name":"麥旋風","price":"20"},
		{"code":"G","name":"套餐","price":"100"}
	]
}
作業:
要求:動態的接收使用者的url地址,之後查詢item表的資料, 利用分頁的方式實現
url: http://localhost:8091/item/query?page=1&rows=20
難點: JSON串如何封裝!!!
<table class="easyui-datagrid" id="itemList" title="商品列表"
       data-options="singleSelect:false,fitColumns:true,collapsible:true,pagination:true,url:'/item/query',method:'get',pageSize:20,toolbar:toolbar">
    <thead>
        <tr>
        	<th data-options="field:'ck',checkbox:true"></th>
        	<th data-options="field:'id',width:60">商品ID</th>
            <th data-options="field:'title',width:200">商品標題</th>
            <th data-options="field:'cid',width:100,align:'center',formatter:KindEditorUtil.findItemCatName">葉子類目</th>
            <th data-options="field:'sellPoint',width:100">賣點</th>
            <th data-options="field:'price',width:70,align:'right',formatter:KindEditorUtil.formatPrice">價格</th>
            <th data-options="field:'num',width:70,align:'right'">庫存數量</th>
            <th data-options="field:'barcode',width:100">條形碼</th>
            <th data-options="field:'status',width:60,align:'center',formatter:KindEditorUtil.formatItemStatus">狀態</th>
            <th data-options="field:'created',width:130,align:'center',formatter:KindEditorUtil.formatDateTime">建立日期</th>
            <th data-options="field:'updated',width:130,align:'center',formatter:KindEditorUtil.formatDateTime">更新日期</th>
        </tr>
    </thead>
</table>