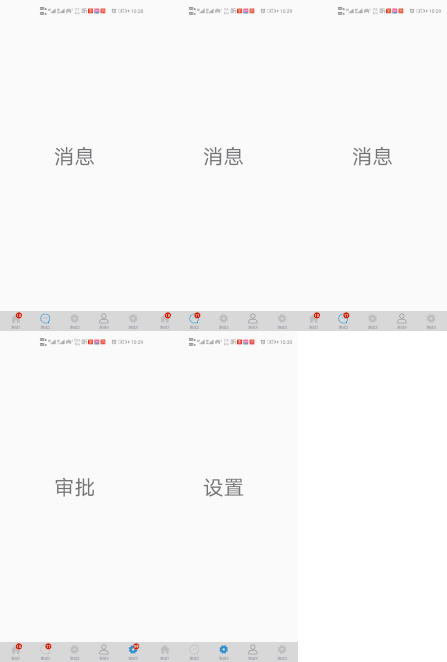
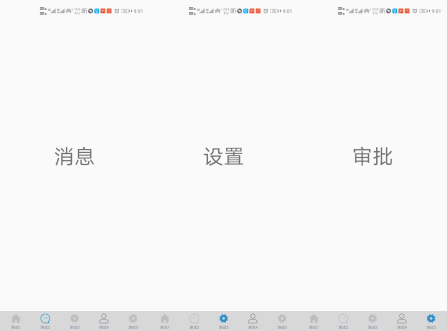
Android 底部導航欄以及導航欄角標顯示,使用LinearLayout+Fragment實現
2020-09-28 11:00:29
Android 底部導航欄以及角標顯示,使用LinearLayout+Fragment實現
看過網上很多大神寫的關於底部導航欄的實現方式,但是總感覺用的不是那麼隨意,作為一個專業的出色的自學者,要借鑑大神的,實現自己的,有何不足之處,歡迎大家批評指正。
特點:可以自由設定每個底部欄按鈕的樣式,大小
MyBottomForLinearLayout中的setMarkerNum方法設定角標
如:bottomForLinearLayout.setMarkerNum(5,122);
5是導航欄第幾個按鈕,122是設定的數位,超過99顯示99


1、自定義按鈕控制元件
Xml介面 my_image_and_text_layout.
<?xml version="1.0" encoding="utf-8"?>
<LinearLayout
    xmlns:android="http://schemas.android.com/apk/res/android"
    xmlns:tools="http://schemas.android.com/tools"
    android:layout_width="wrap_content"
    android:layout_height="wrap_content"
    android:orientation="vertical"
    >
    <RelativeLayout
        android:id="@+id/my_image_and_text_image_rala"
        android:layout_width="30dp"
        android:layout_height="30dp">
        <ImageView
            android:id="@+id/my_image_and_text_iamge"
            android:layout_width="match_parent"
            android:layout_height="match_parent"
            android:src="@mipmap/left"
            android:scaleType="fitCenter"
            android:padding="3dp"
            />
        <RelativeLayout
            android:id="@+id/my_image_and_text_iamges_marker_rala"
            android:layout_width="15dp"
            android:layout_height="15dp"
            android:layout_alignParentEnd="true"
            >
            <ImageView
                android:id="@+id/my_image_and_text_iamges_marker_iamge"
                android:layout_width="match_parent"
                android:layout_height="match_parent"
                android:src="@mipmap/jiao_biao"
                />
            <TextView
                android:id="@+id/my_image_and_text_iamges_marker_rala_num"
                android:layout_width="match_parent"
                android:layout_height="match_parent"
                android:gravity="center"
                android:textColor="#fff"
                android:ellipsize="end"
                android:lines="1"
                android:maxLength="2"
                android:textSize="10sp" />
        </RelativeLayout>
    </RelativeLayout>

    <TextView
        android:id="@+id/my_image_and_text_bottom_text"
        android:layout_width="match_parent"
        android:layout_height="match_parent"
        android:gravity="center"
        android:textSize="9sp"
        android:text="測試中"
        android:ellipsize="end"
        android:lines="1"
        />


</LinearLayout>
邏輯程式碼 MyImageTextShow.
import android.annotation.SuppressLint;
import android.content.Context;
import android.util.AttributeSet;
import android.view.LayoutInflater;
import android.view.ViewGroup;
import android.widget.ImageView;
import android.widget.LinearLayout;
import android.widget.RelativeLayout;
import android.widget.TextView;

import androidx.annotation.NonNull;

import com.mylib.mystyle.R;

import erp.mylib.myutils.data.MyString;

/**
 * 圖片加文字展示
 * 上面是圖片,下面是文字
 *
 */

public class MyImageTextShow extends RelativeLayout{

    private RelativeLayout mRlImages,mRlMaker;
    private ImageView mIvImage,mIvMarker;
    private TextView mTvMarker,mTvBottom;

    public MyImageTextShow(@NonNull Context context, AttributeSet attrs) {
        super(context, attrs);
        LayoutInflater.from(context).inflate(R.layout.my_image_and_text_layout, this);

        mRlImages = findViewById(R.id.my_image_and_text_image_rala);
        mRlMaker = findViewById(R.id.my_image_and_text_iamges_marker_rala);
        mIvImage = findViewById(R.id.my_image_and_text_iamge);
        mIvMarker = findViewById(R.id.my_image_and_text_iamges_marker_iamge);
        mTvMarker = findViewById(R.id.my_image_and_text_iamges_marker_rala_num);
        mTvBottom = findViewById(R.id.my_image_and_text_bottom_text);
        mRlMaker.setVisibility(GONE);
    }

    /**
     * 設定角標數位
     * @param num 數量
     */
    @SuppressLint("SetTextI18n")
    public void setMakerNum(int num) {

            if (num>0) {
                mRlMaker.setVisibility(VISIBLE);
                if (num<100) mTvMarker.setText(String.valueOf(num));
                else mTvMarker.setText("99+");
            }
            else mRlMaker.setVisibility(GONE);
    }

    /**
     * 設定角標尺寸
     * @param w 寬
     * @param h 高
     */
    public void setMarkerSize(int w,int h) {
        ViewGroup.LayoutParams pp = mRlMaker.getLayoutParams();
        mRlMaker.getLayoutParams();
        pp.height = h;
        pp.width = w;
        mRlMaker.setLayoutParams(pp);
    }

    /**
     * 設定底圖尺寸
     * @param w 寬
     * @param h 高
     */
    public void setImageSize(int w,int h) {
        ViewGroup.LayoutParams pp = mRlImages.getLayoutParams();
        mRlImages.getLayoutParams();
        pp.height = h;
        pp.width = w;
        mRlImages.setLayoutParams(pp);
    }

    public RelativeLayout getmRlImages() {
        return mRlImages;
    }

    public void setmRlImages(RelativeLayout mRlImages) {
        this.mRlImages = mRlImages;
    }

    public RelativeLayout getmRlMaker() {
        return mRlMaker;
    }

    public void setmRlMaker(RelativeLayout mRlMaker) {
        this.mRlMaker = mRlMaker;
    }

    public ImageView getmIvImage() {
        return mIvImage;
    }

    public void setmIvImage(ImageView mIvImage) {
        this.mIvImage = mIvImage;
    }

    public ImageView getmIvMarker() {
        return mIvMarker;
    }

    public void setmIvMarker(ImageView mIvMarker) {
        this.mIvMarker = mIvMarker;
    }

    public TextView getmTvMarker() {
        return mTvMarker;
    }

    public void setmTvMarker(TextView mTvMarker) {
        this.mTvMarker = mTvMarker;
    }

    public TextView getmTvBottom() {
        return mTvBottom;
    }

    public void setmTvBottom(TextView mTvBottom) {
        this.mTvBottom = mTvBottom;
    }

}
2、自定義底部欄
xml程式碼 my_bttom_for_linear_layout
<?xml version="1.0" encoding="utf-8"?>
<LinearLayout xmlns:android="http://schemas.android.com/apk/res/android"
    android:orientation="horizontal"
    android:layout_width="match_parent"
    android:layout_height="wrap_content"
    android:padding="3dp"
    >

    <erp.mylib.mystyle.from.MyImageTextShow
        android:id="@+id/my_buttom_for_linear_layout_1"
        android:layout_width="match_parent"
        android:layout_height="wrap_content"
        android:gravity="center"
        android:layout_gravity="center"
        android:layout_weight="1"
        />
    <erp.mylib.mystyle.from.MyImageTextShow
        android:id="@+id/my_buttom_for_linear_layout_2"
        android:layout_width="match_parent"
        android:layout_height="wrap_content"
        android:gravity="center"
        android:layout_gravity="center"
        android:layout_weight="1"
        />
    <erp.mylib.mystyle.from.MyImageTextShow
        android:id="@+id/my_buttom_for_linear_layout_3"
        android:layout_width="match_parent"
        android:layout_height="wrap_content"
        android:gravity="center"
        android:layout_gravity="center"
        android:layout_weight="1"
        />
    <erp.mylib.mystyle.from.MyImageTextShow
        android:id="@+id/my_buttom_for_linear_layout_4"
        android:layout_width="match_parent"
        android:layout_height="wrap_content"
        android:gravity="center"
        android:layout_gravity="center"
        android:layout_weight="1"
        />
    <erp.mylib.mystyle.from.MyImageTextShow
        android:id="@+id/my_buttom_for_linear_layout_6"
        android:layout_width="match_parent"
        android:layout_height="wrap_content"
        android:gravity="center"
        android:layout_gravity="center"
        android:layout_weight="1"
        />
    <erp.mylib.mystyle.from.MyImageTextShow
        android:id="@+id/my_buttom_for_linear_layout_7"
        android:layout_width="match_parent"
        android:layout_height="wrap_content"
        android:gravity="center"
        android:layout_gravity="center"
        android:layout_weight="1"
        />
    <erp.mylib.mystyle.from.MyImageTextShow
        android:id="@+id/my_buttom_for_linear_layout_8"
        android:layout_width="match_parent"
        android:layout_height="wrap_content"
        android:gravity="center"
        android:layout_gravity="center"
        android:layout_weight="1"
        />
    <erp.mylib.mystyle.from.MyImageTextShow
        android:id="@+id/my_buttom_for_linear_layout_5"
        android:layout_width="match_parent"
        android:layout_height="wrap_content"
        android:gravity="center"
        android:layout_gravity="center"
        android:layout_weight="1"
        />

</LinearLayout>
邏輯程式碼 MyBottomForLinearLayout
LogUtil 自定義的紀錄檔檔案管理,替換城自己的或者替換為系統的都可以
import android.content.Context;
import android.util.AttributeSet;
import android.view.LayoutInflater;
import android.view.View;
import android.widget.LinearLayout;
import android.widget.TextView;
import androidx.annotation.NonNull;
import com.mylib.mystyle.R;
import java.util.ArrayList;
import erp.mylib.myutils.sys.LogUtil;

/**
 * 底部選單,由LinearLayout實現
 * 我這裡弄了8個按鈕,在avtivity頁面傳幾個引數就顯示幾個
 */

public class MyBottomForLinearLayout extends LinearLayout{
    MyImageTextShow mBtm1;
    MyImageTextShow mBtm2;
    MyImageTextShow mBtm3;
    MyImageTextShow mBtm4;
    MyImageTextShow mBtm5;
    MyImageTextShow mBtm6;
    MyImageTextShow mBtm7;
    MyImageTextShow mBtm8;
    MyImageTextShow oldBtm;
    private int oldColor;//未選中顏色
    private int selectColor;//選中顏色
    private int oldImageId;//前一個按鈕id

    public MyBottomForLinearLayout(@NonNull Context context, AttributeSet attrs) {
        super(context, attrs);
        LayoutInflater.from(context).inflate(R.layout.my_bttom_for_linear_layout, this);
        mBtm1 = findViewById(R.id.my_buttom_for_linear_layout_1);
        mBtm2 = findViewById(R.id.my_buttom_for_linear_layout_2);
        mBtm3 = findViewById(R.id.my_buttom_for_linear_layout_3);
        mBtm4 = findViewById(R.id.my_buttom_for_linear_layout_4);
        mBtm5 = findViewById(R.id.my_buttom_for_linear_layout_5);
        mBtm6 = findViewById(R.id.my_buttom_for_linear_layout_6);
        mBtm7 = findViewById(R.id.my_buttom_for_linear_layout_7);
        mBtm8 = findViewById(R.id.my_buttom_for_linear_layout_8);
        mBtm1.setVisibility(GONE);
        mBtm2.setVisibility(GONE);
        mBtm3.setVisibility(GONE);
        mBtm4.setVisibility(GONE);
        mBtm5.setVisibility(GONE);
        mBtm6.setVisibility(GONE);
        mBtm7.setVisibility(GONE);
        mBtm8.setVisibility(GONE);
    }

    /**
     * 設定文字選中後和未選中顏色
     * @param oldColor 未選中顏色
     * @param clickColor 選中顏色
     */
    public void setTextClolor(int oldColor,int clickColor){
        this.oldColor = oldColor;
        this.selectColor = clickColor;
    }

    //**********************設定未選中時圖片,選中時圖片、文字、點選事件屬性***************************
    //**********************需要幾個按鈕再ACTIVITY頁面就設定幾個***************************
    public void setBottom1OnClick(int oldId, int nowId,String text,OnClickListener listener){
        setBottomProPerty(mBtm1,oldId,nowId,text,listener);
    }
    public void setBottom2OnClick(int oldId, int nowId,String text,OnClickListener listener){
        setBottomProPerty(mBtm2,oldId,nowId,text,listener);
    }
    public void setBottom3OnClick(int oldId, int nowId,String text,OnClickListener listener){
        setBottomProPerty(mBtm3,oldId,nowId,text,listener);
    }
    public void setBottom4OnClick(int oldId, int nowId,String text,OnClickListener listener){
        setBottomProPerty(mBtm4,oldId,nowId,text,listener);
    }
    public void setBottom5OnClick(int oldId, int nowId,String text,OnClickListener listener){
        setBottomProPerty(mBtm5,oldId,nowId,text,listener);
    }
    public void setBottom6OnClick(int oldId, int nowId,String text,OnClickListener listener){
        setBottomProPerty(mBtm6,oldId,nowId,text,listener);
    }
    public void setBottom7OnClick(int oldId, int nowId,String text,OnClickListener listener){
        setBottomProPerty(mBtm7,oldId,nowId,text,listener);
    }
    public void setBottom8OnClick(int oldId, int nowId,String text,OnClickListener listener){
        setBottomProPerty(mBtm8,oldId,nowId,text,listener);
    }

    /**
     * 設定圖片寬高
     * @param w 寬度
     * @param h 高度
     */
    public void setImageSize(int w,int h){
        for (int i =0;i<this.getChildCount(); i++){
            if (this.getChildAt(i) instanceof MyImageTextShow){
                MyImageTextShow imageTextShow = (MyImageTextShow) this.getChildAt(i);
                imageTextShow.setImageSize(w,h);
            }
        }
    }

    /**
     * 設定角標寬高
     * @param w 寬度
     * @param h 高度
     */
    public void setMarkerSize(int w,int h){
        for (int i =0;i<this.getChildCount(); i++){
            if (this.getChildAt(i) instanceof MyImageTextShow){
                MyImageTextShow imageTextShow = (MyImageTextShow) this.getChildAt(i);
                imageTextShow.setMarkerSize(w,h);
            }
        }
    }

    /**
     * 批次建立底部按鈕
     * ArrayList<myBottom>
     * @param myBottoms  內部類myBottom陣列
     */
    public void setMyBottoms(ArrayList<myBottom> myBottoms){
        if (!checkMyBottomS(myBottoms)) LogUtil.d("存在一個或多個按鈕未設定圖片或點選事件,將顯示原始值");
        if (myBottoms.size()>getChildCount()) LogUtil.d("傳入控制元件過多,將只顯示前"+getChildCount()+"個控制元件");
        switch (myBottoms.size()){
            case 8:
                setBottom8OnClick(myBottoms.get(7).imaged,
                        myBottoms.get(7).selectId,
                        myBottoms.get(7).text,
                        myBottoms.get(7).listener);
            case 7:
                setBottom7OnClick(myBottoms.get(6).imaged,
                        myBottoms.get(6).selectId,
                        myBottoms.get(6).text,
                        myBottoms.get(6).listener);
            case 6:
                setBottom6OnClick(myBottoms.get(5).imaged,
                        myBottoms.get(5).selectId,
                        myBottoms.get(5).text,
                        myBottoms.get(5).listener);
            case 5:
                setBottom5OnClick(myBottoms.get(4).imaged,
                        myBottoms.get(4).selectId,
                        myBottoms.get(4).text,
                        myBottoms.get(4).listener);
            case 4:
                setBottom4OnClick(myBottoms.get(3).imaged,
                        myBottoms.get(3).selectId,
                        myBottoms.get(3).text,
                        myBottoms.get(3).listener);
            case 3:
                setBottom3OnClick(myBottoms.get(2).imaged,
                        myBottoms.get(2).selectId,
                        myBottoms.get(2).text,
                        myBottoms.get(2).listener);
            case 2:
                setBottom2OnClick(myBottoms.get(1).imaged,
                        myBottoms.get(1).selectId,
                        myBottoms.get(1).text,
                        myBottoms.get(1).listener);
            case 1:
                setBottom1OnClick(myBottoms.get(0).imaged,
                        myBottoms.get(0).selectId,
                        myBottoms.get(0).text,
                        myBottoms.get(0).listener);
        }
    }

    /**
     * 設定角標數位
     * @param id 按鈕序號(從左到右從1開始)
     * @param num 角標數位
     */
    public void setMarkerNum(int id, int num){
        switch (id){
            case 1:
                mBtm1.setMakerNum(num);
                break;
            case 2:
                mBtm2.setMakerNum(num);
                break;
            case 3:
                mBtm3.setMakerNum(num);
                break;
            case 4:
                mBtm4.setMakerNum(num);
                break;
            case 5:
                mBtm5.setMakerNum(num);
                break;
            case 6:
                mBtm6.setMakerNum(num);
                break;
            case 7:
                mBtm7.setMakerNum(num);
                break;
            case 8:
                mBtm8.setMakerNum(num);
                break;
        }
    }

    /**
     * 按鈕初始化,及點選事件處理邏輯
     * @param imageTextShow 自定義圖片加文字控制元件
     * @param oldId 載入圖片ID
     * @param nowId 選中圖片ID
     * @param text 文字
     * @param listener 點選事件
     */
    private void setBottomProPerty(final MyImageTextShow imageTextShow, final int oldId, final int nowId,String text, final OnClickListener listener){
        if (!checkInit()) return;
        if (imageTextShow != null) imageTextShow.setVisibility(VISIBLE);
        if (oldId != 0) imageTextShow.getmIvImage().setImageResource(oldId);
        if (oldColor != 0) imageTextShow.getmTvBottom().setTextColor(oldColor);
        if (text != null) imageTextShow.getmTvBottom().setText(text);
        if (imageTextShow != null){
            imageTextShow.setOnClickListener(new OnClickListener() {
                @Override
                public void onClick(View view) {
                    if (oldBtm != null && imageTextShow == oldBtm) return;
                    if (oldBtm != null && imageTextShow != oldBtm) setOldBtmType();
                    oldBtm = imageTextShow;
                    oldImageId = oldId;
                    imageTextShow.getmIvImage().setImageResource(nowId);
                    imageTextShow.getmTvBottom().setTextColor(selectColor);
                    if (listener != null) listener.onClick(view);

                }
            });
        }
    }

    /**
     * 切換選中狀態
     */
    private void setOldBtmType(){
        if (oldBtm != null){
            oldBtm.getmIvImage().setImageResource(oldImageId);
            oldBtm.getmTvBottom().setTextColor(oldColor);
        }
    }

    /**
     * 檢查陣列
     * @param myBottoms 內部類
     * @return 布林值
     */
    private boolean checkMyBottomS(ArrayList<myBottom> myBottoms){
        for (myBottom s:myBottoms){
            if (s.imaged == 0 || s.selectId == 0 || s.listener == null){
                return false;
            }
        }
        return true;
    }

    /**
     * 初始化檢查是否傳入文字顏色
     * @return 布林值
     */
    private boolean checkInit(){
        if (oldColor == 0 || selectColor == 0) {
            LogUtil.d("請先設定字型顏色");
           return false;
        }
        return true;
    }

    //*****************GET,SET方法,用於設定每個控制元件的詳細屬性*******************
    //*****************用來設定每個底部按鈕的樣式屬性*******************

    public MyImageTextShow getmBtm1() {
        return mBtm1;
    }
    public void setmBtm1(MyImageTextShow mBtm1) {
        this.mBtm1 = mBtm1;
    }

    public MyImageTextShow getmBtm2() {
        return mBtm2;
    }
    public void setmBtm2(MyImageTextShow mBtm2) {
        this.mBtm2 = mBtm2;
    }

    public MyImageTextShow getmBtm3() {
        return mBtm3;
    }
    public void setmBtm3(MyImageTextShow mBtm3) {
        this.mBtm3 = mBtm3;
    }

    public MyImageTextShow getmBtm4() {
        return mBtm4;
    }
    public void setmBtm4(MyImageTextShow mBtm4) {
        this.mBtm4 = mBtm4;
    }

    public MyImageTextShow getmBtm5() {
        return mBtm5;
    }
    public void setmBtm5(MyImageTextShow mBtm5) {
        this.mBtm5 = mBtm5;
    }

    public MyImageTextShow getmBtm6() {
        return mBtm6;
    }
    public void setmBtm6(MyImageTextShow mBtm6) {
        this.mBtm6 = mBtm6;
    }

    public MyImageTextShow getmBtm7() {
        return mBtm7;
    }
    public void setmBtm7(MyImageTextShow mBtm7) {
        this.mBtm7 = mBtm7;
    }

    public MyImageTextShow getmBtm8() {
        return mBtm8;
    }
    public void setmBtm8(MyImageTextShow mBtm8) {
        this.mBtm8 = mBtm8;
    }

    public static class myBottom{
        public int imaged;
        public String text;
        public int selectId;
        public OnClickListener listener;
    }

}
3、使用
邏輯程式碼 activity_start_expense
<?xml version="1.0" encoding="utf-8"?>
<RelativeLayout xmlns:android="http://schemas.android.com/apk/res/android"
    xmlns:app="http://schemas.android.com/apk/res-auto"
    xmlns:tools="http://schemas.android.com/tools"
    android:layout_width="match_parent"
    android:layout_height="match_parent"
    android:orientation="horizontal"
    tools:context="erp.expense.StartExpenseActivity">
    <FrameLayout
        android:id="@+id/start_activity_framelayout"
        android:layout_width="match_parent"
        android:layout_height="match_parent"
        android:layout_above="@+id/start_activity_mylayout"
        />
    <erp.mylib.mystyle.from.MyBottomForLinearLayout
        android:id="@+id/start_activity_mylayout"
        android:layout_width="match_parent"
        android:layout_height="wrap_content"
        android:layout_alignParentBottom="true"
        android:background="@color/color_recycle_rectangle"
        />
</RelativeLayout>
邏輯程式碼 StartExpenseActivity.
ToastUtil 是自定義的彈出視窗,使用系統的替換即可
自定義程式碼部分就不貼了,很簡單的幾個個Fragment
import androidx.appcompat.app.AppCompatActivity;
import android.os.Bundle;
import android.view.View;
import android.widget.FrameLayout;
import com.rfid.R;
import java.util.ArrayList;
import erp.mylib.mystyle.from.MyBottomForLinearLayout;
import erp.mylib.myutils.sys.ToastUtil;
import erp.rfid.MyFragment.BottomFragmentForApproval;
import erp.rfid.MyFragment.BottomFragmentForIndex;
import erp.rfid.MyFragment.BottomFragmentForInformation;
import erp.rfid.MyFragment.BottomFragmentForInstall;
import erp.rfid.MyFragment.BottomFragmentForMy;
import erp.works.StartWorksActivity;

public class StartExpenseActivity extends AppCompatActivity{
    MyBottomForLinearLayout bottomForLinearLayout;

    //自定義fragment
    BottomFragmentForIndex index;
    BottomFragmentForInformation information;
    BottomFragmentForInstall install;
    BottomFragmentForMy my;
    BottomFragmentForApproval approval;

    @Override
    protected void onCreate(Bundle savedInstanceState) {
        super.onCreate(savedInstanceState);
        setContentView(R.layout.activity_start_expense);

        initFragment();//初始化自定義Fragment頁面
        getSupportFragmentManager().beginTransaction().add(R.id.start_activity_framelayout,index).commitNowAllowingStateLoss();
        initBottom();//初始化底部欄
    }

    /**
     * 初始化自定義Fragment頁面(需要用個人的,這裡就不貼了)
     */
    private void initFragment(){
        index = new BottomFragmentForIndex();
        information = new BottomFragmentForInformation();
        install = new BottomFragmentForInstall();
        my = new BottomFragmentForMy();
        approval = new BottomFragmentForApproval();
    }

    /**
     * 載入底部欄
     */
    private void initBottom(){
        bottomForLinearLayout = findViewById(R.id.start_activity_mylayout);
        bottomForLinearLayout.setImageSize(30,30);
        bottomForLinearLayout.setTextClolor(R.color.color_main_button_background,R.color.color_rfid_edittext_value);
        bottomForLinearLayout.setMyBottoms(loadBittomProperty());
    }

    /**
     * 設定顯示的按鈕
     * @return
     */
    private ArrayList<MyBottomForLinearLayout.myBottom>  loadBittomProperty(){
        ArrayList<MyBottomForLinearLayout.myBottom>  myBottoms = new ArrayList<>();
        MyBottomForLinearLayout.myBottom ee = new MyBottomForLinearLayout.myBottom();
        ee.imaged = R.mipmap.fragment_index_after;
        ee.selectId = R.mipmap.fragment_index_before;
        ee.text = "測試1";
        ee.listener = new View.OnClickListener() {
            @Override
            public void onClick(View view) {
                getSupportFragmentManager().beginTransaction().replace(R.id.start_activity_framelayout,index).commitNowAllowingStateLoss();
            }
        };
        myBottoms.add(ee);
        MyBottomForLinearLayout.myBottom a1 = new MyBottomForLinearLayout.myBottom();
        a1.imaged = R.mipmap.fragment_information_before;
        a1.selectId = R.mipmap.fragment_information_after;
        a1.text = "測試2";
        a1.listener = new View.OnClickListener() {
            @Override
            public void onClick(View view) {
                getSupportFragmentManager().beginTransaction().replace(R.id.start_activity_framelayout,information).commitNowAllowingStateLoss();
            }
        };
        myBottoms.add(a1);
        MyBottomForLinearLayout.myBottom a2 = new MyBottomForLinearLayout.myBottom();
        a2.imaged = R.mipmap.fragment_install_after;
        a2.selectId = R.mipmap.fragment_install_before;
        a2.text = "測試3";
        a2.listener = new View.OnClickListener() {
            @Override
            public void onClick(View view) {
                getSupportFragmentManager().beginTransaction().replace(R.id.start_activity_framelayout,install).commitNowAllowingStateLoss();
            }
        };
        myBottoms.add(a2);
        MyBottomForLinearLayout.myBottom a3 = new MyBottomForLinearLayout.myBottom();
        a3.imaged = R.mipmap.fragment_my_before;
        a3.selectId = R.mipmap.fragment_my_after;
        a3.text = "測試4";
        a3.listener = new View.OnClickListener() {
            @Override
            public void onClick(View view) {
                getSupportFragmentManager().beginTransaction().replace(R.id.start_activity_framelayout,my).commitNowAllowingStateLoss();
            }
        };
        myBottoms.add(a3);
        MyBottomForLinearLayout.myBottom a4 = new MyBottomForLinearLayout.myBottom();
        a4.imaged = R.mipmap.fragment_install_after;
        a4.selectId = R.mipmap.fragment_install_before;
        a4.text = "測試5";
        a4.listener = new View.OnClickListener() {
            @Override
            public void onClick(View view) {
                getSupportFragmentManager().beginTransaction().replace(R.id.start_activity_framelayout,approval).commitNowAllowingStateLoss();
            }
        };
        myBottoms.add(a4);
        return myBottoms;
    }
}
以上內容是看過很多大神寫的關於底部導航欄實現的思想,根據個人需求一行一行寫出。
歡迎各位看官指出不足之處
如果你感覺對自己有些幫助,請動動小手點個贊👍