學習筆記--第三週
2020-09-28 11:00:22
本週Android學習總結
activity生命週期
測試:
在MainActivity.java中寫入如下程式碼
public class MainActivity extends AppCompatActivity {
    private static final String TAG = "life_cycle";

    @Override
    protected void onCreate(Bundle savedInstanceState) {
        super.onCreate(savedInstanceState);
        setContentView(R.layout.activity_main);
        Log.d(TAG, "onCreate invoked. (建立)");
    }

    @Override
    protected void onStart() {
        super.onStart();
        Log.d(TAG, "onStart invoked. (已開始)");
    }

    @Override
    protected void onResume() {
        super.onResume();
        Log.d(TAG, "onResume invoked. (已恢復)");
    }

    @Override
    protected void onPause() {
        super.onPause();
        Log.d(TAG, "onPause invoked. (暫停)");
    }

    @Override
    protected void onStop() {
        super.onStop();
        Log.d(TAG, "onStop invoked. (已停止)");
    }

    @Override
    protected void onRestart() {
        super.onRestart();
        Log.d(TAG, "onRestart invoked. (已重新啟動)");
    }

    @Override
    protected void onDestroy() {
        super.onDestroy();
        Log.d(TAG, "onDestroy invoked. (釋放資源)");
    }
}
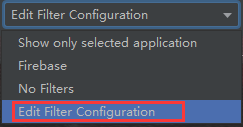
點選左下角第四個按鈕logcat,在最右邊的下拉框中選擇Edit Filter Configuration
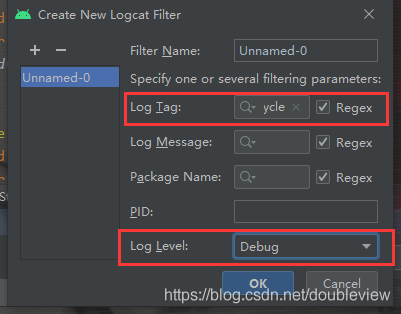
選擇按標籤過濾並寫入標籤名,下面選擇debug
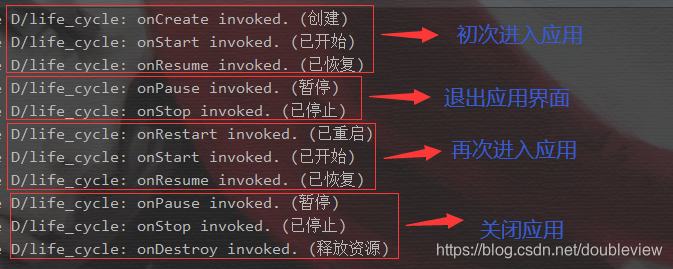
生命週期這一塊並沒有完全弄懂,使用者在恢復和暫停期間可以互動這些也很好理解,但是總覺得漏了點什麼;這方面的應用倒是見過不少,比如某大砍刀購物軟體,你幫別人砍刀之後再退出的時候總是有一堆彈窗跳出來,這應該是在呼叫關閉應用那幾個回撥方法的時候設定的吧(個人理解)。
視窗跳轉(攜帶資料)
首先編寫首頁,注意在需要攜帶資料的地方和跳轉按鈕新增id屬性
<?xml version="1.0" encoding="utf-8"?>
<LinearLayout xmlns:android="http://schemas.android.com/apk/res/android"
    xmlns:app="http://schemas.android.com/apk/res-auto"
    xmlns:tools="http://schemas.android.com/tools"
    android:layout_width="match_parent"
    android:layout_height="match_parent"
    android:orientation="vertical"
    android:gravity="center"
    android:padding="15sp"
    android:background="@drawable/bk012"
    tools:context=".LoginActivity">

    <TextView
        android:id="@+id/tvUserLogin"
        android:layout_width="wrap_content"
        android:layout_height="wrap_content"
        android:text="@string/user_login"
        android:textColor="#ff00ff"
        android:textSize="25sp"/>

    <LinearLayout
        android:layout_width="wrap_content"
        android:layout_height="wrap_content"
        android:gravity="center_horizontal"
        android:orientation="horizontal"
        android:layout_marginBottom="30dp">

        <TextView
            android:id="@+id/tvUsername"
            android:layout_width="wrap_content"
            android:layout_height="wrap_content"
            android:text="@string/username"
            android:textColor="#000000"
            android:textSize="20sp" />

        <EditText
            android:id="@+id/edtUsername"
            android:layout_width="wrap_content"
            android:layout_height="wrap_content"
            android:hint="@string/input_username"
            android:ems="10"
            android:singleLine="true"/>

    </LinearLayout>

    <LinearLayout
        android:layout_width="wrap_content"
        android:layout_height="wrap_content"
        android:gravity="center_horizontal"
        android:orientation="horizontal">

        <TextView
            android:id="@+id/tvPassword"
            android:layout_width="wrap_content"
            android:layout_height="wrap_content"
            android:text="@string/password"
            android:textColor="#000000"
            android:textSize="20sp" />

        <EditText
            android:id="@+id/edtPassword"
            android:layout_width="wrap_content"
            android:layout_height="wrap_content"
            android:hint="@string/input_password"
            android:inputType="textPassword"
            android:ems="10"
            android:singleLine="true"/>
    </LinearLayout>
    <LinearLayout
        android:layout_width="wrap_content"
        android:layout_height="wrap_content"
        android:gravity="center_horizontal"
        android:orientation="horizontal">

        <Button
            android:id="@+id/btnLogin"
            android:layout_width="wrap_content"
            android:layout_height="wrap_content"
            android:paddingLeft="30dp"
            android:paddingRight="30dp"
            android:background="@color/danlv"
            android:textColor="#ffffff"
            android:text="@string/login"
            android:layout_marginRight="10dp"
            android:textSize="20sp"/>

        <Button
            android:id="@+id/btnCancel"
            android:layout_width="wrap_content"
            android:layout_height="wrap_content"
            android:paddingLeft="30dp"
            android:paddingRight="30dp"
            android:background="@color/danlv"
            android:text="@string/cancel"
            android:textSize="20sp"
            android:textColor="#ffffff"/>
    </LinearLayout>
</LinearLayout>
之後編寫對應的Java頁面(註釋很清楚)
public class LoginActivity extends AppCompatActivity {
    private EditText edtUsername;
    private EditText edtPassword;
    private Button btnLogin;
    private Button btnCancel;

    @Override
    protected void onCreate(Bundle savedInstanceState) {
        super.onCreate(savedInstanceState);
        setContentView(R.layout.activity_login);
        //活動欄圖示
        ActionBar actionBar = getSupportActionBar();
        actionBar.setDisplayShowHomeEnabled(true);
        actionBar.setDisplayUseLogoEnabled(true);
        actionBar.setLogo(R.mipmap.ic_launcher);
        //獲取控制元件範例
        edtUsername = findViewById(R.id.edtUsername);
        edtPassword = findViewById(R.id.edtPassword);
        btnLogin = findViewById(R.id.btnLogin);
        btnCancel = findViewById(R.id.btnCancel);
        //給登入按鈕註冊監聽器
        btnLogin.setOnClickListener(new View.OnClickListener() {
            @Override
            public void onClick(View view) {
                //儲存使用者輸入資料
                String strUsername=edtUsername.getText().toString().trim();//trim()去除使用者在前面輸入的空格
                String strPassword=edtPassword.getText().toString().trim();
                //判斷使用者名稱密碼是否正確
                if (strUsername.equals("admin") && strPassword.equals("pwd")) {
                    //利用吐司提示使用者登入情況
                    Toast.makeText(LoginActivity.this, "登入成功", Toast.LENGTH_SHORT).show();//LENGTH_SHORT表示時間長度
                    //建立顯示意圖
                    Intent intent = new Intent(LoginActivity.this, MainActivity.class);
                    //建立封包封裝資料(封裝)
                    Bundle date = new Bundle();
                    date.putString("username", strUsername);
                    date.putString("password", strPassword);
                    //通過意圖攜帶封包
                    intent.putExtras(date);
                    //按照意圖啟動目標元件
                    startActivity(intent);
                } else {
                    Toast.makeText(LoginActivity.this, "使用者名稱密碼錯誤", Toast.LENGTH_SHORT).show();
                }
            }
        });
        btnCancel.setOnClickListener(new View.OnClickListener() {
            @Override
            public void onClick(View view) {
                //關閉視窗
                finish();
            }
        });
    }
}
然後編寫跳轉後的頁面(這裡只簡單弄個展示),還是注意新增id屬性
<?xml version="1.0" encoding="utf-8"?>
<LinearLayout xmlns:android="http://schemas.android.com/apk/res/android"
    xmlns:app="http://schemas.android.com/apk/res-auto"
    xmlns:tools="http://schemas.android.com/tools"
    android:layout_width="match_parent"
    android:layout_height="match_parent"
    android:gravity="center"
    android:background="@drawable/bk016"
    tools:context=".MainActivity">

    <TextView
        android:id="@+id/tvMessage"
        android:layout_width="wrap_content"
        android:layout_height="wrap_content"
        android:text="Hello World!"
        android:textSize="25dp"
        android:textColor="#ff00ff"/>

</LinearLayout>
再之後編寫跳轉後頁面對應的Java檔案,用於接收資料
public class MainActivity extends AppCompatActivity {
    protected TextView tvMessage;
    @Override
    protected void onCreate(Bundle savedInstanceState) {
        super.onCreate(savedInstanceState);
        //利用佈局資源設定使用者介面
        setContentView(R.layout.activity_main);
       //通過資源識別符號獲取控制元件範例
        tvMessage = findViewById(R.id.tvMessage);
        //獲取意圖
        Intent intent = getIntent();
        //判斷意圖是否為空
        if (intent != null) {
            //獲取意圖攜帶封包(封裝)
            Bundle date = intent.getExtras();
            String username = date.getString("username");
            String password = date.getString("password");
            //拼接使用者資訊
            String message = "登陸成功!\n使用者:" + username + "\n密碼:" + password;
            //設定標籤屬性,顯示使用者資訊
            tvMessage.setText(message);
        }

    }
}
最後新增佈局檔案啟動

效果
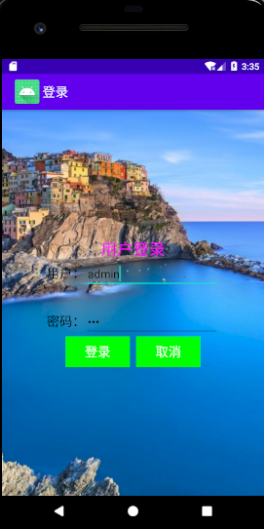
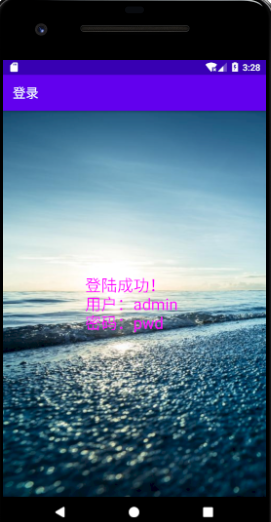
跳轉這一塊學起來真的很有意思(或許是因為視覺化可變動的原因),這一塊感覺並不是難主要是繁瑣;上面只說了封裝,主要是我有一種思維(或許大多數人都有)–資料封裝更專業,更安全。封裝的邏輯也很清晰。