神奇的GL_EXT_YUV_target擴充套件
最近發現了一個神奇的OPENGL擴充套件:GL_EXT_YUV_target
現在我們研究下.
1. GL_EXT_YUV_target擴充套件官方介紹
khronos opengl extension官網關於GL_EXT_YUV_target的描述如下:
Overview
This extension adds support for three new YUV related items: first
rendering to YUV images, second sampling from YUV images while keeping the
data in YUV space, third it defines a new built in function that does
conversion from RGB to YUV with controls to choose ITU-R BT.601-7,
ITU-R BT.601-7 Full range (JFIF images), or ITU-R BT.709-5 standard.
1.2 GL_EXT_YUV_target能實現的功能
通過khronos官網描述,可以知道該擴充套件能實現的功能有三個:
- 渲染至YUV 格式的影象
- 對YUV影象進行採用並保持YUV格式
- 新增了一些內建變數,能夠實現YUV和RGB格式的相互轉換
這個三個功能都能實現哪些具體功能呢?我們來舉個例子。
目前 Android Camera系統幀資料大部分是以YUV(如NV21)格式儲存的,而GL_EXT_YUV_target正好又能渲染至YUV格式的影象上,也就是說可以直接通過該擴充套件使用OpenGLES對Camera幀資料進行二次處理,在Camera幀資料上渲染上一些非常炫酷的物體。 這也是本文的終極目標。
下邊我們開始逐個功能研究
2. Rendering to YUV images
khronos官網上對這方面的描述如下:
To perform the YUV rendering capability in this extension an
application
will attach a texture to the framebuffer object as the color attachment.
If the texture has a target type of TEXTURE_EXTERNAL_OES with YUV color
format then the GL driver can use this framebuffer object as the render
target, TEXTURE_EXTERNAL_OES target with RGB color format are not allowed
with this extension.
通過上述描述我們可以理解到可以將一個YUV格式的TEXTURE_EXTERNAL_OES 紋理繫結到framebuffer object。GL就可以使用該framebuffer object作為渲染目標進行渲染。
在khronos opengl extension官網後邊的描述中,我們知道在openges 3.0 spec中描述了可以將TEXTURE_EXTERNAL_OES 紋理邦迪到framebuffer object上,描述如下:
  from
    "If texture is not zero, then texture must either name an existing
    two dimensional texture object and textarget must be TEXTURE_2D or
    texture must name an existing cube map...."

  to
    "If texture is not zero, then texture must either name an existing
    two dimensional texture object and textarget must be TEXTURE_2D or
    TEXTURE_EXTERNAL_OES or texture must name an existing cube map...."
2.1 framebuffer object的建立
我們介紹下將TEXTURE_EXTERNAL_OES 繫結到framebuffer object的實現程式碼:
	sp<GraphicBuffer> dstTexBuffer;
	GLuint dstTex;
	GLuint gFbo;

    //建立紋理然後將img1繫結到該紋理上
    glGenTextures(1, &dstTex);
    checkGlError("glGenTextures");
    glBindTexture(GL_TEXTURE_EXTERNAL_OES, dstTex);
    checkGlError("glBindTexture");
    glEGLImageTargetTexture2DOES(GL_TEXTURE_EXTERNAL_OES,
    				(GLeglImageOES)img1);
    checkGlError("glEGLImageTargetTexture2DOES");
    //建立Framebuffer Object並將紋理dstTex繫結到color attachment0上
    glGenFramebuffers(1, &gFbo);
    glBindFramebuffer(GL_FRAMEBUFFER, gFbo);
    //將dstTex繫結到Framebuffer Object的colorattachment0 上
    //這裡需要注意第二個引數只能為GL_COLOR_ATTACHMENT0
    //第三個引數為GL_TEXTURE_EXTERNAL_OES
    glFramebufferTexture2D(GL_FRAMEBUFFER, GL_COLOR_ATTACHMENT0,
    				GL_TEXTURE_EXTERNAL_OES, dstTex, 0);
    //檢查Framebuffer object的有效性
    glCheckFramebufferStatus(GL_FRAMEBUFFER);
    checkEglError("glCheckFramebufferStatus");
2.2 framebuffer object的使用
我們首先介紹下一個最簡單的使用場景,glClearColor
在 framebuffer object clear上我們期望的顏色。
 void renderFrame() {

	glBindFramebuffer(GL_FRAMEBUFFER, gFbo);
	//注意在framebuffer 邦迪到了
	//HAL_PIXEL_FORMAT_YCrCb_420_SP格式的yuv紋理上時
	//glClearColor的第一個引數清理的是Y plant
	//第二個引數清理的是UV Plant的U分量
	//第三個引數清理的是UV Plant的V分量
	//第四個引數無意義
	glClearColor(1.0f, 0.0f, 0.0f, 1.0f);
	checkGlError("glClearColor");
	//glClear( GL_DEPTH_BUFFER_BIT | GL_COLOR_BUFFER_BIT);
	//需要注意只能清理顏色緩衝區,清理其它顏色緩衝區會報錯
	glClear(GL_COLOR_BUFFER_BIT);
	checkGlError("glClear");

	//儲存dstTexBuffer內容到sdcard中
	//檢查glClearColor是否成功
	char* buf = NULL;
	dstTexBuffer->lock(GRALLOC_USAGE_SW_WRITE_OFTEN, (void**)(&buf));
	dumpImage((unsigned char*)buf,frameid++,yuvTexWidth,yuvTexHeight,1.5);
	dstTexBuffer->unlock();
 }
Khronos官網上關於glClearColor有這樣一段描述:
When clearing YUV
Color Buffers, clear color should be defined in yuv color space and so
floating point r, g, and b value will be mapped to corresponding y, u and v
value and alpha channel will be ignored. The result of clearing integer
color buffers with Clear is undefined."
通過上述描述可知,
glClearColor的第一個引數清理的是Y 分量
第二個引數清理的是U分量
第三個引數清理的是V分量
第四個引數無意義
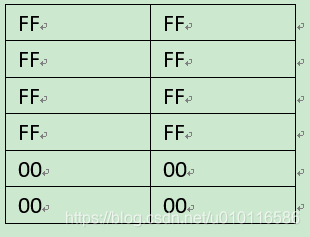
當使用glClearColor(1.0f, 0.0f, 0.0f, 1.0f)清理後,得到的結果為
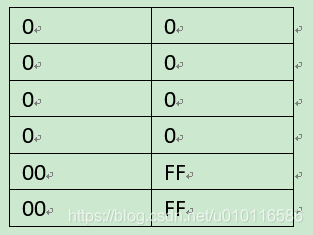
當使用glClearColor(0.0f, 1.0f, 0.0f, 1.0f)清理後,得到的結果為:
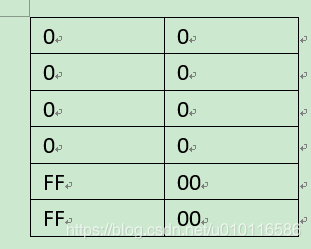
當使用glClearColor(0.0f, 0.0f, 1.0f, 1.0f)清理後,得到的結果為:
2.3 渲染物體至framebuffer object
基於2.2小節,我們在framebuffer object上渲染一個正方形
2.3.1 shader建立
需要在fragement shader中開啟GL_EXT_YUV_target擴充套件,程式碼如下:
"#extension GL_EXT_YUV_target : require\n"
如果是渲染至YUV紋理上,還需要新增
layout (yuv)限定符。
khronos官網上是如下這樣描述的
A shader which produces yuv format color output must qualify the fragment
shader output variable with new yuv layout qualifier as described below.

layout (yuv) out vec4 color;

The new yuv layout qualifier can't be combined with any other layout qualifier,
can only be used with fragment shader outputs and would be available only when
the new GLSL extension is specified. Additionally if the shader qualifies
fragment shader output with the new yuv qualifier and write depth or multiple
color output, it would cause compilation failure.
完整的shader程式碼如下:
vertex shader:
static const char gVertexShader[] =
static const char gVertexShader[] =
    "#version 300 es\n"
    "in vec4 vPosition;\n"

    "void main() {\n"
    "  gl_Position = vec4(vPosition.x*0.5,vPosition.y*0.5,0.0,1.0);\n"
    "  //gl_Position  = vPosition;\n"
    "}\n";
fragement shader:
…
static const char gFragmentShader[] =
    "#version 300 es\n"
    "#extension GL_EXT_YUV_target : require\n"
    "precision mediump float;\n"
    "layout (yuv) out vec3 outColor;\n"
    "void main() {\n"
    "   outColor     = vec3(1.0,0.0,1.0);\n"
    "}\n";
使用的頂點
const GLfloat gTriangleVertices[] = {
    -1.0f, 1.0f,
    -1.0f, -1.0f,
    1.0f, -1.0f,
    1.0f, 1.0f,
};
2.3.2 繪製正方形程式碼
繪製程式碼如下:
void renderFrame() {
    glBindFramebuffer(GL_FRAMEBUFFER, gFbo);

    glClearColor(0.0f, 0.0f, 0.0f, 1.0f);
    checkGlError("glClearColor");
    glClear(GL_COLOR_BUFFER_BIT);
    checkGlError("glClear");

    glUseProgram(gProgram);
    checkGlError("glUseProgram");

    glVertexAttribPointer(gvPositionHandle, 2, GL_FLOAT, GL_FALSE, 0, gTriangleVertices);
    checkGlError("glVertexAttribPointer");
    glEnableVertexAttribArray(gvPositionHandle);
    checkGlError("glEnableVertexAttribArray");

    glUniform1i(gYuvTexSamplerHandle, 0);
    checkGlError("glUniform1i");
    glBindTexture(GL_TEXTURE_EXTERNAL_OES, yuvTex);
    checkGlError("glBindTexture");

    glDrawArrays(GL_TRIANGLE_FAN, 0, 4);
    checkGlError("glDrawArrays");

    //glFinish();
    //printf("glFinish %d ====.\n",frameid);

    char* buf = NULL;
    dstTexBuffer->lock(GRALLOC_USAGE_SW_WRITE_OFTEN, (void**)(&buf));
    dumpImage((unsigned char*)buf,frameid++,yuvTexWidth,yuvTexHeight,1.5);
    dstTexBuffer->unlock();

}
最終渲染出的結果如下圖:
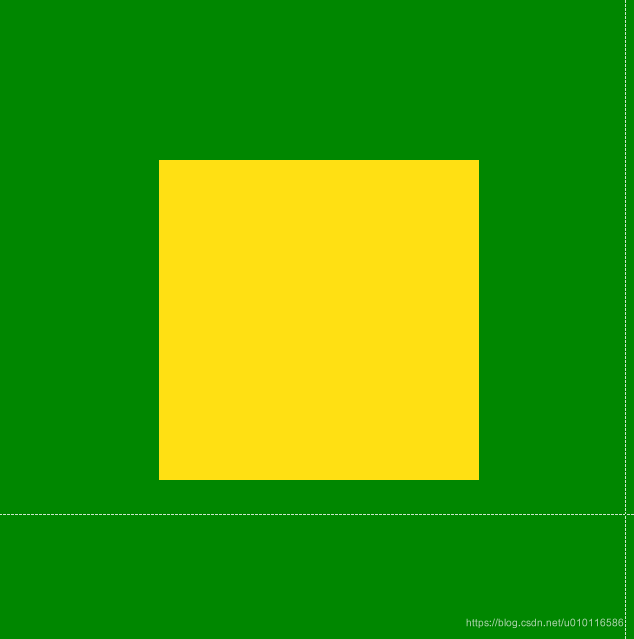
其中 綠色為clear的顏色,黃色為 渲染的正方形。
3. 對YUV影象進行採用並保持YUV格式
khronos關於這方面的主要描述有:
A new OpenGL GLSL extension flag is added:
    #extension GL_EXT_YUV_target

When the above GLSL extension is specified, one new sampler type
will be available for sampling the 2D texture:

    __samplerExternal2DY2YEXT

The "__samplerExternal2DY2YEXT" is used to sample a YUV texture image and
output color value without any color conversion.

Whenever a YUV sample is output from the sampler, the format of the YUV
will be as if YUV 4:4:4 format is output. This also means that the Y
sample maps to component R, the U sample maps to component G, the V sample
maps to component B, and the component A will be 1.0f.

The RGB sample output will be the same as in OpenGL ES specification.

Here is one example:

    uniform __samplerExternal2DY2YEXT   u_sTexture;
通過上邊的描述可知,開啟GL_EXT_YUV_target後,新增了一種取樣器__samplerExternal2DY2YEXT,該種取樣器可以實現取樣YUV格式的紋理且不做任何格式轉換。
我這隻附一下一個使用__samplerExternal2DY2YEXT的完整的 fragement shader demo
static const char gFragmentShader[] =
    "#version 300 es\n"
    "#extension GL_OES_EGL_image_external_essl3 : require\n"
    "#extension GL_EXT_YUV_target : require\n"
    "precision mediump float;\n"
    "//uniform samplerExternalOES yuvTexSampler;\n"
    "uniform __samplerExternal2DY2YEXT   yuvTexSampler;\n"
    "in vec2 yuvTexCoords;\n"
    "out vec4 outColor;\n"
    "void main() {\n"
    "  vec3 srcYuv = texture(yuvTexSampler, yuvTexCoords).xyz;\n"
    "  outColor    = vec4(yuv_2_rgb(srcYuv, itu_601), 1.0);\n"
    "}\n";
yuvTexSampler取樣的格式為YUV,可以使用內建函數yuv_2_rgb將YUV格式轉換為RGB,這個就可在普通的surface上正常顯示YUV紋理了,上述shader和下邊的效果是一致的
static const char gFragmentShader[] =
    "#version 300 es\n"
    "#extension GL_OES_EGL_image_external_essl3 : require\n"
    "#extension GL_EXT_YUV_target : require\n"
    "precision mediump float;\n"
    "uniform samplerExternalOES yuvTexSampler;\n"
    "//uniform __samplerExternal2DY2YEXT   yuvTexSampler;\n"
    "in vec2 yuvTexCoords;\n"
    "out vec4 outColor;\n"
    "void main() {\n"
    "  outColor     = texture(yuvTexSampler, yuvTexCoords);\n"
    "}\n";
4. 新增YUV和RGB格式的相互轉換內建變數
khronos關於這方面的描述如下:
New Built-in function
When the new GLSL extension is specified, two new built in functions
will be available for rgb to yuv or yuv to rgb color space conversion.

    vec3 rgb_2_yuv(vec3 color, yuvCscStandardEXT conv_standard);

The function rgb_2_yuv will apply rgb to yuv color conversion
transformation on "color" value using the formula specified as per new type
yuvCscStandardEXT variable. The first input parameter supposed to specify
rgb value using x, y & z channels of a vec3 variable, correspondingly
return value of this function will have transformed y, u and v value in its
x, y and z channel. Precision of the input color will define the precision
used for color space conversion and for output yuv color value.

    vec3 yuv_2_rgb (vec3 color, yuvCscStandardEXT conv_standard);

The function yuv_2_rgb will apply yuv to rgb color conversion
transformation on "color" value using the formula specified as per new type
yuvCscStandardEXT variable. The first input parameter supposed to specify
yuv value using x, y & z channels of a vec3 variable, correspondingly
return value of this function will have transformed r, g and b value in its
x, y and z channel. Precision of the input color will define the precision
used for color space conversion and for output yuv color value.
通過上邊的描述可知,開啟GL_EXT_YUV_target 後,新增了rgb_2_yuv、yuv_2_rgb 兩個內建函數,可以實現YUV-RGB的相互轉換,我們基於第二小節實現一個rgb_2_yuv的小demo。
在第二小節中 fragement shader的輸出為
" outColor = vec3(1.0,0.0,1.0);\n"
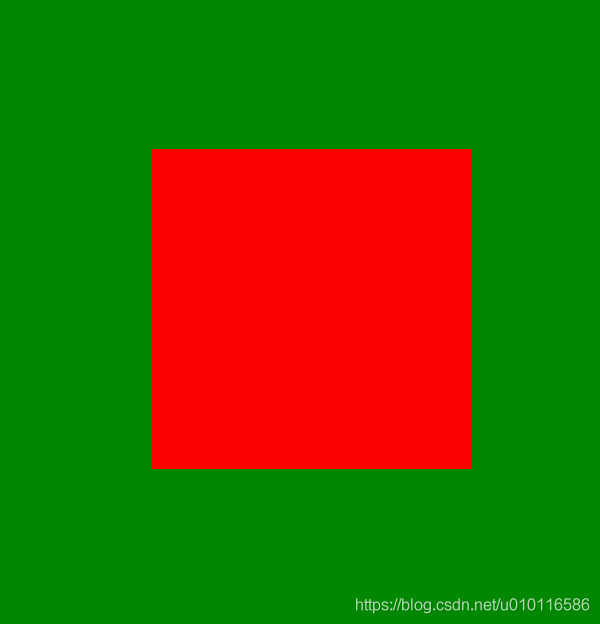
最終輸出的黃色的正方形,如果我們期望輸出紅色的矩形,只需要稍微修改下fragement shader即可,程式碼如下:
static const char gFragmentShader[] =
    "#version 300 es\n"
    "#extension GL_EXT_YUV_target : require\n"
    "precision mediump float;\n"
    "layout (yuv) out vec3 outColor;\n"
    "void main() {\n"
    "   vec3 red     = vec3(1.0,0.0,0.0);\n"
    "   outColor     = rgb_2_yuv(red,itu_601);\n"
    "   //outColor   = vec3(1.0,0.0,1.0);\n"
    "}\n";
最終渲染效果如下圖
當然這兩個內建變數還有一個很重要的用途:影象格式轉換。
- 將YUV紋理影象轉換為RGB紋理影象,當然這個轉換使用samplerExternalOES 也能實現
- 將RGB紋理影象轉換為YUV紋理影象
至此完成了GL_EXT_YUV_target的初步學習,下一步計劃,將該EGL 擴充套件應用到Android Camera 系統中,實現直接對相機YUV幀資料進行二次渲染處理,敬請期待!!!