深聊效能測試,從入門到放棄之:Locust效能自動化(二)程式碼實戰
1. 引言
在本章節,你可以學習到:
1、Locust程式碼範例展示及解讀:
①官網程式碼範例
②demo模板程式碼
3、Loucst的高階用法:
①關聯
②引數化
③檢查點
4、Locust的執行模式:
①單程序執行模式
②多程序分散式執行
5、Locust介面展示及結果分析
2. Locust範例展示
2.1 官網程式碼範例
我們來看看官網的第一個例子,
很簡單:
# -*- coding: utf-8 -*-
"""
@ auth : carl_DJ
@ time : 2020-9-23
"""

from locust import HttpUser, between, task

class WebsiteUser(HttpUser):
	#設定等待時間間隔
    wait_time = between(5, 15)

    def on_start(self):
        self.client.post("/login", {
            "username": "test_user",
            "password": ""
        })

    @task
    def index(self):
        self.client.get("/")
        self.client.get("/static/assets.js")

    @task
    def about(self):
        self.client.get("/about/")
這裡有幾點說一下:
1、between: 設定等待時間, 5s~15s;
2、client.get/ client.post: 用法跟request是一樣的。
其他的就沒有什麼可以重點強調的!
2.2 Locust 程式碼模板及執行順序
這段程式碼,小魚展示兩點:
1、locust demo模板;
2、locust 程式碼執行順序。
# -*- coding: utf-8 -*-
"""
@ auth : carl_DJ
@ time : 2020-9-23
"""


from locust import HttpUser,TaskSet,task
'''
執行順序:
Locust setup → TaskSet setup → TaskSet on_start →
TaskSet tasks → TaskSet on_stop → TaskSet teardown →
Locust teardown
'''

class UserBehavor(TaskSet):
    #啟動locust是執行setup方法
    def setup(self):
        print('task setup')

    def teardown(self):
        print('task teardown')

    #虛擬使用者啟動task時執行
    def on_start(self):
        print('start')

    #虛擬使用者結束task時執行
    def on_stop(self):
        print('end')

    @task(2)
    def index(self):
        self.client.get('/')

    @task(1)
    def profile(self):
        self.client.get('/profile')

class WebsitUser(HttpUser):
    def setup(self):
        print('locust setup')

    def teardown(self):
        print('locust teardown')

    host = 'http://xxx.com'
    task_set = task(UserBehavor)
    min_wait = 100
    max_wait = 5000

if __name__ == '__main__':
    pass
雖然小魚展示了模板,可以直接使用,但是,裡面的內容,需要各位大佬自己填充~~
畢竟 業務不同,填充的內容也不一樣!!
小屌絲:魚哥,感覺你在開車,但是沒證據!!
小魚:都快一點了,你還不睡覺,白富美不香嗎!!!
小屌絲:…
3. Locust 類程式碼分析
3.1 範例程式碼展示
關於locust類的詳細講解,放在了第一章節,因為
小魚覺得:先了解基礎,再去看程式碼,這樣就不至於看程式碼想看天書,至少遇到一個類,能有一個印象。
這裡,為了方便大家,點選下方帶顏色的文字即可進入第一章節:
《深聊效能測試,從入門到放棄之:Locust效能自動化(一)初識Locust》
迴歸正題,老規矩,先上程式碼,再逐層分析
# -*- coding: utf-8 -*-
"""
@ auth : carl_DJ
@ time : 2020-9-23
"""

from locust import HttpUser,task,TaskSet
'''
在版本10.1,已經不再使用HttpLocust 和Locust,
取而代之的是HttpUser 和User
'''

# 定義ScriptTasks類,繼承TaskSet類
class ScriptTasks(TaskSet):
    #初始化,每個locust使用者開始做的第一件事
    def on_start(self):
        #放置 使用者名稱和密碼
        self.client.post('/login', {
        "username":"carl_dj",
        "password":'111111'
        })

    #@task()裝飾的方法為一個事務,方法的引數用於指定該行為的執行權重,引數越大每次被虛擬使用者執行的概率越高,預設為1
    @task(2)
    #建立index方法,
    def index(self):
        self.client.get('/')

    @task(1)
    def about(self):
        #self.client 屬性使用python的request庫的方法,呼叫和使用方法和request一樣
        self.client.get('/about')

    @task(2)
    def demo(self):
        payload = {}
        headers = {}
        self.client.post('/demo', data = payload,headers = headers)

#TaskSet類,該類定義使用者任務資訊(模擬使用者資訊),
class WebsitUser(HttpUser):
    #指向一個定義的使用者行為
    task_set = task(ScriptTasks)
    #被測系統的host,
    host = 'http://www.xxxxxx.com'
    #每個使用者執行兩個任務間隔時間最小值,單位是(毫秒,預設是1000ms)
    min_wait = 100
    # 每個使用者執行兩個任務間隔時間最大值,單位是(毫秒)
    max_wait = 5000
這裡小魚在強調一次:
1、關於 HttpUser 和User的使用, 在版本10.1之後,就需要換成HttpUser 和 User,否則報錯;
>>>因為小魚發現,很多網站的大佬都在使用HttpLocust 和Locust,如果你的Locust 版本是 9.x或者8.x,可以使用,不做強要求。
3.2 classTaskSet 用法及展示
3.2.1 定義
1、TaskSet類實現了虛擬使用者所執行任務的排程演演算法,包括:
①規劃任務執行順序:schedule_task;
②挑選下一個任務:execute_next_task;
③執行任務:execute_task;
④休眠等待:wait;
⑤中斷控制:interrupt;
2、在1的基礎上,就可以在TaskSet子類中進行以下操作:
①描述虛擬使用者的業務測試場景;
②對虛擬使用者的所有行為進行組織和描述;
③對不同任務的權重進行設定;
3、 @task
①通過@task()裝飾的方法為一個事務。
>>>引數越大每次被虛擬使用者執行的概率越高,預設是1。
4、TaskSet子類中採用2種方式定義任務資訊:
① @task
② tasks屬性
3.2.2 程式碼展示
1、採用@task裝飾器定義任務資訊:
# -*- coding: utf-8 -*-
"""
@ auth : carl_DJ
@ time : 2020-9-23
"""


from locust import task,TaskSet
class UserBehav(TaskSet):
    @task(2)
    def test_case1(self):
        self.client.get("/testcase1")

    @task(4)
    def test_case2(self):
        self.client.get("/testcase2")
2、採用tasks屬性定義任務資訊:
# -*- coding: utf-8 -*-
"""
@ auth : carl_DJ
@ time : 2020-9-23
"""

from locust import TaskSet

def test_case1(self):
    self.client.get("/testcase1")

def test_case2(self):
    self.client.get("/testcase2")

class UserBehav(TaskSet):
    tasks = {test_case1:2,test_case2:4}
    #另一種寫法
    # tasks = [(test_job1,1), (test_job1,3)]
上面的程式碼,沒有什麼難度,這裡就不做解釋。
4. Locust高階用法
4.1 關聯
做過介面或者爬蟲的的大佬都知道,傳參是必不可少的,
而常見的場景有session_id。
對於返回的html頁面,可用採用lxml庫來定位獲取需要的引數。
我們先上程式碼
# -*- coding: utf-8 -*-
"""
@ auth : carl_DJ
@ time : 2020-9-23
"""

from locust import HttpUser,task,TaskSet
from lxml import etree

class WebsitTasks(TaskSet):

    #獲取session
    def get_session(self,html):
        tags = etree.HTML(html)
        return tags.xpath("輸入標籤需要定位的到元素")
    #啟動
    def on_start(self):
        html = self.client.get('/index')
        session = self.get_session(html.text)
        #設定payload引數
        payload = {
            'username': 'carl_dj',
            'password':'111111',
            'session':session

        }
        #設定header引數
        header = {"Mozilla/5.0 (Windows NT 10.0; Win64; x64) AppleWebKit/537.36 (KHTML, like Gecko) Chrome/83.0.4103.61 Safari/537.36"}
        self.client.post('/login',data = payload,headers = header)

    @task(5)
    def index(self):
        self.client.get('/')

    @task(1)
    def  about(self):
        self.client.about('/about/')


class WebsiteUser(HttpUser):
    # 被測系統的host,在終端中啟動locust時沒有指定--host引數時才會用到
    host     = "http://www.xxx.com/user/login"
    # TaskSet類,該類定義使用者任務資訊,必填。這裡就是:WebsiteTasks類名,因為該類繼承TaskSet;
    task_set = task(WebsiteTasks)
    # 每個使用者執行兩個任務間隔時間的上下限(毫秒),具體數值在上下限中隨機取值,若不指定預設間隔時間固定為1秒
    min_wait = 5000
    max_wait = 15000
嗯,詳細的內容都在程式碼中標註,這裡就不再重新嘮叨。
4.2 引數化
4.2.1 聊一聊引數化
老話說的好:程式碼寫死一時爽,框架重構火葬場
雖然大部分大佬還沒有涉及到 設計框架的階段,但是,只要稍微努努力…
火葬場 遲早都是要去滴~ ~
所以,就有了另一句老話:動態程式碼一時爽,一直動態一時爽
可見,引數化的作用,真的,很Nice!
話說回來,引數化的作用是啥呢:迴圈取資料,資料可重複使用。
4.2.2 三個場景認識引數化
場景1:
>> 模擬3個使用者並行請求網頁,共有100個URL地址,每個虛擬使用者都會依次迴圈載入100個URL地址
程式碼展示:
# -*- coding: utf-8 -*-
"""
@ auth : carl_DJ
@ time : 2020-9-23
"""


from locust import TaskSet, task, HttpUser

class UserBehav(TaskSet):
    def on_start(self):
        self.index = 0

    @task
    def test_visit(self):
        url = self.locust.share_data[self.index]
        print('visit url: %s' % url)
        self.index = (self.index + 1) % len(self.locust.share_data)
        self.client.get(url)

class WebsiteUser( HttpUser):
    host = 'http://www.xxx.com'
    task_set = task(UserBehav)
    share_data = ['url1', 'url2', 'url3', 'url4', 'url5']
    min_wait = 1000
    max_wait = 15000
場景2
>>>模擬3使用者並行註冊賬號,共有9個賬號,要求註冊賬號不重複,註冊完畢後結束測試
概括:
保證並行測試資料唯一性,不迴圈取資料
>>>所有並行虛擬使用者共用同一份測試資料,並且保證虛擬使用者使用的資料不重複;
程式碼
採用佇列
# -*- coding: utf-8 -*-
"""
@ auth : carl_DJ
@ time : 2020-9-23
"""


from locust import TaskSet, task, HttpUser
import queue
class UserBehav(TaskSet):
    @task
    def test_register(self):
        try:
            data = self.locust.user_data_queue.get()
        except queue.Empty:
            print('account data run out, test ended.')
            exit(0)
        print('register with user: {}, pwd: {}'\
            .format(data['username'], data['password']))
        payload = {
            'username': data['username'],
            'password': data['password']
        }
        self.client.post('/register', data=payload)

class WebsiteUser(HttpUser):
    host = 'http://www.xxx.com'
    task_set = task(UserBehav)
    user_data_queue = queue.Queue()
    for index in range(100):
        data = {
            "username": "test%04d" % index,
            "password": "pwd%04d" % index,
            "email": "test%04d@debugtalk.test" % index,
            "phone": "186%08d" % index,
        }
        user_data_queue.put_nowait(data)
    min_wait = 1000
    max_wait = 15000
場景3
>>>模擬3個使用者並行登入賬號,總共有9個賬號,要求並行登入賬號不相同,但資料可迴圈使用;
概括:
保證並行測試資料唯一性,迴圈取資料;
>>>所有並行虛擬使用者共用同一份測試資料,保證並行虛擬使用者使用的資料不重複,並且資料可迴圈重複使用。
程式碼展示
# -*- coding: utf-8 -*-
"""
@ auth : carl_DJ
@ time : 2020-9-23
"""


from locust import TaskSet, task, HttpUser
import queue
class UserBehav(TaskSet):
    @task
    def test_register(self):
        try:
            data = self.locust.user_data_queue.get()
        except queue.Empty:
            print('account data run out, test ended')
            exit(0)
        print('register with user: {0}, pwd: {1}' .format(data['username'], data['password']))
        payload = {
            'username': data['username'],
            'password': data['password']
        }
        self.client.post('/register', data=payload)
        self.locust.user_data_queue.put_nowait(data)
class WebsiteUser(HttpUser):
    host = 'http://www.xxx.com'
    task_set = task(UserBehav)
    user_data_queue = queue.Queue()
    for index in range(100):
        data = {
            "username": "test%04d" % index,
            "password": "pwd%04d" % index,
            "email": "test%04d@debugtalk.test" % index,
            "phone": "186%08d" % index,
        }
        user_data_queue.put_nowait(data)
    min_wait = 1000
    max_wait = 15000
4.3 檢查點
我們直接使用assert來進行斷言操作。
上程式碼:
# -*- coding: utf-8 -*-
"""
@ auth : carl_DJ
@ time : 2020-9-23
"""


from locust import task

@task
def test_interface(self):
     #直接使用csdn的某一個api
    with  self.client.get("https://editor.csdn.net/md?articleId=108596407",name = 'fileconfig',catch_response=True) as response:
    	#python斷言對介面返回值中的max欄位進行斷言
        assert response.json()['rating']['max']==100
        #對http響應碼是否200進行判斷
        if response.status_code ==200:
            response.success()
        else:
            response.failure("Failed!")
這裡說明一下:
1、斷言形式:with self.client.get(「url地址」,catch_response=True) as response;
2、response.status_code獲取http響應碼進行判斷,失敗後會加到統計錯誤表中;
>>>如果直接使用python自帶assert,則不會進入到locust報表,
3、預設不寫引數catch_response=False斷言無效,將catch_response=True才生效。
5. Locust執行模式
執行Locust時,通常會使用到兩種執行模式:單程序執行和多程序分散式執行。
5.1 單程序執行模式
5.1.1 定義及解析
1、Locust所有的虛擬並行使用者均執行在單個Python程序中,
由於單程序的原因,並不能完全發揮壓力機所有處理器的能力,因此主要用於偵錯指令碼和小並行壓測的情況。
2、當並行壓力要求較高時,就需要用到Locust的多程序分散式執行模式。
>>> 一旦單臺計算機不足以模擬所需的使用者數量,Locust就會支援執行分佈在多臺計算機上的負載測試。
3、多程序分佈執行情況:
①多臺壓力機同時執行,每臺壓力機分擔負載一部分的壓力生成;
②同一臺壓力機上開啟多個slave的情況。
>>>如果一臺壓力機有N個處理器核心,那麼就在這臺壓力機上啟動一個master,N個slave。
>>>也可以啟動N的倍數個slave。
5.1.2 有Web UI模式
Locust預設採用8089埠啟動web;如果要使用其它埠,就可以使用如下引數進行指定。
引數說明:
① -P, --port:指定web埠,預設為8089.
終端中—>進入到程式碼目錄: locust -f locustfile.py --host = xxxxx.com
② -f: 指定效能測試指令碼檔案
③ -host: 被測試應用的URL地址【如果不填寫,讀取繼承(HttpLocust)類中定義的host】
注意
1、如果Locust執行在本機,在瀏覽器中存取http://localhost:8089即可進入Locust的Web管理頁面;
2、如果Locust執行在其它機器上,那麼在瀏覽器中存取http://locust_machine_ip:8089即可。
5.1.3 無Web UI模式
如果採用no_web形式,則需使用–no-web引數,並會用到如下幾個引數。
引數說明:
① -c, --clients:指定並行使用者數;
② -n, --num-request:指定總執行測試次數;
③ -r, --hatch-rate:指定並行加壓速率,預設值位1。
範例展示:
$ locust -f locustfile.py --host = xxxxx --no-web -c 1 -n 2
5.1.4 啟動locust
在Pycharm的 的Terminal 中啟動 locust,
輸入內容:
locust --host =http://localhost -f test_load.py

也可以在 VScode、WindowsPowserShell中啟動,這裡我就是用 Pycharm演示一下
5.2 多程序分散式執行
不管是單機多程序,還是多機負載模式,執行方式都是一樣的,都是先執行一個master,再啟動多個slave。
5.2.1 master啟動
1、啟動master時,需要使用–master引數
2、如果要使用8089以外的埠,還需要使用-P, --port引數
範例展示:
locust -f prof_load.py --master --port=8089
5.2.2 slave 啟動
1、啟動slave時需要使用–slave引數
2、在slave中,就不需要再指定埠
3、master啟動後,還需要啟動slave才能執行測試任務
範例展示
locust -f monitorAgent.py --slave
ocust -f monitorAgent.py --slave --master-host=<locust_machine_ip>
master和slave都啟動完成,就可以進入到Locust 的web介面。剩下的操作,就是介面操作了~
6. Locust 結果分析

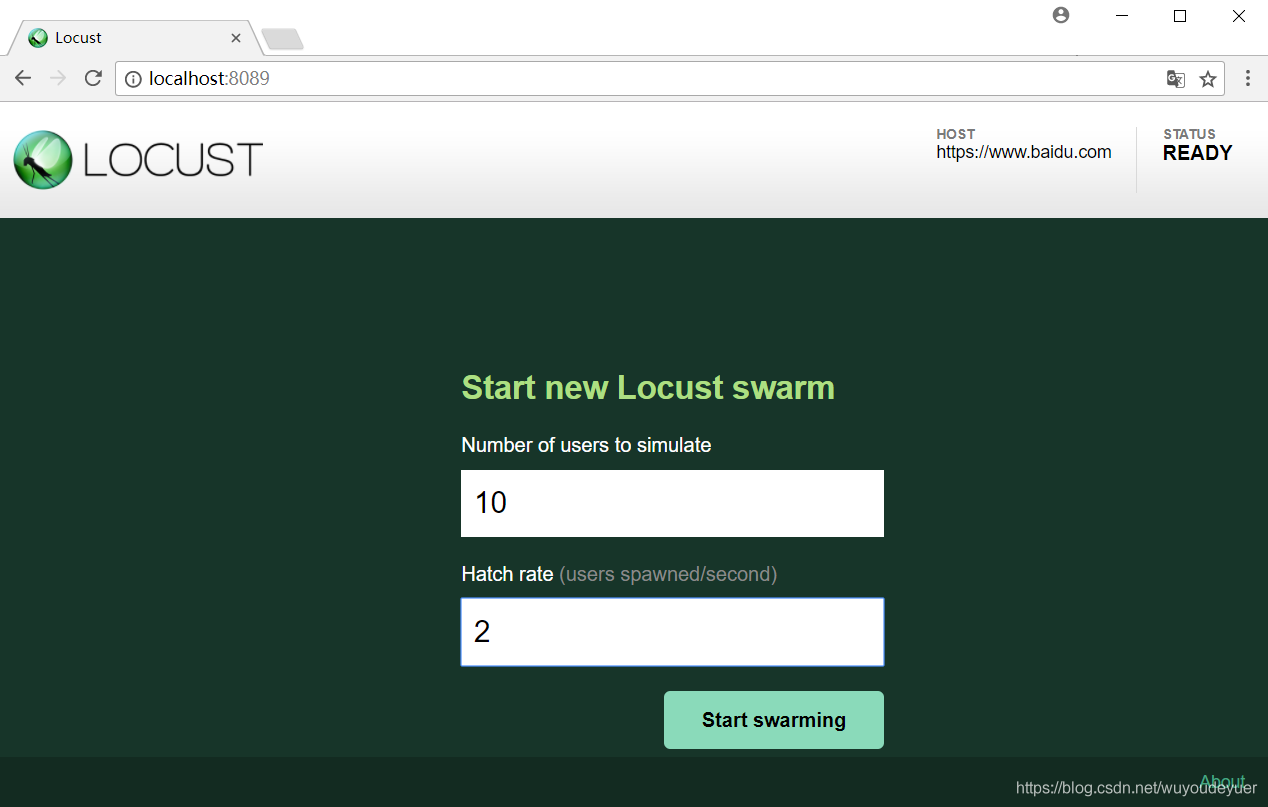
Number of users to simulate: 設定虛擬使用者數,對應中no_web模式的-c, --clients引數;
Hatch rate(users spawned/second): 每秒產生(啟動)的虛擬使用者數 , 對應著no_web模式的-r, --hatch-rate引數,預設為1。

上圖:啟動了一個 master 和兩個 slave,由兩個 slave 來向被測試系統傳送請求
效能測試引數
Type: 請求的型別,例如GET/POST。
Name:請求的路徑。這裡為百度首頁,即:https://www.baidu.com/
request:當前請求的數量。
fails:當前請求失敗的數量。
Median:中間值,單位毫秒,一半的伺服器響應時間低於該值,而另一半高於該值。
Average:平均值,單位毫秒,所有請求的平均響應時間。
Min:請求的最小伺服器響應時間,單位毫秒。
Max:請求的最大伺服器響應時間,單位毫秒。
Content Size:單個請求的大小,單位位元組。
reqs/sec:是每秒鐘請求的個數。
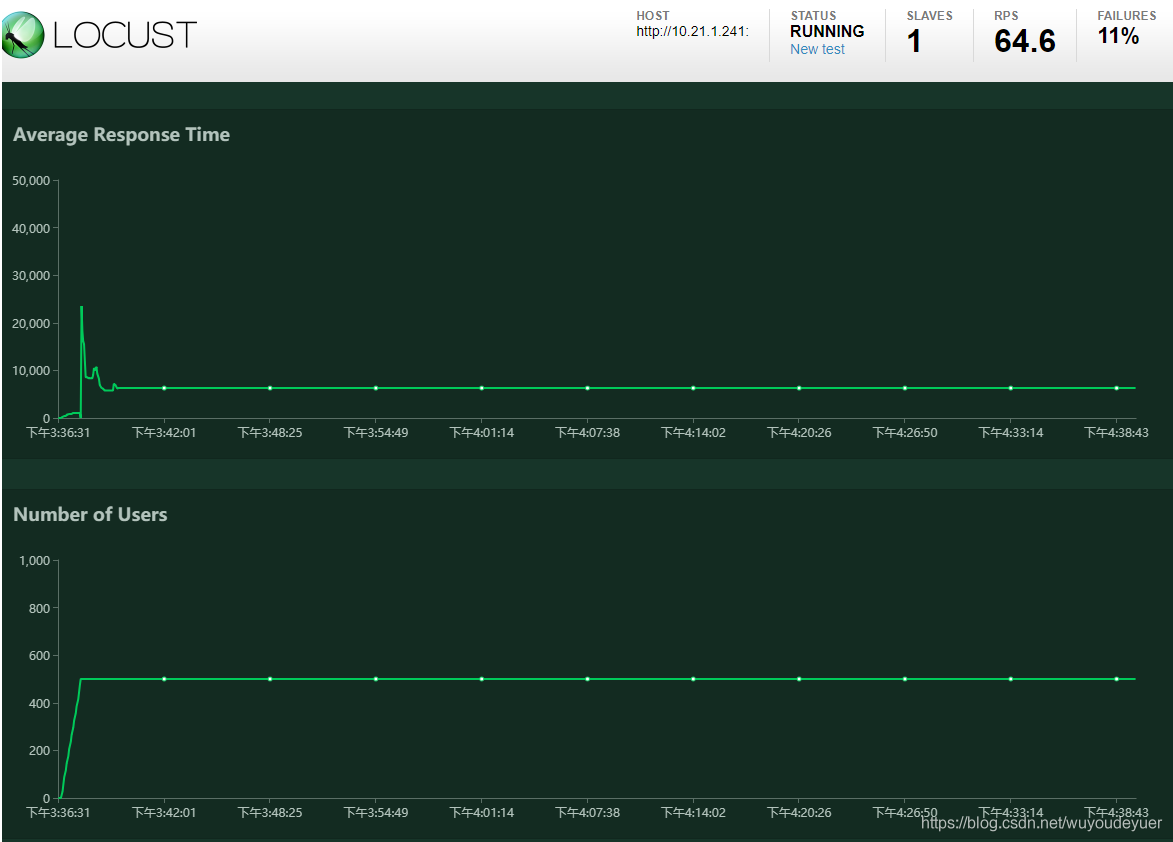
相比於LoadRunner,Locust的結果展示十分簡單,主要就四個指標:並行數、RPS、響應時間、異常率。但對於大多數場景來說,這幾個指標已經足夠了。

上圖是 曲線分析圖。
關於locust的程式碼實戰及結果分析,就先到這裡。
在這裡,小魚再多說一句:
萬行程式碼從頭寫,先看基礎挺要緊
所以,要弄懂程式碼,還是先看基礎。
點選傳送《深聊效能測試,從入門到放棄之:Locust效能自動化(一)初識Locust》