Android四大元件之Activity啟動流程原始碼實現詳解(一)
Activity啟動流程原始碼實現詳解(一)
Android四大元件原始碼實現詳解系列部落格目錄:
Android應用程序建立流程大揭祕
Android四大元件之bindService原始碼實現詳解
Android四大元件之Activity啟動流程原始碼實現詳解概要
Android四大元件之Activity啟動流程原始碼實現詳解(一)
前言
在正式開始Android四大元件之Activity啟動流程原始碼實現詳解之前,如果小夥們還沒有閱讀Activity啟動流程原始碼實現詳解概要,強烈建議先行閱讀該概要,因為該篇部落格從整體概要和Activity啟動的前期知識點出發為我們提供了提綱和將要涉及到的知識點的梳理。在本篇部落格中我們將重點分析目標程序傳送Activity啟動請求和AMS服務對啟動Activity的請求的初步處理,即重點闡述如下階段流程:
-
Souruce端程序傳送請求目標Activity啟動階段:
1.Source端發起顯示/隱式啟動請求啟動Activity -
System_server程序通過AMS處理啟動Activity請求:
2.解析啟動目標Activity的Intent
3.建立目標Activity對應的ActivityRecord -
注意:本篇的介紹是基於Android 7.xx平臺為基礎的,其中涉及的程式碼路徑如下:
frameworks/base/services/core/java/com/android/server/am/
  --- ActivityManagerService.java
  --- ProcessRecord.java
  --- ActivityRecord.java
  --- ActivityResult.java
  --- ActivityStack.java
  --- ActivityStackSupervisor.java
  --- ActivityStarter.java
  --- TaskRecord.java

frameworks/base/services/core/java/com/android/server/pm、
 --- PackageManagerService.java

frameworks/base/core/java/android/app/
  --- IActivityManager.java
  --- ActivityManagerNative.java (內部包含AMP)
  --- ActivityManager.java
  --- AppGlobals.java
  --- Activity.java
  --- ActivityThread.java(內含AT)
  --- LoadedApk.java
  --- AppGlobals.java
  --- Application.java
  --- Instrumentation.java

  --- IApplicationThread.java
  --- ApplicationThreadNative.java (內部包含ATP)
  --- ActivityThread.java (內含ApplicationThread)
  --- ContextImpl.java
- 並且在後續的原始碼分析過程中為了簡述方便,會將做如下簡述:
ApplicationThreadProxy簡稱為ATP
ActivityManagerProxy簡稱為AMP
ActivityManagerService簡稱為AMS
ActivityManagerNative簡稱AMN
ApplicationThreadNative簡稱ATN
PackageManagerService簡稱為PKMS
ApplicationThread簡稱為AT
ActivityStarter簡稱為AS,這裡不要和ActivityServices搞混淆了
ActivityStackSupervisor簡稱為ASS
一. Source端開始請求執行啟動Activity
Source端開始請求執行啟動Activity的核心虛擬碼如下,接下來我們以下面的虛擬碼為脈絡逐步分析,但是不會每個原始碼細節都予以分析(並且如果小夥們只是想大概瞭解一下基本流程,那麼下面的虛擬碼就夠了!),而是挑出重點!
//發起端程序發起啟動Activity請求
	Activity.startActivity(...)
	  Activity.startActivityForResult(...)
	    mInstrumentation.execStartActivity(...)
		  AMP.startActivity(...)//通過AMS代理端向AMS發起啟動Activity的Binder IPC請求
		  mInstrumentation.checkStartActivityResult(...)//檢測啟動是否成功
		mMainThread.sendActivityResult(...)
2.1 Activity.startActivity
    Intent intent = new Intent();
    intent.setAction("xxx.xxx.xxx");
    startActivity(intent);
通常我們在Activity啟動Activity會直接呼叫startActivity方法,此時會執行Activity的startActivity方法
//Activity.java
    @Override
    public void startActivity(Intent intent) {
        this.startActivity(intent, null);
    }
此時可以看到會接著呼叫Activity的過載startActivity方法,我們接著繼續分析其過載方法
//Activity.java
    @Override
    public void startActivity(Intent intent, @Nullable Bundle options) {
        if (options != null) {
            startActivityForResult(intent, -1, options);
        } else {
            startActivityForResult(intent, -1);//進入該分支,注意此時的引數requestCode取值為-1,表明發起端程序無需接收Activity的結果,詳見章節2.2
        }
    }
此時我們的入參options為null,所以會走入else的分支,即此時的startActivityForResult方法的引數requestCode被預設賦予了-1的值。
分析到這裡不知道小夥們注意到一個問題沒有,就是通常我們啟動Activity有兩個方法startActivity和startActivityForResult。這裡我們可以看到Activity中呼叫startActivity的內部也是呼叫的startActivityForResult的。
而我們知道通過startActivityForResult啟動目標Activity可以在Activity中回撥onActivityResult接收目標Acitiy啟動的情況,而呼叫startActivity則不可以呢?其最最主要的原因就是呼叫startActivity啟動目標Acitivity時,其內部呼叫startActivityForResult傳遞的引數requestCode被預設賦予為-1了在後續過程中會根據此值判斷是否需要傳遞迴撥用結果,這也意味著我們在Activity呼叫startActivityForResult的時候傳遞的requestCode值為-1(通過後續分析我們可知,只要小於0)的話,那麼onActivityResult是不起作用的。所以當我們呼叫startActivityForResult的時候需要注意這一點。
2.2 Activity.startActivityForResult
//Activity.java
	Activity mParent;
    public void startActivityForResult(@RequiresPermission Intent intent, int requestCode,
            @Nullable Bundle options) {
        if (mParent == null) {
			/*
			* mToken: 資料型別為IBinder,這個Token貫穿AMS,Activity,WMS,並且可以跨程序傳遞
			* mAppThread: 又是一個IBinder型別,此處它是Binder實體ApplicationThread
			*/
            Instrumentation.ActivityResult ar =
                mInstrumentation.execStartActivity(
                    this, mMainThread.getApplicationThread(), mToken, this,
                    intent, requestCode, options);//詳見2.3
            if (ar != null) {
                mMainThread.sendActivityResult(//傳送執行結果
                    mToken, mEmbeddedID, requestCode, ar.getResultCode(),
                    ar.getResultData());
            }
            if (requestCode >= 0) {//注意此處
                mStartedActivity = true;
            }

            cancelInputsAndStartExitTransition(options);
        } else {//子視窗中會執行此分支
            if (options != null) {
                mParent.startActivityFromChild(this, intent, requestCode, options);
            } else {
                mParent.startActivityFromChild(this, intent, requestCode);
            }
        }
    }
注意這裡有一個判斷邏輯mParent是否為null,這裡的mParent 根據檔案註釋和實測應該是用來判斷是否是在子視窗的,類似於在Dialog中啟動Activity中的那種。在當前情況下我們可知為null所以會走入ifi分支。
這裡我們需要重點分析一下Instrumentation這個類,Instrumentation是android系統中啟動Activity的一個實際操作類,即實際執行者,在有些書中也被成為Activity的大管家。並且這裡我們所說的Source端開始請求執行啟動Activity實際上就是Instrumentation進行實際操作執行的,那麼為什麼說是在應用程序端的啟動呢?實際上Activity的啟動分為應用程序端的啟動和system_server服務程序端的啟動,Activity的啟動不是獨立的,而是多個應用程序相互配合最終完成了Activity在系統中的啟動的,而在應用程序端的啟動實際的操作類就是Intrumentation來執行的。我們來簡單看看其提供了那些基本方法:
newActivity(…)
newApplication(…)
callApplicationOnCreate(…)
callActivityOnCreate(…)
callActivityOnNewIntent(…)
callActivityOnXXX(…)
execStartActivity(…)
從上面可以看到它的方法都是Application和Activity的建立以及生命週期的相關方法。
同時這裡有一個知識點,我需要提前補充一下就是對於每一個Android App程序來說,它的總入口都是ActivityThread的main. 每一個應用的程序都有且僅有一個ActivityThread物件,而每一個ActivityThread物件有且僅有一個Instrumentation成員變數,即整個App程序中ActivityThread和Instrumentation範例物件是唯一的。
2.3 Instrumentation.execStartActivity
//Instrumentation.java
    public ActivityResult execStartActivity(
            Context who,
            IBinder contextThread,
            IBinder token,
            Activity target,
            Intent intent,
            int requestCode,
            Bundle options)
在正式開始分析該方法前,我得對該方法的引數予以隆重的介紹:
-
who
引數型別為Context範例,標明發起端上下文的資訊 -
contextThread
引數型別為IBinder範例,該物件繼承於ApplicationThreadNative(Binder伺服器端),這個ApplicationThread物件很重要,因為正是通過它串聯其了AMS對發起端程序的ActivityThread的互動(如果把ApplicationThread當作伺服器端,那麼此時AMS相關於ApplicationThread而言就是使用者端)。其兩者之間的關係建立詳見下述的示意圖,即AMS持有ApplicationThread的代理端,而應用端程序持有AMS的代理端AMP,二者相互持有各自Binder伺服器端的代理端進而完成了二者之間的RPC呼叫。在目標Activiy啟動後發起端Activity的onPause的執行是由其代理端ATP在AMS中來通過Binder IPC透傳過來,然後發起端Activity執行onPause流程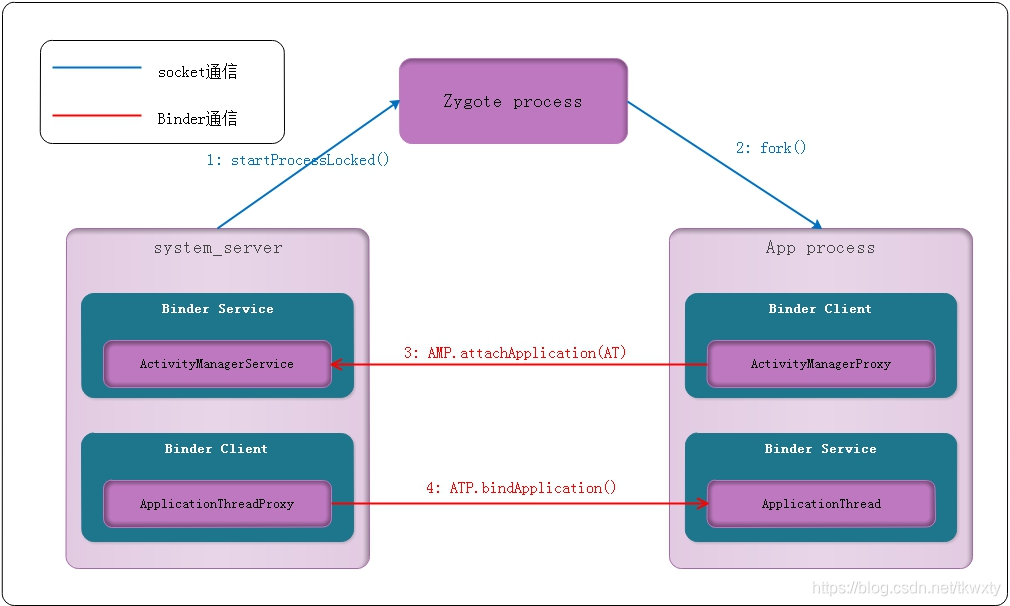
-
token
引數型別也為IBinder範例,指向發起端Activity的ActivityRecord物件中的Token,其Binder實體在AMS中,這裡暫且不表 -
target
引數型別為Activity範例,標明發起端Activity,如果發起端不為Activity此時為null -
intent
引數型別為Intent範例,用來表明要啟動的Activity資訊,此時的intent可能是顯示Intent,也可能是隱式Intent,我們此處的是一個隱式Intent。顯式intent通常用在包內啟動元件,如果是啟動其他APP的元件,則通常用隱式intent。顯式intent裡面包含了一個ComponentName,ComponentName由包名 + 類名組成,可以唯一標識一個元件,系統通過ComponentName就可以找到要啟動的元件。隱式intent通常通過Action來過濾出要啟動的元件 -
requestCode
引數型別為int,啟動Activity的請求碼,此請求碼錶明發起端是否需要接收目標Activity啟動的結果 -
options
引數型別為Bundle ,可以理解我啟動目標Activity的附件引數,譬如附件傳輸的一些額外資訊
    public ActivityResult execStartActivity(
            Context who, IBinder contextThread, IBinder token, Activity target,
            Intent intent, int requestCode, Bundle options) {

        IApplicationThread whoThread = (IApplicationThread) contextThread;
		..
        try {
            intent.migrateExtraStreamToClipData();
            intent.prepareToLeaveProcess(who);

			/* public int startActivity(IApplicationThread caller, String callingPackage, Intent intent,
						String resolvedType, IBinder resultTo, String resultWho, int requestCode, int flags,
			   			ProfilerInfo profilerInfo, Bundle options) throws RemoteException;
			   caller:當前應用的ApplicationThread物件mAppThread
			   callingPackage: 呼叫當前ContextImpl.getBasePackageName(),獲取當前Activity所在包名
			   intent: 這便是啟動Activity時,傳遞過來的引數
			*/

            int result = ActivityManagerNative.getDefault()
                .startActivity(whoThread, who.getBasePackageName(), intent,
                        intent.resolveTypeIfNeeded(who.getContentResolver()),
                        token, target != null ? target.mEmbeddedID : null,
                        requestCode, 0, null, options);//詳見章節2.4
            checkStartActivityResult(result, intent);//檢查Activity啟動是否成功
        } catch (RemoteException e) {
            throw new RuntimeException("Failure from system", e);
        }
        return null;
    }
2.4 AMN.getDefault
繼續回到章節2.3,我們可以看到最後其呼叫了AMN.getDefault().startActivity,這裡牽涉到一個重要的方法AMN.getDefault(),其實它在我們的部落格中 Android Binder框架實現之Java層獲取Binder服務原始碼分析已經有詳細的介紹和分析了,但是為了部落格的連貫性還是簡單過下(主要是為了不太熟悉的小夥伴們)。
//ActivityManagerNative.java
    static public IActivityManager getDefault() {
        return gDefault.get();
    }
這裡的gDefault是Singleton物件範例,而Singleton我們可以看到是一個模板類物件,並且提供了一個單例方法,其定義如下:
//Singleton.java
public abstract class Singleton<T> {
    private T mInstance;

    protected abstract T create();

    public final T get() {
        synchronized (this) {
            if (mInstance == null) {//採用單例模式
                mInstance = create();
            }
            return mInstance;
        }
    }
}
我們將IActivityManager帶入Singleton,得到如下的create方法過程:
	//ActivityManagerNative.java
    private static final Singleton<IActivityManager> gDefault = new Singleton<IActivityManager>() {
        protected IActivityManager create() {
        	//此處等價於IBinder b = new BinderProxy(new BpBinder(handle));
            IBinder b = ServiceManager.getService("activity");
            if (false) {
                Log.v("ActivityManager", "default service binder = " + b);
            }
			//此處等價於IActivityManager am = new ActivityManagerProxy(new BinderProxy(new BpBinder(handle)))
            IActivityManager am = asInterface(b);
            if (false) {
                Log.v("ActivityManager", "default service = " + am);
            }
            return am;
        }
    };

	//注意此處我們的入參是BinderProxy型別,所以會走代理端
    static public IActivityManager asInterface(IBinder obj) {
        if (obj == null) {
            return null;
        }
        IActivityManager in =
            (IActivityManager)obj.queryLocalInterface(descriptor);
        if (in != null) {
            return in;
        }
		//即會走到此處
        return new ActivityManagerProxy(obj);
    }
這裡即最終經過層層轉換得到了AMS服務的代理端ActivityManagerProxy,進而藉助它完成對AMS服務的RPC請求。
2.4.1 AMN.getDefault()小結
AMN.getDefault()的呼叫流程基本分析結束了,我們對其小結一下:
- AMN.getDefault()最終獲取了AMS的遠端Binder代理端AMP
- AMS的Binder通訊過程中提供了一個IActivityManager服務業務層介面,AMP類與AMS類都實現了IActivityManager介面方法,區別不同給的是AMS端顯示了真正的具體服務,而AMP端是封裝了相關的通訊傳輸邏輯。AMP作為Binder通訊的服務代理端,而AMS作為Binder通訊的伺服器端實體,根據Android Binder框架實現之Java層Binder服務跨程序呼叫原始碼分析,AMP.bindService()最終呼叫AMS.startActivity(),整個流程圖如下:
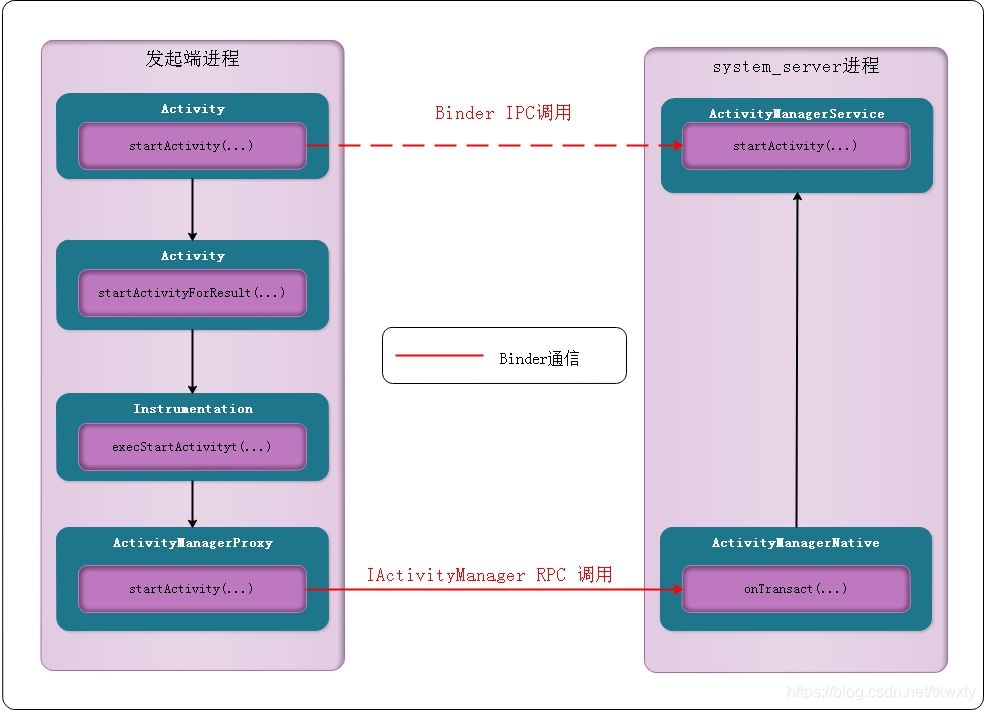
關於上述整個Binder IPC呼叫流程,可以使用如下虛擬碼來簡述
AMP.startActivity(...)--->
BinderProxy.transact(...) --->
BpBinder.transact(...)--->
binder驅動傳輸--->
JavaBBinder.onTransact(...)--->
AMN.onTransact(..)--->
AMN.startActivity(...)
2.5 AMP.startActivity(…)
	//ActivityManagerNative.java
    public int startActivity(IApplicationThread caller,
    						 String callingPackage,
    						 Intent intent,
            				 String resolvedType,
            				 IBinder resultTo,
            				 String resultWho,
            				 int requestCode,
                             int startFlags,
                             ProfilerInfo profilerInfo,
                             Bundle options) throws RemoteException {
        Parcel data = Parcel.obtain();
        Parcel reply = Parcel.obtain();
        //寫入AMS Binder服務描述資訊即android.app.IActivityManager
        data.writeInterfaceToken(IActivityManager.descriptor);
        //寫入IApplicationThread 匿名Binder服務實體(這個在attachApplication時寫入過)
        data.writeStrongBinder(caller != null ? caller.asBinder() : null);
        data.writeString(callingPackage);
        intent.writeToParcel(data, 0);
        data.writeString(resolvedType);
        data.writeStrongBinder(resultTo);
        data.writeString(resultWho);
        data.writeInt(requestCode);
        data.writeInt(startFlags);
        if (profilerInfo != null) {
            data.writeInt(1);
            profilerInfo.writeToParcel(data, Parcelable.PARCELABLE_WRITE_RETURN_VALUE);
        } else {
            data.writeInt(0);
        }
        if (options != null) {
            data.writeInt(1);
            options.writeToParcel(data, 0);
        } else {
            data.writeInt(0);
        }
		//BinderProxy
		//mRemote指向BinderProxy,而BinderProxy持有C++端的BpBinder,進而藉助Binder驅動和AMS通訊
        mRemote.transact(START_ACTIVITY_TRANSACTION, data, reply, 0);
        reply.readException();
        int result = reply.readInt();
        reply.recycle();
        data.recycle();
        return result;
    }
這裡如果對Binder框架熟悉的小夥們應該對上述的呼叫過程是見怪不怪了,但是有幾個點我們需要注意:
- 此處startActivity()的共有10個引數, 下面說說每個引數傳遞AMP.startActivity()每一項的對應值
| 引數型別 | 引數名稱 | 引數含義以及取值 |
|---|---|---|
| IApplicationThread | caller | 當前應用的ActivityThread物件ApplicationThread範例mAppThread |
| String | callingPackage | 呼叫當前ContextImpl.getBasePackageName(),獲取當前Activity所在包名 |
| Intent | intent | 啟動目的端Activity傳遞過來的引數,其中攜帶目的端Acitivity隱式或者顯示啟動需要的引數 |
| String | resolvedType | 呼叫intent.resolveTypeIfNeeded而獲取 |
| IBinder | resultTo | 引數型別也為IBinder範例,指向發起端Activity的ActivityRecord物件中的Token,其Binder實體在AMS中 |
| String | resultWho | 來自於當前發起端Activity.mEmbeddedID,可能為null |
| int | requestCode | 啟動目的端Activity的請求碼,此時的取值為-1 |
| int | startFlags | 此時取值為0,代指Activity的啟動模式 |
| ProfilerInfo | profilerInfo | 此時取值null,這個引數暫時沒有搞懂是幹啥的 |
| Bundle | options | 啟動目的端Activity附加引數,此時取值為null |
- startActivity中呼叫了二次Parcel類的方法writeStrongBinder(),這裡我們需要注意writeStrongBinder()這二次寫入的是Binder實體代理端還是代理端,是實名Binder還是匿名Binder。
- 這裡的mRemote指向BinderProxy,而BinderProxy持有C++端的BpBinder,而BpBinder作為遠端Binder實體的通訊代理端,最後藉助Binder驅動和AMS通訊,最後呼叫到ActivityManagerNative的onTransact()方法中
三. System_server程序接收啟動Activity的請求
通過上面的層層衝關,打怪我們跳出了發起端程序,來到了system_server程序,讓我們接著分析看看system_server是怎麼處理startActivity的RPC請求的。
3.1 AMN.onTransact
	//ActivityManagerNative.java
    @Override
    public boolean onTransact(int code, Parcel data, Parcel reply, int flags)
            throws RemoteException {
        switch (code) {
        case START_ACTIVITY_TRANSACTION:
        {
            data.enforceInterface(IActivityManager.descriptor);
            IBinder b = data.readStrongBinder();
			//轉換成ApplicationThread Binder實體代理端ApplicationThreadProxy
            IApplicationThread app = ApplicationThreadNative.asInterface(b);
            String callingPackage = data.readString();
            Intent intent = Intent.CREATOR.createFromParcel(data);
            String resolvedType = data.readString();
            IBinder resultTo = data.readStrongBinder();
            String resultWho = data.readString();
            int requestCode = data.readInt();
            int startFlags = data.readInt();
            ProfilerInfo profilerInfo = data.readInt() != 0
                    ? ProfilerInfo.CREATOR.createFromParcel(data) : null;
            Bundle options = data.readInt() != 0
                    ? Bundle.CREATOR.createFromParcel(data) : null;
			//呼叫AMN的子類AMS,詳見章節3.2
            int result = startActivity(app, callingPackage, intent, resolvedType,
                    resultTo, resultWho, requestCode, startFlags, profilerInfo, options);
            reply.writeNoException();
            reply.writeInt(result);
            return true;
        }
在正式開始上述的原始碼分析前,我們先來闡述一個重要的知識點,即在這個呼叫過程中涉及到兩個程序,不妨令startActivity的發起程序記為程序Process_A,AMS Service所屬程序記為程序Process_B;那麼程序Process_A通過Binder機制(採用IActivityManager介面)向程序Process_B發起請求服務,程序Process_B則通過Binder機制(採用IApplicationThread介面)向程序Process_A發起請求服務。也就是說程序Process_A與程序Process_B能相互間主動發起請求,進而完成程序通訊,但是這裡有一點需要注意IApplicationThread的Binder實體端並沒有註冊到servicemanager程序中,它是一個依賴於實名Binder的匿名Binder。
這裡涉及IApplicationThread很重要,它串聯起了AMS對App程序的生命週期及其其它的控制,那麼下面直接把其相關的類圖展示如下:
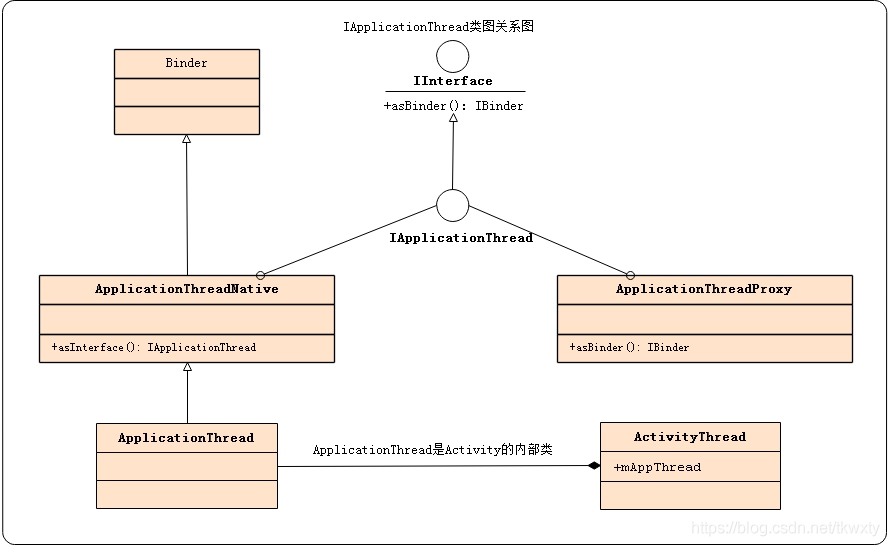
這裡的IApplicationThread與IActivityManager的Binder通訊原理一樣,ATP作為Binder通訊的使用者端,ATN作為Binder通訊的伺服器端,其中ApplicationThread繼承ATN類,覆寫其中的部分方法。
接著繼續分析onTransact方法,其根據AMP傳遞過來的code值進入START_ACTIVITY_TRANSACTION分支,然後解讀取通過Binder驅動傳遞過來的資料,解析完成之後呼叫AMN的方法startActivity繼續未完成之工作(這裡的startActivity在AMS服務中具體實現),這裡從驅動中獲取到資料然後解析這裡就不重點關注了。
3.2 AMS.startActivity
    @Override
    //AMS.java
    public final int startActivity(IApplicationThread caller, String callingPackage,
            Intent intent, String resolvedType, IBinder resultTo, String resultWho, int requestCode,
            int startFlags, ProfilerInfo profilerInfo, Bundle bOptions) {
        return startActivityAsUser(caller, callingPackage, intent, resolvedType, resultTo,
                resultWho, requestCode, startFlags, profilerInfo, bOptions,
                UserHandle.getCallingUserId());
    }
    final ActivityStackSupervisor mStackSupervisor;

    final ActivityStarter mActivityStarter;
    final ActiveServices mServices;
    @Override
    public final int startActivityAsUser(IApplicationThread caller, String callingPackage,
            Intent intent, String resolvedType, IBinder resultTo, String resultWho, int requestCode,
            int startFlags, ProfilerInfo profilerInfo, Bundle bOptions, int userId) {
        enforceNotIsolatedCaller("startActivity");
        userId = mUserController.handleIncomingUser(Binder.getCallingPid(), Binder.getCallingUid(),
                userId, false, ALLOW_FULL_ONLY, "startActivity", null);
                //這裡的mActivityStarter是ActivityStarter的範例物件
        return mActivityStarter.startActivityMayWait(caller, -1, callingPackage, intent,
                resolvedType, null, null, resultTo, resultWho, requestCode, startFlags,
                profilerInfo, null, null, bOptions, false, userId, null, null);//詳見章節3.3
    }
這裡需要重點強調如下幾點:
-
AMS是Android提供負責系統中四大元件的啟動、切換、排程及應用程序的管理和排程等工作的Java層Binder服務,其身上的擔子很重,為了減輕負擔和程式碼邏輯的精簡其會將重任委託給幾個非常重要的類來執行ActivityStarter,ActivityStackSupervisor,ActiveServices,AMS的類圖關係如下所示,並且關於每個類的作用詳見部落格Activity啟動流程原始碼實現詳解概要章節2.5這裡就不重複了。
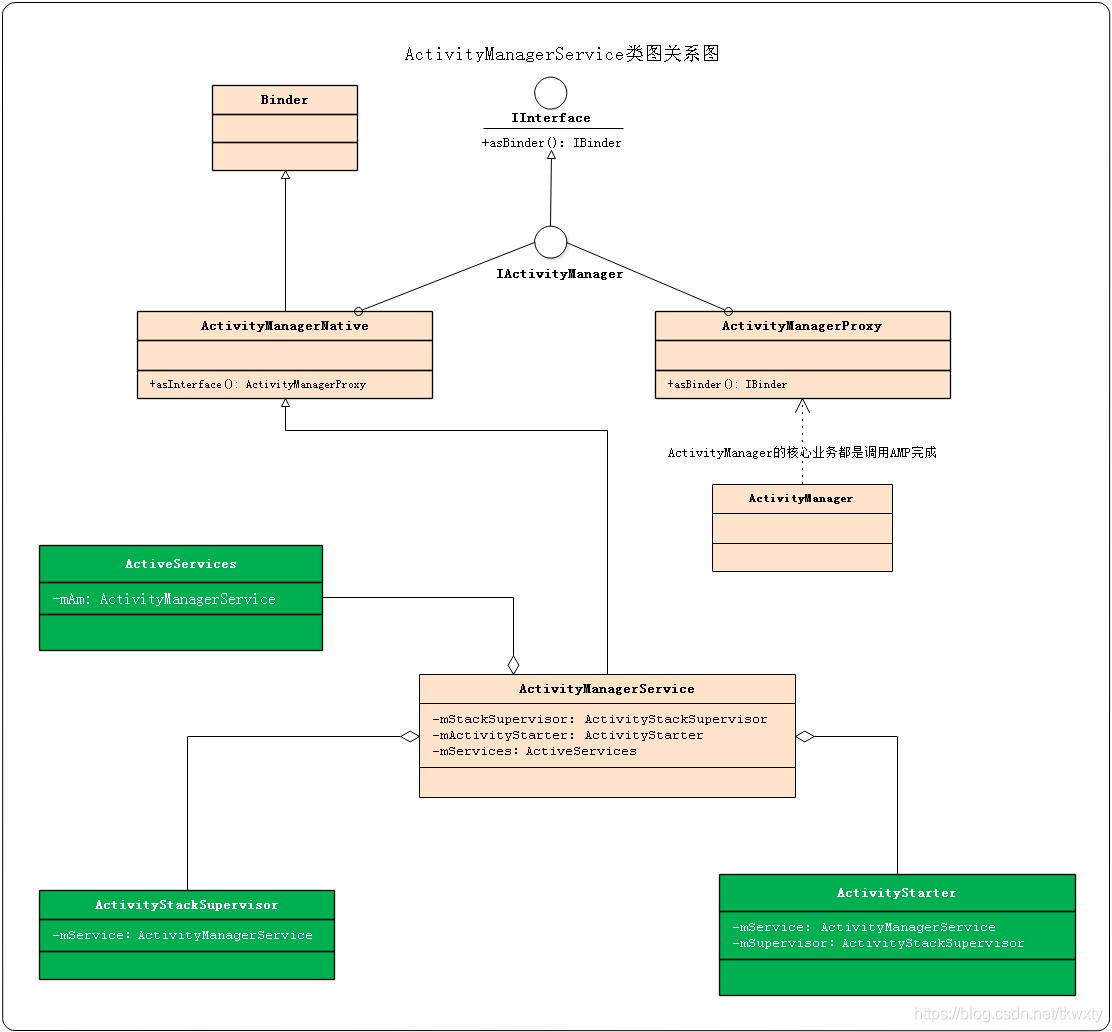
-
這裡的mActivityStarter是ActivityStarter的範例物件,其是在AMS的構造方法中被建立的,如下所示可以看到其持有對AMS和ASS的參照。
//AMS.java
final ActivityStackSupervisor mStackSupervisor;
final ActivityStarter mActivityStarter;
final ActiveServices mServices;
public ActivityManagerService(Context systemContext) {
	...
	mServices = new ActiveServices(this);
	mStackSupervisor = new ActivityStackSupervisor(this);
    mActivityStarter = new ActivityStarter(this, mStackSupervisor);
	...
}
3.3 AS.startActivityMayWait
//ActivityStarter.java
    final int startActivityMayWait(IApplicationThread caller,
    								int callingUid,
            						String callingPackage,
            						Intent intent,
            						String resolvedType,
            						IVoiceInteractionSession voiceSession,
            						IVoiceInteractor voiceInteractor,
            						IBinder resultTo,
            						String resultWho,
            						int requestCode,
            						int startFlags,
            						ProfilerInfo profilerInfo,
            						IActivityManager.WaitResult outResult,
            						Configuration config,
            						Bundle bOptions,
            						boolean ignoreTargetSecurity,
            						int userId,
            						IActivityContainer iContainer,
            						TaskRecord inTask) {
在正式開始分析該方法前,我們先對該方法的引數和入參整理一下,該方法的引數不少啊,總共有19個至多(不知道數對了沒有啊),其引數型別和取值如下:
| 引數型別 | 引數名稱 | 引數含義及取值 |
|---|---|---|
| IApplicationThread | caller | 和發起端程序匿名Binder物件ActivityThread進行通訊的代理端ATP |
| int | callingUid | 取值為-1,看引數命名應該是表示發起端的程序的uid |
| String | callingPackage | 發起端程序所在包名 |
| Intent | intent | 啟動目的端Activity傳遞過來的引數,其中攜帶目的端Acitivity隱式或者顯示啟動需要的引數 |
| String | resolvedType | 發起端程序通過呼叫intent.resolveTypeIfNeeded而獲取 |
| IVoiceInteractionSession | voiceSession | 意義不明,取值為null |
| IVoiceInteractor | voiceInteractor | 意義不明,取值為null |
| IBinder | resultTo | 引數型別也為IBinder範例,指向發起端Activity的ActivityRecord物件中的Token,其Binder實體在AMS中 |
| String | resultWho | 來自於當前發起端Activity.mEmbeddedID,可能為null |
| int | requestCode | 啟動目的端Activity的請求碼,此時的取值為-1 |
| int | startFlags | 此時取值為0,代指Activity的啟動模式 |
| ProfilerInfo | profilerInfo | 此時取值null,這個引數暫時沒有搞懂是幹啥的 |
| WaitResult | outResult | 此時取值為null,這個引數暫時沒有搞懂是幹啥的 |
| Configuration | config | 應該是表示啟動Activity的Configuration設定資訊(不太確定),此時取值為null |
| Bundle | options | 啟動目的端Activity附加引數,此時取值為null |
| boolean | ignoreTargetSecurity | 是否忽略檢查發起端程序的安全,此時取值為false |
| int | userId | 通過mUserController.handleIncomingUser,當呼叫者userId跟當前處於同一個userId,則直接返回該userId;當不相等時則根據呼叫者userId來決定是否需要將callingUserId轉換為mCurrentUserId |
| IActivityContainer | iContainer | 此時取值為null |
| TaskRecord | inTask | 此時取值為null |
入參分析完了,我們接著分析原始碼:
//ActivityStarter.java
    final int startActivityMayWait(IApplicationThread caller, int callingUid,
            String callingPackage, Intent intent, String resolvedType,
            IVoiceInteractionSession voiceSession, IVoiceInteractor voiceInteractor,
            IBinder resultTo, String resultWho, int requestCode, int startFlags,
            ProfilerInfo profilerInfo, IActivityManager.WaitResult outResult, Configuration config,
            Bundle bOptions, boolean ignoreTargetSecurity, int userId,
            IActivityContainer iContainer, TaskRecord inTask) {
		...
        final Intent ephemeralIntent = new Intent(intent);
        //以傳遞進來的intent為引數重新建立新的Intent物件,即便intent被修改也不受影響
        intent = new Intent(intent);
        //收集Intent所指向的Activity資訊, 當存在多個可供選擇的Activity,則直接向使用者彈出resolveActivity
        ResolveInfo rInfo = mSupervisor.resolveIntent(intent, resolvedType, userId);//重點分析該方法,詳見章節3.4
        if (rInfo == null) {//不會進入該分支
        	...
        }
		//根據獲取的rInfo資訊重新組裝intent和設定啟動的引數資訊
        ActivityInfo aInfo = mSupervisor.resolveActivity(intent, rInfo, startFlags, profilerInfo);//詳見3.5
        ...

        final ActivityStack stack;
        if (container == null || container.mStack.isOnHomeDisplay()) {//傳入的引數container為null
            stack = mSupervisor.mFocusedStack;//進入該分支
        } else {
            stack = container.mStack;
        }
		//此時傳入的config為null
        stack.mConfigWillChange = config != null && mService.mConfiguration.diff(config) != 0;
        ...
        if (aInfo != null &&
                (aInfo.applicationInfo.privateFlags
                        & ApplicationInfo.PRIVATE_FLAG_CANT_SAVE_STATE) != 0) {
            //hwavy-weight程序,貌似木有見過這個東東,暫時不管
        	...
        }
        ...
         final ActivityRecord[] outRecord = new ActivityRecord[1];

		//繼續跟進
         int res = startActivityLocked(caller, intent, ephemeralIntent, resolvedType,
                 aInfo, rInfo, voiceSession, voiceInteractor,
                 resultTo, resultWho, requestCode, callingPid,
                 callingUid, callingPackage, realCallingPid, realCallingUid, startFlags,
                 options, ignoreTargetSecurity, componentSpecified, outRecord, container,
                 inTask);//詳見章節3.6

         Binder.restoreCallingIdentity(origId);
		...
		return res;
}
該方法的主要功能如下:
- 藉助ASS的resolveIntent和resolveActivity方法,通過傳遞進來的引數(主要是intent)查詢合適的目標Actitiy,並將儲存到ActivityInfo中
- 繼續呼叫startActivityLocked方法,繼續未完成啟動工作
此時整個上述整個流程的虛擬碼如下:
	AMS.startActivity(...)
	 ActivityStarter.startActivityMayWait(...)
	   ResolveInfo rInfo = ASS.resolveIntent(...)//收集Intent所指向的Activity資訊, 當存在多個可供選擇的Activity,則直接向使用者彈出resolveActivity
	     IPackageManager.Stub.resolveIntent(...)//通過PKMS實體查詢
	   ActivityInfo aInfo = ASS.resolveActivity(...)根據獲取的rInfo資訊重新組裝intent和設定啟動的引數資訊
	   ActivityStarter.startActivityLocked(...)
3.4 通過intent查詢獲取目的端Activity資訊
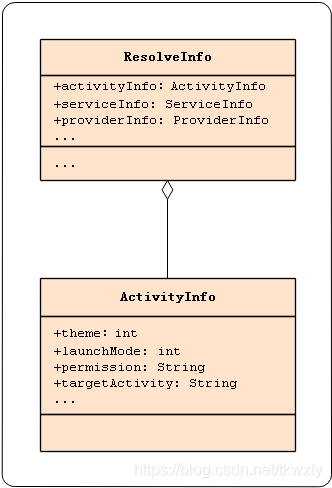
在正式開始該流程分析前,我們先來看看ResolveInfo,它是一個容器類,裡面包含了ActivityInfo,ServiceInfo,ProviderInfo等成員來表示四大元件的資訊,activity和broadcast資訊都是用ActivityInfo來表示的。這三個成員只有一個不為空,這裡我們啟動的是activity,所以ActivityInfo是不為空的。ActivityInfo包含了各種各樣的activity資訊,都是宣告在AndroidManifest.xml檔案中的,比較重要的包括launchMode、theme、screenOrientation等,其中還包含了ApplicationInfo,提供packageName、targetSdkVersion等重要資訊。關於這兩者之間的關係,可以使用如下類圖表示:
3.4.1 ASS.resolveIntent
//[ActivityStackSupervisor.java]
    ResolveInfo resolveIntent(Intent intent, String resolvedType, int userId) {
        return resolveIntent(intent, resolvedType, userId, 0);
    }

    ResolveInfo resolveIntent(Intent intent, String resolvedType, int userId, int flags) {
        try {
        	//呼叫到同進程PKMS服務的resolveIntent
            return AppGlobals.getPackageManager().resolveIntent(intent, resolvedType,
                    PackageManager.MATCH_DEFAULT_ONLY | flags
                    | ActivityManagerService.STOCK_PM_FLAGS, userId);//詳見章節3.4.2
        } catch (RemoteException e) {
        }
        return null;
    }
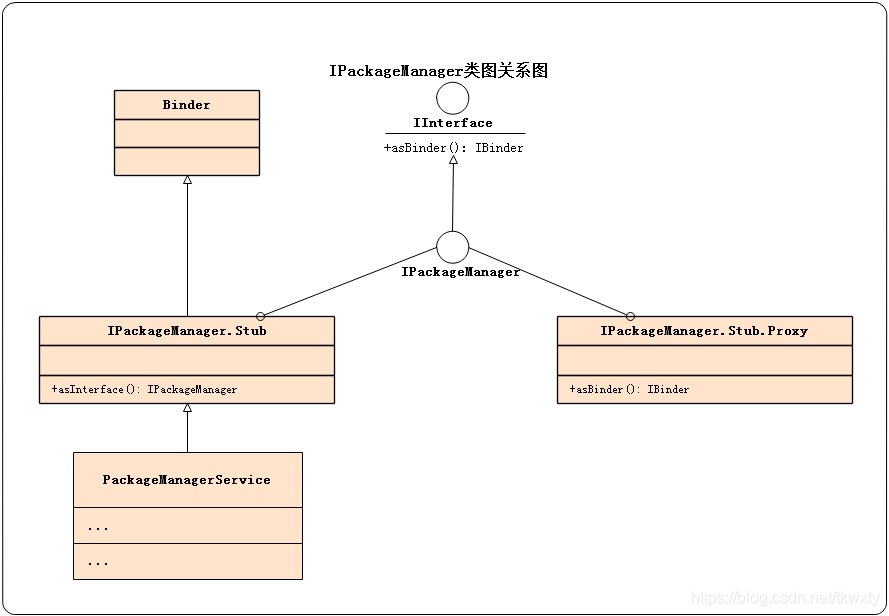
由於該流程牽涉到PKMS服務的呼叫,在開始原始碼前我們先看看PKMS的類圖關係如下:
//[AppGlobals.java]
    public static IPackageManager getPackageManager() {
        return ActivityThread.getPackageManager();
    }

//[ActivityThread.java]
	static volatile IPackageManager sPackageManager;
    public static IPackageManager getPackageManager() {
        if (sPackageManager != null) {
            return sPackageManager;
        }
        //等同於IBinder b = new JavaBBinder()//此時AMS和PKMS在同一個程序,所以獲取的是PKMS的Binder服務的實體端,不需要通過Binder IPC跨程序呼叫
        IBinder b = ServiceManager.getService("package");
        //等同於sPackageManager  = new IPackageManager.Stub(JavaBBinder)
        sPackageManager = IPackageManager.Stub.asInterface(b);
        return sPackageManager;
    }
AppGlobals.getPackageManager()經過函數層層呼叫,獲取的是IPackageManager.Stub,注意獲取的是PKMS的實體端,所以無需經過Binder IPC呼叫,此處一定要特別注意!最終會像是用普通的類一樣直接呼叫到PKMS物件.故此時呼叫方法為PMS.resolveIntent(),至於其中涉及的具體轉換可以詳見部落格Android Binder框架實現之Java層Binder服務跨程序呼叫原始碼分析!
3.4.2 PKMS.resolveIntent
通過上述的分析,我們看到AMS解析Intent主要是通過PKMS來解析的,因為我們四大元件都是必須宣告在AndroidManifest.xml檔案中的(廣播接收器允許動態註冊)。Android這麼做的原因主要是為了遮蔽程序間通訊細節,應用之間通過元件就可以互動,系統會在必要的時候拉起對方程序。但是這裡會存在一個問題,即在應用沒起來之前,只有PMS知道應用都有哪些元件,所以AMS必須藉助PKMS來完成相關intent的查詢。應用四大元件的資訊在應用安裝的時候,就已經被PMS解析儲存起來了。如果沒有宣告在AndroidManifest.xml檔案中,那麼AMS就無法獲取目標元件的資訊,對於顯式intent,會丟擲錯誤;對於隱式intent,也會啟動失敗。關於PKSMS服務對App安裝的處理不是本文的重點,這裡不與過多分析。
//[PackageManagerService.java]
  @Override
  public ResolveInfo resolveIntent(Intent intent, String resolvedType,
          int flags, int userId) {
            enforceCrossUserPermission(Binder.getCallingUid(), userId,false /*requireFullPermission*/, false /*checkShell*/, "resolve intent");

			//queryIntentActivitiesInternal方法返回的結果就是符合intent的ActivityInfo列表
            final List<ResolveInfo> query = queryIntentActivitiesInternal(intent, resolvedType,
                    flags, userId);//詳見章節3.4.3


			//根據priority,preferred選擇最佳的Activity,當有多個合適的Actitiy的時候,會彈出選擇框提供給使用者進行選擇
            final ResolveInfo bestChoice =
                    chooseBestActivity(intent, resolvedType, flags, query, userId);

            return bestChoice;
  }
3.4.3 PKMS.queryIntentActivitiesInternal
//[PackageManagerService.java]
	/*
	1.檢視當前Intent是否是顯式Intent。是則取出其中的class物件和AndroidManifest的進行匹配,匹配成功返回。
	2.如果沒有指定包名則全系統的查詢匹配intent
	3.如果指定包名,則從當前的包名尋找匹配規則相符合的intent的Activity
	*/
    private @NonNull List<ResolveInfo> queryIntentActivitiesInternal(Intent intent,
            String resolvedType, int flags, int userId) {
        if (!sUserManager.exists(userId)) return Collections.emptyList();
        flags = updateFlagsForResolve(flags, userId, intent);
        enforceCrossUserPermission(Binder.getCallingUid(), userId,
                false /* requireFullPermission */, false /* checkShell */,
                "query intent activities");
		//獲取Intent的ComponentName
		ComponentName comp = intent.getComponent();
        if (comp == null) {
            if (intent.getSelector() != null) {
                intent = intent.getSelector();
                comp = intent.getComponent();
            }
        }

		//不為空,則是通過顯示Intent啟動,直接獲取到ActivityInfo返回
        if (comp != null) {
            final List<ResolveInfo> list = new ArrayList<ResolveInfo>(1);
			//獲取Activity資訊
            final ActivityInfo ai = getActivityInfo(comp, flags, userId);
            if (ai != null) {
                final ResolveInfo ri = new ResolveInfo();
                ri.activityInfo = ai;
                list.add(ri);
            }
            return list;
        }
        //comp為空,則是隱式啟動
        synchronized (mPackages) {
            final String pkgName = intent.getPackage();
            if (pkgName == null) {//如果包名為空,則會通過ActivityIntentResolver等進行模糊匹配,比如根據Action、Category等
            	...
                return result;
            }
			// 通過包名獲取到Package物件
            final PackageParser.Package pkg = mPackages.get(pkgName);
            if (pkg != null) {
                return filterIfNotSystemUser(
                        mActivities.queryIntentForPackage(
                                intent, resolvedType, flags, pkg.activities, userId),
                        userId);
            }
            return new ArrayList<ResolveInfo>();
        }
    }
上面的流程就是通過intent獲取目的Activity的ResolveInfo核心程式碼,這裡不過多展開了(因為牽涉到PKMS對App的安裝解析流程),它的大致過程如下:
- 首先獲取Intent的Component物件,如果不為空,說明指定了Componet,那麼就直接通過Componet找到ActivityInfo列表,並且這個列表size為1,所以這個ActivityInfo就是指定需要跳轉的元件。
- 如果沒有指定Component,那就是隱式Intent呼叫,接著獲取Intent傳遞的需要跳轉的包名。
- 如果包名為空,則會通過ActivityIntentResolver等進行模糊匹配,比如根據Action、Category等。
- 如果包名不為空,則直接根據包名來獲取到對應的ActivityInfo物件,而mActivities就是PMS儲存的activity資訊表。
3.4.4 通過intent查詢獲取目的端Activity資訊小結
至此通過intent查詢獲取目的端Activity資訊就告一段落了,此時我們藉助PKMS服務解析intent獲取到了合適的ResolveInfo(啟動包含了ActivityInfo資訊),那麼接下來就可以繼續餘下的工作了,我們還是用相關的虛擬碼來總結一下上述的流程:
   ResolveInfo rInfo = ASS.resolveIntent(...)//收集Intent所指向的Activity資訊, 當存在多個可供選擇的Activity,則直接向使用者彈出resolveActivity
     IPackageManager.Stub.resolveIntent(...)//通過PKMS實體查詢
	   PKMS.resolveIntent(...)
		 PKMS.queryIntentActivitiesInternal(...)
		 PKMS.chooseBestActivity(...)
3.5 ASS.resolveActivity
讓我們整理下思路,回到章節3.3繼續分析resolveActivity方法
//[ActivityStackSupervisor.java]
	/*根據獲取的rInfo資訊重新組裝intent和設定啟動的引數資訊
	 startFlags = 0;
	 profilerInfo = null;
	 rInfo 指向通過PKMS解析intent資訊獲取到的ResolveInfo範例物件,其中包含ActivityInfo的資訊
	*/
    ActivityInfo resolveActivity(Intent intent, ResolveInfo rInfo, int startFlags,
            ProfilerInfo profilerInfo) {
        final ActivityInfo aInfo = rInfo != null ? rInfo.activityInfo : null;
        if (aInfo != null) {
            intent.setComponent(new ComponentName(
                    aInfo.applicationInfo.packageName, aInfo.name));
            if (!aInfo.processName.equals("system")) {//對於非system程序,根據flags來設定相應的debug資訊
                if ((startFlags & ActivityManager.START_FLAG_DEBUG) != 0) {//用於偵錯debug app
                    mService.setDebugApp(aInfo.processName, true, false);
                }

                if ((startFlags & ActivityManager.START_FLAG_NATIVE_DEBUGGING) != 0) {//偵錯native
                    mService.setNativeDebuggingAppLocked(aInfo.applicationInfo, aInfo.processName);
                }

                if ((startFlags & ActivityManager.START_FLAG_TRACK_ALLOCATION) != 0) {//用於偵錯allocation tracking
                    mService.setTrackAllocationApp(aInfo.applicationInfo, aInfo.processName);
                }

                if (profilerInfo != null) {
                    mService.setProfileApp(aInfo.applicationInfo, aInfo.processName, profilerInfo);
                }
            }
        }
        return aInfo;
    }
resolveActivity方法的處理邏輯比較簡單,主要是根據前面獲取的rInfo資訊重新組裝intent和設定Activity啟動的引數資訊。ActivityManager類提供瞭如下3個flags用於偵錯,如下:
- START_FLAG_DEBUG:用於偵錯debug app
- START_FLAG_NATIVE_DEBUGGING:用於偵錯native
- START_FLAG_TRACK_ALLOCATION: 用於偵錯allocation tracking
3.6 AS.startActivityLocked
讓我們整理下思路,回到章節3.3繼續分析startActivityLocked方法,在繼續分析之前,我們還是整理整理system_server程序從接收到啟動Activity至此startActivityLocked的呼叫流程!
	AMS.startActivity(...)
	 ActivityStarter.startActivityMayWait(...)
	   ResolveInfo rInfo = ASS.resolveIntent(...)//收集Intent所指向的Activity資訊, 當存在多個可供選擇的Activity,則直接向使用者彈出resolveActivity
	     IPackageManager.Stub.resolveIntent(...)//通過PKMS實體查詢
		   PKMS.resolveIntent(...)
			 PKMS.queryIntentActivitiesInternal(...)
			 PKMS.chooseBestActivity(...)
	   ActivityInfo aInfo = ASS.resolveActivity(...)根據獲取的rInfo資訊重新組裝intent和設定啟動的引數資訊
	   ActivityStarter.startActivityLocked(...)
不知道小夥們,我這個節奏是否還跟得上!如果小夥們感覺有點吃力了,不要退縮堅持就好了,因為當初的我也是這麼過來的!大夥可以先上上廁所,喝杯茶。我們接著繼續!
//[ActivityStarter.java]
    final int startActivityLocked(IApplicationThread caller, //caller是請求啟動當前Activity的發起方,IApplicationThread類是AMS呼叫ActivityThread的IBinder介面,在啟動者的ActivityThread中定義
			Intent intent, //啟動當前Activity的intent
			Intent ephemeralIntent,//啟動當前Activity的intent複本
            String resolvedType, //啟動當前Activity的resolvedType
            ActivityInfo aInfo, //當前啟動的Activity的ActivityInfo(PackageManger解析獲得,具體獲取見前面的操作步驟
            ResolveInfo rInfo,//目標Activity的ResolveInfo資訊
            IVoiceInteractionSession voiceSession, //暫時忽略
            IVoiceInteractor voiceInteractor,//暫時忽略
            IBinder resultTo, // 呼叫方Activity的ActivityRecord,每個Activity在啟動之後,AMS均會將這個Activity的ActivityRecord的IBinder再傳遞給Activity,作為其在AMS中的標識。
            String resultWho,
            int requestCode,
            int callingPid, int callingUid,//用於許可權檢查,檢查請求放是否有許可權啟動這個Activity
            String callingPackage, int realCallingPid, int realCallingUid, int startFlags,
            ActivityOptions options, boolean ignoreTargetSecurity, boolean componentSpecified,
            ActivityRecord[] outActivity, ActivityStackSupervisor.ActivityContainer container,
            TaskRecord inTask) {
        int err = ActivityManager.START_SUCCESS;

		//用來儲存呼叫者的程序記錄物件
        ProcessRecord callerApp = null;
        if (caller != null) {
            callerApp = mService.getRecordForAppLocked(caller);//獲取呼叫者的程序資訊
            if (callerApp != null) {
                callingPid = callerApp.pid;
                callingUid = callerApp.info.uid;
            } else {
				...
                err = ActivityManager.START_PERMISSION_DENIED;
            }
        }

        final int userId = aInfo != null ? UserHandle.getUserId(aInfo.applicationInfo.uid) : 0;


		//記錄發起端Activity資訊記錄物件
        ActivityRecord sourceRecord = null;//表示請求啟動當前Activity的Activity
        ActivityRecord resultRecord = null;//表示當前activity啟動之後需要得到返回結果的activity

		/**若當前啟動方式是以startActivityForResult啟動的,
		*則儲存在呼叫者Activity在sourceRecord中,
		*如果啟動時候設定了requestCode並且大於是0,那麼將接收
		*startActivityForResult返回值的Activity儲存在resultRecord中。
		*在此種情況下,呼叫者和接收返回者的Activity是相同的
		*是不是還是很抽象,我們來舉個例子:
		*假如Activity A通過startActivityForResult啟動B,並且requestCode>0
		*那麼此時sourceRecord和resultRecord都為A
		*/
		if (resultTo != null) {
			//獲取呼叫者所在的Activity
            sourceRecord = mSupervisor.isInAnyStackLocked(resultTo);
            if (DEBUG_RESULTS) Slog.v(TAG_RESULTS,
                    "Will send result to " + resultTo + " " + sourceRecord);
            if (sourceRecord != null) { //一般情況下,sourceRecord的activity使用startActivityForResult()啟動當前activity且requestCode>=0,那麼resultRecord = sourceRecord
                if (requestCode >= 0 && !sourceRecord.finishing) {
                    resultRecord = sourceRecord;
                }
            }
        }

        final int launchFlags = intent.getFlags();

		// Activity執行結果的返回由源Activity轉換到新Activity, 不需要返回結果則不會進入該分支
		// 特殊情況,若sourceRecord啟動當前activity時設定了標記Intent.FLAG_ACTIVITY_FORWARD_RESULT,且requestCode<0, 那麼當前activity的resultRecord等於sourceRecord.resultTo,也就是sourceRecord的resultRecord

		/**
		 *FLAG_ACTIVITY_FORWARD_RESULT這個FLAG作用,舉個例子:
		 * 當一個應用中存在有ActivityA,B,C,A以startActivityForResult方式啟動了B,
		 * 此時B設定了FLAG_ACTIVITY_FORWARD_RESULT啟動了C,注意此時B啟動C
		 * 時requestCode不設定或者設定值要小於0,不然會報錯。
		 * 那麼原來在A中接收返回值從B返回的,但這時A接收的返回值變成從C返回。
		 */

		if ((launchFlags & Intent.FLAG_ACTIVITY_FORWARD_RESULT) != 0 && sourceRecord != null) {
            // Transfer the result target from the source activity to the new
            // one being started, including any failures.
            // 將sourceRecord的resultRecord轉移給當前新啟動的activity
            if (requestCode >= 0) {
                ActivityOptions.abort(options);
                return ActivityManager.START_FORWARD_AND_REQUEST_CONFLICT;
            }
            resultRecord = sourceRecord.resultTo;
            if (resultRecord != null && !resultRecord.isInStackLocked()) {
                resultRecord = null;
            }
            resultWho = sourceRecord.resultWho;
            requestCode = sourceRecord.requestCode;
            sourceRecord.resultTo = null;
            if (resultRecord != null) {
                resultRecord.removeResultsLocked(sourceRecord, resultWho, requestCode);
            }
            if (sourceRecord.launchedFromUid == callingUid) {
				...
                callingPackage = sourceRecord.launchedFromPackage;
            }
        }

        if (err == ActivityManager.START_SUCCESS && intent.getComponent() == null) {
            //從Intent中無法找到相應的Component
            err = ActivityManager.START_INTENT_NOT_RESOLVED;
        }

        if (err == ActivityManager.START_SUCCESS && aInfo == null) {
            //從Intent中無法找到相應的ActivityInfo
            err = ActivityManager.START_CLASS_NOT_FOUND;
        }


		執行後resultStack = null
        final ActivityStack resultStack = resultRecord == null ? null : resultRecord.task.stack;

        if (err != START_SUCCESS) {
            if (resultRecord != null) {
                resultStack.sendActivityResultLocked(
                        -1, resultRecord, resultWho, requestCode, RESULT_CANCELED, null);
            }
            ActivityOptions.abort(options);
            return err;
        }

		//許可權檢測
        boolean abort = !mSupervisor.checkStartAnyActivityPermission(intent, aInfo, resultWho,
                requestCode, callingPid, callingUid, callingPackage, ignoreTargetSecurity, callerApp,
                resultRecord, resultStack, options);
        abort |= !mService.mIntentFirewall.checkStartActivity(intent, callingUid,
                callingPid, resolvedType, aInfo.applicationInfo);

        if (mService.mController != null) {
            try {
                Intent watchIntent = intent.cloneFilter();
                abort |= !mService.mController.activityStarting(watchIntent,
                        aInfo.applicationInfo.packageName);
            } catch (RemoteException e) {
                mService.mController = null;
            }
        }

		...
        if (abort) {//許可權檢查不滿足,才進入該分支則直接返回
            if (resultRecord != null) {
                resultStack.sendActivityResultLocked(-1, resultRecord, resultWho, requestCode,
                        RESULT_CANCELED, null);
            }

            ActivityOptions.abort(options);
            return START_SUCCESS;
        }

		...


		//建立Activity記錄物件
        ActivityRecord r = new ActivityRecord(mService, callerApp, callingUid, callingPackage,
                intent, resolvedType, aInfo, mService.mConfiguration, resultRecord, resultWho,
                requestCode, componentSpecified, voiceSession != null, mSupervisor, container,
                options, sourceRecord);//詳見章節3.7
        if (outActivity != null) {
            outActivity[0] = r;// 將建立的ActivityRecord返回
        }

        if (r.appTimeTracker == null && sourceRecord != null) {
            // If the caller didn't specify an explicit time tracker, we want to continue
            // tracking under any it has.
            r.appTimeTracker = sourceRecord.appTimeTracker;
        }

		// 將mFocusedStack賦予當前stack,這裡的mFocusedStack表示當前活動的
        final ActivityStack stack = mSupervisor.mFocusedStack;
        if (voiceSession == null && (stack.mResumedActivity == null
                || stack.mResumedActivity.info.applicationInfo.uid != callingUid)) {
            // 前臺stack還沒有resume狀態的Activity時, 則檢查app切換是否允許
            if (!mService.checkAppSwitchAllowedLocked(callingPid, callingUid,
                    realCallingPid, realCallingUid, "Activity start")) {
                PendingActivityLaunch pal =  new PendingActivityLaunch(r,
                        sourceRecord, startFlags, stack, callerApp);
				// 當不允許切換,則把要啟動的Activity新增到mPendingActivityLaunches物件, 並且直接返回
                mPendingActivityLaunches.add(pal);
                ActivityOptions.abort(options);
                return ActivityManager.START_SWITCHES_CANCELED;
            }
        }

        if (mService.mDidAppSwitch) {
            //從上次禁止app切換以來,這是第二次允許app切換,因此將允許切換時間設定為0,則表示可以任意切換app
            mService.mAppSwitchesAllowedTime = 0;
        } else {
            mService.mDidAppSwitch = true;
        }

		//處理 pendind Activity的啟動, 這些Activity是由於app switch禁用從而被hold的等待啟動activity
        doPendingActivityLaunchesLocked(false);

        try {
			//這個方法很長,很長,很長
            err = startActivityUnchecked(r, sourceRecord, voiceSession, voiceInteractor, startFlags,
                    true, options, inTask);
        } finally {
            mService.mWindowManager.continueSurfaceLayout();
        }
        postStartActivityUncheckedProcessing(r, err, stack.mStackId, mSourceRecord, mTargetStack);
        return err;
    }
startActivityLocked方法看著程式碼一大堆,是有蠻唬人的。其實主要邏輯就是:
- 進一步對發起端的程序做一些許可權檢查,然後接著確定sourceRecord和resultRecord的取值
- 接著通過上述確認的引數構建ActivityRecord,這個是重點會在後面章節分析
- 接著繼續呼叫startActivityUnchecked方法開始後續的Activity啟動,這個方法牽涉的邏輯很長,很長
3.7 ActivityRecord
ActivityRecord是AMS中儲存activity資訊的資料結構,AMS就是通過著這樣一個結構來管理Activity的,注意和ActivityInfo的區別!我個人認為二者最大的區別在與ActivityInfo是死的,它是對AndroidManifest.xml的完全解析的呈現,而ActivityRecord是根據發起端程序建立目標Activiyt傳入的引數等情況確定的。
ActivityRecord類的定義如下:
//ActivityRecord
final class ActivityRecord {
	/*表示AMS在建立ActivityRecord時候指定*/
	final ActivityManagerService service;

	/*這個是和WindomMangerService通訊的,該值會賦值給Activity中*/
	final IApplicationToken.Stub appToken;

	/*這個描述是AndroidManifest.xml中定義activity相關資訊*/
	final ActivityInfo info;

	/*這個描述是AndroidManifest.xml中定義application相關資訊*/
	final ApplicationInfo appInfo;

	...

	/*應用的包名*/
	final String packageName;

	final String processName;
	/**Activity親和性,這上簡單的描述就是該Activity應屬於是哪個Task*/
	final String taskAffinity;

	...
	/**以下三個表示該Activity型別*/
	static final int APPLICATION_ACTIVITY_TYPE= 0;
	static final int HOME_ACTIVITY_TYPE = 1;
	static final int RECENTS_ACTIVITY_TYPE = 2;
	int mActivityType;
	...
	/**Activity屬於哪個Task*/
	TaskRecord task;
	/**通過startActivityForResult啟動時,接收返回值的Activity*/
	ActivityRecord resultTo;
	/**通過startActivityForResult啟動時設定的requestCode*/
	final int requestCode;
	...

	/*Activity所屬的程序*/
	ProcessRecord app;

	/*表示Activity的當前狀態, INITIALIZING,RESUMED,PAUSING,PAUSED,STOPPING,STOPPED,FINISHING,DESTROYING,DESTROYED
	有這幾種狀態*/
	ActivityState state;
	/*標記是否為Task的root Activity,比如每個應用有一個mainActivity,一般
	*情況下該main Activity即為對應Task的rootActivity*/
	boolean frontOfTask;

	/*標記該ActivityRecord是否已經stoped*/
	boolean stopped;

	/*標記ActivityRecord是否已經finishing,這在activity finish時置為true*/
	boolean finishing;

	boolean deferRelaunchUntilPaused;

	boolean visible;
	boolean sleeping;
	boolean nowVisible;
	/*ActivityStack管理類*/
	final ActivityStackSupervisormStackSupervisor;

    ActivityRecord(ActivityManagerService _service, ProcessRecord _caller,
            int _launchedFromUid, String _launchedFromPackage, Intent _intent, String _resolvedType,
            ActivityInfo aInfo, Configuration _configuration,
            ActivityRecord _resultTo, String _resultWho, int _reqCode,
            boolean _componentSpecified, boolean _rootVoiceInteraction,
            ActivityStackSupervisor supervisor,
            ActivityContainer container, ActivityOptions options, ActivityRecord sourceRecord) {
    	...
    	appToken = new Token(this, service);//注意此處的Token是一個匿名Binder,既然是Binder就可以跨程序傳輸了
    	state = ActivityState.INITIALIZING;
    	...
    }
我還得在2.3章節中對execStartActivity中傳入的引數token嗎,它的Binder實體就是在啟動過程中經由此處建立的(當然它的Binder實體不是這裡的Token,這裡只是表達告訴各位小夥們這個token會隨著Activity的建立會在AMS,WMS,Activity之間進行傳遞的)YOU
有了以上知識的鋪墊,那麼此處的構造方法就很好理解了在AMS中為目標Activity構建了一個ActivityRecord資料結構,並且在其構造方法中範例化了一個Token,這個Token很重要它是Activity的唯一標識,並且會隨著目標Activity的啟動在AMS和WMS以及目標程序中傳輸!至此目標Ativity相關資訊已經在AMS中建立了!
這裡補充一個小的知識點,我們可以藉助dumpsys命令檢視AMS中相關的ActivityRecord的資料結構資訊,如下!特別是當我們想檢視當前與使用者互動的前臺Activity時Android通過adb shell命令檢視當前與使用者互動的前臺Activity。
130|XXX:/ # dumpsys activity | grep ActivityRecord
        Hist #0: ActivityRecord{4c7a084 u0 com.android.launcher3/.Launcher t73}
        Run #0: ActivityRecord{4c7a084 u0 com.android.launcher3/.Launcher t73}
        Hist #0: ActivityRecord{68a76e3 u0 com.android.calculator2/.Calculator t77}
        Hist #0: ActivityRecord{697cb49 u0 com.cyanogenmod.filemanager/.activities.NavigationActivity t76}
        Hist #0: ActivityRecord{4c3e469 u0 org.codeaurora.gallery/com.android.gallery3d.app.GalleryActivity t75}
        Hist #0: ActivityRecord{8a53d39 u0 com.pax.printtest/com.example.api.aidl.AidlActivity t74}
        Run #3: ActivityRecord{68a76e3 u0 com.android.calculator2/.Calculator t77}
        Run #2: ActivityRecord{697cb49 u0 com.cyanogenmod.filemanager/.activities.NavigationActivity t76}
        Run #1: ActivityRecord{4c3e469 u0 org.codeaurora.gallery/com.android.gallery3d.app.GalleryActivity t75}
        Run #0: ActivityRecord{8a53d39 u0 com.pax.printtest/com.example.api.aidl.AidlActivity t74}
  mFocusedActivity: ActivityRecord{4c7a084 u0 com.android.launcher3/.Launcher t73}
小結
閱讀原始碼是很操蛋的事情,同樣的如果將太多的邏輯放在一篇中我想小夥們也會閱讀起來也會操蛋,失去耐心的的,所以本篇章就先到這裡了。分析至此我們應該有了如下的知識圖譜:
- 發起端程序是怎麼通過Instrumentation管理類,並且藉助AMP完成啟動Activity請求的傳送
- system_server程序中的AMS初步處理啟動Activiyt的請求,並藉助PKMS服務解析intent獲取目標Activity的ActivityInfo資訊,然後通過上述解析得到的資料為目標Activiyt構建ActivityRecord資料結構
關於上述整個的過程可以使用下述的虛擬碼來簡單描述:
發起端程序發起啟動Activity請求
	Activity.startActivity(...)
	  Activity.startActivityForResult(...)
	    mInstrumentation.execStartActivity(...)
		  AMP.startActivity(...)//通過AMS代理端向AMS發起啟動Activity的Binder IPC請求
		  mInstrumentation.checkStartActivityResult(...)//檢測啟動是否成功
		mMainThread.sendActivityResult(...)


system_server程序端
AMS解析Intent
	AMS.startActivity(...)
	 ActivityStarter.startActivityMayWait(...)
	   ResolveInfo rInfo = ASS.resolveIntent(...)//收集Intent所指向的Activity資訊, 當存在多個可供選擇的Activity,則直接向使用者彈出resolveActivity
	     IPackageManager.Stub.resolveIntent(...)//通過PKMS實體查詢
		   PKMS.resolveIntent(...)
			 PKMS.queryIntentActivitiesInternal(...)
			 PKMS.chooseBestActivity(...)
	   ActivityInfo aInfo = ASS.resolveActivity(...)根據獲取的rInfo資訊重新組裝intent和設定啟動的引數資訊
	   ActivityStarter.startActivityLocked(...)
		  ActivityRecord r = new ActivityRecord(callerApp,intent,aInfo,mSupervisor,...)
			appToken = new Token(this, _intent);
			  設定state為INITIALIZING
		  ActivityStarter.startActivityUnchecked(...)

建立目的端Activity的ActivityRecord
	ActivityStarter.startActivityLocked(...)
	  ActivityRecord r = new ActivityRecord(callerApp,intent,aInfo,mSupervisor,...)
	    appToken = new Token(this, _intent);
		  設定state為INITIALIZING
好了,今天的部落格就到這裡了!閱讀原始碼小夥們一定要做好心理準備,千萬不能半途而廢!在接下來的篇章中我們將繼續分析system_server程序對Activity啟動的請求處理,希望小夥們能繼續關注。