Python程式設計基礎——程式設計環境準備工作
Python程式設計基礎——程式設計環境準備工作
寫在前面 本系列部落格文章針對非計算機專業,特別人文社科、管理經濟等相關專業學生或者人員學習實踐資料分析與視覺化、機器學習等鋪路,精選部落格或書籍為參考,以簡潔、實用為前提,注重任務導向和實操練習。
Anaconda的安裝與使用
介紹
- 開源包管理系統和環境管理系統 ,包括多種語言的包安裝,執行,更新,刪除,最重要的是可以解決包依賴問題
- 支援語言套件括 Python,R,Ruby,Lua,Scala,Java,JavaScript,C / C ++,FORTRAN
- 支援在Windows,macOS和Linux上執行
- Conda可以構建不同的環境,同時可以對環境進行儲存,載入和切換操作
- Conda包和環境管理器包含在所有版本的Anaconda和Miniconda中
下載與安裝(本文僅以Win10為例)
參考: Anaconda介紹、安裝及使用教學.
-
前往官方下載頁面下載。目前官網僅提供Python 3.8版,根據Win10作業系統的情況點選「64-Bit Graphical Installer」或「32-Bit Graphical Installer」進行下載。
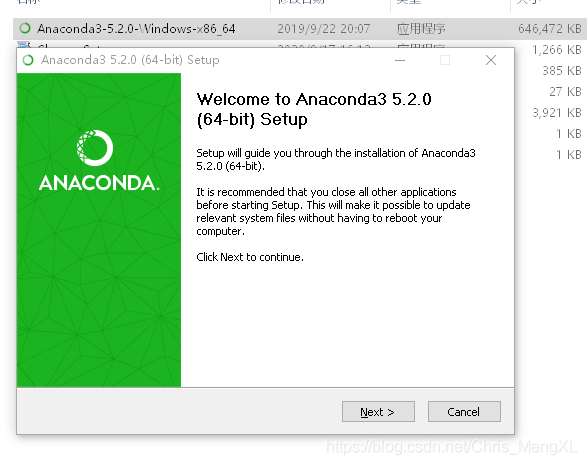
本教學以Anaconda3-5.2.0-Windows-x86_64版(Python3.6)為例 提供百度網路硬碟下載地址 提取碼:gr81 -
完成下載之後,雙擊下載檔案,啟動安裝程式。
-
選擇「Next」。

-
閱讀許可證協定條款,然後勾選「I Agree」並進行下一步。
-
除非是以管理員身份為所有使用者安裝,否則僅勾選「Just Me」並點選「Next」。
-
在「Choose Install Location」介面中選擇安裝Anaconda的目標路徑,然後點選「Next」。

注意:目標路徑中不能含有空格或中文。
- 在「Advanced Installation Options」中要勾選「Add Anaconda to my PATH environment variable.」(「新增Anaconda至我的環境變數。」)。
注意:部分資料建議不要勾選,原因是如果勾選,則將會影響其他程式的使用,筆者暫未發現。
- 點選「Install」開始安裝。如果想要檢視安裝細節,則可以點選「Show Details」。
- 點選「Next」。
- 進入「Thanks for installing Anaconda!」介面則意味著安裝成功,點選「Finish」完成安裝。
注意:如果你不想了解「Anaconda雲」和「Anaconda支援」,則可以不勾選「Learn more about Anaconda Cloud」和「Learn more about Anaconda Support」。
- 驗證安裝結果。可選以下任意方法:
- 「開始 → Anaconda3(64-bit)→ Anaconda Navigator」,若可以成功啟動Anaconda Navigator則說明安裝成功。
- 「開始 → Anaconda3(64-bit)→ 右鍵點選Anaconda Prompt → 以管理員身份執行」,在Anaconda Prompt中輸入
conda list,可以檢視已經安裝的包名和版本號。若結果可以正常顯示,則說明安裝成功。
Pip的基本使用與映象源設定
介紹
- pip 是一個現代的,通用的 Python 包管理工具。提供了對 Python 包的查詢、下載、安裝、解除安裝的功能
Pip映象源設定(本文僅以Win10為例)
pip預設是使用Python官方的源設定在海外,下載速度慢或連線超時,故需使用國內的Python映象源。
參考: Python切換pip映象源(安裝源)的方法詳解.
常見國內映象源
http://pypi.douban.com/simple/ 豆瓣
http://mirrors.aliyun.com/pypi/simple/ 阿里
http://pypi.hustunique.com/simple/ 華中理工大學
http://pypi.sdutlinux.org/simple/ 山東理工大學
http://pypi.mirrors.ustc.edu.cn/simple/ 中國科學技術大學
https://pypi.tuna.tsinghua.edu.cn/simple /清華大學
-
在windows檔案管理器中輸入「 %APPDATA% 」,如下圖所示:

-
「回車」將定位到一個新的目錄下(「C:\Users\Administrator\AppData\Roaming\pip\pip.ini」),Administrator為自己的使用者名稱,在該目錄下新建pip資料夾,然後到pip資料夾中新建一個 pip.ini 檔案,如下圖所示 :

-
在新建的 pip.ini 檔案中輸入以下內容,然後儲存。
注意:" index-url " 的內容是映象源的路徑,可以更換
[global]
timeout = 6000
index-url = https://pypi.tuna.tsinghua.edu.cn/simple
trusted-host = pypi.tuna.tsinghua.edu.cn
如下圖(更換清華源的截圖):
 Notepad++ 7.8.9 官方中文版 下載連結
Pip基本使用
pip命令及其引數
在命令列視窗輸命令pip --help,可以檢視pip命令的引數及其用法,如下圖所示:
# pip --help

Usage:
  pip <command> [options]

Commands:
  install                     Install packages.  安裝包
  download                    Download packages. 下載包
  uninstall                   Uninstall packages. 解除安裝包
  freeze                      Output installed packages in requirements format. 按著一定格式輸出已安裝包列表
  list                        List installed packages. 列出已安裝包
  show                        Show information about installed packages. 顯示包詳細資訊
  check                       Verify installed packages have compatible dependencies.檢查包的依賴關係是否完整
  config                      Manage local and global configuration.管理設定
  search                      Search PyPI for packages.搜尋包
  wheel                       Build wheels from your requirements.
  hash                        Compute hashes of package archives.計算包的hash值
  completion                  A helper command used for command completion.
  help                        Show help for commands.

General Options:
  -h, --help                  Show help.
  --isolated                  Run pip in an isolated mode, ignoring environment variables and user configuration.
  -v, --verbose               Give more output. Option is additive, and can be used up to 3 times.
  -V, --version               Show version and exit.
  -q, --quiet                 Give less output. Option is additive, and can be used up to 3 times (corresponding to WARNING, ERROR, and CRITICAL logging levels).
  --log <path>                Path to a verbose appending log.
  --proxy <proxy>             Specify a proxy in the form [user:passwd@]proxy.server:port.
  --retries <retries>         Maximum number of retries each connection should attempt (default 5 times).
  --timeout <sec>             Set the socket timeout (default 15 seconds).
  --exists-action <action>    Default action when a path already exists: (s)witch, (i)gnore, (w)ipe, (b)ackup, (a)bort).
  --trusted-host <hostname>   Mark this host as trusted, even though it does not have valid or any HTTPS.
  --cert <path>               Path to alternate CA bundle.
  --client-cert <path>        Path to SSL client certificate, a single file containing the private key and the certificate in PEM format.
  --cache-dir <dir>           Store the cache data in <dir>.
  --no-cache-dir              Disable the cache.
  --disable-pip-version-check
                              Don't periodically check PyPI to determine whether a new version of pip is available for download. Implied with --no-index.
  --no-color                  Suppress colored output
pip常用命令
- 安裝模組
pip install <包名>
- 解除安裝模組
pip uninstall <包名>
- 升級模組
pip install -U <包名>
- 檢視已安裝的包及其版本
pip freeze
- 檢視可升級的包
pip list -o
注意:當出現下面語句時應按提示升級pip。
You are using pip version 10.0.1, however version 20.2.3 is available.
You should consider upgrading via the ‘pip install –upgrade pip’ command.
這句話的意思是「您正在使用pip版本10.0.1,但是可以使用版本20.2.3。您應該考慮通過「pip install –upgrade pip」命令進行升級」

- 升級pip
python -m pip install --upgrade pip
Jupyter Notebook介紹、執行及使用
介紹
- Jupyter Notebook是基於網頁的用於互動計算的應用程式。其可被應用於全過程計算:開發、檔案編寫、執行程式碼和展示結果。
執行Jupyter Notebook
在終端中輸入以下命令:
jupyter notebook
執行命令之後,在終端中將會顯示一系列notebook的伺服器資訊,同時瀏覽器將會自動啟動Jupyter Notebook。
啟動過程中終端顯示內容如下:
[I 18:47:37.542 NotebookApp] Writing notebook server cookie secret to C:\Users\MXL\AppData\Roaming\jupyter\runtime\notebook_cookie_secret
[I 18:47:39.002 NotebookApp] JupyterLab beta preview extension loaded from C:\Users\MXL\Anaconda3\lib\site-packages\jupyterlab
[I 18:47:39.003 NotebookApp] JupyterLab application directory is C:\Users\MXL\Anaconda3\share\jupyter\lab
[I 18:47:39.895 NotebookApp] Serving notebooks from local directory: C:\Users\MXL
[I 18:47:39.895 NotebookApp] 0 active kernels
[I 18:47:39.897 NotebookApp] The Jupyter Notebook is running at:
[I 18:47:39.899 NotebookApp] http://localhost:8888/?
注意:之後在Jupyter Notebook的所有操作,都請保持終端不要關閉,因為一旦關閉終端,就會斷開與本地伺服器的連結,你將無法在Jupyter Notebook中進行其他操作啦。
瀏覽器位址列中預設地將會顯示:http://localhost:8888。其中,「localhost」指的是本機,「8888」則是埠號。
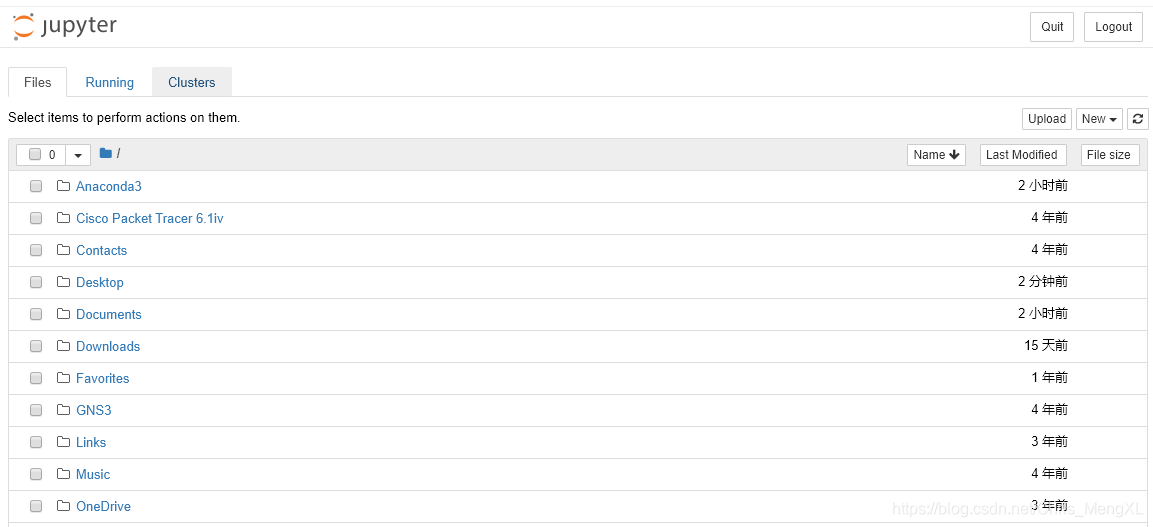
主頁面(下一節專題介紹)
當執行完啟動命令之後,瀏覽器將會進入到Notebook的主頁面,如下圖所示。

設定Jupyter Notebook檔案存放位置
如果你不想把今後在Jupyter Notebook中編寫的所有檔案都直接儲存在家目錄下,那你需要修改Jupyter Notebook的檔案存放路徑。
- 建立資料夾/目錄
Windows使用者在想要存放Jupyter Notebook檔案的磁碟中新建資料夾併為該資料夾命名;雙擊進入該資料夾,然後複製位址列中的路徑。
- 組態檔路徑
在終端中輸入以下命令(生成組態檔):
jupyter notebook --generate-config
注意: 若組態檔已經存在或被修改,使用這個命令之後會出現詢問「Overwrite /Users/XXX/.jupyter/jupyter_notebook_config.py with default config? [y/N]」,即「用預設組態檔覆蓋此路徑下的檔案嗎?」,如果按「y」,則完成覆蓋,那麼之前所做的修改都將失效;如果只是為了查詢路徑,那麼一定要輸入「N」。
- 修改組態檔
(a) 開啟組態檔
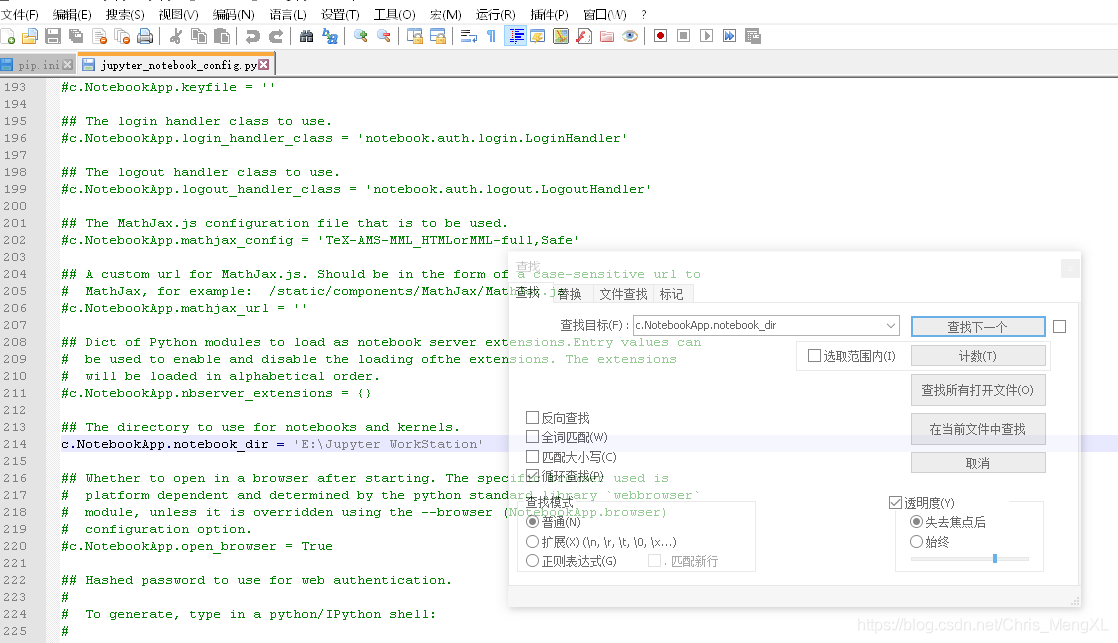
Windows系統的使用者可以使用檔案編輯工具Notepad++開啟「jupyter_notebook_config.py」檔案並進行編輯。
(b) 查詢關鍵詞
進入組態檔後Ctrl+F查詢關鍵詞「c.NotebookApp.notebook_dir」。
(c) 編輯組態檔
(d) 取消註釋
把該行行首的井號(#)刪除。因為組態檔是Python的可執行檔案,在Python中,井號(#)表示註釋,即在編譯過程中不會執行該行命令,所以為了使修改生效,需要刪除井號(#)。

(e) 儲存組態檔
(f) 驗證
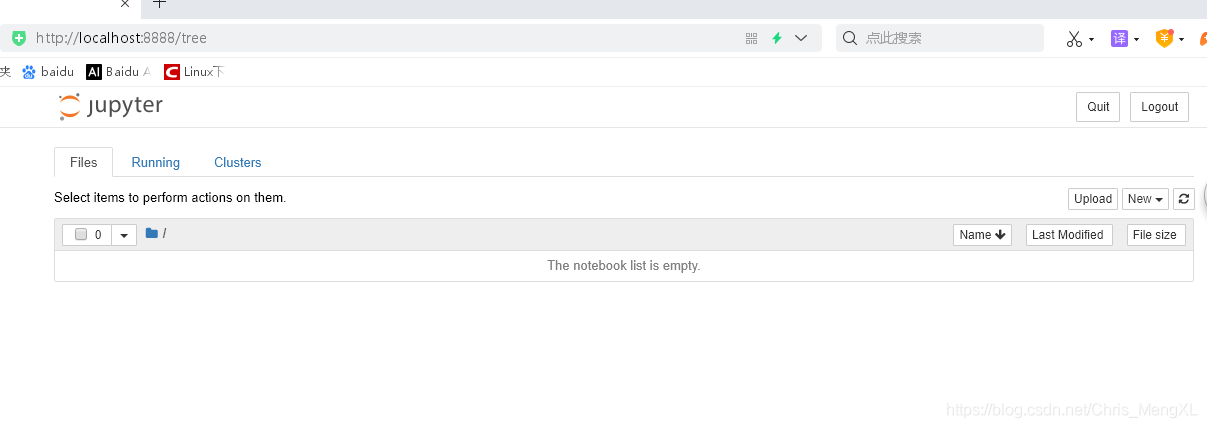
在終端中輸入命令jupyter notebook開啟Jupyter Notebook,此時你會看到一個清爽的介面,恭喜!

注意:以上所有命令均以英文半形格式輸入,若有報錯,請嚴格檢查這兩個條件,英文且半形。