iOS - Navigation Bar(導航欄)
使用導航欄
導航欄包含導航按鈕,導航控制器,這是一個堆疊檢視控制器,可入棧和出棧。標題導航欄上的標題是當前檢視的控制器
範例程式碼和步驟
1. 建立一個檢視的應用程式
2. 現在選擇APP Delegate.h,新增一個屬性,導航控制器如下
#import <UIKit/UIKit.h>

@class ViewController;

@interface AppDelegate : UIResponder <UIApplicationDelegate>

@property (strong, nonatomic) UIWindow *window;

@property (strong, nonatomic) ViewController *viewController;

@property (strong, nonatomic) UINavigationController *navController;

@end
3. 現在更新應用:didFinishLaunchingWithOptions 方法在 AppDelegate.m 檔案分配導航控制器,使視窗的根檢視控制器如下:
- (BOOL)application:(UIApplication *)application didFinishLaunchingWithOptions:(NSDictionary *)launchOptions
{
    self.window = [[UIWindow alloc] initWithFrame:
    [[UIScreen mainScreen] bounds]];
    // Override yiibai for customization after application launch.
    self.viewController = [[ViewController alloc]
    initWithNibName:@"ViewController" bundle:nil];
    //Navigation controller init with ViewController as root
    UINavigationController *navController = [[UINavigationController alloc]
    initWithRootViewController:self.viewController];
    self.window.rootViewController = navController;
    [self.window makeKeyAndVisible];
    return YES;
}
4.現在,新增新的類檔案TempViewController通過選擇File -> New ->File... -> Objective C Class,UIViewController 的子類命名類為 TempViewController。
5. 新增一個UIButton navButon 在ViewController.h 如下
// ViewController.h
#import <UIKit/UIKit.h>

@interface ViewController : UIViewController
{
    UIButton *navButton;
}
@end
6. 現在新增一個方法 addNavigationBarItem 並在 viewDidLoad 中呼叫此方法。
7. 建立導航專案動作的方法。
8. 我們還需要另一種方法來建立另一個檢視控制器TempViewController的推播。
9. 更新後的 ViewController.m 如下
// ViewController.m
#import "ViewController.h"
#import "TempViewController.h"
@interface ViewController ()

@end
@implementation ViewController

- (void)viewDidLoad
{
    [super viewDidLoad];
    [self addNavigationBarButton];
    //Do any additional setup after loading the view, typically from a nib
}

- (void)didReceiveMemoryWarning
{
    [super didReceiveMemoryWarning];
    // Dispose of any resources that can be recreated.
}

-(IBAction)pushNewView:(id)sender{
   TempViewController *tempVC =[[TempViewController alloc]
   initWithNibName:@"TempViewController" bundle:nil];
   [self.navigationController pushViewController:tempVC animated:YES];
}

-(IBAction)myButtonClicked:(id)sender{
   // toggle hidden state for navButton
   [navButton setHidden:!nav.hidden];
}

-(void)addNavigationBarButton{
   UIBarButtonItem *myNavBtn = [[UIBarButtonItem alloc] initWithTitle:
   @"MyButton" style:UIBarButtonItemStyleBordered target:
   self action:@selector(myButtonClicked:)];

   [self.navigationController.navigationBar setBarStyle:UIBarStyleBlack];
   [self.navigationItem setRightBarButtonItem:myNavBtn];

   // create a navigation push button that is initially hidden
   navButton = [UIButton buttonWithType:UIButtonTypeRoundedRect];
   [navButton setFrame:CGRectMake(60, 50, 200, 40)];
   [navButton setTitle:@"Push Navigation" forState:UIControlStateNormal];
   [navButton addTarget:self action:@selector(pushNewView:)
   forControlEvents:UIControlEventTouchUpInside];
   [self.view addSubview:navButton];
   [navButton setHidden:YES];
}
@end
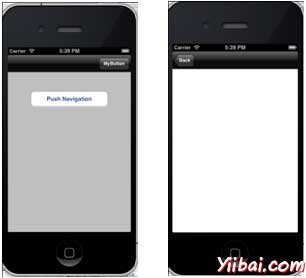
10. 現在,當我們執行程式時,我們會得到下面的輸出
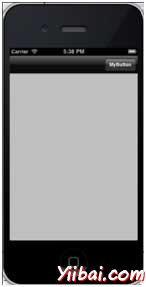
11. 點選導航按鈕MyButton,推播導航按鈕切換能見度
12. 點選推導航按鈕按下另一個檢視控制器,如下圖所示。