Android Intent過濾器
Android Intent 是承載一個意圖,即物件。將訊息從一個元件傳到另一個元件,在應用程式或應用程式之外。Intent 之間溝通訊息的任何應用程式的三個核心元件 - 活動,服務和廣播接收器。
意圖本身是一個Intent物件,是一種被動的資料結構保持將要執行的動作的抽象描述。
例如,讓我們假設有一個Activity ,需要啟動電子郵件用戶端和傳送電子郵件,使用Android裝置。為了達到這個目的,Activity會隨著適當選擇器,一個ACTION_SEND傳送到 Android Intent 解析器。指定的選擇器提供適當的介面供使用者選擇如何傳送電子郵件資料。
例如,有一個Activity ,需要在 Android 裝置上用Web瀏覽器開啟網址。為了達到這個目的Activity將傳送ACTION_WEB_SEARCH Intent 到Android Intent 解析器,並在Web瀏覽器中開啟給定的URL。Intent 解析器解析通過一個活動列表,並選擇一個最合適的 Intent ,在這種情況下,就是Web瀏覽器活動。Intent通過網頁解析後,網頁瀏覽器啟動 Web 瀏覽器活動。
分開機制對於每種型別的元件提供意圖,如:活動,服務和廣播接收器。
| S.N. | 方法& 描述 |
|---|---|
| 1 |
Context.startActivity() Intent物件傳遞給此方法來啟動一個新的活動或獲得現有活動來做一些新的東西。 |
| 2 |
Context.startService() Intent物件傳遞給此方法來啟動服務或提供新的指令到一個持續的服務。 |
| 3 |
Context.sendBroadcast() Intent物件傳遞給這個方法訊息給所有感興趣的廣播接收器。 |
Intent物件
Intent物件是成綑的資訊,這些資訊所使用的元件,它接收的意圖和Android系統中的資訊。
Intent物件可以基於它是什麼交流或要執行,包含以下元件:
動作
強制Intent物件是一個字串,命名要執行操作或廣播意圖,正在發生的動作和報告。動作在很大程度上決定意圖物件的其餘部分的結構如何。Intent類定義了一些動作常數對應不同的意圖。下面列出的是 Android Intent標準動作
動作在一個Intent物件的 setAction() 方法可以設定,通過 getAction() 方法讀取。
資料
要採取動作的資料的URI和該資料的MIME型別。例如,如果動作欄位ACTION_EDIT,在資料欄位將包含要顯示的編輯的文件的URI。
setData()方法指定資料僅作為URI的setType()指定它只能作為一個MIME型別,和setDataAndType()指定它作為一個URI和MIME型別。讀取的URI由getData()和getType()。
操作/資料對的一些例子是:
| S.N. | 動作/資料對和說明 |
|---|---|
| 1 |
ACTION_VIEW content://contacts/people/1 顯示有關其識別符號為“1”的人的資訊。 |
| 2 |
ACTION_DIAL content://contacts/people/1 顯示電話撥號程式已填充的人。 |
| 3 |
ACTION_VIEW tel:123 顯示電話撥號程式已填充的給定數。 |
| 4 |
ACTION_DIAL tel:123 顯示電話撥號程式已填充的給定數。 |
| 5 |
ACTION_EDIT content://contacts/people/1 編輯有關其識別符號為“1”的人的資訊。 |
| 6 |
ACTION_VIEW content://contacts/people/ 顯示人的列表,使用者可以瀏覽。 |
類別
類別是 Intent 物件一個可選部分,這是一個字串,其中包含應該處理這個 Intent 元件的附加資訊。 addCategory()方法將類別新增到 Intent物件,removeCategory() 刪除一個類別,GetCategories() 得到當前在物件的所有類別集合。下面是 Android意圖示準類別 列表。
要檢視詳細的 Intent過濾器可在下一小節,了解如何使用類別,選擇合適的活動對應的意圖。
附加裝置
這是鍵-值對,可了解更多傳遞元件處理 intent 的資訊。額外內容設定和讀取使用 putExtras() 和 getExtras() 方法。這裡是一個 Android intent 標準額外資料列表。
標誌位
這些標誌是Intent物件可選部分,並指示Android系統如何啟動一個活動以及如何對待它在啟動後等等。
元件名稱
可選欄位是一個 android 元件名稱的活動,服務或BroadcastReceiver類物件。如果它沒有被設定,Android使用Intent 物件的資訊,找到一個合適的目標,Intent 物件傳遞到指定類的一個範例。
元件名稱由setComponent(),setClass()設定,由 setClassName()和 getComponent()讀取。
Intents型別
有以下兩種型別的意圖支援到 Android 4.1版本
顯式意圖
顯示意圖指定目標元件的名稱,通常用於應用程式內部訊息 - 比如一個活動啟動從??服務或啟動一個組活動。例如:
// Explicit Intent by specifying its class name
Intent i = new Intent(this, TargetActivity.class);
i.putExtra("Key1", "ABC");
i.putExtra("Key2", "123");

// Starts TargetActivity
startActivity(i);
隱式意圖
這些意圖由其的名字指定目標元件,它們通常用於應用程式內部訊息 - 例如一個活動啟動一個附屬服務或啟動一個姐妹的活動。例如:
// Implicit Intent by specifying a URI
Intent i = new Intent(Intent.ACTION_VIEW,
Uri.parse("http://www.example.com"));

// Starts Implicit Activity
startActivity(i);
目標元件接收的意圖可以使用getExtras()方法來獲得元件傳送額外的資料源。例如:
// Get bundle object at appropriate place in your code
Bundle extras = getIntent().getExtras();

// Extract data using passed keys
String value1 = extras.getString("Key1");
String value2 = extras.getString("Key2");
例子
下面的例子展示了Android意圖的功能,啟動各種 Android 的內建應用。
| 步驟 | 描述 |
|---|---|
| 1 | 使用Eclipse IDE建立Android應用程式,並將其命名為IntentDemo在com.example.intentdemo包下。在建立這個專案,請確保目標SDK並編譯在Android SDK的最新版本為使用更高階別的API。 |
| 2 | 修改 src/MainActivity.java 檔案,並新增程式碼來定義相應的兩個按鈕,即兩個監聽器。啟動瀏覽器,並開啟電話。 |
| 3 | 修改布局XML檔案res/layout/activity_main.xml新增三個按鈕的設定為線性布局。 |
| 4 | 修改 res/values/strings.xml 中定義所需的常數值 |
| 5 | 執行該應用程式啟動Android模擬器來驗證應用程式所做的修改結果。 |
以下是修改主要活動檔案 src/com.example.intentdemo/MainActivity.java 的內容:
package com.example.intentdemo;

import android.net.Uri;
import android.os.Bundle;
import android.app.Activity;
import android.content.Intent;
import android.view.Menu;
import android.view.View;
import android.widget.Button;

public class MainActivity extends Activity {

   @Override
   protected void onCreate(Bundle savedInstanceState) {
      super.onCreate(savedInstanceState);
      setContentView(R.layout.activity_main);

      Button startBrowser = (Button) findViewById(R.id.start_browser);
      startBrowser.setOnClickListener(new View.OnClickListener() {
         public void onClick(View view) {
            Intent i = new Intent(android.content.Intent.ACTION_VIEW,
            Uri.parse("http://www.example.com"));
            startActivity(i);
         }
      });
      Button startPhone = (Button) findViewById(R.id.start_phone);
      startPhone.setOnClickListener(new View.OnClickListener() {
         public void onClick(View view) {
            Intent i = new Intent(android.content.Intent.ACTION_VIEW,
            Uri.parse("tel:9510300000"));
            startActivity(i);
         }
      });
   }
   @Override
   public boolean onCreateOptionsMenu(Menu menu) {
      // Inflate the menu; this adds items to the action
      // bar if it is present.
      getMenuInflater().inflate(R.menu.main, menu);
      return true;
   }

}
下面是 res/layout/activity_main.xml 檔案的內容:
<LinearLayout xmlns:android="http://schemas.android.com/apk/res/android"
   android:layout_width="fill_parent"
   android:layout_height="fill_parent"
   android:orientation="vertical" >

   <Button android:id="@+id/start_browser"
   android:layout_width="fill_parent"
   android:layout_height="wrap_content"
   android:text="@string/start_browser"/>

   <Button android:id="@+id/start_phone"
   android:layout_width="fill_parent"
   android:layout_height="wrap_content"
   android:text="@string/start_phone" />

</LinearLayout>
下面 res/values/strings.xm 定義兩個新的常數的內容:
<?xml version="1.0" encoding="utf-8"?>
<resources>

    <string name="app_name">IntentDemo</string>
    <string name="action_settings">Settings</string>
    <string name="hello_world">Hello world!</string>
    <string name="start_browser">Start Browser</string>
    <string name="start_phone">Start Phone</string>

</resources>
以下是 AndroidManifest.xml 檔案的預設內容:
<?xml version="1.0" encoding="utf-8"?>
<manifest xmlns:android="http://schemas.android.com/apk/res/android"
    package="com.example.intentdemo"
    android:versionCode="1"
    android:versionName="1.0" >

    <uses-sdk
        android:minSdkVersion="8"
        android:targetSdkVersion="17" />

    <application
        android:allowBackup="true"
        android:icon="@drawable/ic_launcher"
        android:label="@string/app_name"
        android:theme="@style/AppTheme" >
        <activity
            android:name="com.example.intentdemo.MainActivity"
            android:label="@string/app_name" >
            <intent-filter>
                <action android:name="android.intent.action.MAIN" />

                <category android:name="android.intent.category.LAUNCHER" />
            </intent-filter>
        </activity>
    </application>

</manifest>
現在執行 IntentDemo應用程式。假設建立AVD同時做正確的環境設定。要從Eclipse執行的應用程式,開啟一個專案的活動檔案,並 從工具列上單擊“Run”  圖示。 Eclipse AVD安裝的應用程式,並啟動它,如果一切都設定和應用沒有問題,它會顯示以下模擬器視窗:
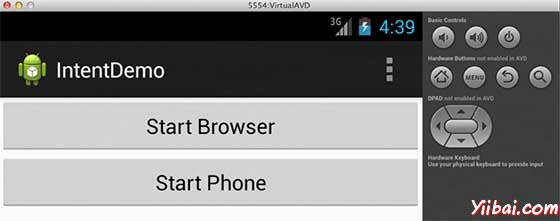
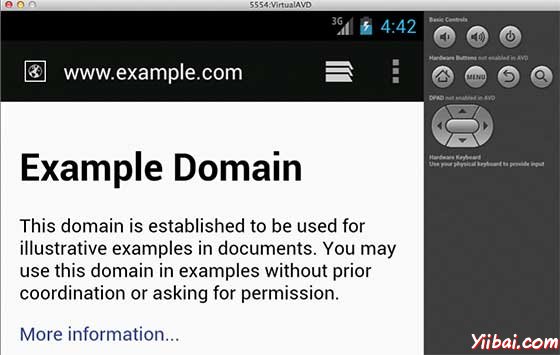
現在點選開始瀏覽按鈕,這將啟動一個瀏覽器組態並顯示 http://www.example.com 如下所示:
類似的方式,可以啟動手機介面使用開始電話按鈕,這允許撥打已經給定的電話號碼。
Intent過濾器
上面已經看到了意圖如何用來呼叫一個活動。 Android作業系統使用過濾器來查明活動,服務和廣播接收器能夠處理指定的一組動作,類別。使用 <intent-filter> 元素在 manifest 檔案中,列出了動作,類別和資料型別相關聯的活動,服務或廣播接收器。
以下是 AndroidManifest.xml 檔案中的一部分,指定活動 com.example.intentdemo.CustomActivity 的兩個動作,類和資料,下面是可以呼叫的一個例子:
<activity android:name=".CustomActivity"
   android:label="@string/app_name">
   <intent-filter>
      <action android:name="android.intent.action.VIEW" />
      <action android:name="com.example.intentdemo.LAUNCH" />
      <category android:name="android.intent.category.DEFAULT" />
      <data android:scheme="http" />
   </intent-filter>
</activity>
活動的定義是隨著上面提到的過濾器,活動將使用 android.intent.action.VIEW 或 com.example.intentdemo.LAUNCH 動作提供其類別來呼叫這個活動,否則使用android.intent.category.DEFAULT。
<data> 元素活動被稱為指定資料型別,上面的例子中自定義活動的資料以 "http://" 開始
有可能在只是一個意圖的情況下,可以通過一個以上的活動或服務的過濾器,使用者可能會被要求指定啟用哪個元件。可以發現如果沒有指定目標,則會引發異常。
以下測試 Android 檢查在呼叫活動前:
-
如上圖所示,但這個列表不能為空,可能會列出多個過濾器<intent-filter>動作,一個過濾器必須至少包含一個<action>元素,否則會阻止所有意圖。如果有一個以上的動作列出,那麼Android將嘗試匹配在呼叫活動之前所提到的其中一個動作。
-
過濾器<intent-filter>可能列出零個,一個或一個以上。如果沒有類被提到,Android也能通過這個測試,但如果超過一個類提到通過類的測試意圖,在過濾器中,每一個類中的Intent物件必須符合一個類。
-
每個<data>元素可以指定一個URI和資料型別(MIME媒體型別)。單獨的屬性,如方案,主機,埠和路徑URI的每個部分。同時包含URI和資料型別的一個Intent物件通過測試,只有當它的型別在過濾器列出的型別相匹配資料型別的一部分。
例子
下面是修改上面例子的一個例子。在這裡將看到 Android 如何解決衝突,如果一個意圖呼叫定義了兩個活動,接下來如何呼叫自定義活動使用一個過濾器,第三個是一個在例外情況下,如果 Android 不提交適當的活動意圖定義。
| 步驟 | 描述 |
|---|---|
| 1 | 使用Eclipse IDE建立 Android 應用程式,並將其命名為 IntentDemo 在一個包com.example.intentdemo下。在建立這個專案前,確保目標SDK編譯在Android SDK的最新版本或使用更高階別的API。 |
| 2 | 修改 src/MainActivity.java 檔案,並新增程式碼來定義相應的布局檔案中定義了三個按鈕的監聽器。 |
| 3 | 新增一個新的 src/CustomActivity.java 檔案,將由不同的意圖來呼叫一個自定義的活動。 |
| 4 | 修改布局XML檔案res/layout/activity_main.xml 新增三個按鈕的線性布局。 |
| 5 | 新增一個布局XML檔案res/layout/custom_view.xml,在其中新增一個簡單的<TextView>來顯示通過意圖傳遞的資料。 |
| 6 | 修改 res/values/strings.xml 定義所需的常數值 |
| 7 | 修改 AndroidManifest.xml 新增 <intent-filter> 定義規則,來自定義意圖呼叫活動。 |
| 8 | 執行該應用程式啟動Android模擬器,並確認在應用修改變化的結果。 |
以下是內容是修改了主要活動檔案 src/com.example.intentdemo/MainActivity.java.
package com.example.intentdemo;

import android.net.Uri;
import android.os.Bundle;
import android.app.Activity;
import android.content.Intent;
import android.view.Menu;
import android.view.View;
import android.widget.Button;

public class MainActivity extends Activity {

   @Override
   protected void onCreate(Bundle savedInstanceState) {
      super.onCreate(savedInstanceState);
      setContentView(R.layout.activity_main);

      // First intent to use ACTION_VIEW action with correct data
      Button startBrowser_a = (Button) findViewById(R.id.start_browser_a);
      startBrowser_a.setOnClickListener(new View.OnClickListener() {
         public void onClick(View view) {
            Intent i = new Intent(android.content.Intent.ACTION_VIEW,
            Uri.parse("http://www.example.com"));
            startActivity(i);
         }
      });

      // Second intent to use LAUNCH action with correct data
      Button startBrowser_b = (Button) findViewById(R.id.start_browser_b);
      startBrowser_b.setOnClickListener(new View.OnClickListener() {
         public void onClick(View view) {
            Intent i = new Intent("com.example.intentdemo.LAUNCH",
            Uri.parse("http://www.example.com"));
            startActivity(i);
         }
      });

      // Third intent to use LAUNCH action with incorrect data
      Button startBrowser_c = (Button) findViewById(R.id.start_browser_c);
      startBrowser_c.setOnClickListener(new View.OnClickListener() {
         public void onClick(View view) {
            Intent i = new Intent("com.example.intentdemo.LAUNCH",
            Uri.parse("https://www.example.com"));
            startActivity(i);
         }
      });

   }

   @Override
   public boolean onCreateOptionsMenu(Menu menu) {
   // Inflate the menu; this adds items to the
   // action bar if it is present.
   getMenuInflater().inflate(R.menu.main, menu);
   return true;
   }

}
以下是修改的主要活動檔案的內容 src/com.example.intentdemo/CustomActivity.java.
package com.example.intentdemo;

import android.app.Activity;
import android.net.Uri;
import android.os.Bundle;
import android.widget.TextView;

public class CustomActivity extends Activity {
   @Override
   public void onCreate(Bundle savedInstanceState) {
      super.onCreate(savedInstanceState);
      setContentView(R.layout.custom_view);

      TextView label = (TextView) findViewById(R.id.show_data);

      Uri url = getIntent().getData();
      label.setText(url.toString());
   }

}
以下是 res/layout/activity_main.xml 檔案的內容:
<LinearLayout xmlns:android="http://schemas.android.com/apk/res/android"
   android:layout_width="fill_parent"
   android:layout_height="fill_parent"
   android:orientation="vertical" >

   <Button android:id="@+id/start_browser_a"
   android:layout_width="fill_parent"
   android:layout_height="wrap_content"
   android:text="@string/start_browser_a"/>

   <Button android:id="@+id/start_browser_b"
   android:layout_width="fill_parent"
   android:layout_height="wrap_content"
   android:text="@string/start_browser_b"/>

   <Button android:id="@+id/start_browser_c"
   android:layout_width="fill_parent"
   android:layout_height="wrap_content"
   android:text="@string/start_browser_c"/>

</LinearLayout>
下面是 res/layout/custom_view.xml 檔案的內容:
<?xml version="1.0" encoding="utf-8"?>
<LinearLayout xmlns:android="http://schemas.android.com/apk/res/android"
    android:orientation="vertical"
    android:layout_width="fill_parent"
    android:layout_height="fill_parent"    >

   <TextView android:id="@+id/show_data"
   android:layout_width="fill_parent"
   android:layout_height="400dp"/>

</LinearLayout>
下面 res/values/strings.xml 檔案內容中定義兩個新的常數:
<?xml version="1.0" encoding="utf-8"?>
<resources>

    <string name="app_name">IntentDemo</string>
    <string name="action_settings">Settings</string>
    <string name="hello_world">Hello world!</string>
    <string name="start_browser_a">Start Browser with VIEW action</string>
    <string name="start_browser_b">Start Browser with LAUNCH action</string>
    <string name="start_browser_c">Exception Condition</string>

</resources>
以下是 AndroidManifest.xml 檔案的預設內容:
<?xml version="1.0" encoding="utf-8"?>
<manifest xmlns:android="http://schemas.android.com/apk/res/android"
    package="com.example.intentdemo"
    android:versionCode="1"
    android:versionName="1.0" >

    <uses-sdk
        android:minSdkVersion="8"
        android:targetSdkVersion="17" />
    <application
        android:allowBackup="true"
        android:icon="@drawable/ic_launcher"
        android:label="@string/app_name"
        android:theme="@style/AppTheme" >
        <activity
            android:name="com.example.intentdemo.MainActivity"
            android:label="@string/app_name" >
            <intent-filter>
                <action android:name="android.intent.action.MAIN" />

                <category android:name="android.intent.category.LAUNCHER" />
            </intent-filter>
        </activity>
        <activity android:name="com.example.intentdemo.CustomActivity"
            android:label="@string/app_name">
           <intent-filter>
              <action android:name="android.intent.action.VIEW" />
              <action android:name="com.example.intentdemo.LAUNCH" />
              <category android:name="android.intent.category.DEFAULT" />
              <data android:scheme="http" />
           </intent-filter>
        </activity>
    </application>

</manifest>
要執行IntentDemo應用程式。假設建立了AVD並設定了環境。要從 Eclipse 執行應用程式,開啟一個專案的活動檔案,從工具列上單擊“Run” 圖示。 Eclipse AVD安裝的應用程式並啟動它,如果一切設定和應用都沒有問題,它會顯示以下模擬器視窗:
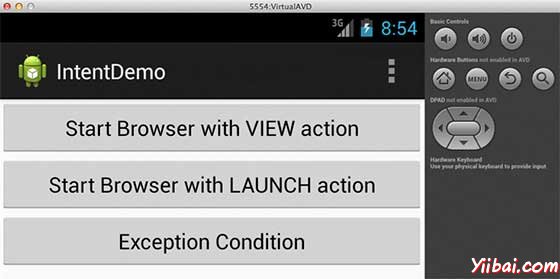
現在,開始第一個按鈕“Start Browser with VIEW Action”。這裡定義了自定義活動過濾器“android.intent.action.VIEW”,並且已經有一個預設的活動,由Android啟動Web瀏覽器檢視定義動作,所以android 顯示以下兩個選項來選擇要啟動的活動。
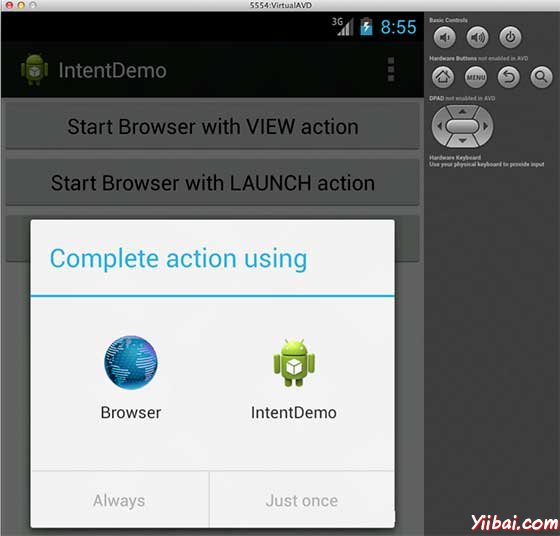
現在,如果選擇瀏覽器,那麼Android將啟動網頁瀏覽器並開啟 example.com 網站,但如果選擇“IndentDemo”選項,那麼Android將啟動CustomActivity什麼也不做,只不過是捕捉傳遞的資料,並顯示在文字檢視如下:
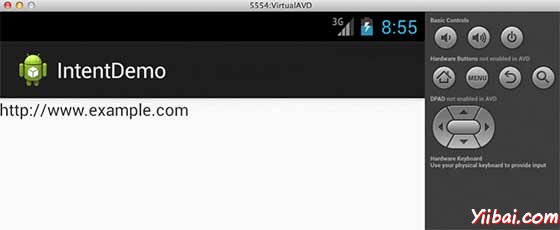
現在使用“後退”按鈕,並點選“Start Browser with LAUNCH Action”按鈕,這裡 Android 應用過濾器來選擇定義活動,只需啟動自定義活動,再次顯示以下畫面:
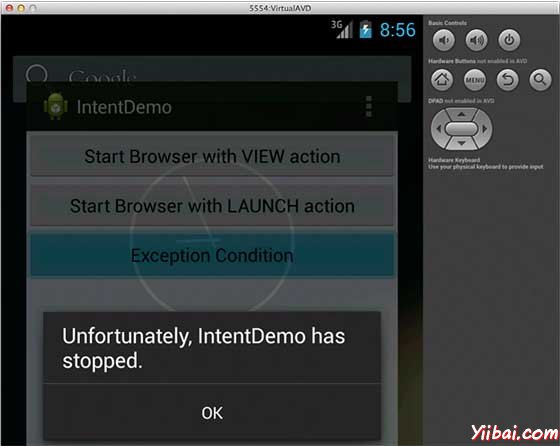
同樣,返回使用“後退”按鈕,並點選“Exception Condition”按鈕,在這裡Android試圖找出一個有效的過濾器,對於給定intent,它沒有找到一個有效活動定義,因為在這個時候,已經資料使用HTTPS,而不是HTTP,雖然是一個正確的動作,但是Android丟擲一個異常,並顯示以下畫面: