Spring Security基於角色登入範例
最基本的,我們要做的是建立一個自定義的成功處理程式來負責根據登入使用者的角色重定向到相應的URL。Spring Security中已經提供了 SimpleUrlAuthenticationSuccessHandler,它包含了成功處理程式的邏輯。我們只是用自己的重定向邏輯擴充套件它來實現我們的目標。
- Spring 4.1.6.RELEASE
- Spring Security 4.0.1.RELEASE
- Maven 3
- JDK 1.8
- Tomcat 7
- Eclipse JUNO Service Release 2
讓我們現在就開始,建議您按照以下步驟一起來實踐。
步驟1: 工程目錄結構
第2步:更新pom.xml,包括所需依懶
<project xmlns="http://maven.apache.org/POM/4.0.0" xmlns:xsi="http://www.w3.org/2001/XMLSchema-instance"
  xsi:schemaLocation="http://maven.apache.org/POM/4.0.0 http://maven.apache.org/xsd/maven-4.0.0.xsd">
  <modelVersion>4.0.0</modelVersion>

  <groupId>com.yiibai.springsecurity</groupId>
  <artifactId>SpringSecurityRoleBasedLogin</artifactId>
  <version>1.0.0</version>
  <packaging>war</packaging>

  <name>SpringSecurityRoleBasedLogin</name>

	<properties>
		<springframework.version>4.1.6.RELEASE</springframework.version>
		<springsecurity.version>4.0.1.RELEASE</springsecurity.version>
	</properties>

	<dependencies>
		<!-- Spring -->
		<dependency>
			<groupId>org.springframework</groupId>
			<artifactId>spring-core</artifactId>
			<version>${springframework.version}</version>
		</dependency>
		<dependency>
			<groupId>org.springframework</groupId>
			<artifactId>spring-web</artifactId>
			<version>${springframework.version}</version>
		</dependency>
		<dependency>
			<groupId>org.springframework</groupId>
			<artifactId>spring-webmvc</artifactId>
			<version>${springframework.version}</version>
		</dependency>

		<!-- Spring Security -->
		<dependency>
			<groupId>org.springframework.security</groupId>
			<artifactId>spring-security-web</artifactId>
			<version>${springsecurity.version}</version>
		</dependency>
		<dependency>
			<groupId>org.springframework.security</groupId>
			<artifactId>spring-security-config</artifactId>
			<version>${springsecurity.version}</version>
		</dependency>

		<dependency>
			<groupId>javax.servlet</groupId>
			<artifactId>javax.servlet-api</artifactId>
			<version>3.1.0</version>
		</dependency>
		<dependency>
			<groupId>javax.servlet.jsp</groupId>
			<artifactId>javax.servlet.jsp-api</artifactId>
			<version>2.3.1</version>
		</dependency>
		<dependency>
			<groupId>javax.servlet</groupId>
			<artifactId>jstl</artifactId>
			<version>1.2</version>
		</dependency>
	</dependencies>

	<build>
		<pluginManagement>
			<plugins>
				<plugin>
					<groupId>org.apache.maven.plugins</groupId>
					<artifactId>maven-compiler-plugin</artifactId>
					<version>3.2</version>
					<configuration>
						<source>1.7</source>
						<target>1.7</target>
					</configuration>
				</plugin>
				<plugin>
					<groupId>org.apache.maven.plugins</groupId>
					<artifactId>maven-war-plugin</artifactId>
					<version>2.4</version>
					<configuration>
						<warSourceDirectory>src/main/webapp</warSourceDirectory>
						<warName>SpringSecurityRoleBasedLoginExample</warName>
						<failOnMissingWebXml>false</failOnMissingWebXml>
					</configuration>
				</plugin>
			</plugins>
		</pluginManagement>
		<finalName>SpringSecurityRoleBasedLogin</finalName>
	</build>
</project>
步驟3: 新增Spring Security組態類
這裡最重要一個步驟,在我們的應用程式中新增 Spring Security 是來建立Spring Security的Java組態。 這個結構將建立用來負責應用程式內所有安全(保護應用程式的URL,驗證提交使用者名和密碼,重定向到紀錄檔中的形式等等)的springSecurityFilterChain Servlet過濾程式。
package com.yiibai.springsecurity.configuration;

import org.springframework.beans.factory.annotation.Autowired;
import org.springframework.context.annotation.Configuration;
import org.springframework.security.config.annotation.authentication.builders.AuthenticationManagerBuilder;
import org.springframework.security.config.annotation.web.builders.HttpSecurity;
import org.springframework.security.config.annotation.web.configuration.EnableWebSecurity;
import org.springframework.security.config.annotation.web.configuration.WebSecurityConfigurerAdapter;

@Configuration
@EnableWebSecurity
public class SecurityConfiguration extends WebSecurityConfigurerAdapter {

	@Autowired
	CustomSuccessHandler customSuccessHandler;

	@Autowired
	public void configureGlobalSecurity(AuthenticationManagerBuilder auth) throws Exception {
		auth.inMemoryAuthentication().withUser("yiibai").password("123456").roles("USER");
		auth.inMemoryAuthentication().withUser("admin").password("123456").roles("ADMIN");
		auth.inMemoryAuthentication().withUser("dba").password("123456").roles("ADMIN","DBA");
	}

	@Override
	protected void configure(HttpSecurity http) throws Exception {
	  http.authorizeRequests()
	  	.antMatchers("/", "/home").access("hasRole('USER')")
	  	.antMatchers("/admin/**").access("hasRole('ADMIN')")
	  	.antMatchers("/db/**").access("hasRole('ADMIN') and hasRole('DBA')")
	  	.and().formLogin().loginPage("/login").successHandler(customSuccessHandler)
	  	.usernameParameter("ssoId").passwordParameter("password")
	  	.and().csrf()
	  	.and().exceptionHandling().accessDeniedPage("/Access_Denied");
	}

}
這個類是類似的,只不過有一些重要區別於之前教學文章:
formLogin().loginPage("/login").successHandler(customSuccessHandler). 現在來看看 successHandler。這個類[如下所示]負責基於自定義邏輯的重定向,這對我們來說是根據他的角色[USER / ADMIN / DBA]使用者重定向[ home/admin/db]。
<beans:beans xmlns="http://www.springframework.org/schema/security"
    xmlns:beans="http://www.springframework.org/schema/beans"
    xmlns:xsi="http://www.w3.org/2001/XMLSchema-instance"
    xsi:schemaLocation="http://www.springframework.org/schema/beans http://www.springframework.org/schema/beans/spring-beans-4.1.xsd
    http://www.springframework.org/schema/security http://www.springframework.org/schema/security/spring-security-4.0.xsd">

    <http auto-config="true" >
        <intercept-url pattern="/" access="hasRole('USER')" />
        <intercept-url pattern="/home" access="hasRole('USER')" />
        <intercept-url pattern="/admin**" access="hasRole('ADMIN')" />
        <intercept-url pattern="/dba**" access="hasRole('ADMIN') and hasRole('DBA')" />
        <form-login  login-page="/login"
                     username-parameter="ssoId"
                     password-parameter="password"
                     authentication-success-handler-ref="customSuccessHandler"
                     authentication-failure-url="/Access_Denied" />
        <csrf/>
    </http>

    <authentication-manager >
        <authentication-provider>
            <user-service>
                <user name="yiibai"  password="123456"  authorities="ROLE_USER" />
                <user name="admin" password="123456" authorities="ROLE_ADMIN" />
                <user name="dba"   password="123456" authorities="ROLE_ADMIN,ROLE_DBA" />
            </user-service>
        </authentication-provider>
    </authentication-manager>

    <beans:bean id="customSuccessHandler" class="com.websystique.springsecurity.configuration.CustomSuccessHandler" />

</beans:beans>
下面是上面提及成功處理的類,如下圖的所示 -
package com.websystique.springsecurity.configuration;

import java.io.IOException;
import java.util.ArrayList;
import java.util.Collection;
import java.util.List;

import javax.servlet.http.HttpServletRequest;
import javax.servlet.http.HttpServletResponse;

import org.springframework.security.core.Authentication;
import org.springframework.security.core.GrantedAuthority;
import org.springframework.security.web.DefaultRedirectStrategy;
import org.springframework.security.web.RedirectStrategy;
import org.springframework.security.web.authentication.SimpleUrlAuthenticationSuccessHandler;
import org.springframework.stereotype.Component;

@Component
public class CustomSuccessHandler extends SimpleUrlAuthenticationSuccessHandler {

	private RedirectStrategy redirectStrategy = new DefaultRedirectStrategy();

	@Override
	protected void handle(HttpServletRequest request, HttpServletResponse response, Authentication authentication)
			throws IOException {
		String targetUrl = determineTargetUrl(authentication);

		if (response.isCommitted()) {
			System.out.println("Can't redirect");
			return;
		}

		redirectStrategy.sendRedirect(request, response, targetUrl);
	}

	/*
	 * This method extracts the roles of currently logged-in user and returns
	 * appropriate URL according to his/her role.
	 */
	protected String determineTargetUrl(Authentication authentication) {
		String url = "";

		Collection<? extends GrantedAuthority> authorities = authentication.getAuthorities();

		List<String> roles = new ArrayList<String>();

		for (GrantedAuthority a : authorities) {
			roles.add(a.getAuthority());
		}

		if (isDba(roles)) {
			url = "/db";
		} else if (isAdmin(roles)) {
			url = "/admin";
		} else if (isUser(roles)) {
			url = "/home";
		} else {
			url = "/accessDenied";
		}

		return url;
	}

	private boolean isUser(List<String> roles) {
		if (roles.contains("ROLE_USER")) {
			return true;
		}
		return false;
	}

	private boolean isAdmin(List<String> roles) {
		if (roles.contains("ROLE_ADMIN")) {
			return true;
		}
		return false;
	}

	private boolean isDba(List<String> roles) {
		if (roles.contains("ROLE_DBA")) {
			return true;
		}
		return false;
	}

	public void setRedirectStrategy(RedirectStrategy redirectStrategy) {
		this.redirectStrategy = redirectStrategy;
	}

	protected RedirectStrategy getRedirectStrategy() {
		return redirectStrategy;
	}

}
第4步:使用war註冊springSecurityFilter
package com.websystique.springsecurity.configuration;

import org.springframework.security.web.context.AbstractSecurityWebApplicationInitializer;

public class SecurityWebApplicationInitializer extends AbstractSecurityWebApplicationInitializer {

}
<filter>
    <filter-name>springSecurityFilterChain</filter-name>
    <filter-class>org.springframework.web.filter.DelegatingFilterProxy</filter-class>
</filter>

<filter-mapping>
    <filter-name>springSecurityFilterChain</filter-name>
    <url-pattern>/*</url-pattern>
</filter-mapping>
第5步: 新增控制器
package com.yiibai.springsecurity.controller;

import javax.servlet.http.HttpServletRequest;
import javax.servlet.http.HttpServletResponse;

import org.springframework.security.core.Authentication;
import org.springframework.security.core.context.SecurityContextHolder;
import org.springframework.security.core.userdetails.UserDetails;
import org.springframework.security.web.authentication.logout.SecurityContextLogoutHandler;
import org.springframework.stereotype.Controller;
import org.springframework.ui.ModelMap;
import org.springframework.web.bind.annotation.RequestMapping;
import org.springframework.web.bind.annotation.RequestMethod;

@Controller
public class HelloWorldController {


	@RequestMapping(value = { "/", "/home" }, method = RequestMethod.GET)
	public String homePage(ModelMap model) {
		model.addAttribute("user", getPrincipal());
		return "welcome";
	}

	@RequestMapping(value = "/admin", method = RequestMethod.GET)
	public String adminPage(ModelMap model) {
		model.addAttribute("user", getPrincipal());
		return "admin";
	}

	@RequestMapping(value = "/db", method = RequestMethod.GET)
	public String dbaPage(ModelMap model) {
		model.addAttribute("user", getPrincipal());
		return "dba";
	}

	@RequestMapping(value = "/Access_Denied", method = RequestMethod.GET)
	public String accessDeniedPage(ModelMap model) {
		model.addAttribute("user", getPrincipal());
		return "accessDenied";
	}

	@RequestMapping(value = "/login", method = RequestMethod.GET)
	public String loginPage() {
		return "login";
	}

	@RequestMapping(value="/logout", method = RequestMethod.GET)
	public String logoutPage (HttpServletRequest request, HttpServletResponse response) {
		Authentication auth = SecurityContextHolder.getContext().getAuthentication();
		if (auth != null){
			new SecurityContextLogoutHandler().logout(request, response, auth);
		}
		return "redirect:/login?logout";
	}

	private String getPrincipal(){
		String userName = null;
		Object principal = SecurityContextHolder.getContext().getAuthentication().getPrincipal();

		if (principal instanceof UserDetails) {
			userName = ((UserDetails)principal).getUsername();
		} else {
			userName = principal.toString();
		}
		return userName;
	}

}
第6步: 新增SpringMVC組態類
package com.spring.springsecurity.configuration;

import org.springframework.context.annotation.Bean;
import org.springframework.context.annotation.ComponentScan;
import org.springframework.context.annotation.Configuration;
import org.springframework.web.servlet.ViewResolver;
import org.springframework.web.servlet.config.annotation.EnableWebMvc;
import org.springframework.web.servlet.view.InternalResourceViewResolver;
import org.springframework.web.servlet.config.annotation.ResourceHandlerRegistry;
import org.springframework.web.servlet.config.annotation.WebMvcConfigurerAdapter;
import org.springframework.web.servlet.view.JstlView;

@Configuration
@EnableWebMvc
@ComponentScan(basePackages = "com.yiibai.springsecurity")
public class HelloWorldConfiguration extends WebMvcConfigurerAdapter{

	@Bean
	public ViewResolver viewResolver() {
		InternalResourceViewResolver viewResolver = new InternalResourceViewResolver();
		viewResolver.setViewClass(JstlView.class);
		viewResolver.setPrefix("/WEB-INF/views/");
		viewResolver.setSuffix(".jsp");

		return viewResolver;
	}

     /*
     * Configure ResourceHandlers to serve static resources like CSS/ Javascript etc...
     */
    @Override
    public void addResourceHandlers(ResourceHandlerRegistry registry) {
        registry.addResourceHandler("/static/**").addResourceLocations("/static/");
    }
}
第7步: 新增初始化類
package com.yiibai.springsecurity.configuration;

import org.springframework.web.servlet.support.AbstractAnnotationConfigDispatcherServletInitializer;

public class SpringMvcInitializer extends AbstractAnnotationConfigDispatcherServletInitializer {

	@Override
	protected Class<?>[] getRootConfigClasses() {
		return new Class[] { HelloWorldConfiguration.class };
	}

	@Override
	protected Class<?>[] getServletConfigClasses() {
		return null;
	}

	@Override
	protected String[] getServletMappings() {
		return new String[] { "/" };
	}

}
第8步: 新增檢視
login.jsp
<%@ page language="java" contentType="text/html; charset=ISO-8859-1" pageEncoding="ISO-8859-1"%>
<%@ taglib prefix="c" uri="http://java.sun.com/jsp/jstl/core"%>
<html>
	<head>
		<meta http-equiv="Content-Type" content="text/html; charset=ISO-8859-1">
		<title>Login page</title>
		<link href="<c:url value='/static/css/bootstrap.css' />"  rel="stylesheet"></link>
		<link href="<c:url value='/static/css/app.css' />" rel="stylesheet"></link>
		<link rel="stylesheet" type="text/css" href="//cdnjs.cloudflare.com/ajax/libs/font-awesome/4.2.0/css/font-awesome.css" />
	</head>

	<body>
		<div id="mainWrapper">
			<div class="login-container">
				<div class="login-card">
					<div class="login-form">
						<c:url var="loginUrl" value="/login" />
						<form action="${loginUrl}" method="post" class="form-horizontal">
							<c:if test="${param.error != null}">
								<div class="alert alert-danger">
									<p>Invalid username and password.</p>
								</div>
							</c:if>
							<c:if test="${param.logout != null}">
								<div class="alert alert-success">
									<p>You have been logged out successfully.</p>
								</div>
							</c:if>
							<div class="input-group input-sm">
								<label class="input-group-addon" for="username"><i class="fa fa-user"></i></label>
								<input type="text" class="form-control" id="username" name="ssoId" placeholder="Enter Username" required>
							</div>
							<div class="input-group input-sm">
								<label class="input-group-addon" for="password"><i class="fa fa-lock"></i></label>
								<input type="password" class="form-control" id="password" name="password" placeholder="Enter Password" required>
							</div>
							<input type="hidden" name="${_csrf.parameterName}"  value="${_csrf.token}" />

							<div class="form-actions">
								<input type="submit"
									class="btn btn-block btn-primary btn-default" value="Log in">
							</div>
						</form>
					</div>
				</div>
			</div>
		</div>

	</body>
</html>
<input type="hidden" name="${_csrf.parameterName}" value="${_csrf.token}" /></strong>
這是需要用來防止跨站請求偽造攻擊。正如您所看到的,CSRF引數可在JSP EL表示式存取,還可以通過新增以下到JSP的頂部來強行執行EL表示式計算:
<%@ page isELIgnored="false"%>
welcome.jsp
<%@ page language="java" contentType="text/html; charset=ISO-8859-1" pageEncoding="ISO-8859-1"%>
<%@ taglib prefix="c" uri="http://java.sun.com/jsp/jstl/core"%>
<html>
<head>
	<meta http-equiv="Content-Type" content="text/html; charset=ISO-8859-1">
	<title>Welcome page</title>
</head>
<body>
	Dear <strong>${user}</strong>, Welcome to Home Page.
	<a href="<c:url value="/logout" />">Logout</a>
</body>
</html>
admin.jsp
<%@ page language="java" contentType="text/html; charset=UTF-8" pageEncoding="UTF-8"%>
<%@ taglib prefix="c" uri="http://java.sun.com/jsp/jstl/core"%>
<html>
<head>
	<meta http-equiv="Content-Type" content="text/html; charset=ISO-8859-1">
	<title>Admin page</title>
</head>
<body>
	Dear <strong>${user}</strong>, Welcome to Admin Page.
	<a href="<c:url value="/logout" />">Logout</a>
</body>
</html>
dba.jsp
<%@ page language="java" contentType="text/html; charset=ISO-8859-1" pageEncoding="ISO-8859-1"%>
<%@ taglib prefix="c" uri="http://java.sun.com/jsp/jstl/core"%>
<html>
<head>
	<meta http-equiv="Content-Type" content="text/html; charset=ISO-8859-1">
	<title>DBA page</title>
</head>
<body>
	Dear <strong>${user}</strong>, Welcome to DBA Page.
	<a href="<c:url value="/logout" />">Logout</a>
</body>
</html>
accessDenied.jsp
<%@ page language="java" contentType="text/html; charset=ISO-8859-1" pageEncoding="ISO-8859-1"%>
<%@ taglib prefix="c" uri="http://java.sun.com/jsp/jstl/core"%>
<html>
<head>
	<meta http-equiv="Content-Type" content="text/html; charset=ISO-8859-1">
	<title>AccessDenied page</title>
</head>
<body>
	Dear <strong>${user}</strong>, You are not authorized to access this page
	<a href="<c:url value="/logout" />">Logout</a>
</body>
</html>
app.css
html{
	background-color:#2F2F2F;
}

body, #mainWrapper {
	height: 100%;
}

body, #mainWrapper, .form-control{
	font-size:14px!important;
}

#mainWrapper {
	height: 100vh;
	padding-left:10px;
	padding-right:10px;
	padding-bottom:10px;
}

#authHeaderWrapper{
	clear:both;
	width: 100%;
	height:3%;
	padding-top:5px;
	padding-bottom:5px;
}

.login-container {
    margin-top: 100px;
    background-color: floralwhite;
    width: 40%;
    left: 30%;
    position: absolute;
}

.login-card {
    width: 80%;
    margin: auto;
}
.login-form {
    padding: 10%;
}
第9步:構建和部署應用程式
現在構造 war(通過 eclipse/m2eclipse)或通過Maven的命令列(mvn clean install)。部署WAR檔案到Servlet3.0容器。由於這裡我使用的是在 eclipse 中組態 Tomcat,可以直接發佈到 Tomcat 服務容器中。如果不知道怎麼使用,可以參考:/20/223/8584.html

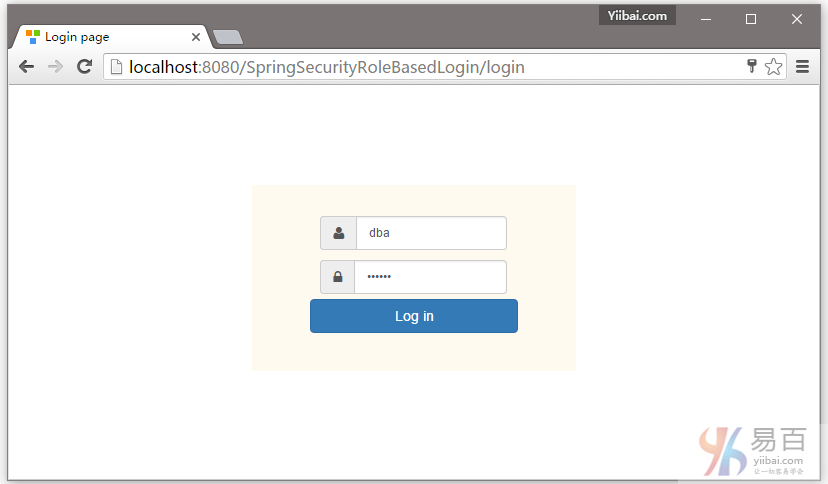
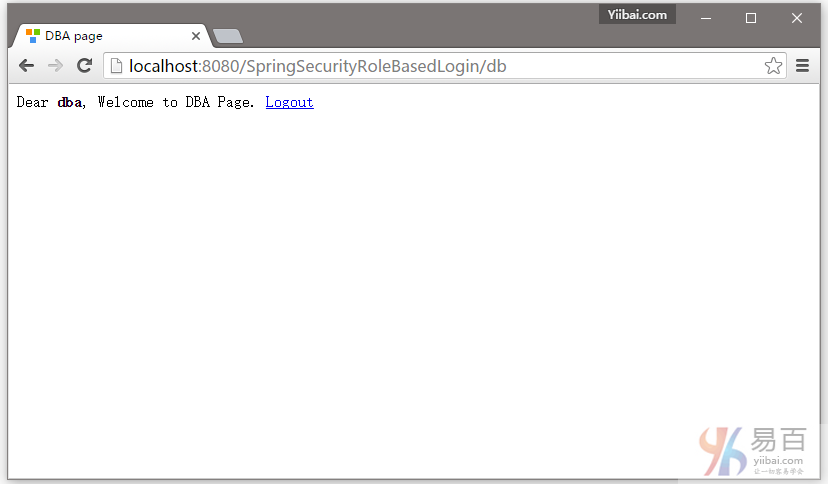
提交,您將會被跳轉到 /db 頁面,作為登入的使用者具有DBA角色(基於角色的登入)。如下圖中所示 -
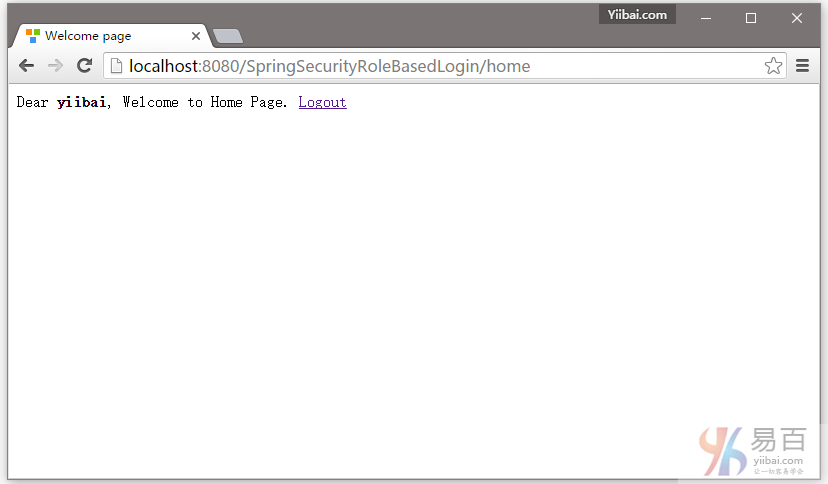
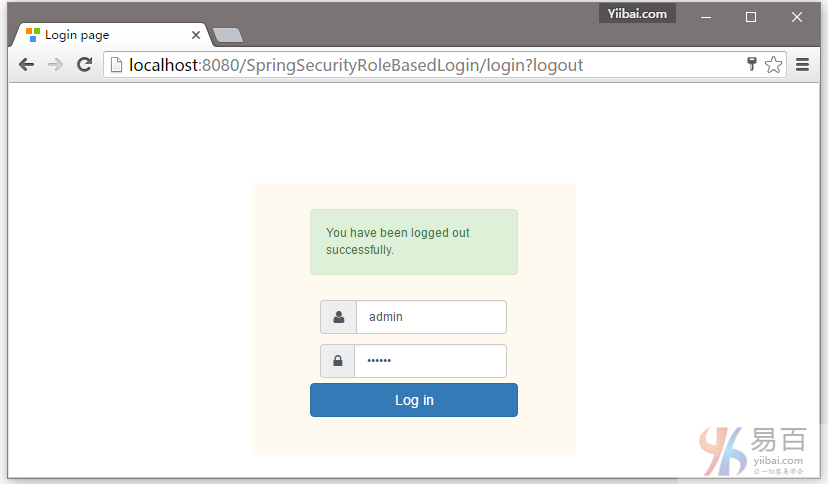
現在登出,並填寫使用者(yiibai)角色的憑據(使用使用者名和密碼)登入。

首先提供一個錯誤的密碼,然後點選登入 -

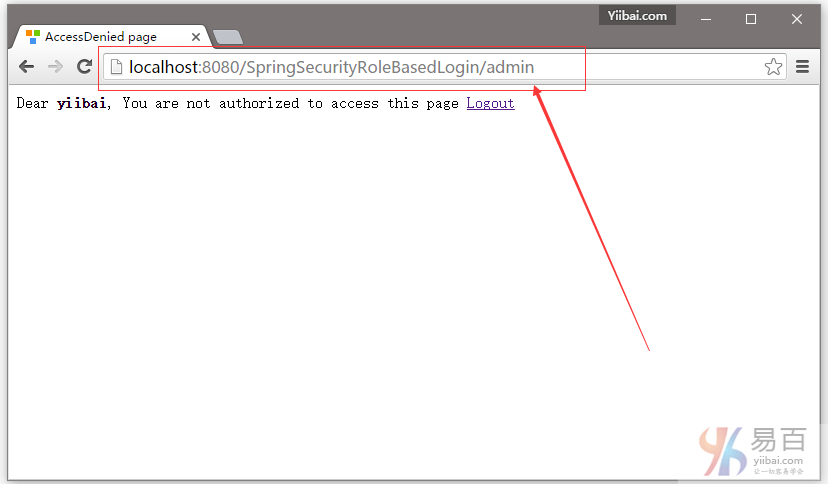
現在,登出並使用管理員憑據登入,您將會被重向到URL:/admin 。如下圖中所示 -
使用者 admin 登入成功後的頁面,如下所示 -

到這裡就結束了。在下一篇文章中將學習使用基於Hibernate的註解方法的Spring Security資料庫認證。