Hibernate每個具體類一張表對映(使用注釋)
在每個類建立一張表的情況下, 表中不使用Null值的列。 這種方法的缺點是在子類表中建立了重複的列。
在這裡,我們需要在父類別中使用@Inheritance(strategy = InheritanceType.TABLE_PER_CLASS)注釋,並在子類中使用@AttributeOverrides注釋。@Inheritance(strategy = InheritanceType.TABLE_PER_CLASS)指定正在使用每個具體類策略的表。它應該僅在父類別中指定。
@AttributeOverrides定義該類中的父類別屬性將被覆蓋。 在表結構中,父類別表列將被新增到子類表中。
我們來了解對映的層次結構。
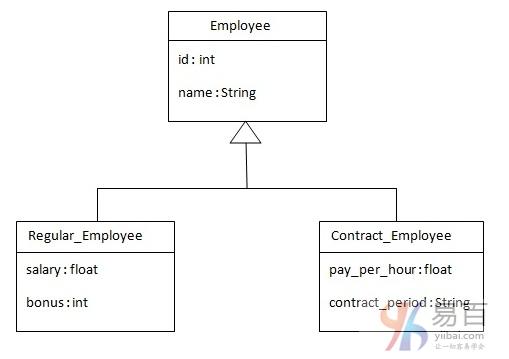
在每個具體類一張表的情況下,資料庫中將有三個表,每個表表示一個特定的類。
每個表的格結構如下:Employee類的表結構 -
CREATE TABLE `emp122` (
  `id` int(11) NOT NULL,
  `name` varchar(255) DEFAULT NULL,
  PRIMARY KEY (`id`)
) ENGINE=InnoDB DEFAULT CHARSET=utf8;
Regular_Employee類的表結構 -
CREATE TABLE `regemp122` (
  `id` int(11) NOT NULL,
  `name` varchar(255) DEFAULT NULL,
  `salary` float DEFAULT NULL,
  `bonus` int(11) DEFAULT NULL,
  PRIMARY KEY (`id`)
) ENGINE=InnoDB DEFAULT CHARSET=utf8;
Contract_Employee類的表結構 -
CREATE TABLE `contemp122` (
  `id` int(11) NOT NULL,
  `name` varchar(255) DEFAULT NULL,
  `pay_per_hour` float DEFAULT NULL,
  `contract_duration` varchar(255) DEFAULT NULL,
  PRIMARY KEY (`id`)
) ENGINE=InnoDB DEFAULT CHARSET=utf8;
每個具體類的表範例
在這個例子中,我們建立了三個類,並在employee.hbm.xml檔案中提供了這些類的對映。建立一個專案:inheritance2annotation, 完整的專案結構如下 -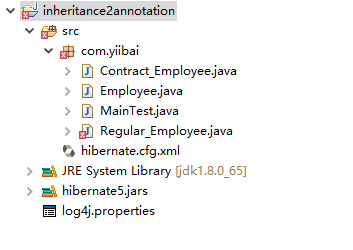
1)建立持久類
您需要建立表示繼承的持久化類。 讓我們為上面的層次結構建立三個類:
檔案:Employee.java
package com.yiibai;

import javax.persistence.*;
import javax.persistence.*;

@Entity
@Table(name = "employee102")
@Inheritance(strategy = InheritanceType.TABLE_PER_CLASS)
public class Employee {
    @Id
    @GeneratedValue(strategy = GenerationType.AUTO)
    @Column(name = "id")
    private int id;

    @Column(name = "name")
    private String name;

    public int getId() {
        return id;
    }

    public void setId(int id) {
        this.id = id;
    }

    public String getName() {
        return name;
    }

    public void setName(String name) {
        this.name = name;
    }

    // setters and getters

}
檔案:Regular_Employee.java
package com.yiibai;

/**
 *
 * @author by maxsu
 * @copyright https://www.tw511.com
 * @link download at: https://www.tw511.com/siteinfo/download.html
 */
import javax.persistence.*;

@Entity
@Table(name = "regularemployee102")
@AttributeOverrides({
        @AttributeOverride(name = "id", column = @Column(name = "id")),
        @AttributeOverride(name = "name", column = @Column(name = "name")) })
public class Regular_Employee extends Employee {

    @Column(name = "salary")
    private float salary;

    @Column(name = "bonus")
    private int bonus;

    public float getSalary() {
        return salary;
    }

    public void setSalary(float salary) {
        this.salary = salary;
    }

    public int getBonus() {
        return bonus;
    }

    public void setBonus(int bonus) {
        this.bonus = bonus;
    }

    // setters and getters

}
檔案:Contract_Employee.java
package com.yiibai;

/**
 *
 * @author by maxsu
 * @copyright https://www.tw511.com
 * @link download at: https://www.tw511.com/siteinfo/download.html
 */
import javax.persistence.*;

@Entity
@Table(name = "contractemployee102")
@AttributeOverrides({
        @AttributeOverride(name = "id", column = @Column(name = "id")),
        @AttributeOverride(name = "name", column = @Column(name = "name")) })
public class Contract_Employee extends Employee {

    @Column(name = "pay_per_hour")
    private float pay_per_hour;

    @Column(name = "contract_duration")
    private String contract_duration;

    public float getPay_per_hour() {
        return pay_per_hour;
    }

    public void setPay_per_hour(float payPerHour) {
        pay_per_hour = payPerHour;
    }

    public String getContract_duration() {
        return contract_duration;
    }

    public void setContract_duration(String contractDuration) {
        contract_duration = contractDuration;
    }
}
2)在組態檔案中新增hbm檔案的對映
開啟hibernate.cfg.xml文件,並新增如下對映資源的項:
<mapping class="com.yiibai.Employee" />
        <mapping class="com.yiibai.Contract_Employee" />
        <mapping class="com.yiibai.Regular_Employee" />
現在組態檔案將如下所示:
檔案:hibernate.cfg.xml
<?xml version='1.0' encoding='UTF-8'?>
<!DOCTYPE hibernate-configuration PUBLIC
          "-//Hibernate/Hibernate Configuration DTD 3.0//EN"
          "http://hibernate.sourceforge.net/hibernate-configuration-3.0.dtd">

<!-- Generated by MyEclipse Hibernate Tools. -->
<hibernate-configuration>

    <session-factory>
        <property name="hbm2ddl.auto">update</property>
        <property name="connection.driver_class">com.mysql.jdbc.Driver</property>
        <property name="connection.url">jdbc:mysql://localhost:3306/test</property>
        <property name="connection.username">root</property>
        <property name="connection.password">123456</property>
        <property name="dialect">org.hibernate.dialect.MySQL5InnoDBDialect</property>
        <property name="show_sql">true</property>

        <mapping class="com.yiibai.Employee" />
        <mapping class="com.yiibai.Contract_Employee" />
        <mapping class="com.yiibai.Regular_Employee" />
    </session-factory>

</hibernate-configuration>
hbm2ddl.auto屬性定義是用於在資料庫中建立自動表。
4)建立儲存持久物件的類
在這個類中,我們只是將Employee 物件儲存在資料庫表中。
檔案:MainTest.java
package com.yiibai;

import org.hibernate.*;
import org.hibernate.boot.MetadataSources;
import org.hibernate.boot.registry.StandardServiceRegistry;
import org.hibernate.boot.registry.StandardServiceRegistryBuilder;

/**
 *
 * @author by maxsu
 * @copyright https://www.tw511.com
 * @link download at: https://www.tw511.com/siteinfo/download.html
 */

public class MainTest {
    public static void main(String[] args) {
        // 但在5.1.0版本匯總,hibernate則採用如下新方式獲取:
        // 1. 組態型別安全的準服務註冊類,這是當前應用的單例物件,不作修改,所以宣告為final
        // 在configure("cfg/hibernate.cfg.xml")方法中,如果不指定資源路徑,預設在類路徑下尋找名為hibernate.cfg.xml的檔案
        final StandardServiceRegistry registry = new StandardServiceRegistryBuilder()
                .configure("hibernate.cfg.xml").build();
        // 2. 根據服務註冊類建立一個後設資料資源集,同時構建後設資料並生成應用一般唯一的的session工廠
        SessionFactory sessionFactory = new MetadataSources(registry)
                .buildMetadata().buildSessionFactory();

        /**** 上面是組態準備,下面開始我們的資料庫操作 ******/
        Session session = sessionFactory.openSession();// 從對談工廠獲取一個session

        // creating transaction object
        Transaction t = session.beginTransaction();

        Employee e1 = new Employee();
        e1.setName("使用者名-01");

        Regular_Employee e2 = new Regular_Employee();
        e2.setName("yiibai su");
        e2.setSalary(50002);
        e2.setBonus(5);

        Contract_Employee e3 = new Contract_Employee();
        e3.setName("Mina su");
        e3.setPay_per_hour(1010);
        e3.setContract_duration("15 hours");

        session.persist(e1);
        session.persist(e2);
        session.persist(e3);

        t.commit();
        session.close();
        System.out.println("success");
    }
}
執行上面程式碼執行測試即可,應該會自動建立三張表,並插入資料。