ASP.Net MVC手腳架
ASP.NET腳手架是ASP.NET Web應用程式的程式碼生成框架。 Visual Studio 2013包含用於MVC和Web API專案的預安裝程式碼生成器。當想快速新增與資料模型互動的程式碼時,可以將腳手架新增到專案中。使用腳手架可以減少在專案中開發標準資料操作的時間。
正如在前面章節教學中所看到的,我們已經為Index,Create,Edit操作建立了檢視,並且還需要更新操作方法。但ASP.Net MVC提供了一種使用腳手架建立所有這些檢視和操作方法的更簡單的方法。
我們來看一個簡單的例子。它建立一個包含模型類 - Employee的相同範例,但是這次將使用腳手架。
第1步 - 開啟Visual Studio,然後單擊:檔案 -> 新建 -> 專案 選單選項。一個新的專案對話方塊開啟。
第2步 - 在左側窗格中,選擇:模板 -> Visual C# -> Web 。
第3步 - 在中間窗格中,選擇「ASP.NET Web應用程式」。
第4步 - 在名稱欄位中輸入專案名稱:MVCScaffolding ,然後單擊確定 繼續。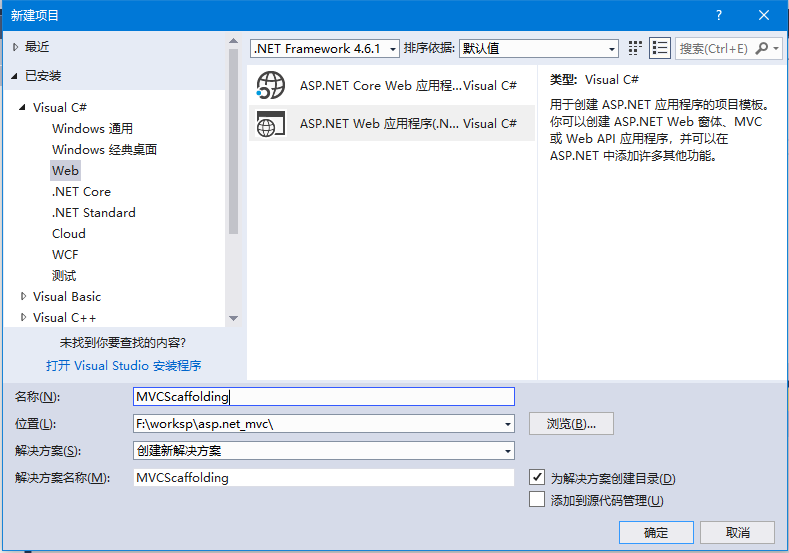
將看到下面的對話方塊,要求設定ASP.NET專案的初始內容。
第5步 - 為了簡單起見,選擇:空 選項,並在為以下項新增檔案夾和核心參照’ 中選中MVC 核取方塊,然後單擊確定。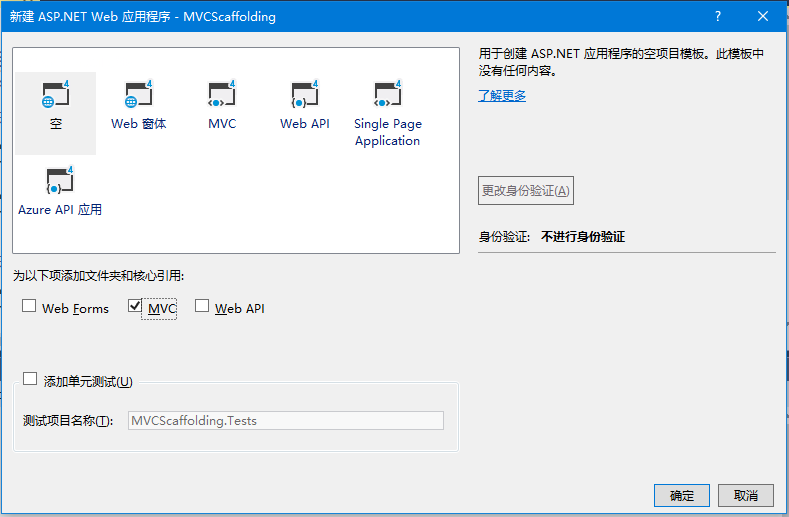
它將使用最少的預定義內容建立一個基本的MVC專案。
專案由Visual Studio建立後,將在「解決方案資源管理器」 視窗中看到許多檔案和檔案夾。
新增 Entity Framework 支援
第一步是安裝實體框架(Entity Framework)。右鍵單擊該專案,然後選擇:管理NuGet程式包 ,開啟NuGet軟體包管理器 。它將開啟「NuGet包管理器」,在搜尋框中搜尋Entity Framework。如下所示 -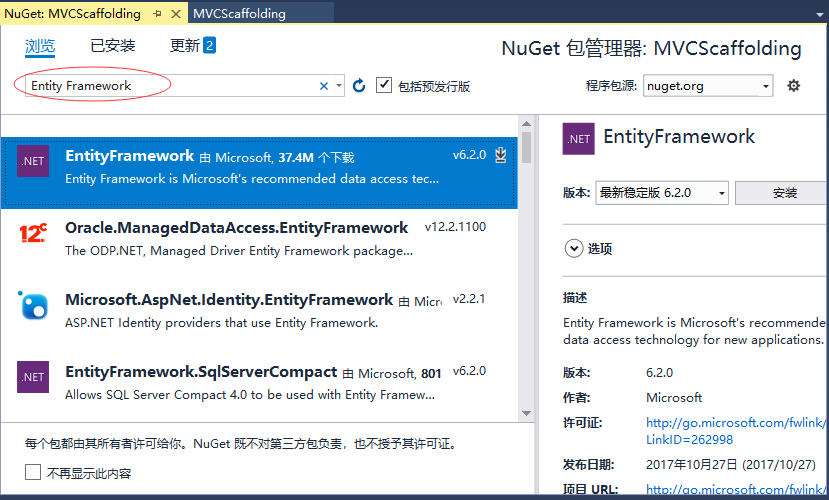
選擇實體框架(Entity Framework),然後點選「安裝(Install)」 按鈕。 它將開啟預覽對話方塊。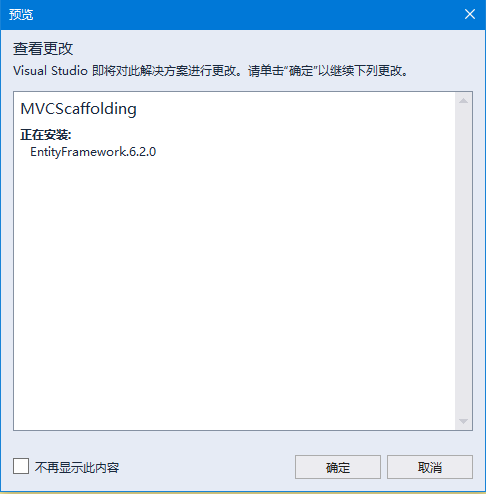
點選確定 繼續下一步 -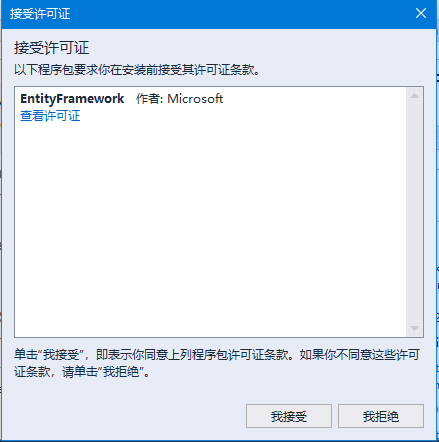
點選「我接受」按鈕開始安裝,完成後如下 -
當實體框架安裝成功後,可看到如上面的截圖所示的出視窗的訊息。
新增模型
要新增模型,請右鍵單擊解決方案資源管理器 中的Models 檔案夾,然後選擇:新增 -> 類 ,會看到新增新專案 對話方塊。
在中間平移中選擇:類,並在名稱欄位中輸入:Employee.cs。如下圖所示 -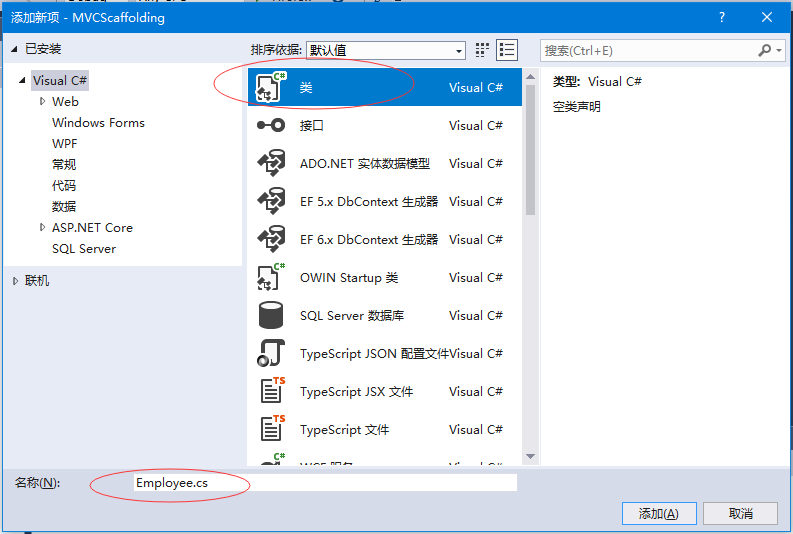
使用以下程式碼將一些屬性新增到Employee類。
using System;

namespace MVCScaffolding.Models {
   public class Employee{
      public int ID { get; set; }
      public string Name { get; set; }
      public DateTime JoiningDate { get; set; }
      public int Age { get; set; }
   }
}
新增DBContext
經過上一步,我們已經建立了一個Employee模型,現在需要在這個模型類上新增另一個類,它將與實體框架(Entity Framework)進行通訊來檢索和儲存資料。 以下是Employee.cs檔案中的完整程式碼。
using System;
using System.Data.Entity;

namespace MVCScaffolding.Models{
   public class Employee{
      public int ID { get; set; }
      public string Name { get; set; }
      public DateTime JoiningDate { get; set; }
      public int Age { get; set; }
   }

   public class EmpDBContext : DbContext{
      public DbSet<Employee> Employees { get; set; }
   }
}
如上面所看到的EmpDBContext是從一個名為DbContext的EF類派生的。 在這個類中,有一個名為DbSet的屬性,它基本上代表了要查詢和儲存的實體。
新增腳手架專案
要新增腳手架,請右鍵單擊解決方案管理器中的Controllers檔案夾,然後選擇:新增 -> 新建搭建基架專案 ,如下圖所示 -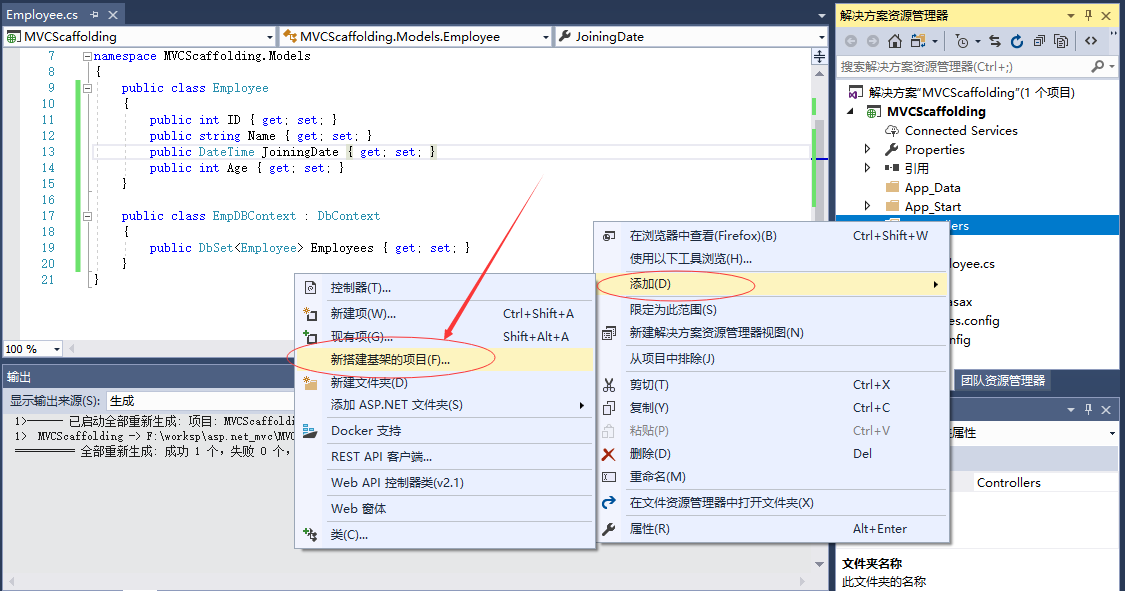
它將顯示「新增腳手架」對話方塊 -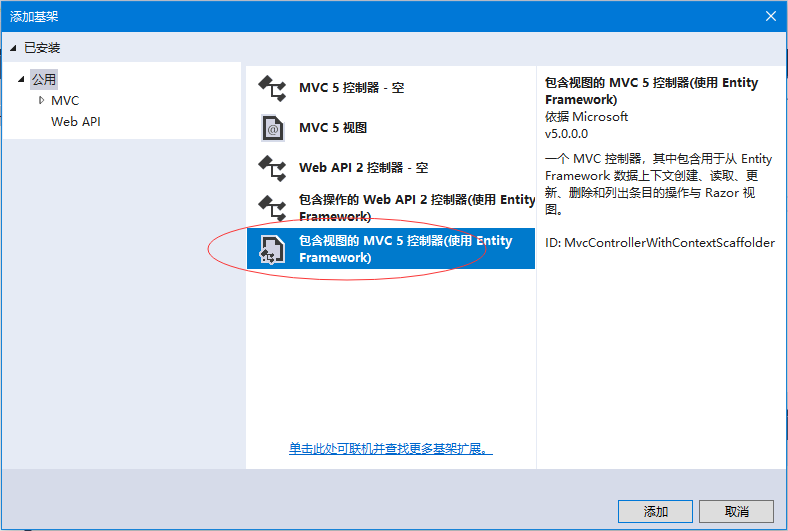
選擇:包含檢視MVC 5控制器(使用Entity Framework) 項,然後單擊「新增」 按鈕,這將顯示新增控制器對話方塊。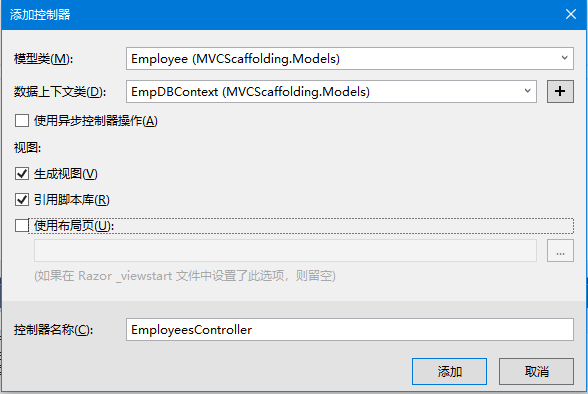
從模型類 下拉選單中選擇:Employee,並從資料上下文類 下拉選單中選擇EmpDBContext。還將看到預設情況下選擇了控制器名稱。
單擊「新增」按鈕繼續,在由Visual Studio使用腳手架建立的EmployeesController中看到以下程式碼。
using System;
using System.Collections.Generic;
using System.Data;
using System.Data.Entity;
using System.Linq;
using System.Net;
using System.Web;
using System.Web.Mvc;
using MVCScaffolding.Models;

namespace MVCScaffolding.Controllers
{
    public class EmployeesController : Controller
    {
        private EmpDBContext db = new EmpDBContext();

        // GET: Employees
        public ActionResult Index()
        {
            return View(db.Employees.ToList());
        }

        // GET: Employees/Details/5
        public ActionResult Details(int? id)
        {
            if (id == null)
            {
                return new HttpStatusCodeResult(HttpStatusCode.BadRequest);
            }
            Employee employee = db.Employees.Find(id);
            if (employee == null)
            {
                return HttpNotFound();
            }
            return View(employee);
        }

        // GET: Employees/Create
        public ActionResult Create()
        {
            return View();
        }

        // POST: Employees/Create
        // 為了防止「過多發布」攻擊,請啟用要係結到的特定屬性,有關
        // 詳細資訊,請參閱 http://go.microsoft.com/fwlink/?LinkId=317598。
        [HttpPost]
        [ValidateAntiForgeryToken]
        public ActionResult Create([Bind(Include = "ID,Name,JoiningDate,Age")] Employee employee)
        {
            if (ModelState.IsValid)
            {
                db.Employees.Add(employee);
                db.SaveChanges();
                return RedirectToAction("Index");
            }

            return View(employee);
        }

        // GET: Employees/Edit/5
        public ActionResult Edit(int? id)
        {
            if (id == null)
            {
                return new HttpStatusCodeResult(HttpStatusCode.BadRequest);
            }
            Employee employee = db.Employees.Find(id);
            if (employee == null)
            {
                return HttpNotFound();
            }
            return View(employee);
        }

        // POST: Employees/Edit/5
        // 為了防止「過多發布」攻擊,請啟用要係結到的特定屬性,有關
        // 詳細資訊,請參閱 http://go.microsoft.com/fwlink/?LinkId=317598。
        [HttpPost]
        [ValidateAntiForgeryToken]
        public ActionResult Edit([Bind(Include = "ID,Name,JoiningDate,Age")] Employee employee)
        {
            if (ModelState.IsValid)
            {
                db.Entry(employee).State = EntityState.Modified;
                db.SaveChanges();
                return RedirectToAction("Index");
            }
            return View(employee);
        }

        // GET: Employees/Delete/5
        public ActionResult Delete(int? id)
        {
            if (id == null)
            {
                return new HttpStatusCodeResult(HttpStatusCode.BadRequest);
            }
            Employee employee = db.Employees.Find(id);
            if (employee == null)
            {
                return HttpNotFound();
            }
            return View(employee);
        }

        // POST: Employees/Delete/5
        [HttpPost, ActionName("Delete")]
        [ValidateAntiForgeryToken]
        public ActionResult DeleteConfirmed(int id)
        {
            Employee employee = db.Employees.Find(id);
            db.Employees.Remove(employee);
            db.SaveChanges();
            return RedirectToAction("Index");
        }

        protected override void Dispose(bool disposing)
        {
            if (disposing)
            {
                db.Dispose();
            }
            base.Dispose(disposing);
        }
    }
}
執行應用程式並使用瀏覽器開啟URL: http://localhost:59083/Employees ,將看到以下輸出結果 -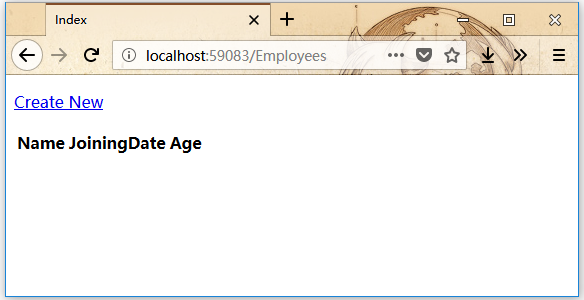
可以看到檢視中並沒有資料,因為我們還沒有向 Visual Studio 建立的資料庫新增任何記錄。
下面點選新增(Create New)連結來一個記錄,它將顯示建立檢視,填入相關資訊 -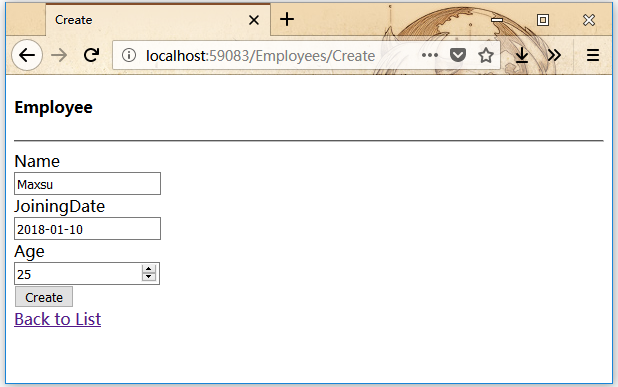
點選「建立」按鈕,它將更新Index 檢視,看到有一條記錄。如下所示-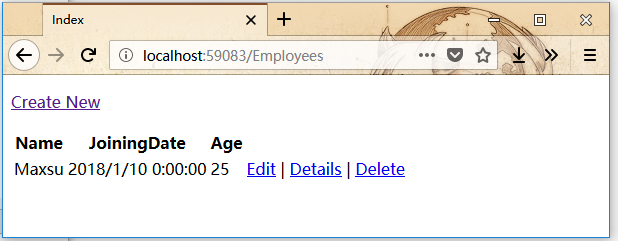
也可以看到新記錄也被新增到資料庫中。
通過上面所看實現步驟可以看到,我們已經通過使用腳手架實現了一個簡單的例子,這是一個用來建立模型類,檢視和動作方法的更容易方式。